
Overview
The Actionstep integration connects EzeScan WebApps with Actionstep, enabling users to browse and search Actionstep data during indexing and execute actions that create or update records in Actionstep.
A typical workflow involves selecting a matter and, where required, a folder or tag, entering document details, and submitting the RIA item. The document is then uploaded to Actionstep with the configured metadata. Additional upload actions can create follow-up tasks, record time entries, or populate matter-specific information.
Requirements
-
EzeScan WebApps 4.1.10 or higher
-
An Actionstep Production or Development environment
-
An Actionstep account with permissions to authorise the connection and access, create, or modify the required resources
-
Network access to
https://oauth.services.ezescan.netfor OAuth redirects
Recommended: Configure and test in Development before enabling a Production workflow. Development and Production environments are independent. Matter, folder, tag, user, and participant IDs from one environment should not be assumed to refer to the same resources in the other.
Configuration
The connection between EzeScan WebApps and your Actionstep environment is configured globally through the Admin Page via the Integrations tab.
Once configured, the connection is registered as a Connector Instance (commonly referred to as an Integration throughtout the platform) and can be reused across multiple workflows and App Pages.
This allows integration fields and upload actions to reference the same Actionstep connection without needing to configure it separately for each workflow or page.
Creating a new Actionstep integration
-
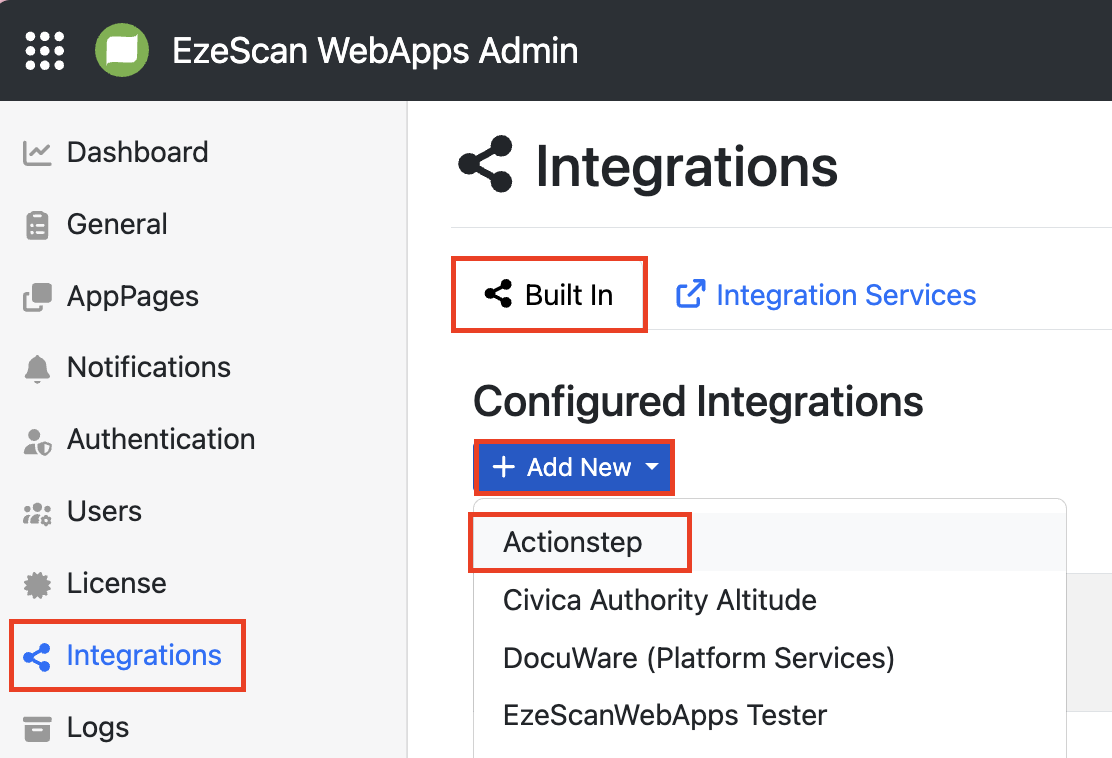
Open the Admin page → Select Integrations → Built In Tab
-
Click the Add New drop down and select Actionstep from the drop-down menu
-
Configure the Connection Settings below.
-
Save
Connection Settings
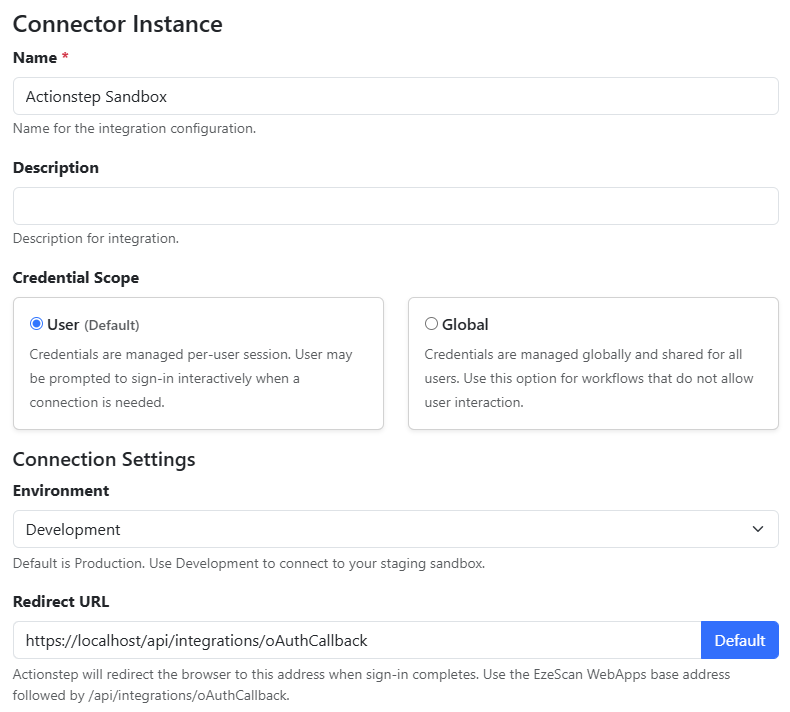
The following settings are used when configuring the Actionstep Connector Instance.
|
Option |
Description |
|---|---|
|
Name |
A recognisable name used to select this instance when configuring an integration field or upload step for Actionstep. |
|
Description |
Optional notes about the environment or purpose. |
|
Credential Scope |
The available options are:
|
|
Environment |
Production for the live Actionstep environment, or Development for the development/staging sandbox. The default is Production. |
|
Redirect URL |
The URL that receives the authorisation callback after the user signs in to Actionstep and grants access. Use the public WebApps URL, including any application subpath, followed by Examples:
|
Testing the Connection
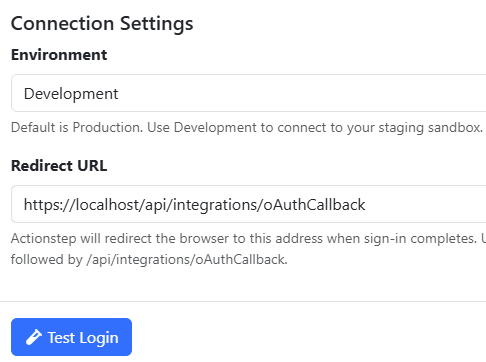
The Test Login button can be used to confirm the connection is working as expected. You should see a login prompt open in a pop-up window after clicking on the button. If not, you may need to configure the browser to allow pop-ups for the EWA website.
The connection test reads matter information. A successful test confirms basic connectivity and authorisation but does not prove the user can perform all operations within Actionstep.
Supported Field Types
The Actionstep integration supports two types of integration fields:
-
Integration Lookup: retrieves a list of available values from Actionstep and presents them in a dropdown menu. Users can select an item from the list, making the associated information available to other form fields and upload actions.
-
Integration Find (Search and Browse): allows users to search for or browse information within Actionstep using a dedicated dialog. Users can locate and select an item through the available search or browse functions. Once selected, the item's associated information can be used by other form fields and upload actions.
Integration Look Up Field
Lookup Fields use the Integration Lookup field type to present a dropdown list of values retrieved from Actionstep. Users select an item from the list, making information about the selected item available to form fields and upload actions.
|
Action |
Purpose |
|---|---|
|
List Matter Folders |
Select an existing folder belonging to a particular matter from a dropdown. |
|
List Tags |
Select an existing Actionstep tag from a dropdown. |
List Matter Folders
Lists the folders associated with the selected matter.
Configuration
-
Add an Integration Lookup field to the App Page.
-
Enter the required Name and ID values.
-
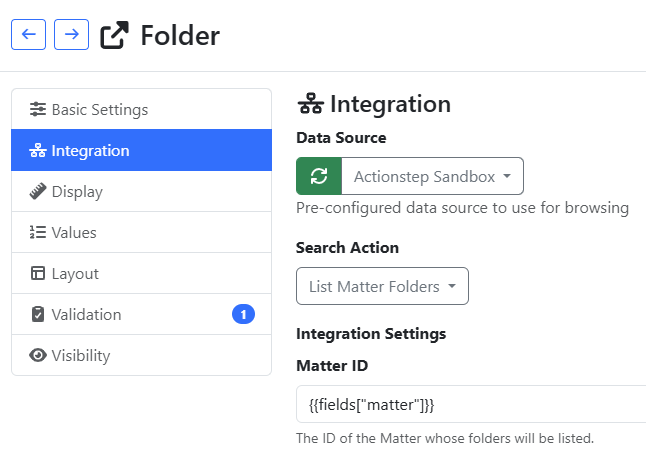
Open the field's Integration tab.
-
Select the Actionstep connector instance as the Data Source.
-
Select List Matter Folders as the Lookup Action.
-
Set Matter ID to the placeholder of the field containing the selected matter ID.
Example:
{{fields["matter"]}} -
Configure any additional display, layout, or validation settings as required.
Usage
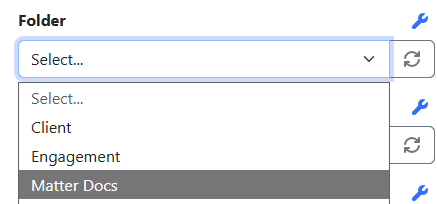
When the user selects a matter, the dropdown displays the folders associated with that matter. The user selects a folder by name from the list. Although the folder name is displayed in the field, the selected folder ID is stored as the field value and can be referenced by other fields and upload actions.
Notes
Nested folders are displayed as backslash-delimited paths to indicate the folder hierarchy (for example, Correspondence\Client\Invoices).
List Tags
Lists the tags available in Actionstep.
Configuration
-
Add an Integration Lookup field to the App Page.
-
Enter the required Name and ID values.
-
Open the field's Integration tab.
-
Select the Actionstep connector instance as the Data Source.
-
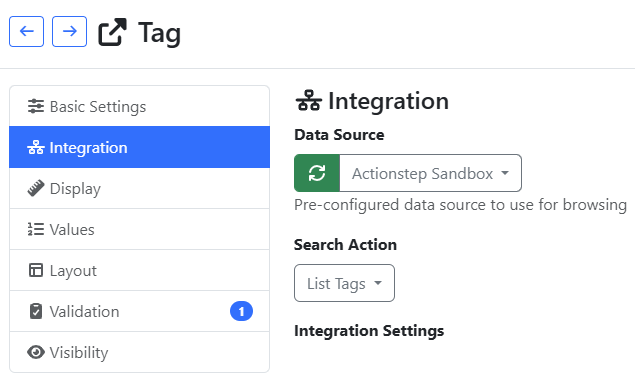
Select List Tags as the Lookup Action.
-
Configure any additional display, layout, or validation settings as required.
Usage
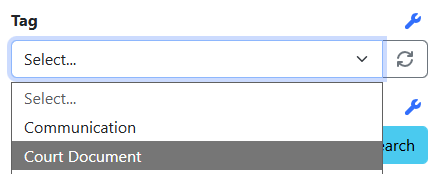
The dropdown displays available tags from Actionstep. The user selects a tag by name from the list. Although the tag name is displayed to the user, the selected tag ID is stored as the field value and can be referenced by other fields and upload actions.
Notes
Nested tags are displayed as hierarchical paths using the greater-than (>) character as the delimiter (for example, Matter Type > Litigation > Commercial).
Integration Find (Browse and Search) Fields
Browse Fields use the Integration Find field type to navigate a hierarchical structure, such as folders, within a dialog. Users browse and select an item, making the selected item's values available for use by other fields and upload actions.
Search Fields use the Integration Find field type to search for and select an Actionstep entity within a dialog. Users select an item from the search results, making the selected item's values available for use by other fields and upload actions.
|
Action |
Purpose |
|
Browse for a Matter Folder |
Navigate a matter's folder hierarchy and select an existing destination folder. |
|
Search for a Matter |
Find a matter and return its ID and selected details. |
|
Search for a Participant |
Find a person or company and return its Participant ID and contact details. |
|
Search for a User |
Find a system user and return account details and information from their linked Participant record. |
Browse for a Matter Folder
Allows users to browse and select a folder associated with the selected matter.
Configuration
-
Add an Integration Find field to the App Page.
-
Enter the required Name and ID values.
-
Open the field's Integration tab.
-
Select the Actionstep connector instance as the Data Source.
-
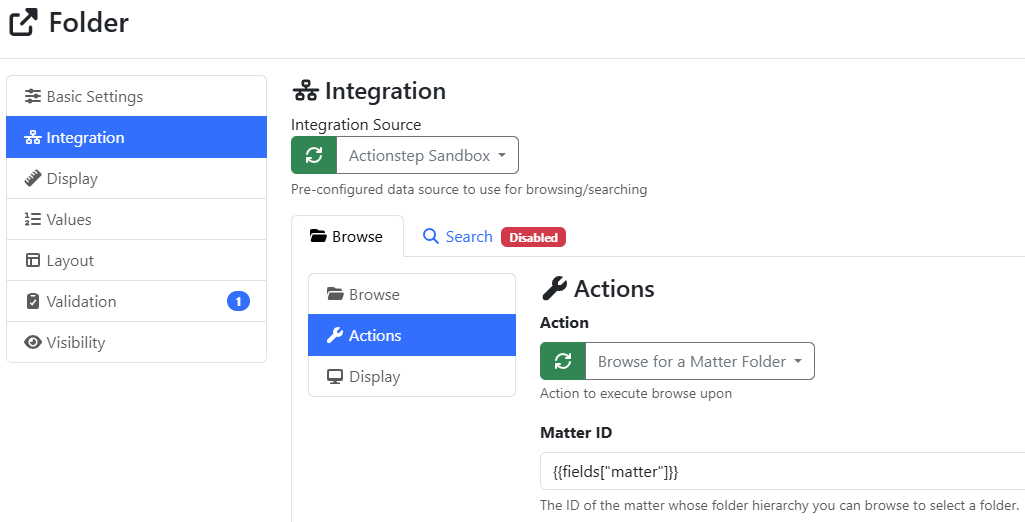
Ensure Browse Enabled is toggled on.
-
Select Browse for a Matter Folder as the Action.
-
Set Matter ID to the placeholder of the field containing the selected matter ID.
Example:
{{fields["matter"]}} -
Configure any additional display, layout, or validation settings as required.
Usage
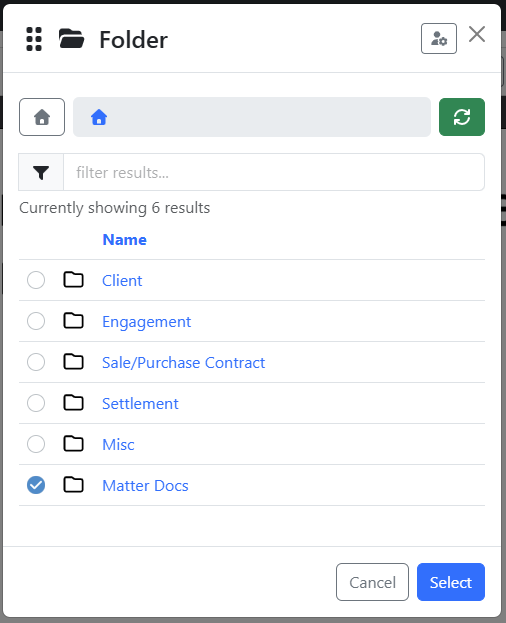
The field displays a Browse button. When clicked, a dialog opens displaying the folders associated with the selected matter. The user navigates the hierarchy and selects the required folder.

Although the folder name is displayed to the user, the selected folder ID is stored as the field value and can be referenced by other fields and upload actions.
Search for a Matter
Allows users to search for and select an Actionstep matter.
Configuration
-
Add an Integration Find field to the App Page.
-
Enter the required Name and ID values.
-
Open the field's Integration tab.
-
Select the Actionstep connector instance as the Data Source.
-
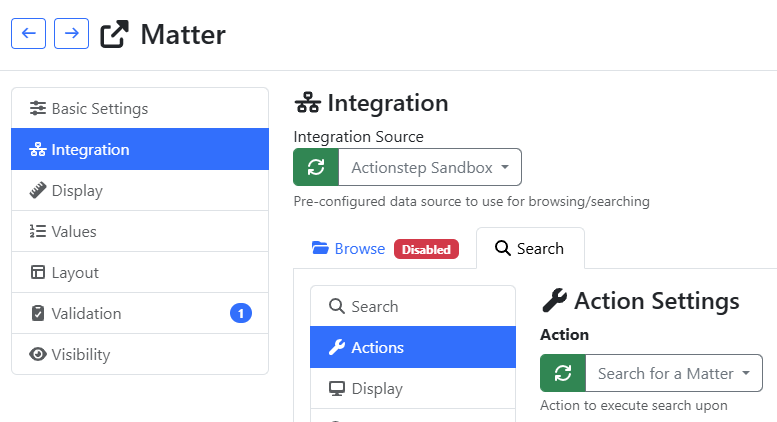
Open the Browse tab and disable Browse Enabled.
-
Open the Search tab and enable Search Enabled.
-
Select Search for a Matter as the Action.
-
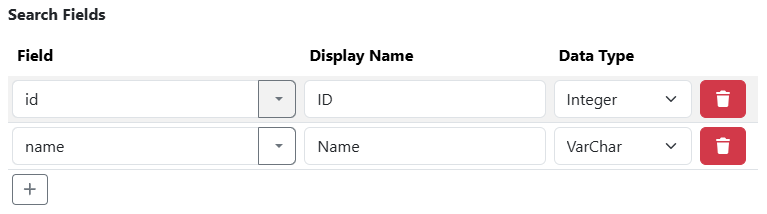
Configure one or more search fields.
The configured search fields determine the criteria available to users when searching for a matter.
The entries in this table determine which search fields are available in the search dialog, including their labels and expected data types. Use the (+) button to add another search field.
|
Setting |
Description |
|---|---|
|
Field |
The API field path to query. For example, matter fields such as Related entity fields can also be queried. For example, |
|
Display Name |
The label displayed for the search field in the search dialog. |
|
Data Type |
The data type of the query field. Available options are:
|
If no search fields are configured, the search dialog uses the default search fields: ID, Name, and File Ref.
-
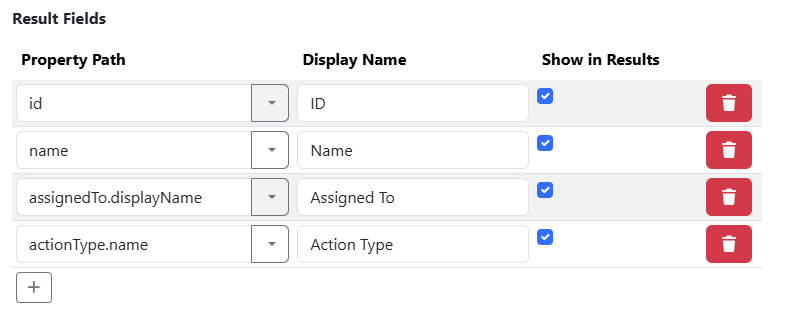
Configure one or more result fields.
The entries in this table determine the Result Fields returned for the selected matter. Fields with Show in Results enabled are also displayed as columns in the search dialog. Use the (+) button to add another result field.
|
Setting |
Description |
|---|---|
|
Property Path |
The property path of the matter field to return. Examples:
Property paths can be entered manually if they are not available in the dropdown list. |
|
Display Name |
The label that will display for the search result column on search dialog. |
|
Show in Results |
When enabled, the field will be displayed as a search result column of the search dialog. |
If no result fields are configured, the search dialog displays only the matter name and returns the selected matter ID as the field value.
-
Set the
Max Resultsto maximum number of search results displayed in the search dialog. -
Configure any additional display, layout, or validation settings as required.
Usage
The field displays a Search button. When clicked, a search dialog opens, allowing the user to search for an Actionstep matter using the configured search fields. The user selects the required matter from the search results.

Although the selected matter name may be displayed to the user, the configured Result Fields for the selected matter are stored as the field value. If no Result Fields are configured, the selected matter ID is stored as the field value. These values can be referenced by other fields and upload actions.
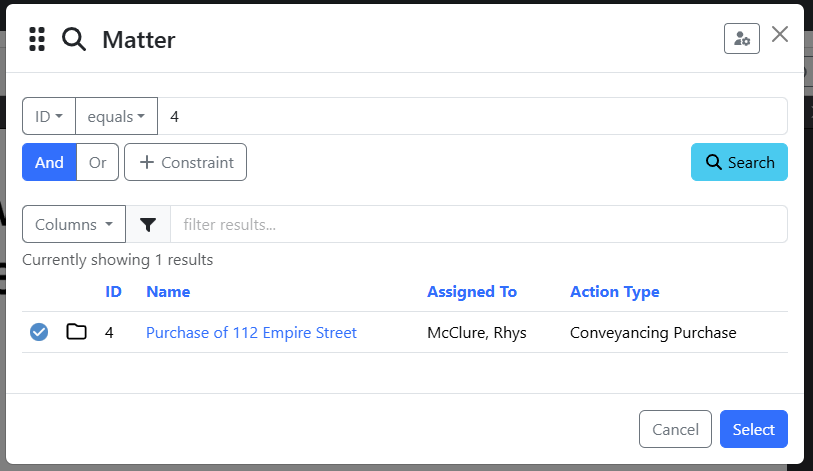
Search for a Participant
Allows users to search for and select an Actionstep participant.
Configuration
-
Add an Integration Find field to the App Page.
-
Enter the required Name and ID values.
-
Open the field's Integration tab.
-
Select the Actionstep connector instance as the Data Source.
-
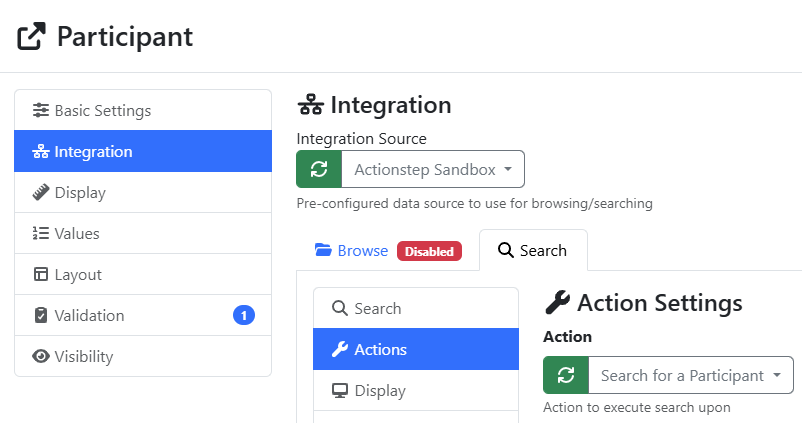
Open the Browse tab and disable Browse Enabled.
-
Open the Search tab and enable Search Enabled.
-
Select Search for a Participant as the Action.
-
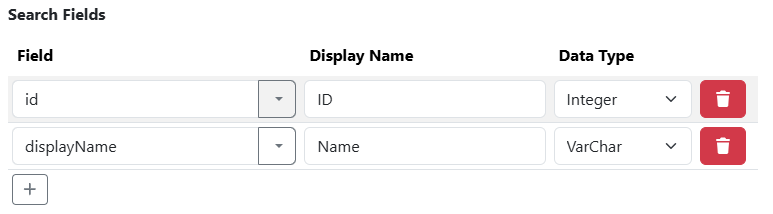
Configure one or more search fields.
The configured search fields determine the criteria available to users when searching for a participant.
The entries in this table determine which search fields are available in the search dialog, including their labels and expected data types. Use the (+) button to add another search field.
|
Setting |
Description |
|---|---|
|
Field |
The API field path to query. For example, participant fields such as |
|
Display Name |
The label displayed for the search field in the search dialog. |
|
Data Type |
The data type of the query field. Available options are:
|
If no search fields are configured, the search dialog uses the default search fields: Display Name, Email, and ID.
-
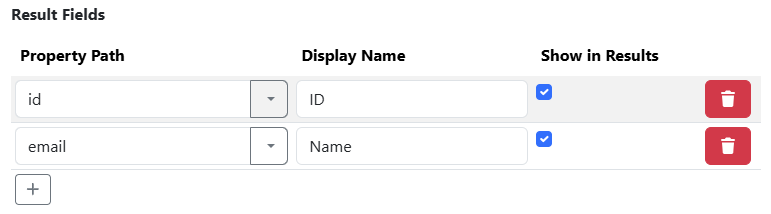
Configure one or more result fields.
The entries in this table determine the Result Fields returned for the selected participant. Fields with Show in Results enabled are also displayed as columns in the search dialog. Use the (+) button to add another result field.
|
Setting |
Description |
|---|---|
|
Property Path |
The property path of the participant field to return. Examples:
Property paths can be entered manually if they are not available in the dropdown list. |
|
Display Name |
The label that will display for the search result column on search dialog. |
|
Show in Results |
When enabled, the field will be displayed as a search result column of the search dialog. |
If no result fields are configured, the search dialog displays only the participant display name and returns the selected participant ID as the field value.
-
Set the
Max Resultsto maximum number of search results displayed in the search dialog. -
Configure any additional display, layout, or validation settings as required.
Usage
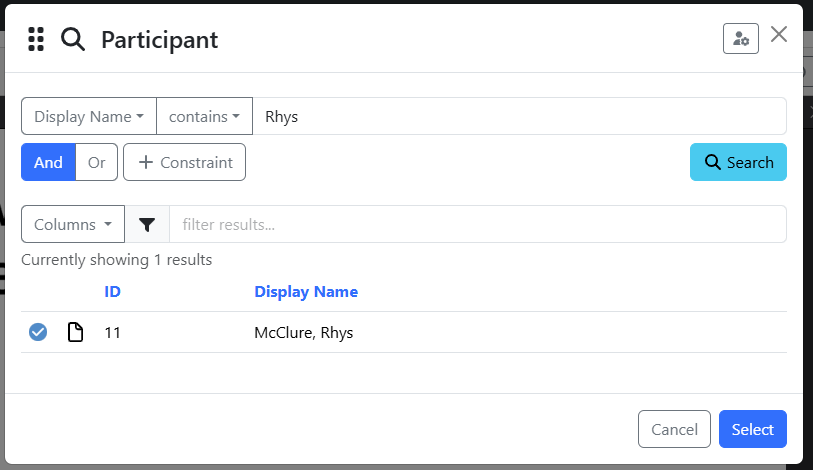
The field displays a Search button. When clicked, a search dialog opens, allowing the user to search for an Actionstep participant using the configured search fields. The user selects the required participant from the search results.

Although the selected participant name may be displayed to the user, the configured Result Fields for the selected participant are stored as the field value. If no Result Fields are configured, the selected participant ID is stored as the field value. These values can be referenced by other fields and upload actions.
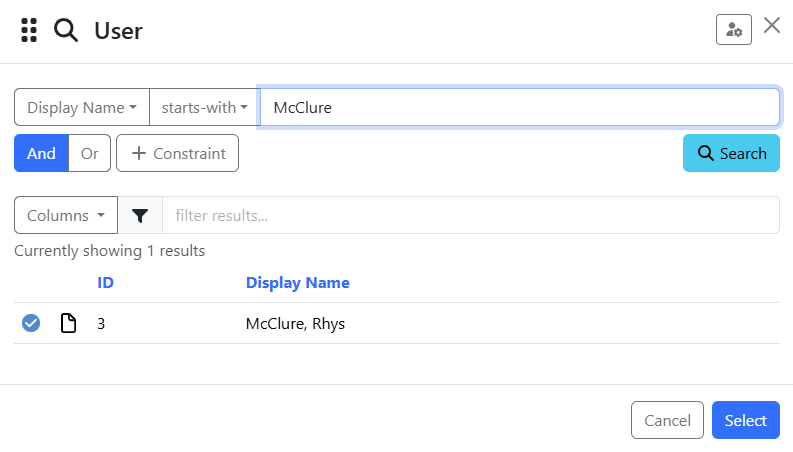
Search for a User
Allows users to search for and select an Actionstep system user.
Configuration
-
Add an Integration Find field to the App Page.
-
Enter the required Name and ID values.
-
Open the field's Integration tab.
-
Select the Actionstep connector instance as the Data Source.
-
Open the Browse tab and disable Browse Enabled.
-
Open the Search tab and enable Search Enabled.
-
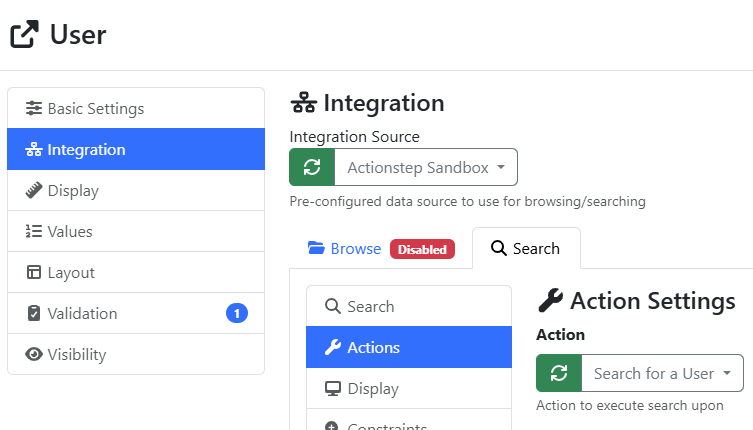
Select Search for a User as the Action.
-
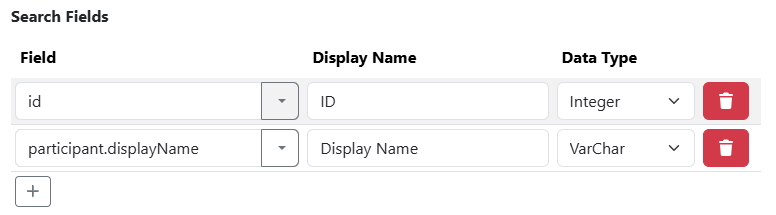
Configure one or more search fields.
The configured search fields determine the criteria available to users when searching for a user.
The entries in this table determine which search fields are available in the search dialog, including their labels and expected data types. Use the (+) button to add another search field.
|
Setting |
Description |
|---|---|
|
Field |
The API field path to query. For example, user fields such as Related entity fields can also be queried. For example, |
|
Display Name |
The label displayed for the search field in the search dialog. |
|
Data Type |
The data type of the query field. Available options are:
|
If no search fields are configured, the search dialog uses the default search fields: Display Name, Email, ID, and Participant ID.
-
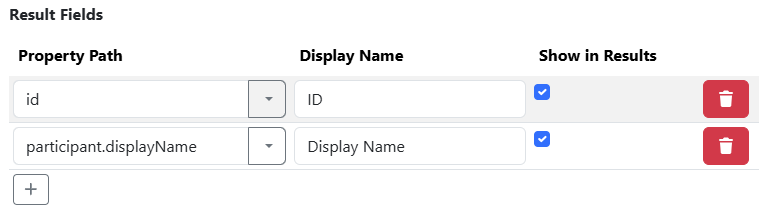
Configure one or more result fields.
The entries in this table determine the Result Fields returned for the selected user. Fields with Show in Results enabled are also displayed as columns in the search dialog. Use the (+) button to add another result field.
|
Setting |
Description |
|---|---|
|
Property Path |
The property path of the matter field to return. Examples:
Property paths can be entered manually if they are not available in the dropdown list. |
|
Display Name |
The label that will display for the search result column on search dialog. |
|
Show in Results |
When enabled, the field will be displayed as a search result column of the search dialog. |
If no result fields are configured, the search dialog displays only the associated participant display name and returns the selected user ID as the field value.
-
Set the
Max Resultsto maximum number of search results displayed in the search dialog. -
Configure any additional display, layout, or validation settings as required.
Usage
The field displays a Search button. When clicked, a search dialog opens, allowing the user to search for an Actionstep system user using the configured search fields. The user selects the required user from the search results.

Although the selected user’s name may be displayed to the user, the configured Result Fields for the selected user are stored as the field value. If no Result Fields are configured, the selected user ID is stored as the field value. These values can be referenced by other fields and upload actions.
Notes
This search field can be used to select an assignee for Create Task and Create Time Entry upload actions. Configure the Result Fields to return participant.id, as Actionstep expects a participant ID rather than a user ID for the assignee.
Upload Actions
Upload Actions allow you to create or update records in Actionstep as part of a submission workflow. These actions are typically executed when a document is submitted and can use information collected from form fields and other integration fields.
The Actionstep integration supports the following upload actions:
|
Action |
Purpose |
|---|---|
|
Matter Document Upload |
Create a document in a matter, optionally within an existing or newly created folder path. |
|
Create Task |
Create a task, optionally linked to a matter. |
|
Create Time Entry |
Create time entries. |
|
Populate Matter Data Collections |
Create or update records in matter data collections. |
Creating an Upload Action
-
Navigate to the Stages tab of your Submit button.
-
Add a new stage and select Integration Upload from the dropdown menu.
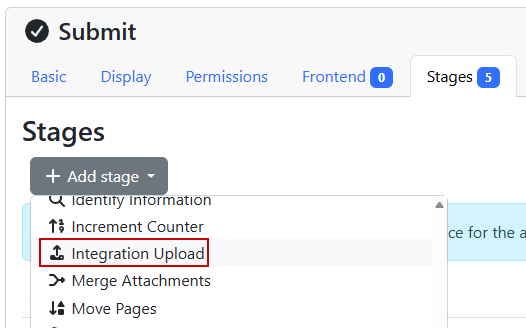
If an upload action requires values from submitted fields, ensure an Update Metadata stage exists before the upload action so those values are saved to the item's metadata.
-
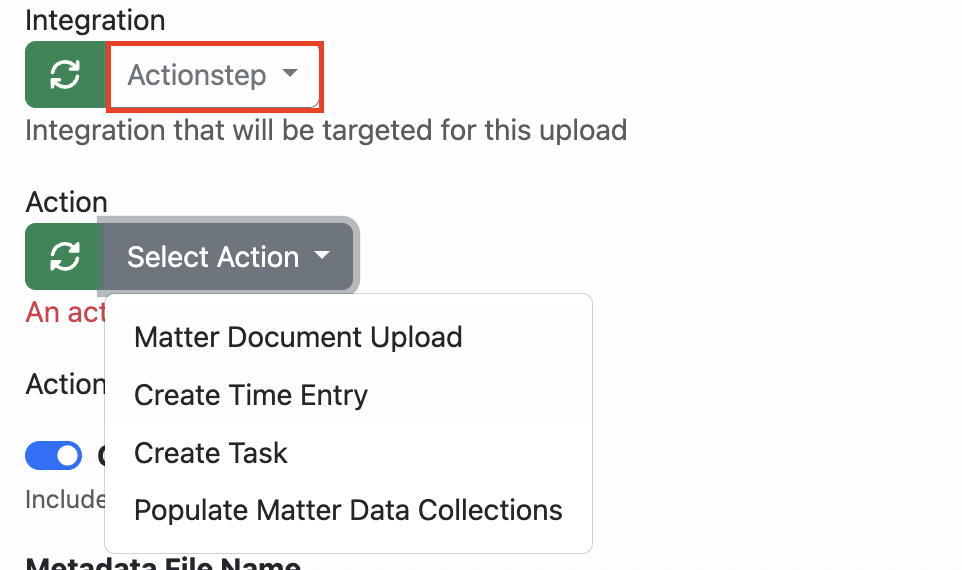
Select the Actionstep integration from the drop down
-
On the action field select your desired action.
Matter Document Upload
Uploads the document to a matter in Actionstep and optionally populates metadata such as the document name, date, keywords, summary, folder, and tags.
Configuration
-
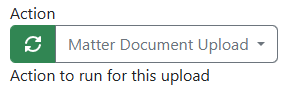
Select Matter Document Upload as the Action.
-
Configure which document/output the stage sends.
-
Enable Create Missing Folders when using Folder Path to automatically create folders that do not already exist.
-
Configure the target fields by mapping placeholders and static values to the corresponding Actionstep fields.

Required Fields
|
Target Field |
Description |
|---|---|
|
Name |
Document name in Actionstep, for example |
|
Matter |
Destination Matter ID, for example The resolved value should be a numeric Matter ID such as |
Optional Fields
|
Target Field |
Description |
|---|---|
|
Folder ID |
Existing folder numeric ID, for example The folder must belong to the selected matter. The resolved value should be a numeric Folder ID such as |
|
Folder Path |
Matter-relative folder path with backslash delimiters, for example:
If both Folder ID and Folder Path are provided, Folder ID takes precedence. When one or more folder path segments do not exist, enabling Create Missing Folders automatically creates the missing folders; otherwise, the upload fails. |
|
Document Date |
Document date, for example Use a valid date value in |
|
Keywords |
Comma-delimited list of keywords, for example |
|
Summary |
Document summary, for example |
|
Tags |
Selected Tag ID, for example The resolved value should be a numeric Tag ID such as |
Use the (...) browse button, where available, to search for and select a static Actionstep value instead of supplying a placeholder.
-
Save the action.
Usage
When the configured upload stage executes, the document is uploaded to Actionstep using the configured field mappings. The stage is recorded as either successful or failed. If the upload fails, refer to the job log for additional details.
Create Time Entry
Creates time entries for billable and non-billable hours spent on a matter.
Configuration
-
Select Create Time Entry as the Action.
-
Configure one or more Time Entry field sets. Each field set represents a single time entry. Populate the required fields and any optional billing information. To dynamically create time entries, map the field set source to Grid metadata. Use + to add additional Time Entry field sets.
Required Fields
|
Target Field |
Description |
|---|---|
|
Action Hours |
Actual hours worked formatted as a numeric value with up to 2 decimal places. Examples:
|
|
Date |
Date of the work in |
|
Fee Earner ID |
The associated participant ID of the system user that will own the time-entry. Use a Search for a User field with result field |
Optional Fields
|
Target Field |
Description |
|---|---|
|
Matter ID |
The ID of the matter to assign the time entry to, for example The resolved value should be a numeric Matter ID such as |
|
Description |
Narrative describing the work. |
|
Is Billable |
Set to |
|
Billable Hours |
Hours to bill formatted as a numeric value with up to 2 decimal places, for example |
|
Billable Amount |
Billing amount formatted as a numeric value with up to 2 decimal places, for example |
|
Billable Amount Type |
Available options are:
|
|
Billing Behaviour |
Available options are:
|
|
Rate ID |
ID of an existing applicable rate. |
|
Rate Source |
Available options are:
|
|
Rate Unit Price |
Rate per unit formatted as numeric value with up to 2 decimal places. Normally per hour. |
|
Start Time |
Start time in |
|
Timer Status |
Available options are:
|
-
Save the action.
Usage
When the upload stage executes, all configured time entries are created in Actionstep using the configured field mappings. The stage is recorded as either successful or failed. If the upload fails, refer to the job log for additional details.
Notes
The upload stage succeeds when no Time Entry field sets are configured or supplied dynamically. In this case, no time entries are created.
Create Task
Creates a task on a matter.
Configuration
-
Select Create Task as the Action.
-
Configure the task fields.
Required Fields
|
Target Field |
Description |
|---|---|
|
Name |
Task title, for example |
|
Status |
Available options are:
|
|
Due Date |
Valid due date and time in |
Optional Fields
|
Target Field |
Description |
|---|---|
|
Priority |
Available options are:
|
|
Description |
Task instructions or background, for example |
|
Complete On Step |
Matter workflow step during which the task should be completed. The step names are resolved against the selected matter’s Matter Type. Use the (…) browse button choose an applicable step. This should be left blank if not linking the task to a matter. |
|
Complete Before Step |
Matter workflow step before which the task should be completed. The step names are resolved against the selected matter’s Matter Type. Use the (…) browse button choose an applicable step. This should be left blank if not linking the task to a matter. |
|
Matter ID |
The ID of the matter the task will be linked to. |
|
Assignee ID |
The associated participant ID of the system user that this task will be assigned to, for example Use a Search for a User field with result field |
-
Save the action.
Usage
When the upload stage executes, a task is created in Actionstep using the configured field mappings. The stage is recorded as either successful or failed. If the upload fails, refer to the job log for additional details.
Populate Matter Data Collections
Creates or updates data collection records on a matter in Actionstep.
This upload action should only be used with matters of the same Matter Type. Data collection mappings are generated from a specific Matter Type and may not be valid for other Matter Types.
Configuration
-
Select Populate Matter Data Collections as the Action.
-
Hardcode the
Matter IDto the ID of the matter to use a reference to auto populate fields.
A valid Matter ID is required at design-time to discover available data collections and fields. The configured value can be replaced after Auto Populate has been completed.
-
Click Auto Populate to retrieve the matter type and generate field sets for the available data collections.
Auto Populate resolves the matter type for the specified matter and generates a field set for each available data collection. Each generated field is assigned its Type and Mandatory status based on the Actionstep configuration. -
Configure the data collection fields.
Values of fields should be formatted as follows based on their respective type:
|
Type |
Description |
|---|---|
|
String |
Plain text. |
|
Boolean |
Valid values are |
|
Date |
A date formatted as |
|
Date/Time |
A date and time formatted as |
|
Decimal |
A numeric value with up to two decimal places and an optional sign, for example |
|
Integer |
A whole number with optional sign, for example |
|
Time |
A time formatted as |
-
Save the action.
Usage
When the upload stage executes, the configured data collection records are created or updated in Actionstep using the configured field mappings. The stage is recorded as successful or failed. If the upload fails, refer to the job log for additional details.
Notes
-
Fields with the
:memosuffix can be used to populate the memo associated with the corresponding Date or Date/Time field. -
Auto Populate generates field sets based on the selected matter type. If the matter type configuration changes in Actionstep, run Auto Populate again to refresh the generated fields.
-
The data collection may be populated differently depending on their type:
|
Collection Type |
Collection Update Behavior |
|---|---|
|
Single-record collection |
Update the existing record's mapped values. If no record exists, create one. |
|
Multi-record collection |
Always create a new record for each populated field set/row. This operation does not find and update an existing multi-record row. |