
PRO
File Menu Options
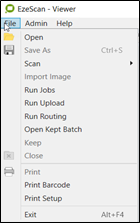
Open
This option will allow the operator to open a Tiff Image.
This option is for viewing purposes only.
If an image is required to be imported and profiled to a destination please use the import option through an EzeScan job.
Save
This will save the image currently displayed in the viewer.
Save As
This option will display a Save As Screen to allow the operator to save the file as another name or to another location.
Scan
This option is used to scan documents through an EzeScan Job Type.
Please refer to the PRO | Job-Types section on how to create and manage a Job Type.
New Document (F2)
This option will run the selected Job Type to scan new documents.
Depending on how the job is configured it can drive a TWAIN scanner or display a dialog to import images from a network path.
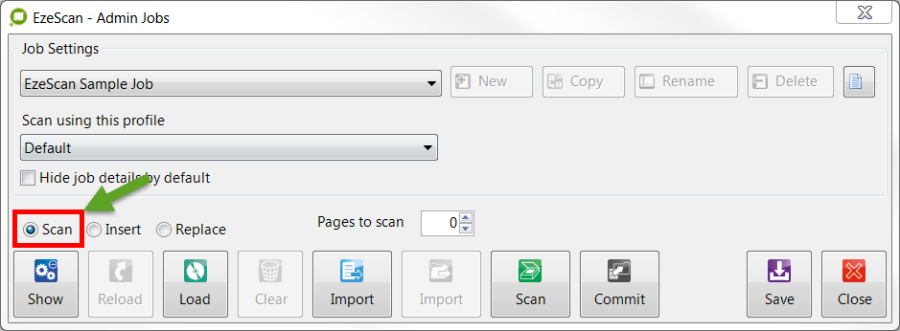
Jobs screen - scan a new document
Append Pages
This option will allow an operator to either append pages to the current scan batch.
E.g. if 20 pages were initially scanned and then 5 pages were appended, the 5 pages would appear after page 20.
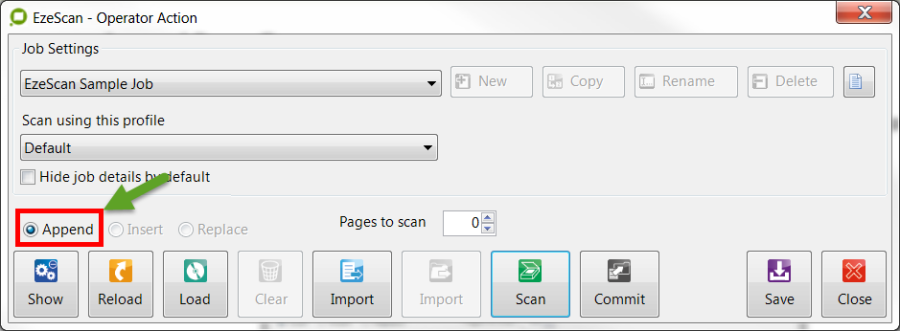
Jobs screen - append pages to an existing image
Insert Pages
This option will allow an operator to insert pages to the current scan batch.
i.e. if a batch is 10 pages and page 5 has been misfed, the operator can simply select this option and when prompted can insert this page before page 6.
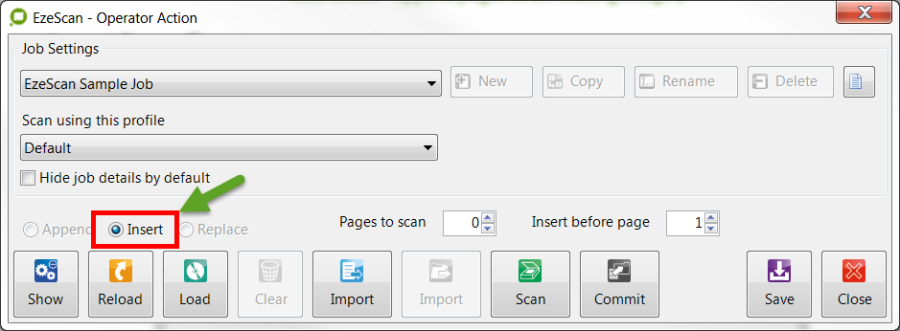
Jobs screen - using the insert option
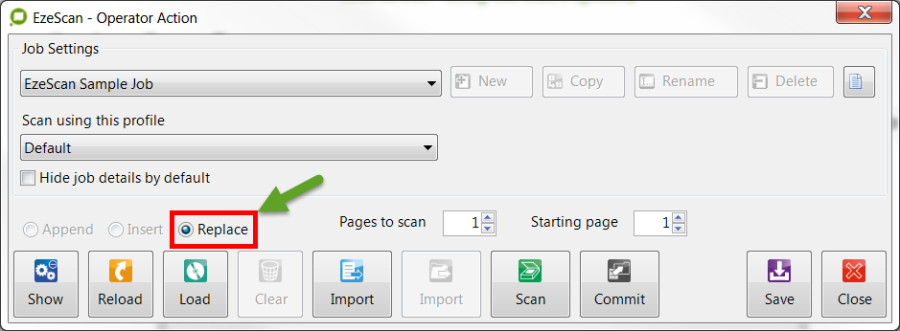
Replace Pages
This option will allow an operator to replace pages in the current scan batch.
The operator can select how many pages to scan and which page number/s EzeScan should start to replace.
Jobs screen - using the insert option
Run Jobs (F2)
This option will allow an operator to run EzeScan Jobs.
The shortcut to this screen is the F2 button.

Jobs screen
The operator can select from the "Select/Modify Job Type" dropdown list which job needs to be run.
Run Upload
This will display the EzeScan UPLOAD interface to allow an operator to run an UPLOAD task.
Please refer to the EzeScan UPLOAD Guide for more information on this module.
Run Routing
This will display the EzeScan ROUTING interface to allow an operator to run a ROUTING task.
Please refer to the EzeScan ROUTING Guide for more information on this module.
Open Kept Batch (i.e. Batch Manager)
This option will launch the Batch Manager form. This form displays a list of batches of previously scanned or imported pages that were displayed in the EzeScan viewer, that have been kept for later processing (instead of processing each batch of pages in real time).
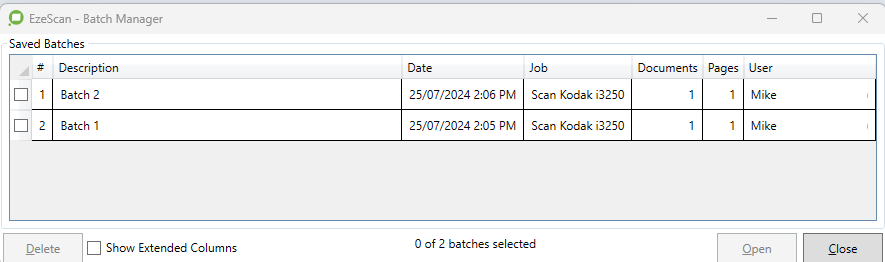
Hint: The Batch Manager form will be empty if you have never ‘kept’ any batches for later processing.
Placing batches into the Batch Manager is quite simple. Simply scan pages or import pages into the EzeScan Viewer using the Job Admin form Scan or Import buttons.
Once you’ve got the desired pages displayed in the EzeScan Viewer, there are 2 ways to invoke ‘keeping’ the batch in the Batch Manager.
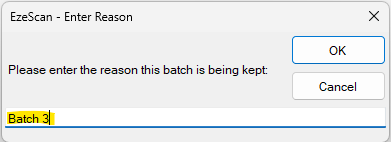
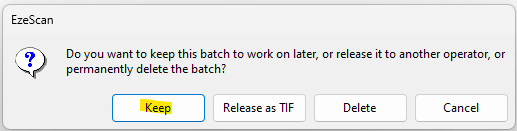
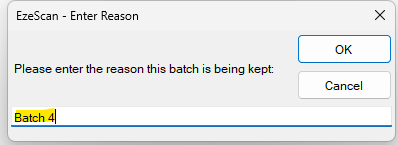
1) Use the File menu Keep option to display the prompt below that allows the operator to name and keep the batch.
2) Or press the toolbar Close icon:
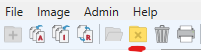
It launches this form. Then press the Keep button.
This will then display the prompt below which allows you to name and keep the batch.
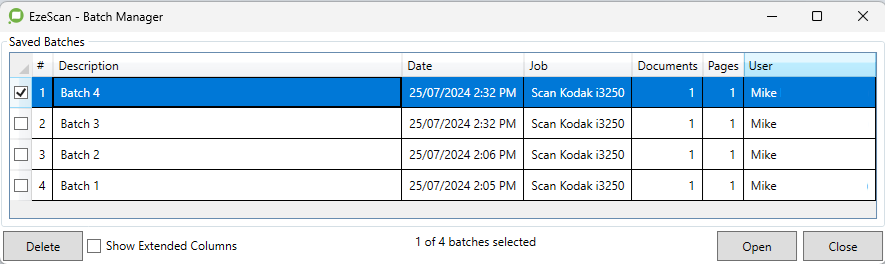
Once the batch has been kept it will be displayed when you next open the Batch Manager form.
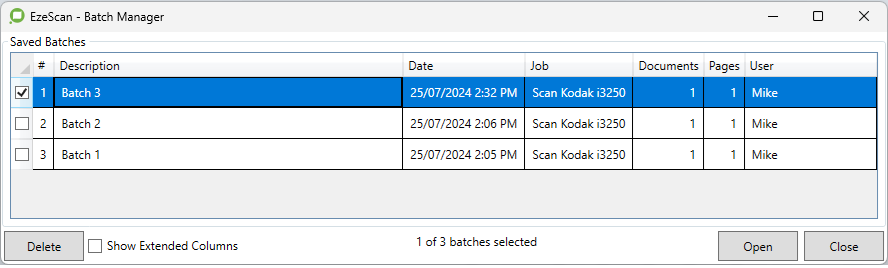
To reopen the batch select the desired batch row and then press the Open button. The batch pages will loaded into the EzeScan Viewer.
Keep
Use the File menu Keep option to display the prompt below that allows the operator to give the current batch of pages displayed in the EzeScan viewer a name, and save that batch into the batch manager for later recall and use.
Use the File menu Open Kept Batch option to display the Batch Manager form
To reopen the batch select the desired batch row and then press the Open button. The batch pages will loaded into the EzeScan Viewer.
Close
This option will close the currently displayed image pages in the EzeScan Viewer (opened using the File > Open option) in the viewer.
This option will display a print dialog screen; which is currently displayed image (opened using the File > Open option) in the viewer.

The "Print" dialog screen
The operator can select a print range and whether annotations need to be printed.
If the operator wishes to print the image "As Zoomed"; right mouse click on the image on the viewer and select "Print" The image size option will then be enabled to allow this.
Print Barcode
This option allows an operator to print a barcode or a batch of barcodes.
For more see Barcode Printing
Print Setup
This option allows the operator to select which printer and options before printing an image.
Exit
Closes the EzeScan application.
Admin Menu / Workstation Options
To configure the EzeScan Admin Options:
Select the Admin > Workstation Options menu option
Refer to Workstation Options for further details.
Admin Menu / Audit Reporting
The Audit reporting tool allows the operator to view the reports of EzeScan Jobs. The reports will contain information of operator activity.
To configure EzeScan for use of Audit reporting please refer to the Audit Options section on page and also refer to the Update audit database section on page to enable auditing for a specific EzeScan Job.
The Audit Reporting Interface
The operator has the following options…
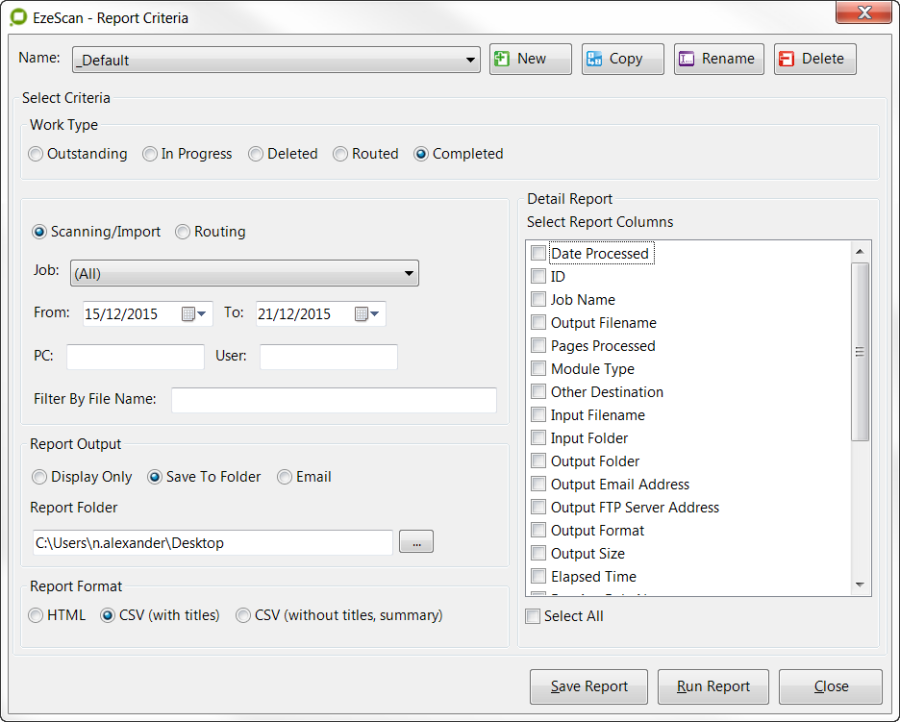
Name
This is the name of the Reporting Job.
The operator can select any of the options in this screen and then click the Save Report button.
The operator can also create new, copy and delete reporting jobs.i.e.

Work Type

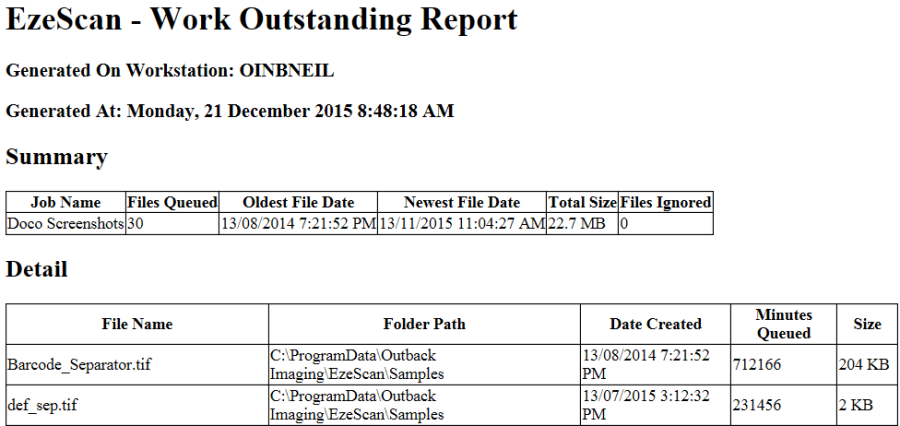
Outstanding This is for jobs that are using Import File or Import Folder Mode.
EzeScan will check to see how many files are waiting in the import folder and list them in the report.
This is a sample outstanding report. It details a Summary and detailed section.
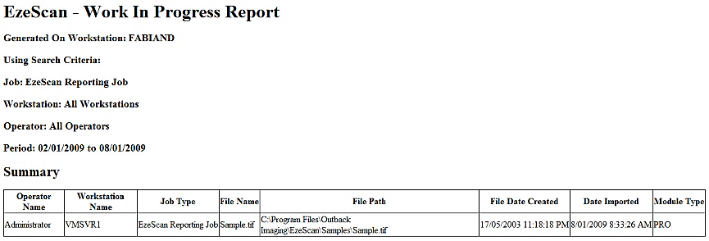
In Progress - will report on a Job (or all jobs) that are currently in use by operator.
In the example below it shows that a user named administrator is running a job on a PC named VMSVR1.
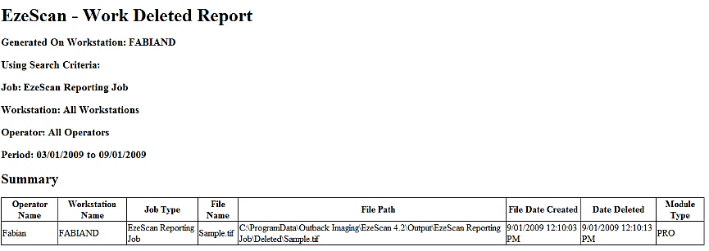
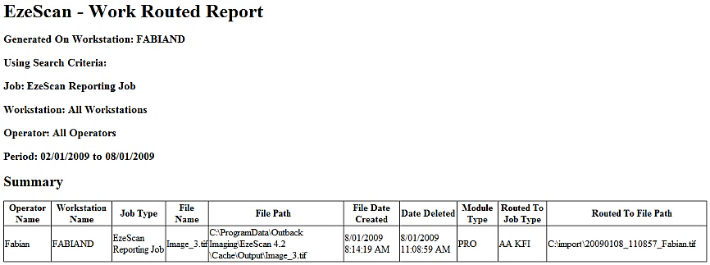
Deleted - will report on a job (or all jobs) on files that have been deleted by an operator.
The sample report below shows the job that was used and also the file path that the deleted image has been routed to.
Routed - will report on a job (or all jobs) that have had images routed to another job type.
The sample report below shows the job that was used and also the job that the image has been routed to.
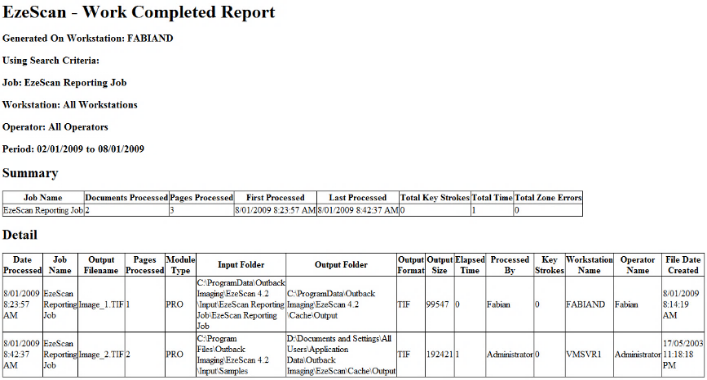
Completed - will report on a job (or all jobs) that have been completed.
The operator has the functionality to customise the report columns.
In the sample report below it details that one job was being used and two images had been processed.
Report Details
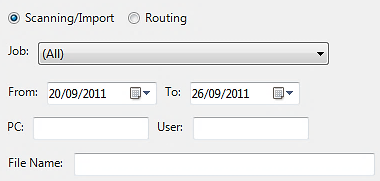
Scanning / Import - will allow the operator to select a Scan / Import Job or a Routing Job.
When the relevant option is selected, the drop down list will show the respective jobs.
From / To - is the date range that the operator can specify.
The report will display the job information for these respective dates.
PC This is a hostname of an EzeScan PC.
If specified, the report will display jobs from the specified PC.
User If specified, EzeScan will display only the jobs that the specified user has performed.
File Name: This option will allow the operator to enter an output file name, if specified; EzeScan will filter the results to only show the jobs that have been processed that match the specified output file name.
E.g. if the output filename of a job is scanned.pdf the results will show display the jobs processed with this value.
Report Output
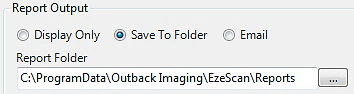
Display Only - will display the report to the screen.
Save To Folder - will allow the operator to save the report to a folder.
The folder can be changed by clicking the … button.
Email - will send the report into an email.
The report will be inserted in the message body of the email.
Report Format

HTML - will save the report in HTML format. HTML can be opened by a web browser.
CSV - will save the report as CSV. CSV can be opened by any text editor application.
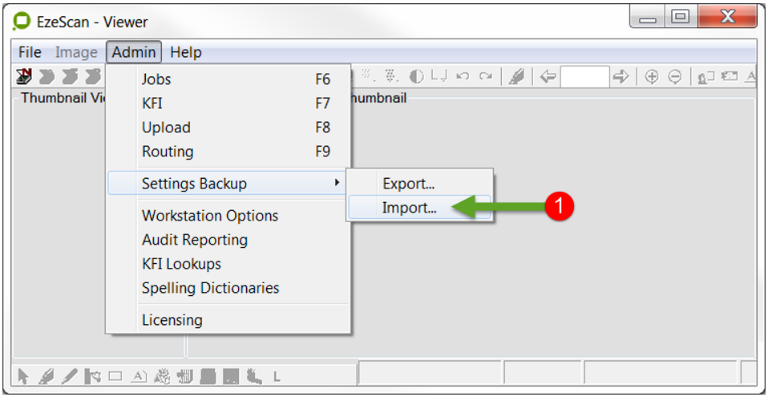
Admin Menu / Settings Backup
To configure the EzeScan Admin Settings Backup:
Select one of the Admin > Settings Backup menu options (Export, or Import)
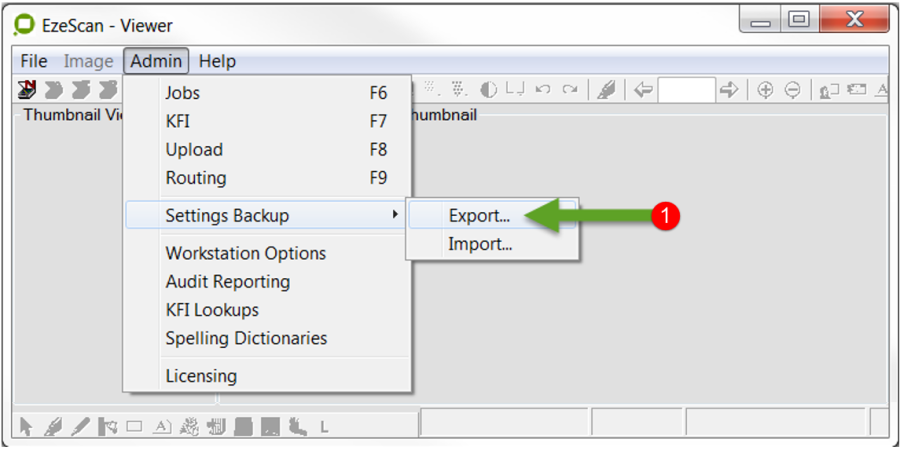
Export
The Select Settings to Export panel is currently disabled as no export path is set.
To set the path; use the browse dialog to select the Export Folder where the exported settings will be written to.
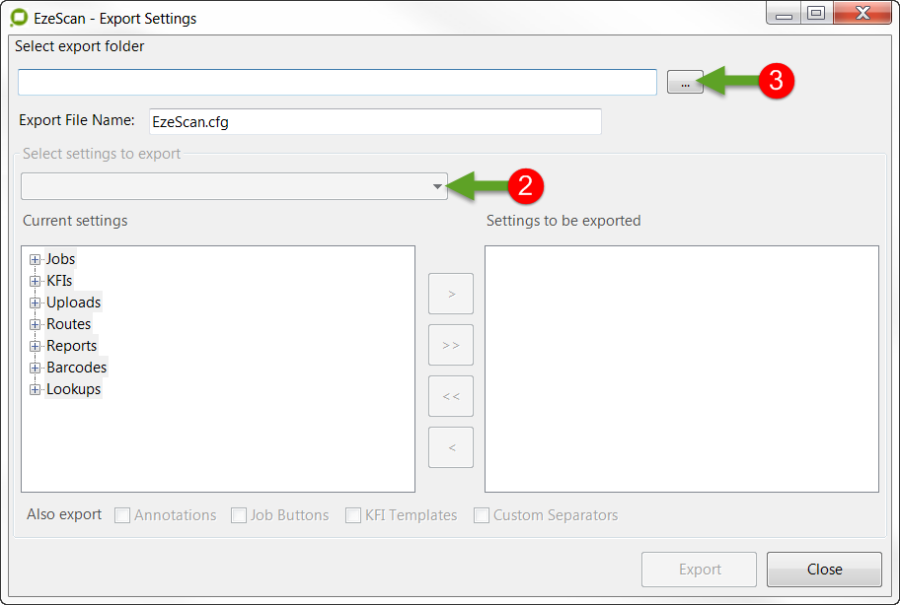
If possible; always save to a network folder and create a new folder for each time a backup is run. Use a naming convention similar to the one shown below.

The Select Settings to Export panel is now enabled.
There are 3 options which may be selected when performing an EzeScan back-up:
Backup entire EzeScan configuration
Includes the Job, KFI, Routing and Upload settings (everything)
Other settings used internally by EzeScan; eg. Annotations, Job buttons, Lookups etc. are automatically included.
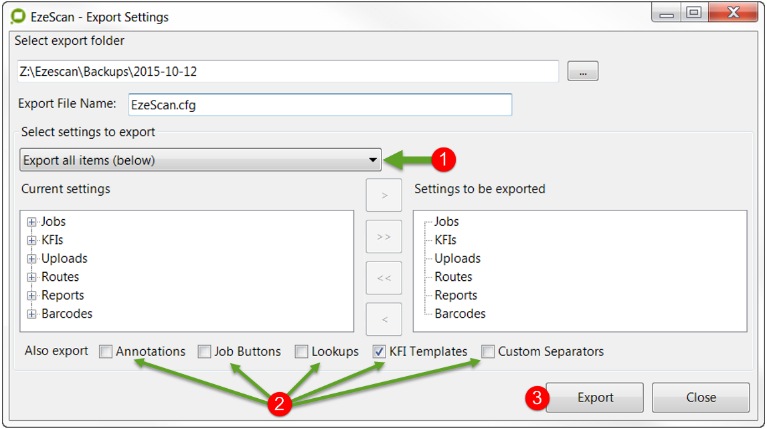
Export all items (below)
Performs the same task as "Backup entire config" but allows the user to choose which options such as Annotations, Job buttons, Lookups etc. to select
Export selected items (below)
The operator is only required to select the EzeScan job.
EzeScan will automatically select the KFI and UPLOAD
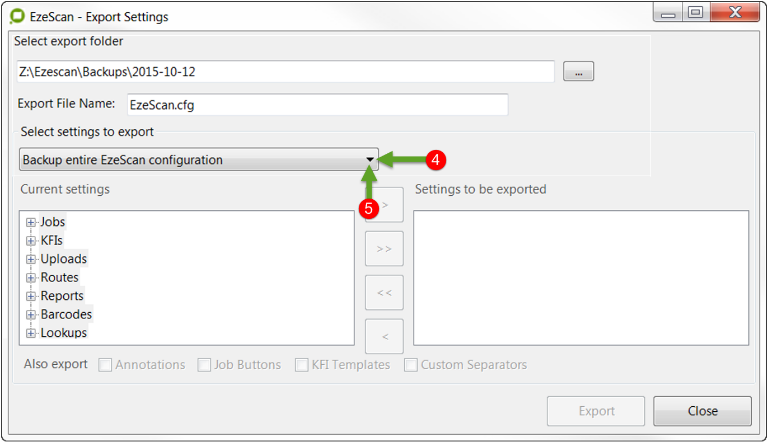
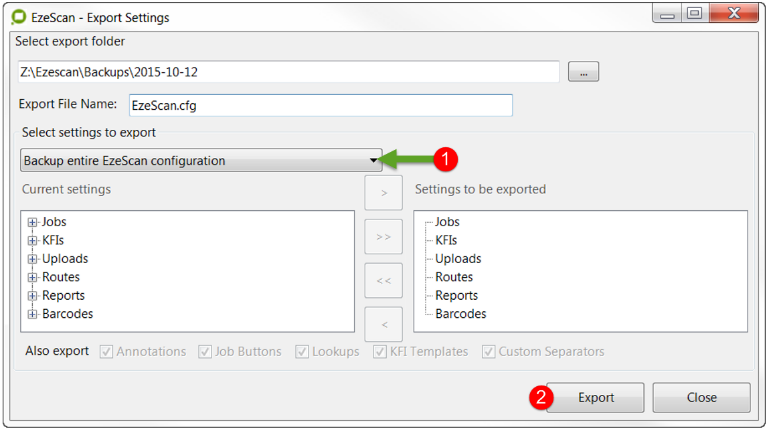
Backup entire EzeScan configuration
To back up the complete workstation settings select the Backup entire EzeScan configuration option from the pulldown list.
Click on the Export button:
Exporting entire EzeScan configuration
Export all items (below)
To backup all Job, KFI, Routing and Upload settings select the Export All Items (Below) Option from the pulldown list.
Select the required options to be included (KFI Templates is ticked by default)
Click on the Export button:
Export all items plus desired options (tick the check boxes)
Export selected items (below)
To selectively backup Job, KFI, Routing and Upload settings, select the Export selected items (below) option from the pulldown list,
Choose the items in the left hand explorer panel to be exported
Press the single arrow button to add it to the right hand explorer panel.
The selected items will appear in the right hand explorer panel in bold text. Any KFI/Upload settings will be automatically added for each job as it is selected
To copy all items click on the double arrow button
Select the required options to be included (KFI Templates is ticked by default).
Click on the Export button:


.
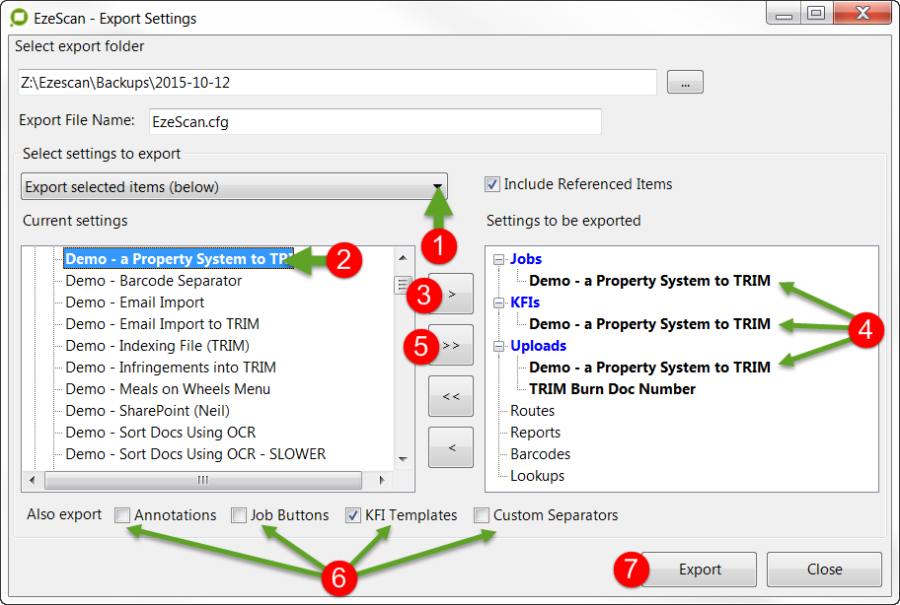
Selecting only the items required to be exported
Once the export has completed the following message is displayed:
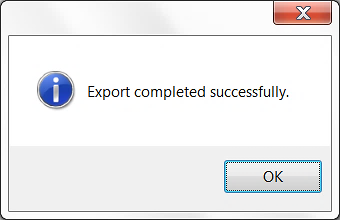
Export successfully completed
The backup will now be saved into the location you specified earlier. In the example below a Backup entire EzeScan configuration has been undertaken.
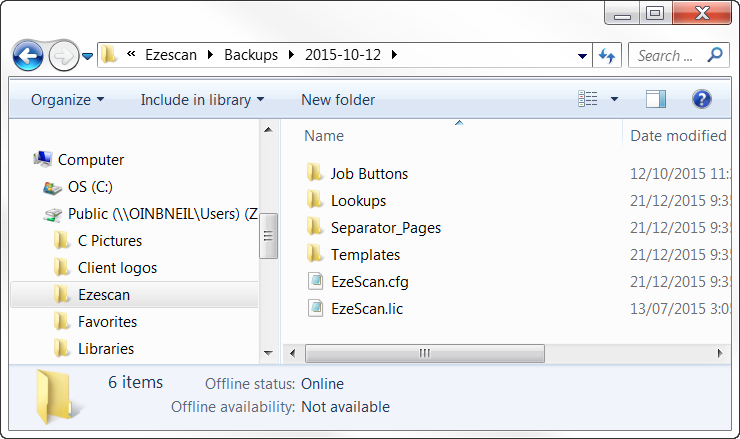
Exported files from a backup of the entire EzeScan configuration
All the components from the Backup entire EzeScan configuration are included in the folder
"Zip up" the entire folder if the backup is to be shared with someone (eg. EzeScan Support) prior to sending it.
Import / Restore configs
Select Import from the Admin > Settings Backup menu options
The Select Settings to Import panel is currently disabled.
This is because no import file has been specified.
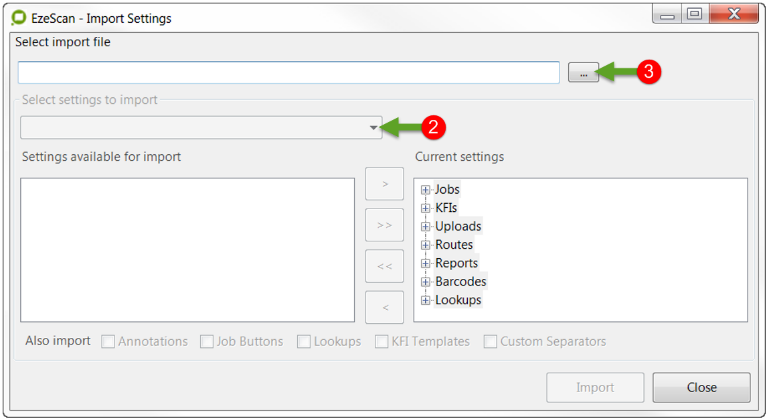
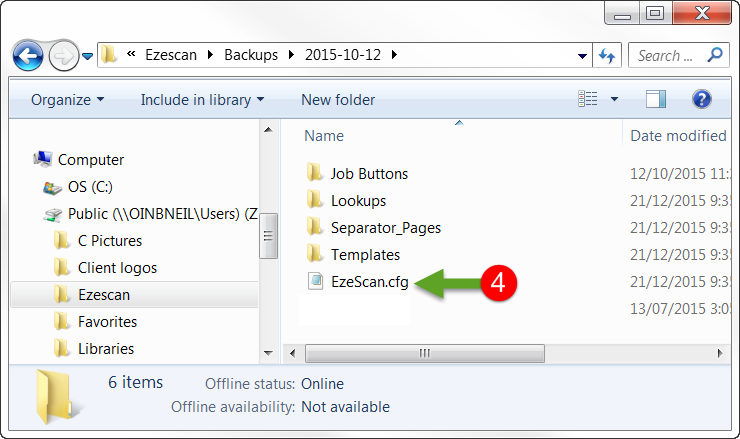
Use the browse dialog to select the Import File (i.e. EzeScan.cfg) where the imported settings will be read from. Click the button.
The following screen appears. Navigate the respective folder and elect your EzeScan.cfg file.

The Select Settings to Import panel is now enabled.
Restoring the settings is basically the reverse of the export process
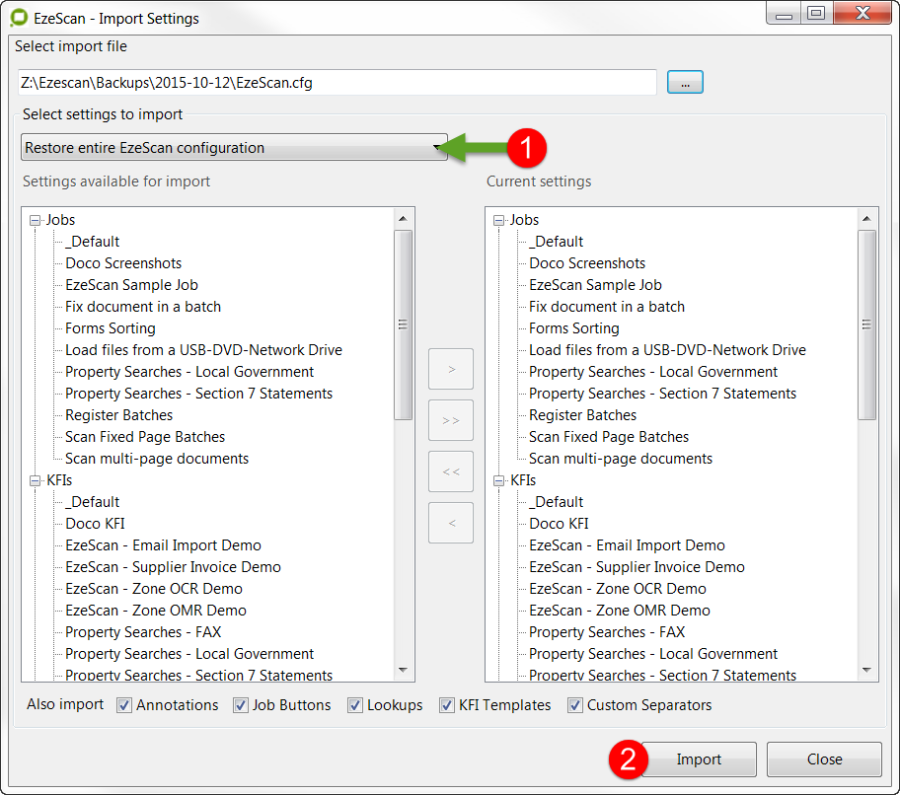
Restore entire EzeScan configuration
To restore up the complete workstation settings select the Restore entire EzeScan configuration option from the pulldown list.
Click on the Import button
Importing entire EzeScan configuration.
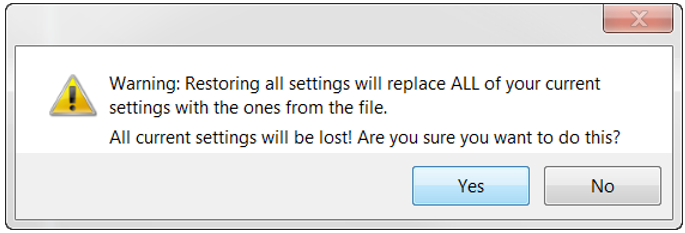
This action will replace ALL of your current settings. The alert message below will appear. Only proceed if you wish to do so. Otherwise use the "Import all items (below)" option.
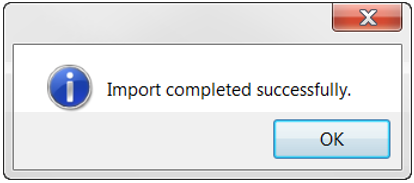
Once the import has completed the following message is displayed:
Click OK to finish the import process
Import all items (below)
Select this option to import up the all of the configuration without overwriting the entire workstation settings.
Click on the Import button
Any Job/KFI/Upload etc with the same name will get overwritten by the import process.
Importing all items in the config

Once the import has completed the following message is displayed:
Click OK to finish the import process
Import selected items (below)
Select this option to import up the only the required items from the configuration.
Double click on the required jobs in the left hand box to be imported.
These will automatically select associated KFIs, Uploads, Routes, Reports & Barcodes too.
The selected items will appear in the right hand box highlighted in blue
Selecting /Deselecting Individual Items
There may be the occasion where only a particular item is required e.g. a KFI or Upload. Click on the single arrow button (> or <) button to select or deselect the item(s).
Clicking on the double arrow button (>> or <<) button to select or deselect ALL item(s).
Any Job/KFI/Upload etc with the same name will get overwritten by the import process.
Select items on right to import & tick the options required too

Click on the Import button
Once the import has completed the following message is displayed:
Import successfully completed
Admin Menu / KFI (Key from Image)
To configure the EzeScan KFI module:
Select the Admin > KFI menu option
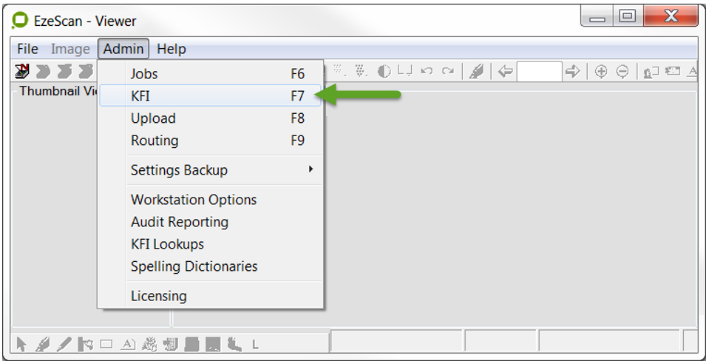
The EzeScan KFI screen displays:
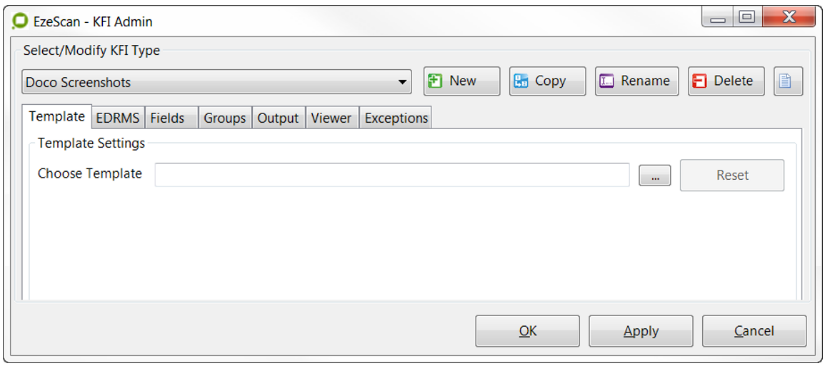
The KFI admin tool is only activated with a valid KFI module license, or with the use of the PRO evaluation license.
For more information relating to the use of this KFI admin tool please refer to the separate Key from Image User Guide Addendum.
Admin Menu / Upload
To configure the EzeScan Upload module:
Select the Admin > Upload menu option
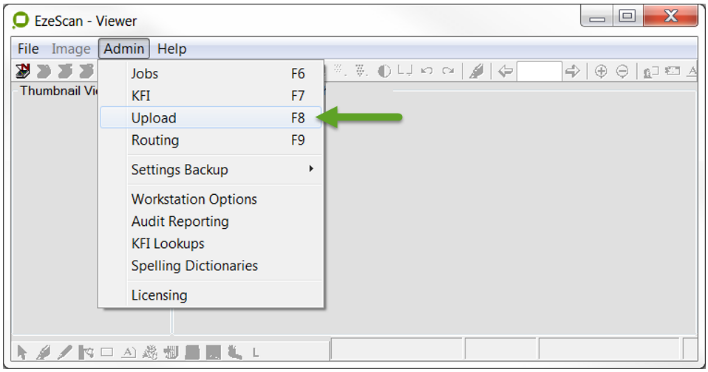
The EzeScan Upload screen displays:

The Upload admin tool is only activated with a valid UPLOAD module license, or with the use of the PRO evaluation license.
For more information relating to the use of this Upload admin tool please refer to the separate Upload User Guide Addendum.
Admin Menu / Routing
To configure the EzeScan Server Routing module:
Select the Admin > Routing menu option
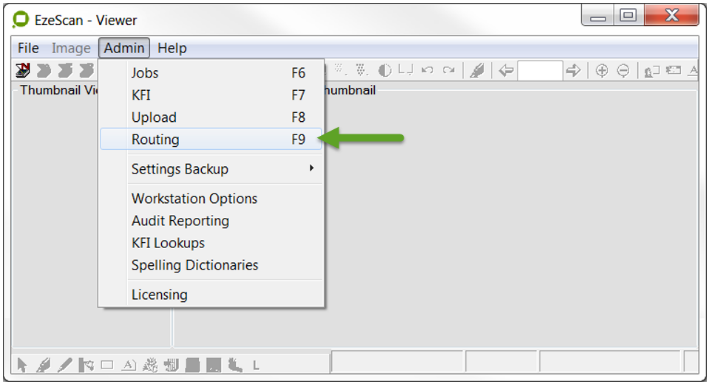
The EzeScan Routing screen displays:
The Routing admin tool is only activated with a valid ROUTING module license, or with the use of the PRO evaluation license.
For more information relating to the use of this Routing admin tool please refer to the separate Routing User Guide Addendum.
Admin Menu / KFI Lookups
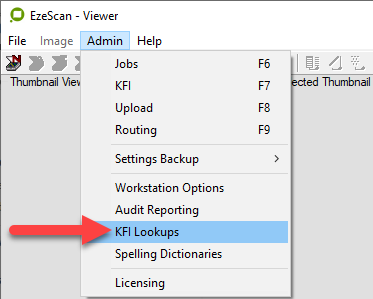
This menu item opens the form for managing both Local and EzeScan Authority based table lookups.
Here lookups can be Imported, Exported and Edited.
Lookup tables hosted on EzeScan Authority can also be edited with the changes resaved back to EzeScan Authority when they are applied.
Where there are same named tables for both Local and EzeScan Authority, the EzeScan Authority tables will take precedence over local tables.
Lookup tables are based on the format of comma separated variable (.csv) and can be imported with either a .txt or .csv file extension.
When stored in the EzeScan configuration structure the files as saved with a .txt extension using the imported file name.
Imported local lookups can be found in the following default path.
C:\ProgramData\Outback Imaging\EzeScan\Lookups
Operator Actions
All operator interaction with EzeScan is now initiated through the Operator Actions Form.
To launch this form:
Select the menu, File > Scan > New Document menu option,
or the Scan Icon on the toolbar,
or press F2 shortcut key.
The following form displays:
Job Settings screen
The following sections explain in detail what each section of this form do.
Job Types
The top section of the form allows the operator to save their customised job settings as different job types.

EzeScan is supplied with one pre-configured job type called _Default.

The settings set for this job type can be altered and saved, but this job type can never be deleted from the list. However other job types can be added or deleted from the list.
For example it is possible to build a list of job types such i.e. Scan Colour 300 DPI and store to Folder A, Scan BW 200 DPI and store to Folder B and Scan BW 600 DPI and store to folder C,
It is much better to have different jobs rather than changing scanner and output settings at each job per hand.
Managing Jobs
There are 5 buttons next to the list of available job types.

The New button creates a new job type.
If the new job type name already exists in the available job types list then the operator is asked to select a different name.
The Copy button copies the currently selected job type
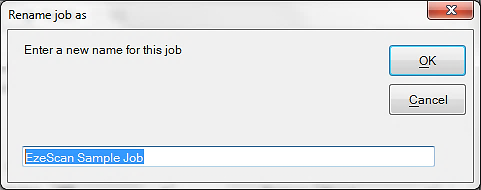
The Rename button renames the currently selected job type
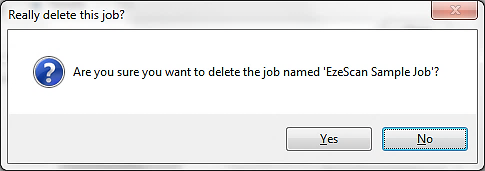
The Delete button deletes the selected job type from the list. The operator is asked to confirm deletion of the job type before it is deleted from the list.
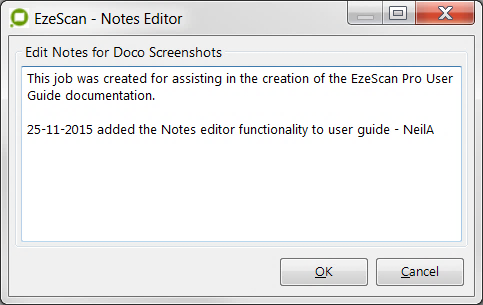
The Edit Notes button provides the option to keep notes about each job. Designed to provide a history about what the job does when it was last updated etc. It is a free text type field.

Any changes to a job type settings are saved by pressing the Save Settings button.

Actions

These radio buttons select the type of scanning/deletion action that will be applied to the current document/batch displayed in the viewer.
When the Scan radio button is selected, and scanning is initiated, then scanned pages will be added to the end of the current document/batch.
When the Insert radio button is selected, and scanning is initiated, then X scanned pages will be inserted before the currently viewed page in the displayed document/batch.
When the Replace radio button is selected, and scanning is initiated, then X scanned pages will be replaced starting at the currently viewed page in the displayed document/batch.
Command Buttons
 | The Hide button is used to shrink the size of the Operator Actions form. In doing so it hides the Scanner, Import, Enhancement, Profiling, Output and OCR tabs. |
 | The Show button expands the Operator Actions form back to its original size, and in doing so allows the operator to change the configuration details on the Scanner, Import, Enhancement, Profiling, Output and OCR tabs. |
 | The Reload button is used to reload the images that are currently displayed in the Viewer. It is primarily used as a means of switching between job types on the fly, without having to re-scan or re-import. |
 | The Load button is used to copy images from a CD into the jobs input directory |
 | The Clear button forces EzeScan to clear the current job types workflow cache subdirectory. |
 | The Import File button initiates importing a document from the specified job type input directory. |
 | The Import Folder button initiates repeatedly importing documents from the specified job type input directory, until either no more files exist, or the operator decides to cancel the import. |
 | The Scan button initiates scanning. This is achieved with either the TWAIN or ISIS vendor scanner driver. |
 | The Commit button will move files from an output folder to a secondary folder. |
 | The Save button saves any changes to the currently selected job type setting. |
 | The Close button closes the Operator Actions form. |
Scan Tab
The Scan Tab allows the operator to set specific scan settings for the respective job type.
Enable scanning using this profile
When the Enable scanner processing option is ticked the Scan button is enabled on the Operator Actions Form.
The operator can choose to use TWAIN, ISIS or WIA drivers for communication with the scanner. Please check the vendor driver documentation for which method to use.
If the operator does not need to use a scanner with a job type (e.g. because it is using Folder Import) then simply untick this option and the Scan Button becomes disabled.
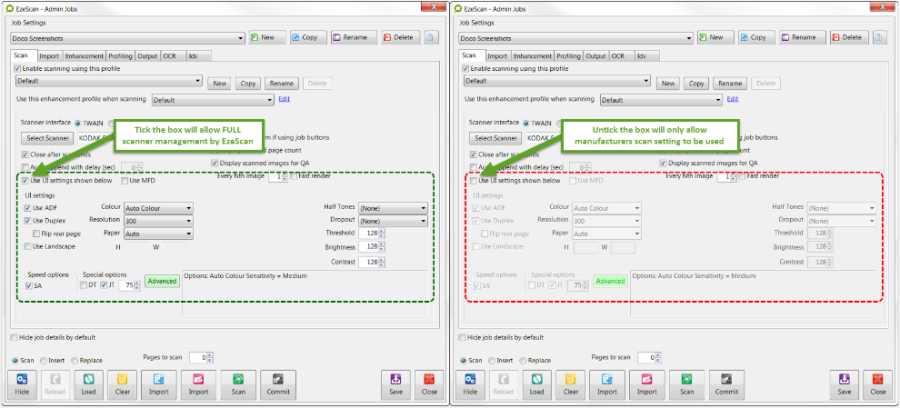
Use UI settings shown below
Ticking the "Use UI settings" shown below box will allow the operator to set the scanner settings in EzeScan instead of having to use the vendor driver panel.
Select Scanner
Use this button to select the scanner that you want to use.

Each job type could use a different scanner.
As you switch between job types EzeScan will automatically switch to the new scanner driver for you.
The selected scanner must be connected to the PC running the EzeScan job.
Clear
Use this button to reset the scanner selection back to NONE.
Close after scan ends
This option is usually ticked. But if you want to scan books using a flatbed scanner then untick this option and set the scan delay at between 5-10 seconds.
EzeScan will scan from the glass every 5-10 seconds allowing sufficient time for the operator to turn over the page to the next page.
Auto-append with delay (sec)
If scanning large documents in a single batch, enable this option. After EzeScan has loaded the first batch of images and applied its enhancements, EzeScan will automatically reload the Scan form.
The operator can then simply load the next stack of documents in the scanner ADF, press the scan button and EzeScan will continue scanning.
Use UI settings shown below
When the Use UI settings shown below option is ticked on the operator Actions form, the operator can set the default options on the EzeScan UI settings they wish to use when scanning.
When the Use UI settings shown below option is not ticked on the operator Actions form, the operator will have to use the vendor user interface that was supplied by the scanner vendor to operate the scanner.
This should be used only in circumstances when the operator wishes to use a scanning option present in the scanner vendors' user interface that is not available in the EzeScan UI scanner settings or custom settings.
The following functions are only available if the Use UI settings shown below option is ticked
MFD
When ticked this option disables the UI settings panel options.
This is done because a scanner operator will set those values on the actual networked multifunction device TWAIN driver, not in EzeScan.
Display scan form if using job buttons
If using the Job Button interface, this option will display the scan form after clicking on its respective job button.
This option is great to simply EzeScan jobs, e.g. instead of having a separate Colour, B&W & Grayscale job, the operator can have one job and when the button is pressed EzeScan will display a simplified scan form to allow the operator to change settings for the current scan batch.
This is the scan form available when used via a Job Button:
This option can also be set as a global option for all jobs in the Jobs Tab in Workstation Options (refer to the Show Scan Form section on page ).
Display scanned page count
This option is unticked by default.
When ticked it will display a message box informing the user of the total number of pages scanned.
Display scanned images for QA
This option will display the images in EzeScan whilst being scanned.
The operator can specify whether every image or every Nth image to be displayed there is also a fast render option to speed up the process.
For colour scanning using this option can slow down the scanning process.
UI Settings
Use ADF
If your scanner supports an Auto Document Feeder (ADF), the Use ADF option will be available for operator selection. The operator can select whether to use the ADF or the flatbed.
Use Duplex / Use Manual Duplex
Duplex scanning allows the operator to scan double-sided documents using the scanner's ADF.
In this mode, the operator places the double-sided document in the ADF and scans the document (both sides) in 1 pass.
Real Duplex Scanners
If your scanner supports real Duplex then the Use Duplex option will be available for operator selection. However if your scanner does not support Duplex, but it does have an ADF then the Use Manual Duplex option will be available for operator selection.
Non Duplex Scanners
In Manual Duplex mode, the operator places the double-sided document in the ADF and scans the front side of each page of the document. They then turn the document over and scan the backside of each page in the document.
Then EzeScan shuffles the document pages back into the correct order (matching the order that a real duplex scanner would produce). This feature effectively turns your existing simplex ADF scanners into duplex capable scanners.
If the number of pages scanned in the 2nd pass does not equal the number of pages scanned in the 1st pass then EzeScan will display a warning message and delete all the pages scanned in passes 1 and 2. You'll have to rescan the duplex document.
Flip rear page
The flip rear pages check box allows the operator to force the rear page of a duplex scan upside down.
This option is used to overcome a problem with some scanner drivers that actually output the rear page upside down, so using this option forces that rear page up the right way.
Use Landscape
When ticked this option forces the scanner to switch its height and width length settings, thereby effectively switching from portrait to landscape mode.
It is not normally recommended on small A4 scanners, as it will result in the truncation of some of the scanned image.
Colour
This colour list box allows the operator to choose between scanning in Black & White, Greyscale, Colour or Auto Colour Detection (if scanner supported).
The operator is responsible for ensuring that the output image colour and quality is acceptable.
Resolution
The operator can select either 75,150, 200, 300, 400, 600, or 1200 dpi (dots per inch).
Some scanners will not allow you to set all of these values. EzeScan will attempt to warn the operator if a setting is not valid.
The operator is responsible for ensuring that the output image resolution is acceptable.
Paper Size
The operator can select either Legal, Letter, A4, A3, A2, A1, A0, Custom or Auto.
Auto Paper Size is only supported if the scanner supports it. Please use Custom to select your settings for paper sizes other than these. Custom paper sizes are set using the Custom H and W fields.
Some scanners will not allow you to set all of these values. EzeScan will attempt to warn the operator if a setting is not valid.
The operator is responsible for ensuring that the output image is acceptable.
Custom H & W
The custom fields H (height) and W (width) allow the operator to specify the size of image to capture when using a custom paper size.
These measurements are specified in inches. There are 25.4 mm's in 1 inch.
The operator is responsible for ensuring that the output image is acceptable.
Halftones
The halftones list box allows the operator to select the halftones setting used to improve scanning image quality.
At present time this option is only supported with the Kodak I series scanners (e.g. i30, i40, i360, i380).
Using either Thresholding or Adaptive Thresholding options when scanning documents with red, green, blue and black ink in Black & White scanning mode can yield quite good quality documents without having to scan in colour.
It is the operator's responsibility to choose the correct setting for scanning job, and to confirm that image quality is acceptable.
Dropout
The dropout list box allows the operator to select the dropout lamp colour used when scanning.
Some vendor drivers will not allow you to set this value. EzeScan will attempt to disable this option when this situation is detected.
Brightness
The brightness field allows the operator to specify the brightness setting to use when scanning the documents.
Values between 1 and 255 are accepted. The default setting is 128.
Some vendor drivers will not allow you to set this value. EzeScan will attempt to disable this option when this situation is detected.
Threshold
The threshold field allows the operator to specify the threshold setting to use when scanning the documents.
Values between 1 and 255 are accepted. The default setting is 128.
Some vendor drivers will not allow you to set this value. EzeScan will attempt to disable this option when this situation is detected.
Contrast
The contrast field allows the operator to specify the contrast setting to use when scanning the documents.
Values between 1 and 255 are accepted. The default setting is 128.
Some vendor drivers will not allow you to set this value. EzeScan will attempt to disable this option when this situation is detected.
Speed options
SA
When ticked this option attempts to force the scanner to use its "scan ahead" feature.
This feature enables the scanner to check the feeder to see if there is more documents to scan.
This option is not always supported by the Vendor drivers and therefore we can't always guarantee this will work.
Special options
DT
This option enables "Dynamic Thresholding" on the scanned document.
It only works with Black & White documents.
Dynamic thresholding will determine whether a document has light text or stamps and then make them darker so the document is much more legible.
JT
For grayscale and colour scanning the JPEG compression of the scanned document can be modified.
Setting this option to 100 will deliver the highest quality (no compression). 75 is the default.
The operator is responsible for ensuring that the output image quality is acceptable.
Scanner Advanced Settings
These options will allow EzeScan to set advanced features of the scanner and custom scanner settings.
Functionality not supported on all scanners, please check your devices user guide for supported features. For example some model scanners support settings like double feed detection, hole punch removal, imprinter, endorser etc. Some models need these settings set via its .ini file, some models require specific data settings to be set on the device to make them work.
Scanner Advanced Settings - All Scanners tab
Advanced Scan Settings tab
Auto Sense Medium
Tick this box to have the scanner automatically sense if the document feeder or flatbed should be used (if supported by your scanner)
Double Feed Detection
This option enables the scanners Double Feed Detection feature.
This option will allow the scanner detect if two pages are scanned at once. If a feed detection error occurs the scanner will stop so the operator can attend to it.
The operator can then append scanning in EzeScan to continue processing.
This option requires the operator to select the Double Feed Detection method from the following:
Ultrasonic
This option allows the operator to use Ultrasonic Detection to detect Double Feeds.
This method uses air gaps between documents, allowing multi-feed detection to be used with jobs containing documents with variable thickness.
The sensitivity factor can be set to Low, Medium (default) or High
By Length
This option allows the operator to select the minimum length of the document that can be scanned without a multi-feed being detected.
Both
This option will use both Ultrasonic and Length Detection as outlined above.
Scanner Deskew
When ticked this option attempts to force the scanner to deskew the image.
This option is not always supported by the Vendor drivers and therefore we can't always guarantee this will work.
It is better practice to use the Deskew option in the Enhancement Tab (more details on page ).
Noise Filter
Select the type of Noise Filter to use. The default is none. Other options are:
Auto
Low Pixel
Majority Rule
Scanner Negate Image
When ticked this option attempts to force the scanner to negate the image.
This option is not always supported by the Vendor drivers and therefore we can't always guarantee this will work.
It is better practice to use the Negate / Invert option in the Enhancement Tab. (more details on page )
Punch Hole Removal
When selected this option will enable the hole punch on a scanned image to be removed.
Default is 'Disabled' or select from either:
White Fill: Punch hole marks are filled with white.
Background Fill: Punch hole marks are filled with a colour most used around the holes.
Memory Transfer
When ticked this options passes the scanned image in the memory of the PC before transferring into EzeScan.
This will speed up the data transfer process but may put more load onto the PC resources.
Fujitsu Scanners
Enable SRGB Output
When ticked this option will enable the Fujitsu sRGB option.
Kodak Scanners
Vendor Profile ID
This will use the shortcuts setup in the Kodak driver.
The operator needs to specify the number the shortcut is in the list.
e.g. in this instance if the operator wants to use "My Colour Scans" the setting would be "5"
Kodak application settings screen

This option will ignore all EzeScan scan settings and use the settings specified in the Kodak shortcut.
Use Roller Timeout \ Roller Timeout Seconds
This option will allow the operator to specify a time (in seconds) to leave the rollers running after the last page has been scanned.This will allow the operator to automatically append more pages into the batch.

Roller timeout set to 5 seconds
Auto Colour Sensitivity
This option will allow the operator to select the sensitivity level for Auto colour detection, the operator can select from the following options:
Low:This option is used for documents containing only a small amount of colour to be saved as colour or grayscale images. Used for capturing documents which are primarily black text with small colour logos, or contain small amounts of highlighted text or small colourful photographs.
Medium: This option is used for documents which contain more colours, as compared with the Low option, before they are saved as colour or grayscale images.
High: Documents containing more colours, as compared with the Medium option, before they will be saved as colour or grayscale images. Used for distinguishing documents containing medium- to large-size colourful photos from plain black text. Photos with neutral colours may require adjustments to the colour Threshold or colour Amount values in order to be captured correctly.
Custom: This option allows the operator to manually adjust the Colour Amount and/or Colour Threshold.
Recommended values are 2 and 20 respectively. Always test across a breadth of documents until satisfactory balance is found.
Auto Colour Amount
This option allows the operator to manually select the amount of colour needed on any page before it will be saved as colour. As the value of Colour Amount increases, more colour pixels are required on the page.
Valid values are 1 to 200.
Auto Colour Threshold
This option allows the operator to manually select the colour threshold or intensity. A higher value indicates that a more intense colour is required.
Valid values are 0 to 100.
Ultrasonic Sensitivity
This option allows the operator to define how aggressively the scanner will work to determine if more than one document is fed into the scanner.
User may select Low, Medium and High ranging from least to most aggressive respectively.
Scanner Advanced Settings - Scanner Custom CAPS tab
This option allows to call standard and advanced features of a TWAIN scanner.
To apply the changes click the "Detect UI Capabilities Changes" button, make the adjustments and click vendor scan button. Once scanned click Close on the vendor driver and it will return some changes.
Select the changes and they will be entered into the Desired CAPS section. Click Apply to save these changes.
Scanner Advanced Settings - Scanner INI File Settings tab
This option allows to call standard and advanced features of a TWAIN / ISIS scanner by using its supplied .ini file.
To apply the changes click the "Detect INI Changes" button, make the adjustments and click vendor driver scan button.
Once scanned click Close on the vendor driver and it will return some changes. Select the changes and they will be entered into the Desired Settings section. Click Apply to save these changes.
Scanner Advanced Settings - Scanner Custom Data tab
This option allows to call standard and advanced features of a TWAIN scanner.
To apply the changes click the "Detect UI Capabilities Changes" button, make the adjustments and click vendor scan button.
Once scanned click Close on the vendor driver and it will return some changes. Select the changes and they will be entered into the Desired CAPS section. Click Apply to save these changes.
- CODE
This option will only work with TWAIN 2.0 compliant scanners. This option is similar to Custom CAPS. Custom CAPS will return values as ID's e.g. 4377=500 where custom data will return a value e.g. \[$1\]CustomReso500=500
.Import Tab
The import tab has been designed to configure the document import source from local or network folders or a selection of connectors, for example FTP/FTPS, POP3, IMAP, Office 365 and various others.
There are two Import Methods available:
Import File - will display a browse screen and allow the operator to select a file.
Import Folder - will automatically select files in the specified import folder, remove them from the folder and display it in EzeScan for Processing. Please see below for more details on the import options.
EzeScan Import tab
This option defines the document import settings allowing the operator to configure a default import folder as well as import directory render profiles and import file types.
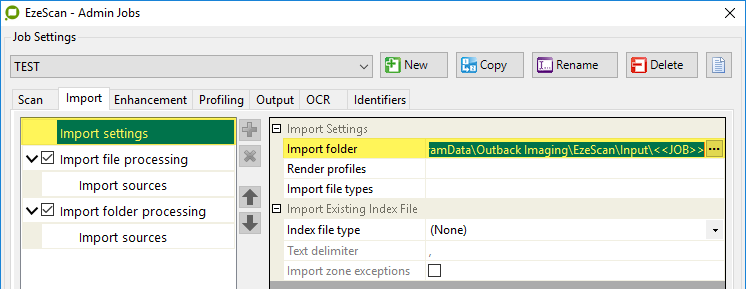
Import Folder
Defines the directory from where documents will be imported from.
Default: "C:\ProgramData\Outback Imaging\EzeScan\Input\<<JOB>>" where <<JOB>> is a placeholder for the actual job name and will create a subfolder using the name of the job in place of "<<JOB>>".
To switch this option off please refer to the Batch Mode Settings section on page "Create Input / Output Job Subfolders"
If the operator needs to specify an import folder, clicking in the "Import folder" field will show the Browse button and enable browsing to the desired folder to set as the import directory. An additional option would be adding a backslash and <<JOB>> to the chosen path to auto-create a subfolder named as the job name.

Render Profiles
The Configuration area for the rendering of the imported file.
For example the PDF configuration default is for a min of 0 and a max of 600, which will automatically choose the best value for a quality yet small PDF file size. Setting a larger min value (e.g. 300) will produce a higher quality PDF file at the expense of a larger PDF file size.
In this instance the recommend PDF values are to leave at the defaults.
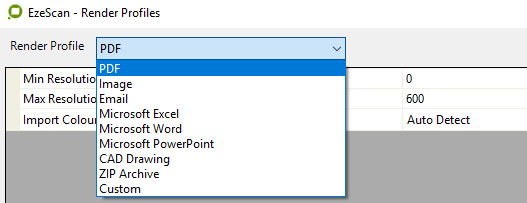
The Render Profiles button opens a window in which you can configure the Image and PDF requirements for the imported documents.
The Email and Microsoft Office Excel, PowerPoint and Word document rendering options are also available provided EzeScan is licensed for them.
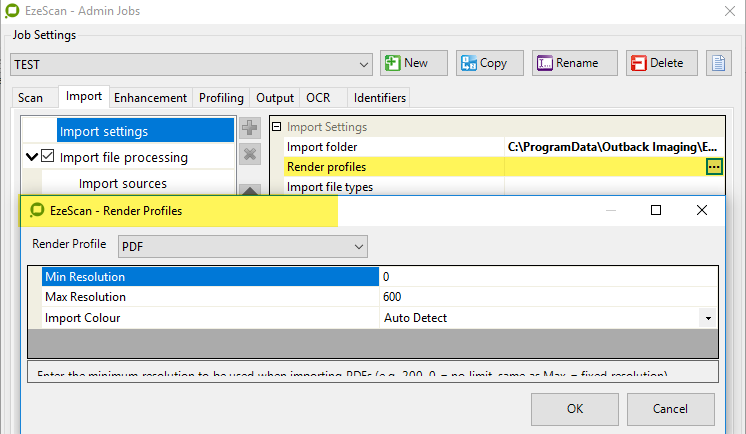

Min Resolution
This option allows the operator to set the minimum resolution (in DPI) when importing PDF files.
Use 0 for auto-detect.
Imported images are increased to the minimum resolution if the original PDF has a lower resolution.
Max Resolution
This option allows the operator to set the maximum resolution (in DPI) when importing PDF.
Use 0 for auto-detect.
Imported PDF's are reduced to the maximum resolution if the original has a higher resolution.
Wherever possible it's best to import TIFs as the import resolution is automatically set by EzeScan.
Import Colour
This option allows the operator to force the import PDF file to the colour type selected from the drop down list.The options are Auto Detect, Black & White, Gray Scale, Colour (24 Bit).

Image
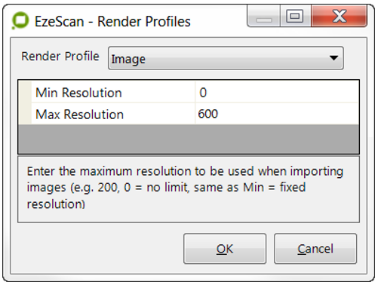
Min Resolution
This option allows the operator to set the minimum resolution (in DPI) when importing image files such as TIF, JPG, GIF or BMP files.
Use 0 for auto-detect.
Imported images are increased to the minimum resolution if the original has a lower resolution.
Max Resolution
This option allows the operator to set the minimum resolution (in DPI) when importing image files such as TIF, JPG, GIF or BMP files.
Use 0 for auto-detect.
Imported images are reduced to the maximum resolution if the original has a higher resolution.
Wherever possible it is best to import TIFs as the import resolution is automatically set by EzeScan.
Email Settings
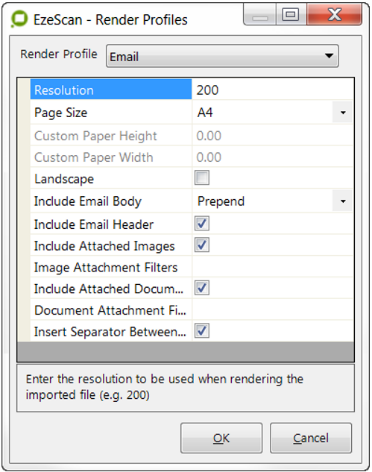
The Email Render Profile has the settings for the rendering of eml files into images for processing.
The header properties of the email can be included as a header in the rendered image, followed by the email body and any attachments.
Separators can be inserted between attachments.
You need to select the .eml as a file type in the Import File Types section. See File Types in this chapter for more information.
If you are importing directly from a mailbox use the 'Generate .eml file from email' setting to create the eml file to be rendered. This is found in the Import Source > Email Settings section - see Download Email Attachments in this chapter for more information.
Resolution
Rendered images are created with the specified resolution. Defaults to 200 dpi.
Page Size
This sets the page size of the rendered image. Select from the pull down list.
If Custom is selected then the height and width of the page can be can be manually entered in inches.
Custom Paper Height
If Custom is selected for the Paper Size then the height in inches can be entered in this field.
Custom Paper Width
If Custom is selected for the Paper Size then the height in inches can be entered in this field.
Note: 1 inch = 25.4 mm
Landscape
Tick the box (off by default) to set the page orientation to be landscape, the default if this is unchecked is portrait orientation.
Include Email Body
Choose how the email body should be included when rendering.The options include:
Prepend (default setting)
Ignore
Append
Include Email Header
Tick the box (on by default) to include any of the email's header fields (sender, date, subject etc)
Include Attached Images
Tick the box (on by default) to include any attached images (i.e. BMP, GIF, JPG) when rendering the email.
Image Attachment Filters
Enter the filename type filter for image attachments (i.e. ".bmp;.jpg") or leave blank to use the default filter.
Include Attached Documents
Tick the box (on by default) to include the CC field in the header when rendering the email.
The Email render can only handle PDF, Word and Excel attachments. PowerPoint attachments would need to be saved and processed with the separate PowerPoint Render Profile.
Document Attachment Filters
Enter the filename type filter for document attachments (i.e. ".doc;.pdf") or leave blank to use the default filter.
Insert Separator Between Attachments
If this check box (on by default) is selected a black separator page will be included between the email and the attachments and between each attachment.
The Email settings apply to the import of eml files which will be rendered to images.
Microsoft Excel Settings
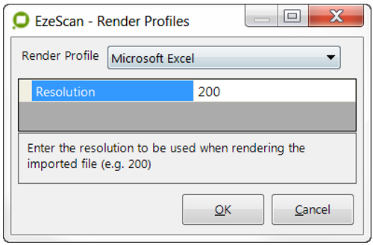
Resolution
Rendered images are created with the specified resolution. Defaults to 200 dpi.
Microsoft Word Settings
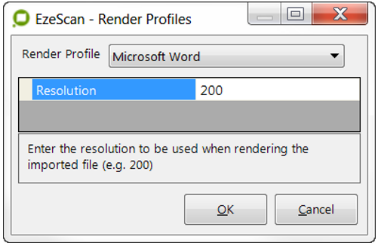
Resolution
Rendered images are created with the specified resolution. Defaults to 200 dpi.
Microsoft PowerPoint Settings
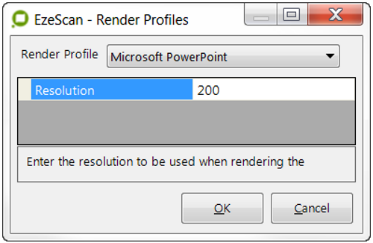
Resolution
Rendered images are created with the specified resolution. Defaults to 200 dpi.
CAD Drawing Settings
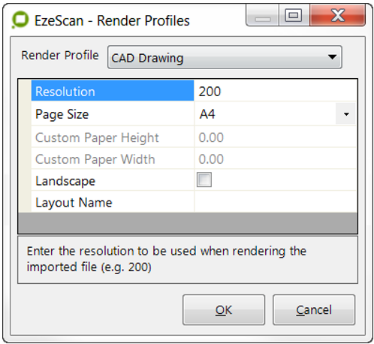
Resolution
Rendered images are created with the specified resolution. Defaults to 200 dpi.
Page Size
This sets the page size of the rendered image. Select from the pull down list.
If Custom is selected then the height and width of the page can be can be manually entered in inches.
Custom Paper Height
If Custom is selected for the Paper Size then the height in inches can be entered in this field.
Custom Paper Width
If Custom is selected for the Paper Size then the height in inches can be entered in this field.
Note: 1 inch = 25.4 mm
Landscape
Tick the box to set page orientation to be landscape. Default is unticked (i.e. portrait orientation).
Layout Name
Enter the name of the layout to use when rendering CAD drawings, otherwise leave blank (default) to render all layouts.
ZIP Archive
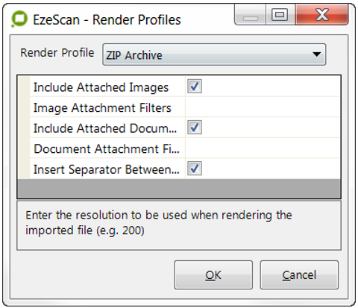
Include Attached Images
When ticked will include images (i.e. bmp; gif; jpg) when rendering the email.
Ticked by default.
Image Attachment Filters
Enter the filename filter for the image attachments (i.e. "*.bmp; *.gif; *.jpg"), or leave blank to use the default filter.
Include Attached Documents
When ticked will include attached documents (i.e. docx; xlsx; pptx) when rendering the email.
Ticked by default.
Document Attachment Filters
Enter the filename filter for the document attachments (i.e. "*.docx; *.xlsx; *.pptx"), or leave blank to use the default filter.
Insert Separator Between Attachments
When ticked will include a black separator between the email and attachments.
Ticked by default.
Custom (Render Profiles)
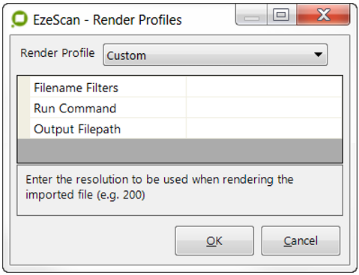
Filename Filters
Enter a semicolon ( delimited list of filename filters to apply to this render profile (i.e. "*.dwg; *.dwf").Blank by default which will not filter anything.
😉
Run Command
Enter the command that will run to render files matched by one or more of the filename filters; i.e.
"convert.exe /In "<<RenderInputDocument>>" /Out "<<RenderInputDocument(-Ext)>>.tif""
Blank by default.
Output Filepath
Enter the path of the run command's output file; i.e.
"<<RenderInputDocument(-Ext)>>.tif"
Blank by default, but must be populated if "run command" option is used.
Import File Types
Defines the type of files to be imported by way of the file type extension.
Creating a new job will contain all standard file types EzeScan currently supports with unknown types set to ignore.
Files To Import
For adding new file type extensions (not appearing in the list). Type the file extension and click on the Add button.
Select types to be removed in the list and click on the Remove button to remove them.
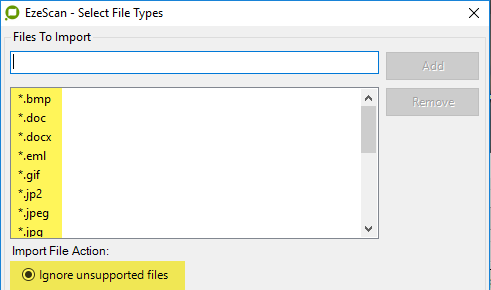
The list of import types acts as a filter and can be reduced to just the particular types the job is intended to import. Should there be a need to restore the defaults, the "Default" button on the bottom of the dialog will reset the list back to the default types.
EzeScan does also support adding additional file types where they can be set to render to a type EzeScan can process (e.g. TIFF).
Testing is advisable when adding new types to confirm their rendering status.
Import File Action
Ignore Unsupported Files
Selected by default. This option will exclude any files which EzeScan cannot render.
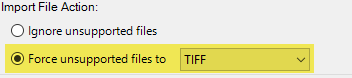
Force Unsupported Files To
Select this option to force unsupported files to be rendered as the specified file type.
Select from the pulldown list; default is TIFF.
Files To Delete
Specified files can also be deleted from the import folder by defining either a specific name or wild card.
The below example will delete all files with an extension of .tmp
e.g. test.tmp, 1234567890.tmp, myfile.tmp, etc.
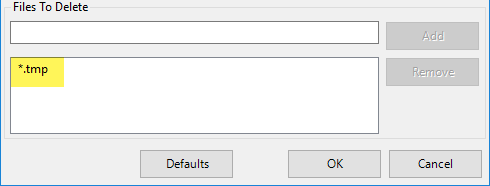
Type the file extension and click on the Add button to include in the list.
Select types to be removed and click on the Remove button to remove them from the list.
Defaults button
Allows the user to reset the settings to the factory defaults.
Be careful defining types of files to be deleted as once a file has been deleted it is gone and you wouldn't want to inadvertantly delete.
Import Existing Index File
Here settings are defined for the importing existing index files.
Index File Type
Chose the type of index file to be imported (default is None).
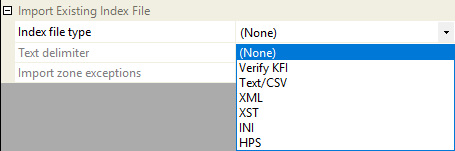
An index file can then be used in the KFI module fields.
Please refer to the "Entry in data file" feature in the Value Tab in the KFI User Guide for further details.
The imported index file must contain the same file name as the image. i.e. image_1.pdf and image_1.csv
When EzeScan sees that there is two files of the same name it will import them together.
For this option to be enabled the KFI module must be a licensed option.
Text Delimiter
Once an index file type has been defined, the delimiter it will be using will need to be set (default is a comma) Note this option is available to the Verify KFI and Text/CSV dropdown selections only.

Set this to the respective value so EzeScan KFI can extract the data correctly.
For this option to be enabled the KFI module must be a licensed option.
Import Zone Exceptions
This check box will be active once an import existing file option has been selected (Verify KFI).

When this option is set the job will import a field exceptions list generated by a sister job/KFI where field Zone exception handling has been configured. The option will run the KFI and skip directly to the sister job's failed fields, thus allowing the operator to correct the problematic values.
Please refer to the KFI user guide AUTO REROUTE DATA EXCEPTIONS ON SUBMIT for further information.
Notes:
When ticked this will import a .ze file with the image. The .ze (zone errors) file is created from a KFI that is set to automatically route exceptions on submit.
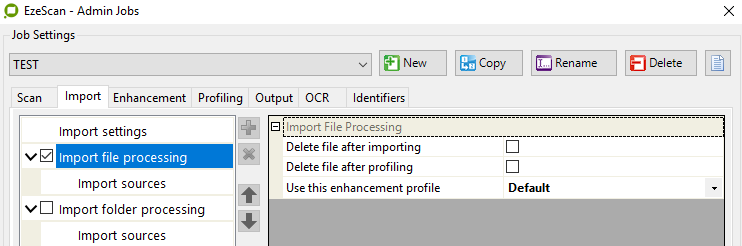
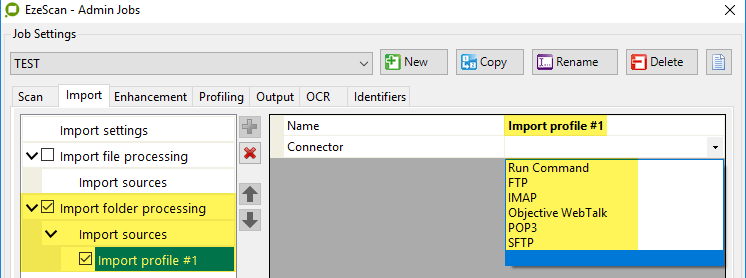
When a .ze file is imported, EzeScan directs the operator to the fields with errors / requiring verification / correction. For this option to be enabled the KFI module must be a licensed option. Import File ProcessingImport file processing refers to the import of single files where one or more individual files are selected and has a series of choices available for configuration.Ticking the checkbox will enable the Import File button on the job and likewise unticking will disable the button.Delete file after importingTick this check box to delete the file after the file is imported into EzeScan.Delete file after profilingTick this check box to delete the file after the file has been profiled by EzeScan.Use this enhancement profileChoose the enhancement profile to apply to the imported documents. Available enhancement profiles are displayed from those created for the job itself. Import Sources (Import File Processing)The import sources functionality has been enhanced quite an amount as EzeScan has evolved and now features the ability to add multiple import sources from a dropdown selection of EzeScan import connectors.Note there are different selection options depending on if import file or folder processing is being configured and here we are covering the "import file processing" import sources. To add an import source click the GreenA new source will be added and a dropdown is available to select the import connector.
The availability of the import connectors will depend on an organisation's EzeScan licensing
The default name will be "Import Profile #<incrementing number>" and can be overtyped to enable an operator to provide their own unique name.
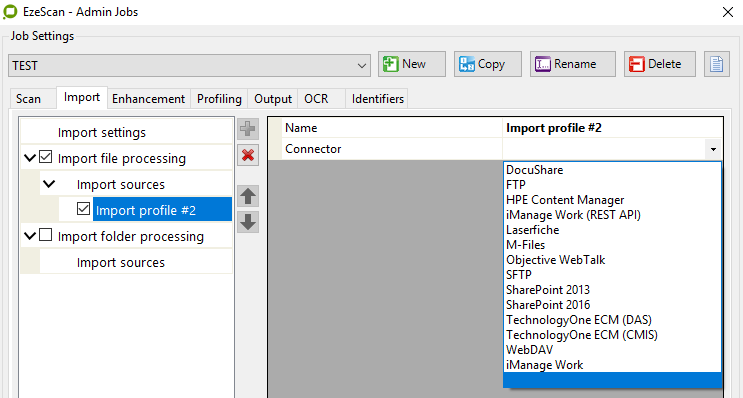
Each chosen connector will present its own specific configuration options and for configuration of connectors please refer to the individual connector's documentation which would be available in the EzeScan Help menu.
Import Folder Processing
This functionality is available when the Import folder processing checkbox is ticked and when ticked the corresponding EzeScan function button is enabled on the job (same as per Import File Processing).
The Import folder processing option (also known as the Input Directory) configures how the import folder defined in in the Import Settings/Import folder is processed.
Keep Polling
When ticked this option in conjunction with the Import Folder checkbox being ticked, forces EzeScan to continuously poll the specified import folder looking for importable items.
A Poll interval can be applied. (defaults to 5 seconds)
When an "import folder" job has been run and all documents have been processed (i.e. the import folder is empty of importable items), the dialog below will appear and will continue to run and check for items to import every xxx number of seconds as defined in the polling interval.

To quit polling mode, press the Stop Polling button on the Polling form, or select File > Close during document processing.
Polling interval
The number of seconds EzeScan will "Poll" the import folder to import items. Defaults to 5 second polling.
Use this enhancement profile
Choose the enhancement profile to apply to the imported documents. Available enhancement profiles are displayed from those created for the job itself.
Folder Settings
The options below allow the following import options when working with folders.
Include sub folders
When ticked this option tells EzeScan to retrieve images from the subfolders located in the job type input directory.
Depth > 1
When ticked this option tells EzeScan to retrieve images from nested subfolders at any depth located in the job type input directory.
Remove empty sub folders
When ticked this option tells EzeScan to remove the subfolders located in the job type input directory when they are empty.
Prompt for Sub Folder
This will prompt the operator to select the next subfolder to be processed.
Prompt for Next File
Instead of picking up the next in line file in the Import folder, EzeScan will prompt the user to select the file to import.
File cache limit
Defines the maximum number of files cached when importing from an import folder or subfolders. Default is 0 (zero = cache all files).
File sort mode
Defines how the import folder's files are to be sorted for import purposes. Options are Date or Name ascending or descending.
Default is "Date Ascending".
Folder sort mode
The option to choose a folder sort mode as an import order is activated when the checkbox to "Include Sub Folders" is ticked. Options are Date or Name ascending or descending.
Default is "Date Ascending".
Import Sources (Import Folder Processing)
The import sources functionality has been enhanced quite an amount as EzeScan has evolved and now features the ability to add multiple import sources from a dropdown selection of EzeScan import connectors.Note there are different selection options depending on if import file or folder processing is being configured and here we are covering the "import folder processing" import sources. To add an import source click the GreenA new source will be added and a dropdown is available to select the import connector.
The import connectors for folder operations are more generic in nature although the total number and types available will depend on an organisation's EzeScan licensing.
The default name will be "Import Profile #<incrementing number>" and can be overtyped to enable an operator to provide their own unique name.Each connector will present its own specific configuration options described further in this document.An operator should also refer to any individual specific connector's documentation which would be in the EzeScan Help menu.
Run command
This option will allow the operator to run a command before EzeScan checks the import folder for documents. e.g. a WinZip command or custom application could be run. When the application is closed EzeScan will then perform import folder processing on the configured import folder.There are some example of EzeScan specific commands in the Command Line Options section on page .
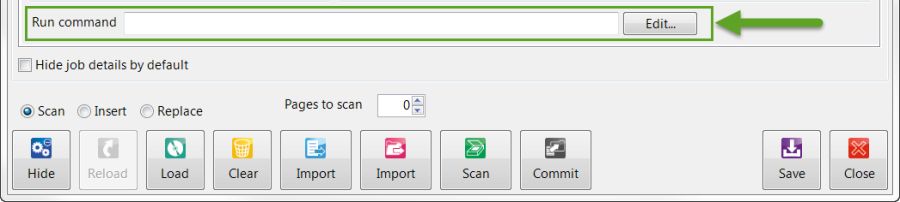
If the operator is importing from an OPEX scanner output they will be required to use the -mergeoxis and -mergeto commands.
-mergeoxi: This is designed to import an .oxi file created from an OPEX scanner. The path needs to be applied of where the .oxi file resides.
-mergeto: This is the folder of where the merged files are to be saved into, usually this would be the same folder as the Job's import folder.
A sample import from an OPEX scanner would be:
"C:\program files (x86)\outback imagingEzeScanEzeScan.exe" -mergeoxi "c:\import\opex\" -mergeto "C:\ProgramData\Outback ImagingEzeScan\Input\Opex Test"
More information on the OPEX integration is available on this FAQ on the EzeScan web site.
Import Source FTP
When ticked this option tells EzeScan to retrieve TIF images from a nominated FTP server.The built in FTP client, will connect to the server, downloading each document (TIF, PDF, JPG) contained http://within.It places the FTP'ed documents into the job type input directory for processing.
Connection Settings
Server, Port, Username, Password, and Security Type
Use these fields to configure the default settings for the FTP server that you want to ftp from.
Enter the appropriate values for the FTP Server Name (or its IP address), the FTP user account and its password.
The Security type can be set to None (default), Explicit SSL/TLS, or Implicit SSL/TLS.
Connection Type and Timeout
Specify the Connection Type the server supports (Active or Passive) and set the time in seconds allowed to establish a connection before timing out. Default is Passive.
Import Document Settings
Folder
This setting allows the operator to select the folder on the FTP server to download images from.
You can use the browse button (dots) on the right to open a browse dialog and browse to the required folder via FTP.
Depending on the FTP server you may need to apply a \ or / before the folder name.
File Import Limit
Specify the maximum number of files to import per session, or leave as 0 for unlimited.
Select file to download
Check this to prompt the user for the file to download from the specified folder.
Import Source Email Configuration
The following pages cover Email configuration options for IMAP/POP3 and Microsoft Office365.
Functionality is added as Import Folder "Import Sources" as shown at right and is applicable to both an EzeScan Client and EzeScan Server configurations.
MAP/POP3/MICROSOFT OFFICE 365 Configuration
IMAP, Microsoft Office 365 and Pop3 use the similar types of settings (see below)
When selected the Connector option tells EzeScan to retrieve images from a nominated email mailbox via the selected protocol.
Available protocols are POP3, IMAP or Microsoft Office 365 where EzeScan will poll the nominated email mailbox and import emails and attachments for processing.
In this configuration we describe IMAP, however the POP3, IMAP and Microsoft Office 365 email connection and configuration settings are all very similar.
IMAP, Microsoft Office 365 and POP3 also all use different ports, additionally IMAP and Microsoft Office 365 have the ability to choose email folders to import email from, as well as being able to move the email into alternate folders once the email has been imported. POP3 has only the ability to import emails as a whole.
Please refer to your email server administrator for the details of the email protocol EzeScan would need to use.
IMAP and Microsoft Office 365 are the preferred email protocols as they provides options POP3 is incapable of provisioning.
Connection Settings (IMAP/POP3)
Server, Port, Username and Password
Use these fields to configure the default settings for the mailbox from where you want to download emails.
Enter the appropriate values for the Server Name (or its IP address), Port, Username and Password, as well as the Security Type.
Example of server, port username and password set-up
Ports are related to the type of IMAP connection, for example.
Port 143 is for the Security Types of NONE and EXPLICIT
Port 993 is for the Security Type of IMPLICIT
Please refer to your email server administrator for the details of the type of Security in use for your Organisation's email server, they will typically also be able to provide such details as the server name, username and password.
Import Document Settings
The Import Document Settings is the area related to the configuration the currently selected connector will use when downloading emails.
Values entered here will configure the methods of processing for downloading emails from an email server.
The pic below displays the settings particular to the IMAP protocol noting the Import Document Settings dialog will display only the settings as provided by the protocol in use.
IMAP download configuration options

The Import Document Settings items are typically common between the various email protocols with any notable differences specifically described i.e. Microsoft Office 365.
Import Document Settings Descriptions
Mailbox:
This option allows the user to specify the IMAP mailbox from which to download emails, the default is set to Inbox.
Subfolders maybe selected and are shown in the list separated by a forward slash eg INBOX/AP Accounts for processing
Prompt for subfolder
Enable this setting for if there are subfolders under the mailbox to be processed. This will allow the operator to see the subfolder under the specified mailbox and choose one to import emails from.
Move to Mailbox:
Specify the IMAP mailbox to move the email to after processing, or leave blank to delete the email.
It is recommended to create a mailbox folder named Processed and then select it in this section. EzeScan will then move all processed emails to this mailbox from the selected inbox.
For testing purposes the Move To Mailbox value can be set as the same as the Mailbox import folder. The result will be the email remaining in the source mailbox folder.
The mailboxes must be a proper mailboxes i.e. have a legitimate email account & cannot be a public folder or shared access type of email account.
Select emails to download
This will display a list of emails that reside in the mailbox and the operator can select which email to import.
Download attachments filter
Set this to either look for emails that have attachments configured in the import file types setting or sell to all for all attachment file types.
Filter emails by attachments
Enable this setting to only process emails with attachments.
Download Count Limit
Specify the number of emails to display/download, default is zero (0) for unlimited. If a number is set it will show the X number of oldest in that mailbox.
Document Basename
This allows the basename of the emails and attachments to be customised.
Where no Basename has been specified the default naming schema used is, Email_<<S3(YYYYMMDD)>>_<<S4(HHMMSS)>>
Available document basename placeholder options are:
<<Email:ToAddress>>
<<Email:ToName>>
<<Email:FromAddress>>
<<Email:FromAddress>>
<<Email:Subject>>
<<Email:Uid>>
<<Attachment:Base>>
<<Attachment:Ext>>
<<Attachment:Index>>
<<Attachment:Number>>
<<Attachment:Count>>
<<S3>> (Date)
<<S4>> (Time)
Create index from headers
This option will create an XML index file (in the specified import folder of the job) which will contain header information of the email.
These include:
From, To, CC, BCC, Reply Address, UID
Subject, Body
Date, Date Downloaded
The operator can use the optional licensed KFI module to extract this data for KFI field processing. Please refer to the "Entry in data file" feature in the Value Tab in the KFI User Guide.
Convert HTML body to XML
Convert HTML email body to XML when inserting into the XML index file
HTML tags to remove
Enter the name of the HTML tags to remove when converting the HTML body to XML
For example: "img;br;script" where each tag separated by a semi-colon.
Generate .eml file from email
When ticked this option tells EzeScan to download each individual email as an .eml file.
This will allow EzeScan to process both the body of the email as well as any attachment (rather than simply all attachments).
EzeScan uses the Email Render Profile to convert imported .eml files to tiff for processing. See Render Profiles > Email Settings for more information.
Filesystem subfolder
This setting works in conjunction with the "prompt for subfolder" settings.
If a subfolder is being used EzeScan can drop the documents into a subfolder (under the import folder) of the same name.
The placeholders available are.
<<Mailbox>> - i.e. INBOX
<<MailboxPath>> - i.e. INBOX/Customers/ABC Pty Ltd
<<MailboxRelativePath>> - i.e. Customers/ABC Pty Ltd
Mark Email as Read after Move
O365 Only
Optionally mark the email as read after moving the email to the designated target email folder. (Default ticked)
Download Newest Emails First
O365 Only
Swap between downloading the Oldest or newest emails in the designated mailbox.
(default unticked)
Connection Settings (Microsoft Office365 Outlook)
The EzeScan Microsoft Office365 Outlook Connector is built to connect to Microsoft's Office365 product and is based upon the Microsoft Graph API using OAuth as the authentication method.
Web based applications such as Microsoft Office 365 typically require specific configuration for OAuth, where the application requiring access will be configured within the Web application and include parameters for authorisation.
For the EzeScan Microsoft Office365 Outlook connector there are two settings applicable to the OAuth method - Inbuilt or Custom, with Inbuilt the default.
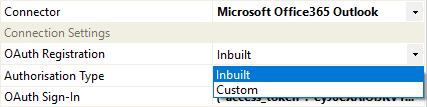
Inbuilt Authentication
The Inbuilt option is a simplified configuration suitable for the majority of Organisations where the OAuth application authorisation has been pre-built leaving just the need for the Office 365 Sign-In.
Sign-in to Microsoft Office 365
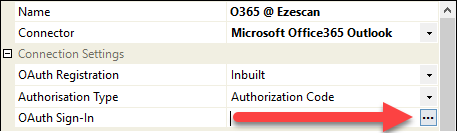
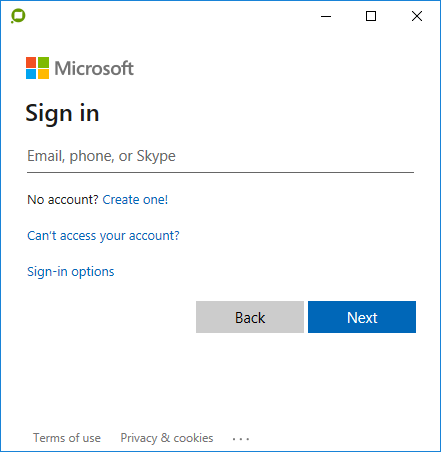
Enter the appropriate Microsoft Office 365 account details. Enter the matching password. Choose to Stay signed in or not - Yes would be typical. Once signed in an Access Token will be generated and populated into the OAuth Sign-In field.Tokens do expire where the actual expiry length is defined by the Microsoft Authentication services.In the token itself the authentication expiry time length of the token is defined by the token value of "additional_properties":{"ext_expires_in":"3599"}} where 3599 demonstrates the value in seconds, e.g. 3599 seconds is one hour minus one second.
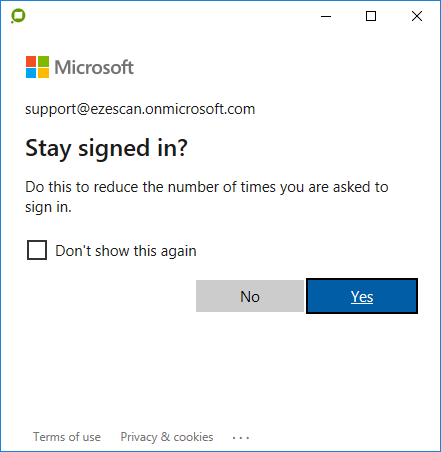
Although a token does expire, it will auto refresh upon expiry (both in EzeScan the Client and in EzeScan Server).
Custom Authentication
The Custom option allows an organisation to configure their own specific OAuth application authorisation should it be required.
The Client ID, Client Secret and Redirect URI are part of a process called App Registration. This makes Microsoft's services aware of the EzeScan Connector and provides the Connector with the authorisation details necessary to perform OAuth authorisation. The below Microsoft links provide more information:https://docs.microsoft.com/en-us/graph/auth-register-app-v2https://docs.microsoft.com/en-us/azure/active-directory/develop/quickstart-configure-app-access-web-apis
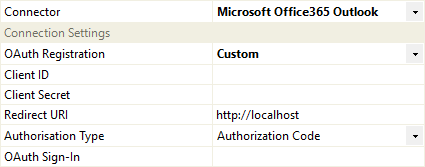
The Client ID and Client Secret are automatically generated by the registration process.
If the registration is for the EzeScan client, the Redirect URI needs to be set to "http://localhost", if the registration is for EWA (EzeScan Web Apps), the Redirect URI needs to be set to whatever EWA defines its OAuth Redirect URI to be.
The Connector must be registered as a "Web App" and requires a minimal set of API Permissions (aka Scopes).
These are:
mail.readwrite
mailboxsettings.readwrite
user.read
offline_access
Please refer to your local Microsoft Azure administrator for further information regarding custom application configuration within Microsoft Azure.
Microsoft Office Outlook Connector Differences
Most of the Import Document Settings are the same or similar to those of IMAP with differences noted below.
O365 Connector download configuration options highlighting differences between IMAP
The Mailbox Browser and Select Emails windows have a different look.
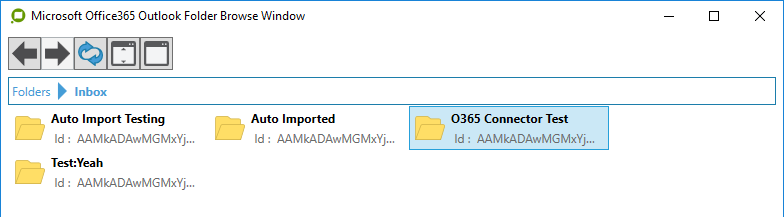
Mailbox and Move to Mailbox folder selection and display
When the Mailbox field is populated the name of the folder and a GUID is used to identify the target folder.

Document Basename
If the configuration specifies a custom document base name and one of the base name elements is…
<<Email:Uid>>
Be aware the Uid returned by the Graph API is a GUID of 152 characters in length that may likely have an impact on Windows path and EzeScan field length allowances and its use should be reviewed in light of the Uid being such a long string of characters.
If no Basename is defined emails will be downloaded using the following naming schema.
Email_<<S3(YYYYMMDD)>>_<<S4(HHMMSS)>>
The Microsoft Office 365 Connector also includes the following additional items
Mark Email as Read after Move (default ticked)Download Newest Emails First (default unticked) Where emails can optionally be not marked as read when moved and emails can be downloaded based on newest first or if unticked the oldest emails are downloaded first.

Enhancement Tab
The image enhancements can be applied during scanning, file or folder import to each scanned page.
In addition to these scanning image enhancements, most of these options are available on the thumbnail and page viewer right mouse button menus, and also as function key shortcuts.
Refer to Help > Shortcut Keys to find out what these shortcuts keys are.
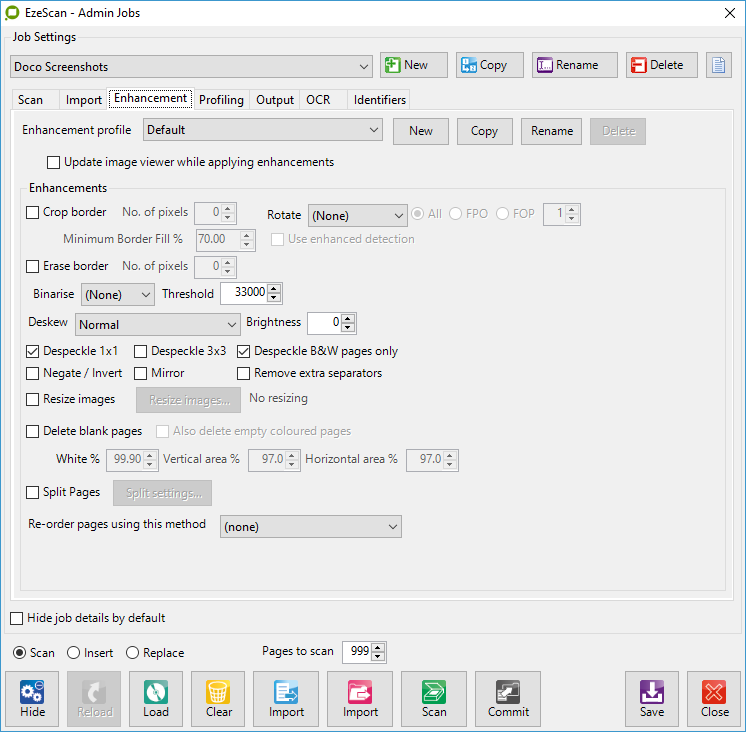
Enable enhancements when
Select 1 or more of the Importing files, Importing Folders or Scanning options to enable image enhancement during that type of processing.
pdate image viewer during processing
This option will display the image enhancements page by page in the EzeScan main viewer.
Having this setting ticked may slow down EzeScan performance.
Crop border
When ticked, the Crop Border option with No of Pixels = 0 will perform black border removal on each page. When No of Pixels > 0 it will trim off around the outside edges of the image by the number of pixels specified. When No of Pixels = -1 it will crop off the bottom half of a page if it is black. When No of Pixels = -2 it will crop off the bottom half of a page if it is white. -3 will crop off the bottom half if it is black.
Minimum Border Fill %
When ticked, the Minimum Border Fill % specified will define what can be cropped when using the aggressive crop modes. For example 90% in Black Border cropping mode will remove borders that are 90% or more black.
Erase border
When ticked, the Erase Border option with No of Pixels > 0 it will white out around the outside edges of the image by the number of pixels specified.
Deskew
When selected, the Deskew option deskews each page. Options are None, Normal or Fax.
A Fax Deskew functions differently to a Normal Deskew as Faxes generally have a header and footer, which may be skewed differently in relation to the actual Fax image. Thusly a Fax deskew works by turning the image onto its side so that the deskew will be based upon the rotated body of the image rather than the header and footer
Fax deskew will rotate the image left 90 degrees, deskew it as per a normal deskew, then rotate the image back right 90 degrees into its original orientation.
In many instances a Fax Deskew operation may not appear to visibly deskew, however it does actually perform a level of deskew that is typically not of a visible level e.g. 0.2 of a degree.
Choose either None, Normal or Fax deskew for the type of images being processed.
Normal would be the typically chosen option in most instances.
Despeckle Options
The Despeckle 1 x 1 option despeckles each page using a 1 x 1 pixel filter. Any isolated 1 x 1 black pixels are removed from the page.
The Despeckle 3 x 3 option despeckles each page using a 3 x 3 pixel filter. Any isolated 1 x 1, 2 x 2 and 3 x 3 black pixels are removed from the page. Use of this option is not recommended for general scanning and should be used with caution.
Negate / Invert
The Negate option inverts each page. Only works with Black & White images.
Mirror
The Mirror option mirrors each page around a vertical axis.
Delete blank pages
The Delete Blank Pages option deletes those pages from the batch, whose percentage of white pixels is >= than the % White Space for Blank Pages setting within a frame on the page whose outer border location is defined by the Horizontal Area % and Vertical Area % settings.
By default the % White Space for Blank Pages value is set to 99.90% and the Horizontal Area % and Vertical Area % are set to 97%. (e.g. 3% of the edge of the page will be ignored) You may need to adjust these values to get satisfactory results. You may delete blank pages at any time by using pressing the shift + delete keys. (If you want to see what percentage of white pixels are on a page, simply select the respective page and use the right mouse button Properties menu option to display this information)
Also delete empty colour pages
Enable option if performing colour scanning with coloured pages. This will remove any blank coloured pages (e.g. blue, green).
It is recommended not to set this setting below 99.70% as EzeScan may delete a page with actual text on it.It is the customers' responsibility to confirm that the delete blank page setting is correct for the environment.
Rotate Options
The Right 90 option, rotates each page +90 degrees. This option is very useful when scanning using a multifunction device scanning in landscape mode, as it enables you to scan in landscape mode, but display in portrait mode.
The 180 option, rotates each page 180 degrees. This option is very useful when scanning in documents that are damaged on the leading scanning edge. Simply put the documents in upside down and then EzeScan will flip them up the right way.
The Left 90 option, rotates each page -90 degrees. This option is very useful when scanning using a multifunction device scanning in landscape mode, as it enables you to scan in landscape mode, but display in portrait mode.
All - will rotate all pages in the image.
FPO - will rotate the first page only.
FOP - will rotate follow on pages from the page number specified.
Rotate FPO/FOP (aka Rotate advanced) is an enhancement that can only be applied during the import/scan process (e.g. not via the Main Viewer's Enhance Wand).
The Using OCR option, dynamically tests each page of the document to see whether it was scanned with the text the correct way up. If not, the page will be flipped to appear the correct way up. If EzeScan cannot determine it will leave image in the orientation that was delivered from the scanner.
This option may not rotate a page that contains image/s with little text.
The Using BCR option, rotates the page to match the barcode label orientation. Requires the optional BCR module. If there are follow on pages in the document, they will be rotated to the same as the barcoded page.
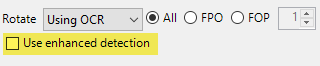
The Use Enhanced Detection check box binarises and auto-inverts the image prior to detection being run and may improve the result in some specific instances.
Default is unticked.
Binarise
This option is designed for use with grayscale and colour scanning. When the documents are processed EzeScan will automatically determine what pages are colour and what pages are black and white. EzeScan will then convert the pages it believes that are black and white to black and white and any grayscale or colour pages will remain as is.
The force option will force all images to become black and white.
Threshold
This option is related to the Binarise option. If the operator is finding that the "Auto" option is not aggressive or too aggressive in converting the pages to black and white, a custom colour count can be set. By default it is set to 33000, to test for a setting scan some documents and in the viewer of each page, right click and select properties.
Check the Unique Colours setting. This will display how many colours are on the page. When the operator has tested some pages it will give a general idea on what the threshold level should be set it.
Brightness
The brightness option will adjust the image to become brighter or darker. The values can be from -100 (darker) to 100 (lighter)
It is recommend to use this option for importing from file or folder only. If using a TWAIN / ISIS scanner please use the Brightness setting in the scan tab.
Remove extra separators
When scanning in duplex the separator page will appear as two images. This option will remove the extra separator image.
Resize images
This option will resize the image. A Paper size can be set. E.g. A3, A4 or a % ratio i.e. 50 or 200%. Please note that this option can decrease the image resolution.
Split
When the Split % option is set to a value greater than 0, then the image will be split into 2 images based on the value n entered.
When ticked the H (V=Checked) option will split an image vertically along a horizontal line n% down the image. When unticked it split an image horizontally along a vertically line n% across the image. This option is ideal for splitting a fanfold document back into individual pages.
Split Pages is an enhancement that can only be applied during the import/scan process. (e.g. not via the Main Viewer's Enhance Wand).
Re-order pages
This option will reorder the imported pages into EzeScan.
i.e. If 4 page booklet is selected and is scanned, the following will occur.
Page 2 becomes Page 1
Page 3 becomes Page 2
Page 4 becomes Page 3
Page 1 becomes Page 4
Re-order Pages is an enhancement that can only be applied during the import/scan process. (e.g. not via the Main Viewer's Enhance Wand).
Profiling Tab
This tab will allow the operator to select or modify the batch profiling settings.
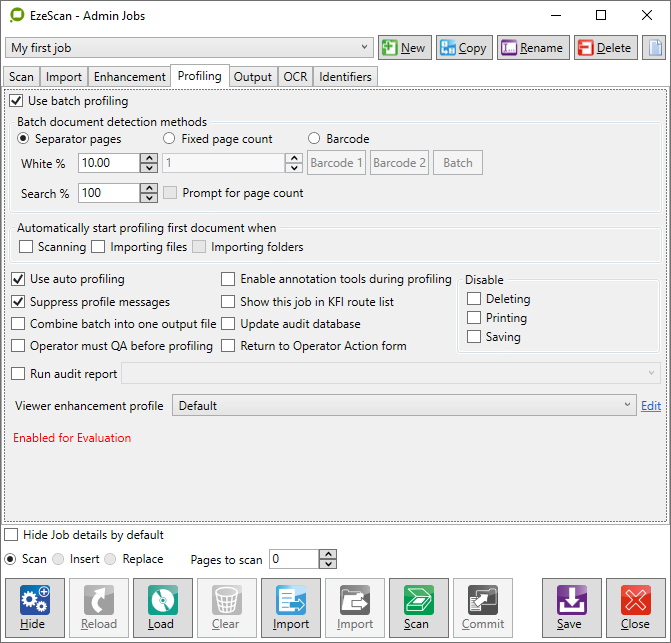
e.g. If the Job was a single page it could be set to a fixed page count of 1, or if the job is using barcodes it will be likely that it would be automated, so the operator could enable "Use auto profiling".
Use Batch Profiling
The following settings on the Scanner Operator Actions form will determine what mode of page detection is used during scanning:
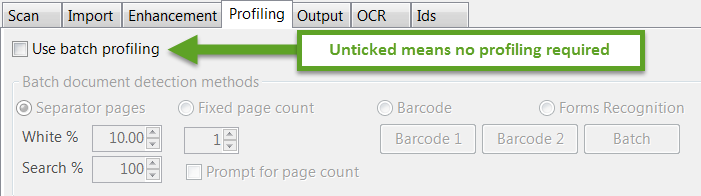
If Unticked, EzeScan will consider the file that has been opened contains just 1 document.
No detection of document start & finish pages using separator pages, fixed page count or barcodes will occur.
The thumbnail borders remain uncoloured in this mode.
Separator pages
In this mode, EzeScan will consider the file that has been opened and may contain multiple documents. EzeScan will run its separator page detection logic to attempt to locate the start & finish of documents in the file. Document page thumbnails are displayed with a yellow border, whilst separator pages have red borders.
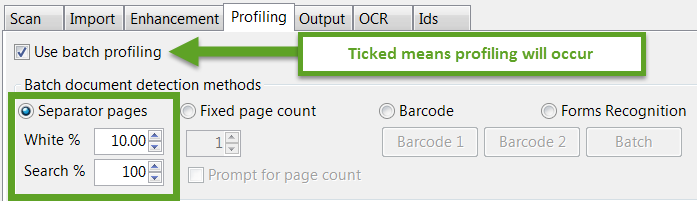
White Fill
Set this value to around 10% when using Black separator pages. We recommend using black separator pages rather than white separator pages. EzeScan will assume any value < 50% indicates that you will be using black separator pages. Any value >= 50% will be treated as using white separator pages. We suggest using 10% for black separators and 99.95% for white separators.
Percentage Search Area
This is the height and width of the search area to detect a separator page. E.g. if using a black separator page which has a white border, it would be recommended to set this to 90.
If you want to see what percentage of white pixels are on a page, simply select that page thumbnail and use the right mouse button Properties menu option to display this information.
Fixed Page Count
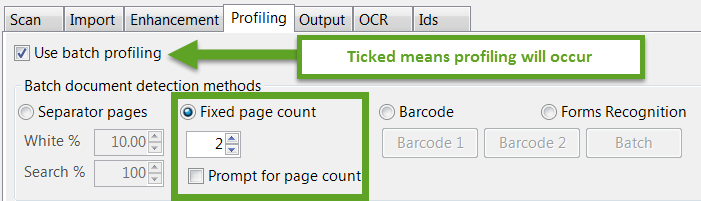
In this mode, EzeScan will consider the file that has been opened contains multiple documents. EzeScan will break the file into separate documents based on the fixed page count value.
Document page thumbnails in the first document are displayed with a yellow border.
The file is not expected to contain any separator pages.
The operator can double click on a page to add or remove it from the highlighted document set before it is profiled (please note that highlighted pages must be in sequence, with no gaps).
If the Prompt for page count box is ticked the operator will be prompted for the page count.
Barcode
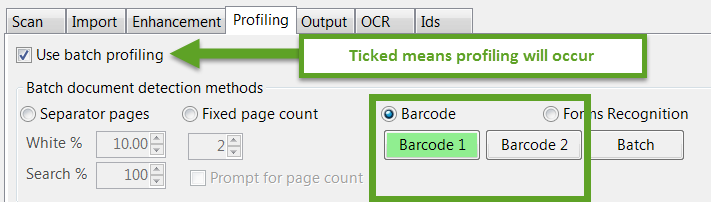
In this mode, EzeScan will expect the file that has been opened contains multiple documents.
Each document is expected to have 1 barcode somewhere on the first page of each document.
The first bar-coded document will have its pages shown in the thumbnails with yellow borders.
The file is not expected to contain any separator pages.
The operator can double click on a page to add or remove it from the highlighted document set before it is profiled.
If the document has two barcodes the Barcode 2 button can be used.
To distinguish between the two barcode values it is highly recommended that each barcode value is to have a unique prefix.
i.e. AA for Barcode 1 and BB for Barcode 2.
This way EzeScan will know which barcode is the first and second.
If using a batch barcoded cover sheet the Batch button can be used.
Barcode settings screen
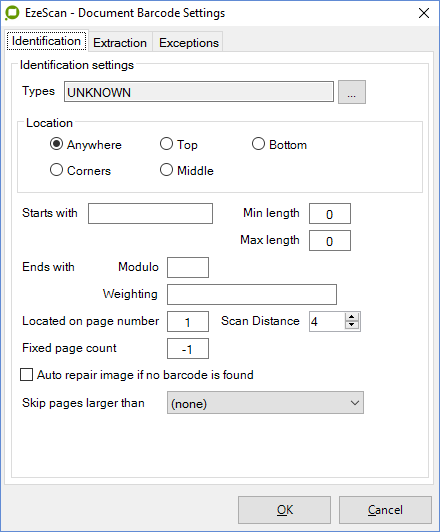
Identification Settings
Click on the Barcode 1 icon to display the barcode identification settings.
If you know the type of barcode simply select it from the pulldown list, otherwise leave the type as UNKNOWN and EzeScan will automatically detect the type for you.
Specific barcode fonts (if known) may be selected:
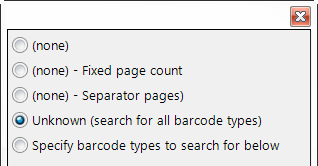
There are 26 different barcode fonts supported by EzeScan. They include:
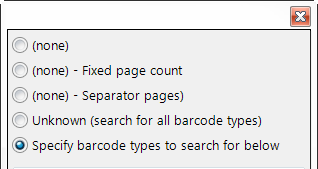
ADD 2
ADD 5
AUSTRALIAN POST 4 STATE OR AUSTRALIAN POST 4 STATE CUSTOM ALPHA OR AUSTRALIAN POST 4 STATE CUSTOM DIGITS
BCD MATRIX
CODABAR 2
CODE 128
CODE 32
CODE 39
CODE 39 EXTENDED
CODE 93
DATALOGIC 2 OF 5
DATAMATRIX
EAN 13
EAN 8
IATA 2 OF 5
INDUSTRY 2 OF 5
INTERLEAVED 2 OF 5
ONE CODE
PATCH CODE
PDF417
POSTNET
QR
ROYAL MAIL 4 STATE
UCC128/EAN128
UPCA
UPCE
Specifying the type of barcode and its location can dramatically help to speed up batch processing when barcodes are used as document separators. There are 5 options that can be used to specify where to look for the barcode on a page:
Anywhere
Top 1/3 of page
Middle 1/3 of page
Bottom 1/3 of page)
Corner (1/4 of the page, search order is TL, TR, BL, BR)
Location
Simply tick the location option that most accurately defines where you expect the barcode to be found on the scanned pages.

Starts With
If your barcode has certain prefix characters you can specify the string that the barcode must start with for it to be recognised by EzeScan

Min and Max Length
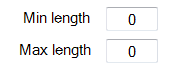
Use these options to specify the minimum and maximum length of the barcode value to be found.
EzeScan will ignore barcodes with values that are shorter than the minimum length or longer than the max length.
If a Min Length of 0 is specified then EzeScan will accept barcode values of any lengths not greater than the Max Length.
If a Max Length of 0 is specified then Routing will accept barcode values of any lengths not less than the minimum length.
If both values are set to 0 then EzeScan will accept any barcode value length.
Ends With

If using a barcode that contains a checksum character as its last character, EzeScan can check that the value is correct.
The operator will need to enter the modulo number and the weighting mask used to create the barcode.
If the modulo result calculated by EzeScan does not match the checksum value indicated by the last character in the barcode, EzeScan will ignore the barcode.
Located on page number

If the barcoded is on a page other than page one, then enter the page number it appears on in this field.
For example if each document had a barcode on page 2, then type 2 in this box.
Scan Distance
This defines the distance in pixels between line sweeps when searching for 1D barcodes.If barcodes are expected to be very short (vertical height) then reducing this value can improve the search results but at a cost of slower performance. The default value is 5 pixels.
Fixed Page Count

If the barcoded documents have a fixed page count, then simply enter the number of pages in the barcode fixed page count box shown below.
For example, if each barcoded document was 1 page long, then type 1 in this box.
If needing EzeScan to ignore barcodes of the same value on the next and following pages set this setting to 0. For example, if barcode value "0001" is on page 1 and page 2, and on page 3 the barcode is "0002" EzeScan would make page 1 and 2 a document.
Auto repair image if no barcode is found
Sometimes the quality of a barcode image may be of poor quality.Ticking this box (off by default) will make a 2nd pass will be made over the document to attempt a repair on the image, which may in turn find the barcode.

Skip Pages Larger Than
If processing images that may be larger than a certain size. (E.g. A3 and greater) and there will never be any barcodes on these pages then enable this setting. It will improve the recognition speed as it will not look for barcodes on these pages.
Extraction Settings

Use Column Mask
It is possible to extract 2 values from within the 1 barcode if required, provided that the values have a fixed filed length in the barcode.
Simply tick the Use Column Mask option and set the column field values to extract only those columns from the read barcode value.
Use Barcode Value as Filename
If you want the output file name of each bar-coded document to use the barcode value (12345678) as the filename (i.e. 12345678.tif) then simply tick the Use Barcode Value as Filename option.
Use Barcode Value as Sub Folder Name
If you want the output file name of each bar-coded document to use the barcode value (e.g. ACME) as the sub Folder name (i.e. \ACME\12345678.tif) then simply tick the Use Barcode Value as Sub Folder name option.
When used in conjunction with the OCR module to create text searchable pdf's, the barcode value produced by the BCR module is overlaid on top of the barcode in the text searchable pdf.
In some cases only a portion of the barcode may be required.
Write values into Job type CSV file
The Write values into job type CSV file option is used when processing PDF417 barcodes.
When ticked the field values read from the PDF417 barcode will be output in CSV file named as jobname.txt.
Barcode Text Delimiter
This will change the default PDF 417 delimiter to the delimiter specified.
Note: The default delimeter in a PDF417 font is a comma.
Exception Settings
When EzeScan is set to barcode mode, EzeScan checks the first page for a barcode.If the document does not have a barcode then it can be automatically routed to an exception folder.As this is an automated feature it will only work in import folder mode.If using Import file or the Scan button the operator will be at the EzeScan PC so the operator can manually correct the exception.
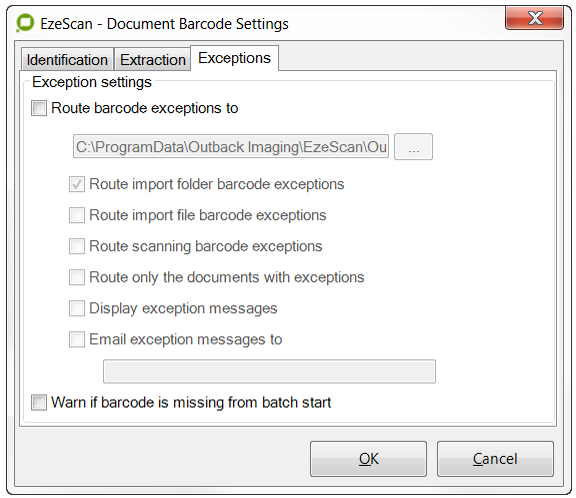
Route Barcode Exceptions To:
This is the folder location of where the barcode exception files are to be sent to.
Exceptions can be routed to this folder based on the import method used:
Route import folder barcode exceptions
Route import file barcode exceptions
Route scanning barcode exceptions
Display Exception Messages
Tick this to prompt the operator with an exception message.
Note: If running in an automated mode it is recommended to tick this off.
Email Exception Messages To:
This will send an email notification to the specified email address of a barcode exception. The file is not attached to the email.
Below is a sample notification message.
Job EzeScan - Barcodes: Doc (1) barcode 1 exception routed to C:\Program Files (x86)\Outback ImagingEzeScan\OutputEzeScan - BCR - Split + Name Files\Barcode1_Exceptions\ICR OMR - Auto Payment Form.tif
Batch Doc ID
When images are loaded into EzeScan, it can have a document counter of the number of documents in the batch. This is the Next Batch Doc ID. I.e. if 50 documents are scanned the Next Batch Doc ID will be 51
Automatically start to profile settings
This option will automatically press the Profile (F4) button for the job. Depending on the method used to scan / import the documents, the operator needs to select to enable.
e.g. If scanning the documents, the scanning checkbox needs to be ticked.
This option is designed for automated jobs that require no QA or operator intervention.
Use auto profiling
Auto profiling can only be enabled when Use Auto Naming is ticked (on the Output tab), and the values for Image Base Filename and Next Number have been entered (also on the Output tab).
When an operator is profiling a batch of documents the default is to use manual profiling. With manual profiling, the user is prompted to confirm the profiled document name for each document in the batch.
When Use Auto Profiling is ticked, the operator is initially prompted to confirm the starting profile image number for the document. Once that is entered/confirmed all of the documents in the batch are auto profiled without further operator intervention.
Suppress profile messages
When ticked this option forces the suppression of the informational profiling message boxes (such as 1 document profiled or Document stored as XYZ.TIF).
Error messages are not suppressed. If you tick this box it will substantially speed up batch profiling.
Combine batch into one output file
The Combine batch into 1 output file option can be used to consolidate the whole batch of documents into one output file.
When a batch is profiled and this option is ticked, the operator will be asked to enter the filename for the batch to append its documents to.
Operator must QA before profiling
When ticked this option forces the operator to QA every page in the batch (if Auto Naming & Auto Profiling are ticked) or every page in the first document (if only Auto Naming is ticked) before the Profile button (or press F4) is enabled for use.
Enable annotation tools during profiling
When ticked this option will automatically enable the annotation tool palette in the lower left hand corner of the Viewer window.
Show job type from KFI route list
When ticked this option will automatically show this job type from the list of available job types that are displayed using the KFI forms Route button.
Update audit database
When ticked this option forces EzeScan to write a new audit statistics row into the internal Audit Database for each document profiled by EzeScan.
This requires the separately licensed AUDIT module.
Return to Operator Action form
After all images have been profiled by the operator, EzeScan will display the Operator Action form. The operator can then begin scanning the next batch of documents.
This option does not work in Job Button mode.
Run Audit Report
This option will display the Audit Report screen after the batch is completed. It can be default to run a specific report.
This requires the separately licensed AUDIT module.
Disable Options
This option will allow for the Delete, Print and Save buttons to be disabled when an image is loaded in the viewer.
It greys them out in the toolbar:
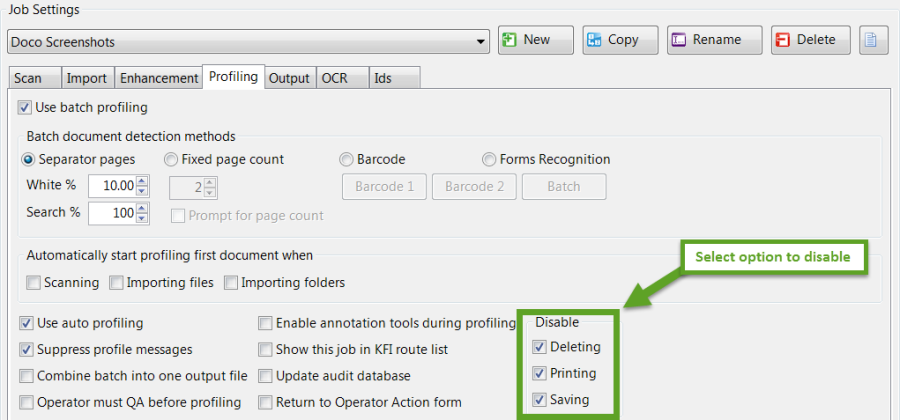

It also disables them if a KFI is used:

Output Tab
The output tab will allow the operator to apply where to save the scanned images e.g. to a folder, using a KFI or connecting directly to an EDRMS system.
The image file type, mark-up options and naming settings are also applied in this screen.
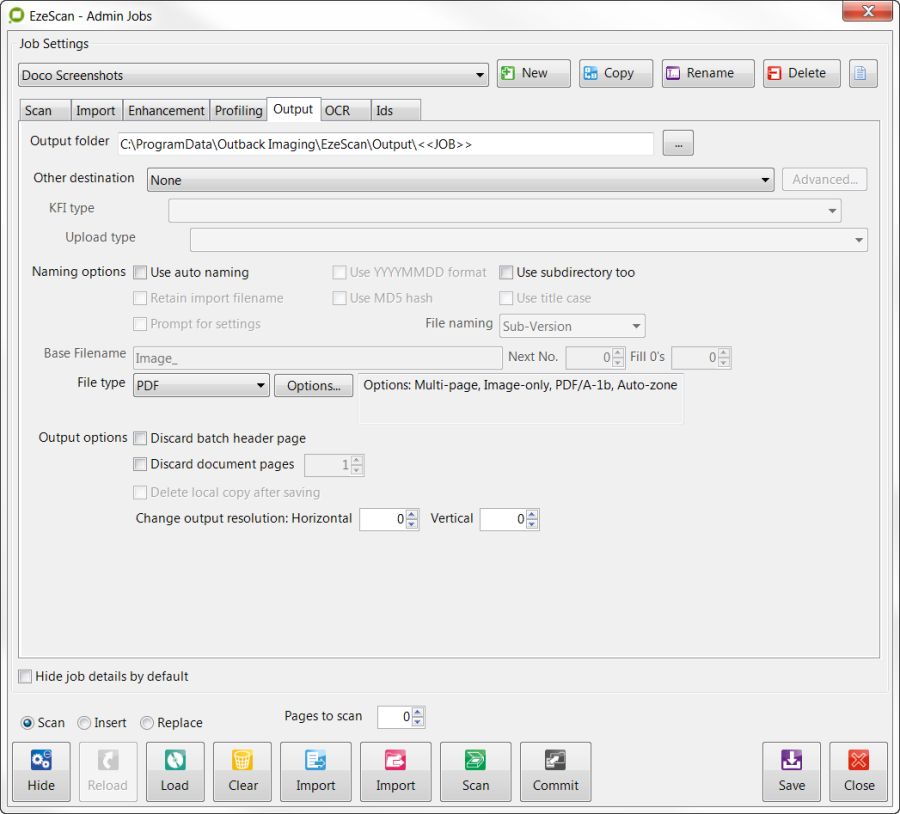
Output Folder
The Output Directory is the location where the output files produced by EzeScan are written.
It is typically the directory from which you will run your File Import, Input Queuing or Directory Monitoring utility that has been supplied with your EDRMS system.
These tools assist you to upload the EzeScan files into the EDRMS system.
The default setting is a folder which was created when the job was first created and saved; as shown below:

If you wish to map a different folder or create a new one then click the Output button and browse to where you want your output files to go:
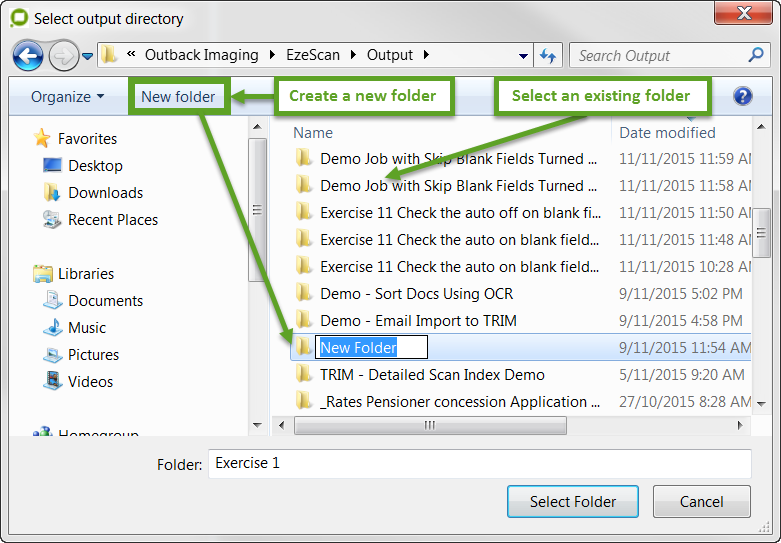
Click on the Select Folder button to select the selected output directory setting.
Other Destination

The core EzeScan PRO application includes the following destinations:
Some destinations require additional EzeScan Modules to be licensed.
None - (i.e. just use the default output directory)
In this mode, during Profile (or press F4) EzeScan will create output files (TIF, PDF) in the directory specified as the job type output directory.
The files remain in that directory until the operator transfers them somewhere else.
Append To Files/Create New Files
In this mode during Profile (or press F4) it allows the operator to selectively choose to either append the profiled document to an existing document, or create a new document.
The file type of the scanned document (TIF, PDF) must match the file type of the file being appended to (TIF, PDF).
Prepend To Files/Create New Files
In this mode during Profile (or press F4) it allows the operator to selectively choose to either prepend the profiled document to an existing document, or create a new document.
The file type of the scanned document (TIF, PDF) must match the file type of the file being prepended to (TIF, PDF).
Send output via an SMTP email.
Click the Advanced button to specify the email defaults.
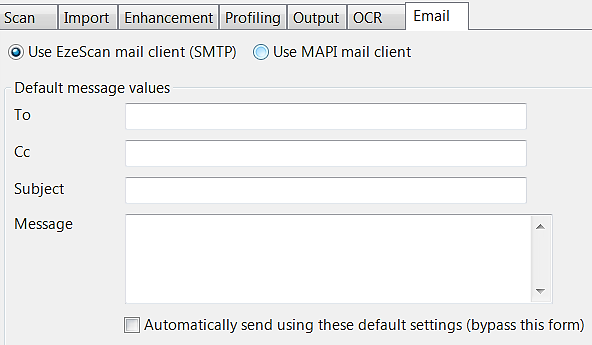
The operator has the option to use the EzeScan Mail Client or the MAPI client.
The operator can change the values in the To, CC, Subject and Message fields to suit their requirements.
The To: and CC: fields currently support only 1 email address per field.
If required any or all of these values can be altered when the Scan To Email function is run.
If you tick the Automatically Send Using These Default Settings option then EzeScan will send the email for you without requiring user intervention.
Press the Close button on the Email Output Settings form to return back to the Output Settings form.
FTP
Send output via FTP.
Click the Advanced button to specify the FTP output defaults.
Use this form to configure the FTP output destination default settings for the remote FTP Server where the output images created by EzeScan will be ftp'd.
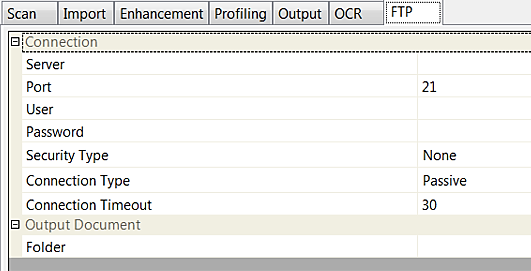
Press the Close button on the FTP Output Settings form to return back to the Output Settings form.
SFTP
Send output via Secure FTP.
Click the Advanced button to specify the SFTP output defaults.
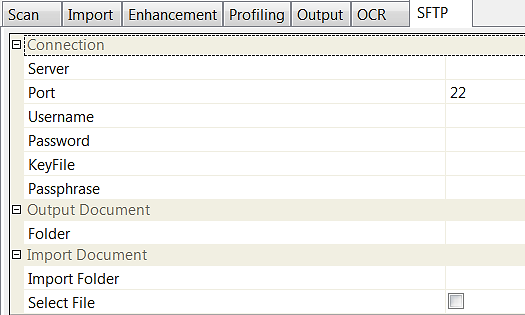
Use this form to configure the SFTP output destination default settings for the remote SFTP Server where the output images created by EzeScan will be ftp'd.
Press the Close button on the SFTP Output Settings form to return back to the Output Settings form.
Output Options available with additional EzeScan Modules
The additional EzeScan modules add the following destinations:
Key From Image (KFI)
During Profile (or press F4) EzeScan will launch one of its Key From Image forms for data entry purposes. KFI is not included with the base EzeScan package but can be purchased as an additional module.
For information relating to the use of KFI please refer to the separate Key from Image User Guide Addendum.
Micro Focus Content Manager
In this mode, during Profile (or press F4) EzeScan will create output files in the directory specified as the job type output directory.
As each output file is written to the output directory EzeScan will launch a profile form, thereby allowing the user to save the document into the EDRMS system.
The integration requires a fully installed and operational version of MFCM client software installed on the PC.
Please refer to the Connector User Guides Micros Focus Content Manager User Guide available from the EzeScan Help Menu to access all the respective documentation.
Alfresco
In this mode, during Profile (or press F4) EzeScan will create output files in the directory specified as the job type output directory.
As each output file is written to the output directory EzeScan will launch an Alfresco profile form.
Please refer to the Connector User Guides Alfresco User Guide available from the EzeScan Help Menu to access all the Alfresco documentation.
DocuShare
In this mode, during Profile (or press F4) EzeScan will create output files in the directory specified as the job type output directory.
As each output file is written to the output directory EzeScan will launch a DocuShare profile form, thereby allowing the user to save the document into the EDRMS system.
Please refer to the Connector User Guides DocuShare User Guide available from the EzeScan Help Menu to access all the DocuShare documentation.
eDocs 5.x/6.x (Hummingbird DM)
In this mode, during Profile (or press F4) EzeScan will create output files in the directory specified as the job type output directory.
As each output file is written to the output directory EzeScan will launch an eDOCS profile form.
Please refer to the Connector User Guides eDocs 5 User Guide available from the EzeScan Help Menu to access all the eDocs 5 documentation.
InfoRouter
In this mode, during Profile (or press F4) EzeScan will create output files in the directory specified as the job type output directory.
As each output file is written to the output directory EzeScan will launch an InfoRouter profile form.
Please refer to the Connector User Guides InfoRouter User Guide available from the EzeScan Help Menu to access all the InfoRouter documentation.
MAGIQ Documents
In this mode, during Profile (or press F4) EzeScan will create output files in the directory specified as the job type output directory.
As each output file is written to the output directory EzeScan will launch an MAGIQ Documents profile form.
Please refer to the Connector User Guides MAGIQ Documents User Guide available from the EzeScan Help Menu to access all the MAGIQ Documents documentation.
Laserfiche
In this mode, during Profile (or press F4) EzeScan will create output files in the directory specified as the job type output directory.
As each output file is written to the output directory EzeScan will launch a Laserfiche profile form.
Please refer to the Connector User Guides Laserfiche User Guide available from the EzeScan Help Menu to access all the Laserfiche documentation.
OpenText Content Server
In this mode, during Profile (or press F4) EzeScan will create output files in the directory specified as the job type output directory.
As each output file is written to the output directory EzeScan will launch an OpenText profile form.
Please refer to the Connector User Guides OpenText Content Server User Guide available from the EzeScan Help Menu to access all the OpenText Content Server documentation.
WinTalk (Objective)
In this mode, during Profile (or press F4) EzeScan will create output files in the directory specified as the job type output directory.
As each output file is written to the output directory EzeScan will launch a WintTalk (Objective) profile form.
Please refer to the Connector User Guides Objective ECM User Guide available from the EzeScan Help Menu to access all the Objective ECM documentation.
SharePoint
In this mode, during Profile (or press F4) EzeScan will create output files in the directory specified as the job type output directory. As each output file is written to the output directory EzeScan will launch a SharePoint profile form.
Please refer to the Connector User Guides SharePoint User Guide available from the EzeScan Help Menu to access all the SharePoint documentation.
SharePoint 2013
Please refer to the Connector User Guides SharePoint User Guide available from the EzeScan Help Menu to access all the SharePoint documentation.
SharePoint 2016
Please refer to the Connector User Guides SharePoint User Guide available from the EzeScan Help Menu to access all the SharePoint documentation.
TechnologyOne ECM
In this mode, during Profile (or press F4) EzeScan will create output files in the directory specified as the job type output directory. As each output file is written to the output directory EzeScan will launch an ECM Save Document screen, thereby allowing the user to save the document into the EDRMS system. The integration requires the DAS client to be installed on the EzeScan PC.
Please refer to the Connector User Guides SharePoint User Guide available from the EzeScan Help Menu to access all the SharePoint documentation.
Therefore
In this mode, during Profile (or press F4) EzeScan will create output files in the directory specified as the job type output directory. As each output file is written to the output directory EzeScan will launch Therefore Save Document screen, thereby allowing the user to save the document into the EDRMS system.
Please refer to the Connector User Guides Therefore User Guide available from the EzeScan Help Menu to access all the Therefore documentation.
WebDAV
In this mode, during Profile (or press F4) EzeScan will create output files in the directory specified as the job type output directory. As each output file is written to the output directory EzeScan will launch a WebDAV session with the target WebDAV Compliant EDRMS system. The operator will be able to select the WebDAV folder and put a title of the image. EzeScan uses its own inbuilt WebDAV client to connect to the WebDAV EDRMS system.
Click on the Advanced tab to set-up:
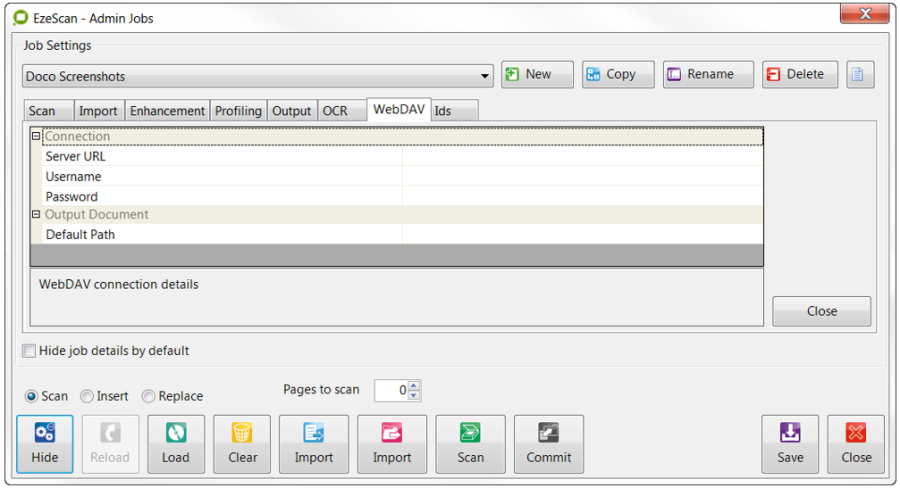
Server URL This option should be set to the WebDAV server and path.
Username This option is for the WebDAV user credentials
Password This option is for the WebDAV password credentials
Default Path Check this option if the operator wishes to select different folder whilst scanning through a batch. If this option is unchecked EzeScan will store to the folder specified in the WebDAV Server option above.
Below is the WebDAV browse screen that will display when this option is enabled.
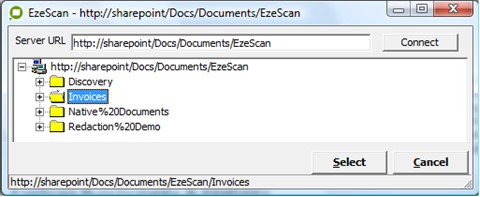
WorkSite
In this mode, during Profile (or press F4) EzeScan will create output files in the directory specified as the job type output directory. As each output file is written to the output directory EzeScan will launch a WorkSite profile form, thereby allowing the user to save the document into the WorkSite EDRMS system.
The integration requires either WorkSite; FileSite or MailSite client to be installed on the EzeScan PC.
Please refer to the Connector User Guides WorkSite User Guide available from the EzeScan Help Menu to access all the SharePoint documentation.
Configuration of the settings for each of the above additonal output types is performed using the Advanced button.
Available KFI Types
Please refer to the KFI User Guide on setting up KFI job types. The information below is a brief outline only.
When the KFI Mode has been selected the list box below will become enabled.
The list contains the names of all of the KFI type definitions that have created using the Admin->KFI form.
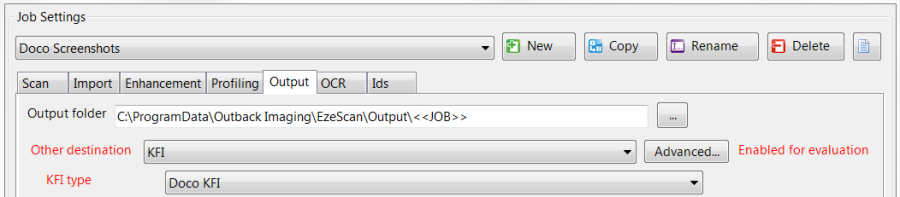
Advanced tab - Allow Change of KFI
Clicking on the advanced button will allow the operator to change to another KFI during profiling.
Clicking on the advanced tab will display this box
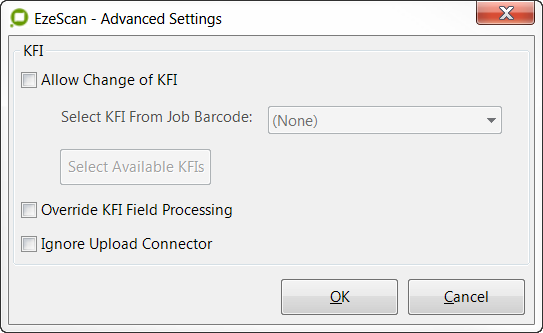
If using an UPLOAD (with the KFI) it must be specified in the Output Tab in the KFI admin form.
Available Upload Types
Please refer to the UPLOAD User Guide on setting up KFI job types. The information below is a brief outline only.
When the KFI destination has been selected this list box will become enabled.
The list contains the names of all of the UPLOAD type definitions that have been created using the Admin > Upload form.
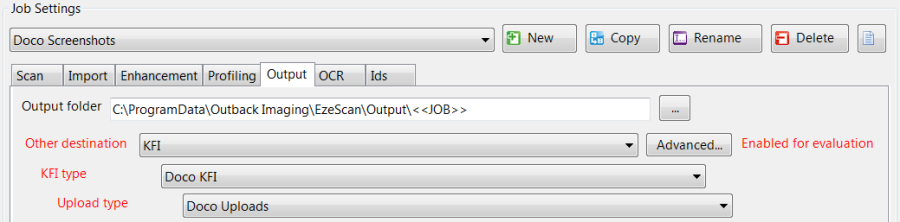
Naming Options
Use Auto Naming
Ticking the Use Auto Naming box will enable the Image Base Filename and Next Number fields.
The "Base Filename" is set to Image_ by default.
These fields allow the user to enter default values that are used by EzeScan to construct the filenames used when saving images during profiling.
Please refer to the next 2 sections for more details. Auto Naming is available in both document and batch scanning modes.
Retain Import Filename
Ticking the Retain Import Filename box will use the imported filename as the output filename.
This assumes that separate input and output directories have been configured for the job type. It also assumes that the input documents contain only 1 document per file.
Prompt for Settings
When enabled, this will prompt the operator to select the Output folder, Image base filename and Image Next Number.
If no changes are required, the operator will click OK.The default output folder, base filename and next number options can all be preconfigured from the Job, Output tab.
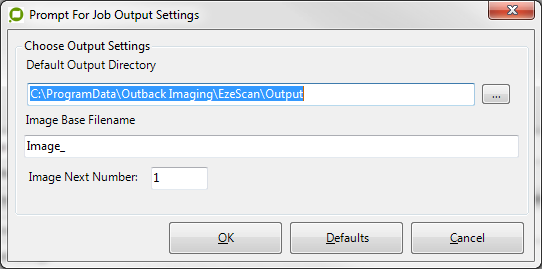
Use YYYYMMDD
When Use YYYYMMDD is ticked, the Image Base Filename value is automatically set by EzeScan with today's date in "YYYYMMDD_" format.
At the start of each days scanning, the Image Next No will be automatically reset to start from 1 for that day.
Use Title Case
When Use Title Case is ticked the output filename will be forced to "Title case" format.
Use MD5 Hash
Tick this to enable the filename to be converted to an MD5# format.
A MD5# value cannot be un-hashed.
Use Subdirectory too
When Use Subdirectory Too is ticked EzeScan will attempt to create the same subdirectory structure in its output directory, as existed in the import folder directory.
Use Title Case
When Use Title Case is ticked EzeScan will force the use of title case
File Naming
When EzeScan is naming the saved file the operator can select three options:
Overwrite: If a file exists in the output folder it will be overwritten with the current file.
Sub-Version: If a file exists in the output folder a sub version of the file name will be created. i.e. if Image_1.tif exists EzeScan will name the current file Image_1(1).tif
Prompt: If a file exists, EzeScan will display a prompt which will notify the operator that the file exists and to use a different file name.
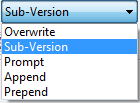
Base Filename
This option is only enabled if you have ticked the Use Auto Naming tick box. In addition you must also enter a number in the Next Number field.
If you enter image base filename of Image_ and a next number of 1, then your images will be auto named during profiling as Image_1.Tif, Image_2.Tif, Image_3.Tif and so on. These file names will be used during either manual or auto profiling.
Using Image Base Filename with Use Auto Naming is optional, whereas using Next Number is mandatory. Leave this field blank if you are using the KFI indexing filed values to name the output file.
Next No.
This option is only enabled if you have ticked the Use Auto Naming tick box
If you enter a next number of 1, then your images will be auto named during profiling as 1.Tif, 2.Tif, 3.Tif and so on.
If you have also entered an image base filename of Image_, then your images will be auto named during profiling as Image_1.Tif, Image_2.Tif, Image_3.Tif and so on.
These file names will be used during either manual or auto profiling
Using Next Number with Use Auto Naming is mandatory, whereas using Image Base Filename is optional. Set this field to 0 fi you are using the KFI indexing filed values to name the output file.
Fill 0's
Specify the number of zero's to right fill the next number value.
For example if you specified 8, then the images will be named as image_00000001.tif, rather than image_1.tif.
Or simply leave the Image Base Filename value blank and your images would be output as 00000001.tif.
Fill Zero's is only enabled when Use Auto Naming is ticked.
Setting the File Types
File Type
EzeScan can save the document in the following formats. TIF, PDF, BMP, GIF, JPG, JP2, PNG, DOC, DOCX, RTF, TXT, XLS, XLSXFor extended output options click the Options button.

Output Image "Options" Button
This allows the operator to set the options which are compatible with the selected file type (see above list) created by the output process. Different settings and tasks may be set to run on the output document.
Please refer to the points below for a description on all the options.
TIFF Options
Uncompressed Colour - By default colour images scanned by EzeScan are saved as a TIF using JPEG compression.
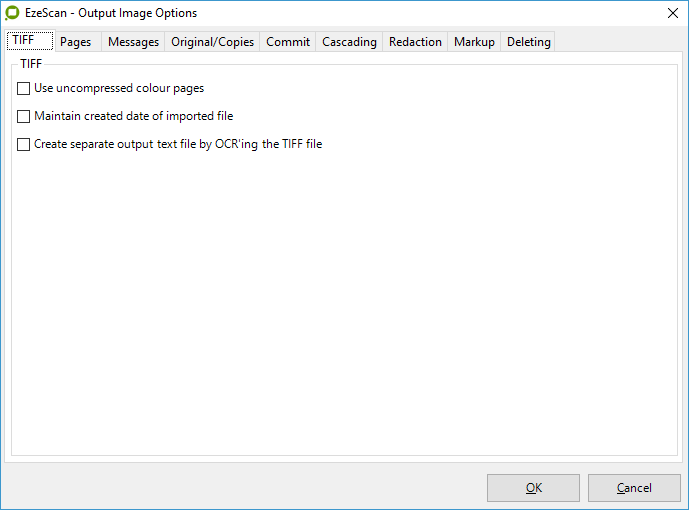
Some EDRMS systems only support colour TIFS that are uncompressed.
Use of is option is not recommended for most recent EDRMS systems.
It is recommended to leave this option unticked, unless you specifically have the EDRMS problem mentioned above.
Maintain Created Date - This option will keep the created date of the import file to the output file.
Create Separate Output Text File by OCR'ing the TIF File - This option will create a text file which will contain the OCR output data.
Please note - this option will only work with Single Page Tiff output.
PDF Options

PDF Format | Default is PDF 1.4 Save PDFs using this format. We only recommend using the PDF/A options when long term archival is required. The available options are:
|
Text Searchable | This option is used to create Text Searchable PDF's. There are a number of factors that can affect the accuracy of the text placed in the PDF. They include image quality, image resolution, image brightness, image contrast, image orientation, image skew, image fonts, and image graphics. It is the responsibility of the person(s) using EzeScan to review the text searchable PDF's created by the EzeScan to ensure that they are suitable for their intended use. Ticking this option will display another tab called OCR where the OCR specific settings can be applied. Please see below for these options. |
Pass through original PDF pages | This will ignore OCR on pages that already contain a text layer, for example digitally born or pre-scanned PDF documents with a text layer. It will retain that layer and pass it through to the output PDF. Please note that any page changes such as erasing or annotations will not be applied to the page. |
Include original PDF document metadata | This will keep the original imported PDF properties. |
JPEG Quality | This will adjust the quality of the image. It can be adjusted from 1 (lowest) to 100 (highest) lowering the quality will create a smaller PDF image. This option will only work with grayscale or colour documents. |
Fast Open | This option will allow the PDF to open faster when viewing from a web page. |
Insert Settings in PDF Keywords | This will save the scanner and enhancement settings into the PDF Keywords. e.g. Keywords: (ES=Dskw Normal; Dspk 1x1) |
Protected | This option will allow the PDF to be password protected. |
Owner Password | This will open the document without any restrictions. |
User Password | This will allow the document to be opened but copying and printing will be restricted. |
OCR Options
The OCR (Optical Character Recognition) function is only available with the PDF option, when the "Text Searchable" box has been ticked.
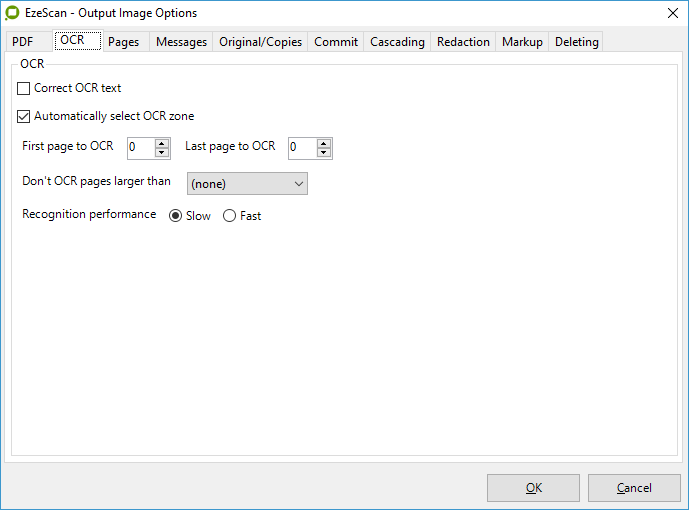
Correct OCR Text - This option is used to allow the operator to correct OCR'ed text before it is placed into the text searchable PDF.
When a high level of OCR text accuracy is required, this option should be ticked.
By default this option is turned off.
Automatically Select the OCR Zone - When ticked this option forces the EzeScan OCR process to automatically find text and graphics in each image, so that only the text areas are OCR'ed into text.
When un-ticked the operator will be shown a window from which they can draw areas where they want the OCR to occur.
By default this option is turned on.
First Page to OCR/Last Page to OCR - This will allow the operator to define which page range of the image to OCR. This option is recommended for specific use case scenarios where explicitly required.
Don't OCR pages larger than - When using multiple size originals it can be quite time consuming to convert large size pages to contain a text layer. Setting this option to a setting such as A3 will tell EzeScan to OCR pages of sizes A3 and smaller only.
Recognition Performance - Slow or Fast.
Setting to slow will give better OCR results but will take longer to OCR each page.
Pages
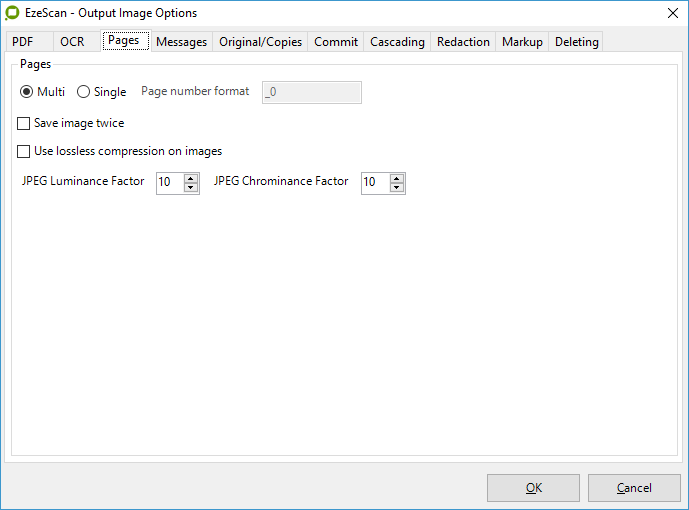
Multi - Save the image in Multi Page Format
Single - Save the image in Single Page Format
Page Number Format - When saved as single page TIF a suffix to the filename can be applied.
Save Image Twice - When enabled the operator will press F4 (or profile icon) twice.
For example the operator may need to save the document into two locations or perform annotations on one version but not the other.
This option is also used with the KFI feature "Second KFI" in the KFI Output Tab. Please refer to the EzeScan KFI user guide for more information.
Use lossless compression on images - option forces EzeScan to save colour images in a larger lossless image format, not JPEG.
JPEG Luminance/Chrominance Factor
JPEG Luminance and Chrominance Factor settings can be adjusted to reduce the output file size of any colour page, using JPEG compression.
Please note: Adjusting these settings may affect the image quality.
Luminane: 0-255(10 Higher, 24 Medium, 50 Lower Quality)
Chrominance:0-255(10 Higher, 30 Medium, 50 Lower Quality)
Messages
Display Output Document Count at Job Completion - EzeScan will display a screen of how many documents have been processed for the current batch. For example:
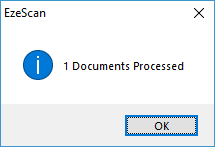
Display EDRMS Record Number Message - This option will display a screen of the saved record number of the document that has just been profiled into the EDRMS.
Optional Prefix - This option will allow the operator to put a pre-defined prefix to be displayed with the saved record number.
Please note: This option will only work with the EzeScan native EDRMS connectors.
Print EDRMS record numbers as barcodes - This option will display the barcode print screen after a document is profiled into the EDRMS.
Please note: This feature requires that Suppress Profile Messages in the Profiling Tab is un-ticked and this only works with the TRIM EDRMS System.
Display File Properties Dialog After Save - When the image processing has been completed the file properties dialog will appear for the newly created file.
Display Prompt to Save Document Again - EzeScan will display a prompt to the operator asking if to keep the document so it can be re-profiled.
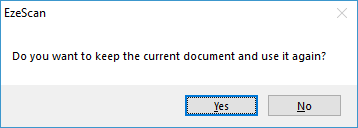
Original/Copies
Output a copy of the original imported document - will copy the file from the scanned image or import folder to the specified folder.
Output the original imported document only - will output the originally imported document (unmodified).
This option works with import file and folder processing only.
Retain the original document's filename - will retain the filename of the imported document. i.e. the name of the file before EzeScan imports it.
Output a copy of the output document to - will output a 2nd copy of the output file to the specified folder.
Include Output Subfolders - will include any sub folders that are created when saving the output document.
Only available when the "Output a copy of the output document to" option has been selected.
If another import file of the same name is imported / copied, it will overwrite the previous file in this specified output folder.
Commit (Document)
This feature will move files from an output folder to a secondary folder. The secondary folder is regarded as the final location.In EzeScan you may have multiple jobs pointing to an output folder. A Commit job can be created to move all these files from this output folder to another folder.
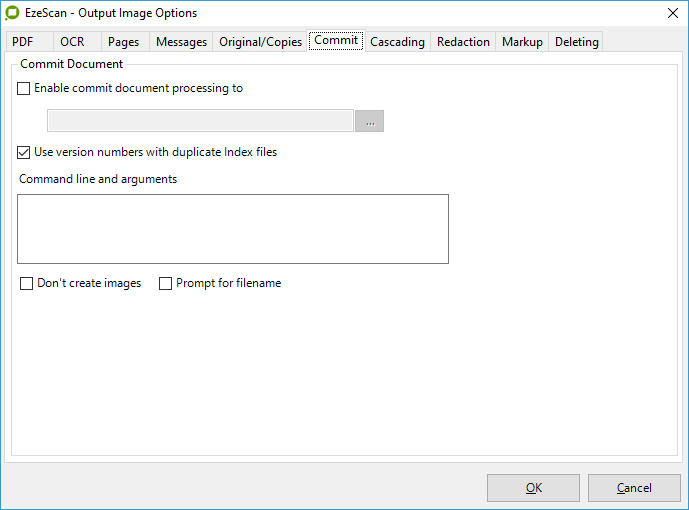
When creating a commit Job the operator should tick off
Enable Scanner Processing - on the Scan tab
Enable Import File Processing and Enable Import Folder Processing - on the Import tab
Enable commit document processing to - will allow the nomination of which folder location the committed files are to be copied to.
By default this is set to:
C:\ProgramData\Outback ImagingEzeScan\Output\<<Job>>\Commit
The following message displays when files are moved to the Commit folder.
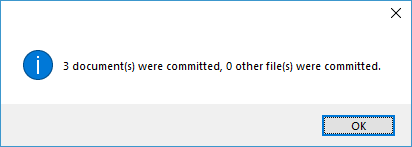
Command Line and Arguments - If the commit files are required to be in a zip format a command line can be run from here to perform this task.
i.e. PKZIP can be used to do this.
Please note: PKZIP is a separately purchased product.
The operator could also specify another command to be run.
Use version number with duplicate Index files - If an index files exists in the Commit folder EzeScan will append a version to the name. i.e. index(2).txt
Don't Create Images - Tick this option if a command line is being used.
Prompt for File Name - When using the command line option (i.e. PKZIP) EzeScan can prompt the operator for a filename.
Cascading
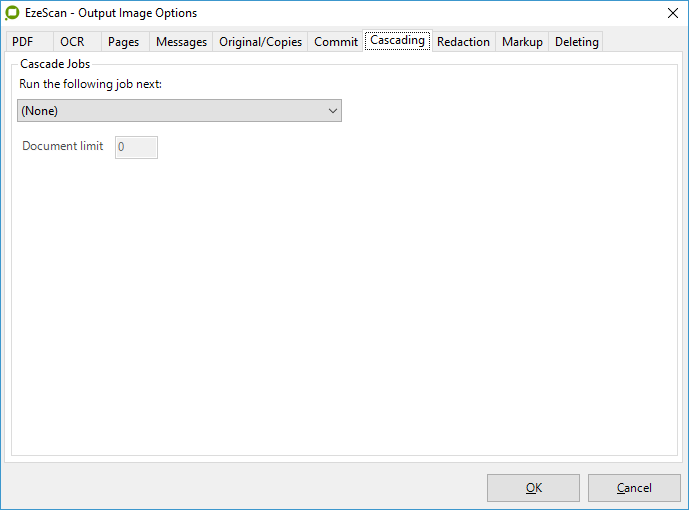
This option will allow the operator to have EzeScan run another job after the current job is completed.
Run the Following Job Next - After the current job has finished processing, EzeScan will automatically move to the next job specified in the drop down list.
The diagram below provides an example.On the cascading tab of Job1 the operator would select Job 2;Job 2 would have Job 3 selectedYou could even send Job 3 to Job 1 thus creating a never ending cycle.
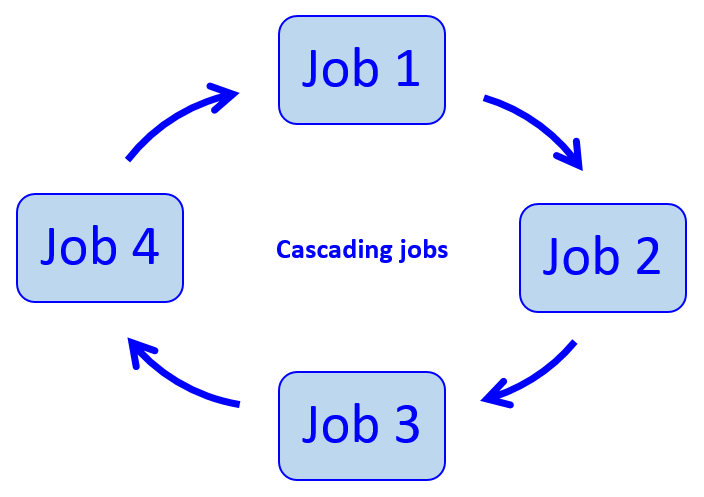
This feature will only work with jobs set to Import Folder Processing mode.
Run the Following Job Next - After the current job has finished processing, EzeScan will automatically move to the next job specified in the drop down list.
Doc Limit - EzeScan will only process the X amount of documents for the job and then will move onto the next job.
Set to 0 to ignore this option.
Redaction Options
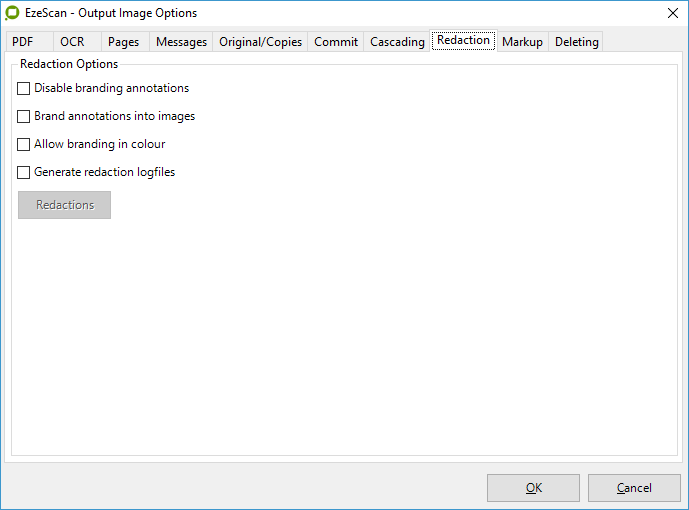
Disable branding annotations - will disable any branding into the image.
Even if the "Brand annotations into images" option (below) is ticked.
Brand annotations into images - will automatically brand any applied annotations onto the image prior to the KFI form being displayed.
Allow Branding in Colour - will allow annotations to be burnt into the images as colour.
This will increase the image size of the output file.
Generate Redaction Log files - will save a log file of the redactions.
The log file will be saved in XML format to the same folder as the output document.
The name is suffixed with “_RedactionLog” to differentiate it from KFI XML output.
Requires “Brand annotations into images” option be enabled.
Markup
This page allows the operator to add a Mark into the image. e.g. Scanned By, Date, Time.
A basic or advanced mark-up can be applied.
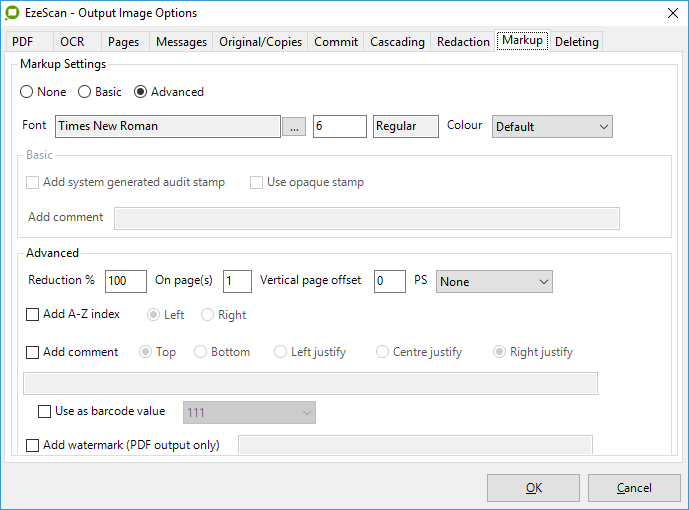
Font - will allow the operator to choose the Font, Size, Font Style and colour of the mark-up.
Please Note: The colour of the mark-up is only designed for the watermark option.Basic SettingsAdd system generated audit stamp - will add an audit stamp during the EzeScan Profile process(Scanned By: Username On DD/MM/YYYY hh:mm:ss) to the top left hand corner of the first page of each scanned output image.This audit stamp is permanently burnt into the files.This option may be used with or without the Add Audit Comment feature.
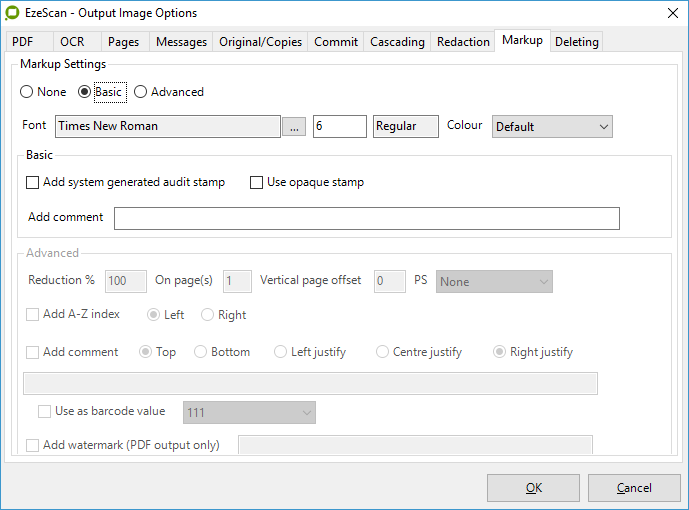
Add Comment text box - allows the addition of a customised comment.
This will appear at the end of the audit stamp string.
Below is a sample Basic Audit Stamp with a comment.
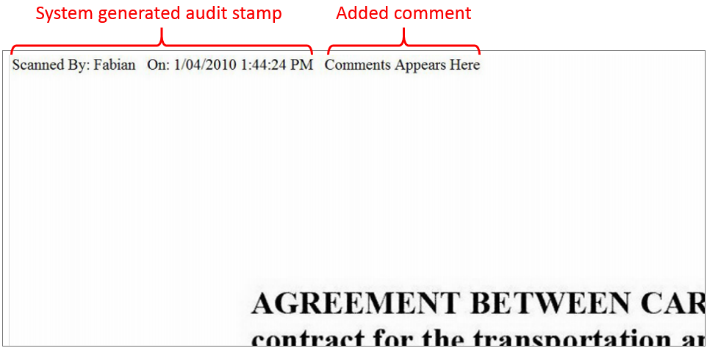
Advanced Settings
The advanced mark-up options allow the operator to specify more custom options to the image.
Reduction - allows the image to be shrunk by the specified percentage.
On page(s) - Enter 0 for all pages or a page number for a specific page.
Vertical page offset - This will drop the image down by the amount of pixels specified.
i.e. if placing the mark-up on the top of the page there could be many instances of company logos and the mark-up will not appear.
PS - will force the output size of the image to a specified Page size.
The page sizes available are Legal, Letter, A5, A4, A3, A2, A1, A0
Add A-Z index - will add an A-Z index across the left or right side of the page.
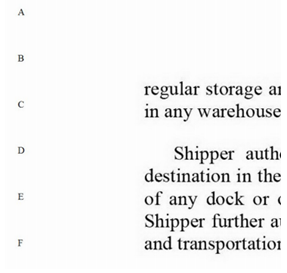
Add comment - This option is similar to the basic Audit Stamp Comment.
The operator can customise it further with more information e.g. a System of Function Placeholder.
In the example below we are using the <<S5>> (number of pages in doc) placeholder.

The completed document will look like this.

The operator also has the option to put the page number on the document.
The placeholder for this is <<PAGENBR>>
If the page numbering need to start from a specific value a KFI field value could be passed which will allow the operator to enter the value to start from.
For example is Field 1 was the page number the value for the comment would be <<=F1+PAGENBR>>
If the operator needed to add 0's as a suffix then the comment would be <<=F1+PAGENBR,00>> e.g. where the number of zero's is how many to suffix.
Please refer to System Placeholders for more information.
The KFI module is a seperately licensed module.
Add watermark (PDF output only) - will place a watermark into the image.
The watermark appears on the top and bottom of the page, and also appears on a 45 degree angle in the middle of the page.
Deleting
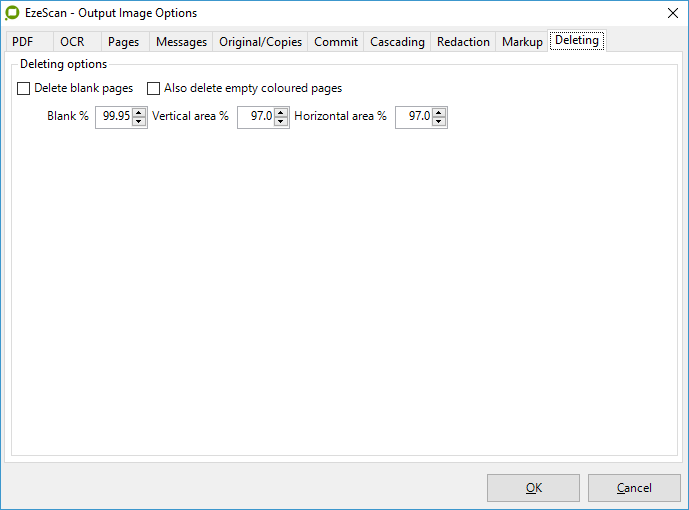
This option when ticked will allow EzeScan to remove blank pages during the output of the document. This setting is really only recommended if blank pages must be visible in the QA process. If not then it is recommended to use the delete blank pages setting in the enhancement tab.
Output Options
Discard batch header page
This option is only intended to be used in conjunction with barcoded separator pages.
When ticked this option will force EzeScan to delete the batch cover page for the scanned batch.
Discard document pages
This option is only intended to be used in conjunction with barcoded separator pages.
When ticked this option will force EzeScan to discard the first page of each document as it is profiled.
Delete local copy after saving
This option is only enabled when using an EDRMS system or passing to the KFI Module.
After the document is profiled, it is removed from the EzeScan output directory.
Change output resolution: Horizontal \ Vertical
When you enter "non zero" values in these horizontal and vertical density fields, during Profile EzeScan will write out the image at the specified Horizontal and Vertical resolutions.
When these density values are set to 0 and 0 the file is written with the same resolution as it was scanned \ imported.
OCR tab
This tab allows the operator to adjust OCR specific settings. It is recommended that the "EzeScan OCR Advanced" Recognition Engine is used.
This form allows the EzeScan operator to choose between 3 OCR Engines.

EzeScan OCR
EzeScan OCR Advanced
OmniPage OCR is available only if the workstation has OmniPage Pro version 16 & 17 installed.
Please Note: OmniPage Pro is not supplied with EzeScan.
OCR recognition engine
Select from the drop down list which OCR Engine to use.
We recommend using "EzeScan OCR Advanced".
Confidence threshold (%)
This options allows you to adjust the OCR Engine 1 Confidence threshold. It is normally set to 90%.
When used in conjunction with the OCR Corrections form it determines how many OCR characters will be displayed as questionable (i.e. highlighted in yellow) to the operator.
Languages
This option specifies which language dictionary to use to perform the OCR.
Use existing PDF Text
This option will skip performing OCR on the page for if the source page is from a PDF with a text layer. For example a PDF that has been digitally created, e.g. from Word > PDF.
Discard page OCR results when percentage of questionable characters is greater than
Tick this option to force EzeScan to discard the OCR text for the current page when creating text searchable DF's.
For example if there were 30% questionable characters read from page, then the resulting OCR text output may not be accurate enough for search purposes. In such cases it makes sense to discard that pages' OCR text and not place it in the text searchable PDF.
It is always the operator's responsibility to ensure that the outputted OCR text accuracy is acceptable.
Discard questionable words
Tick this option to force EzeScan to discard the OCR text for each OCR'ed word that has a lower confidence threshold than what is specified in the confidence threshold value on this tab.
Therefore when OCR errors occur on the page of text, those words will be removed from the index used to create text searchable PDF's.
Prompt whether to ad-hoc OCR each document during profiling
If you tick this option, automated OCR during profiling will occur.
In this case as each document is profiled, the operator will be asked whether to OCR the document, and then to perform OCR on the document and verify the OCR output text.
The OCR text is either placed on the clipboard for cut and paste reuse with other applications.
If you don't tick this option, you can still run adhoc OCR by pressing the OCR button on the EzeScan toolbar.
When enabled EzeScan will do the following.
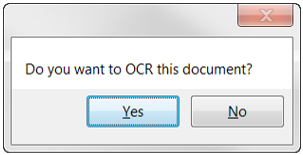
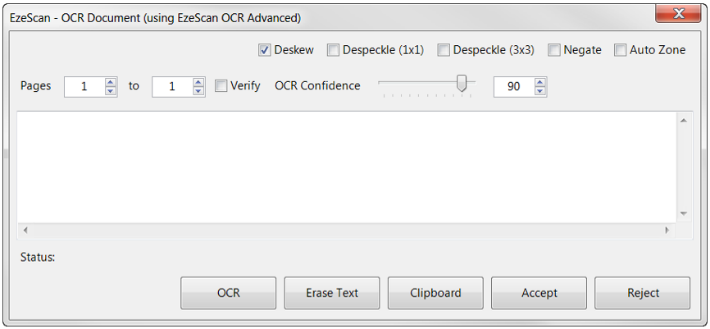
The operator presses the OCR button and a form displays that allows the operator to define zones on the each page where OCR should be performed as follows:
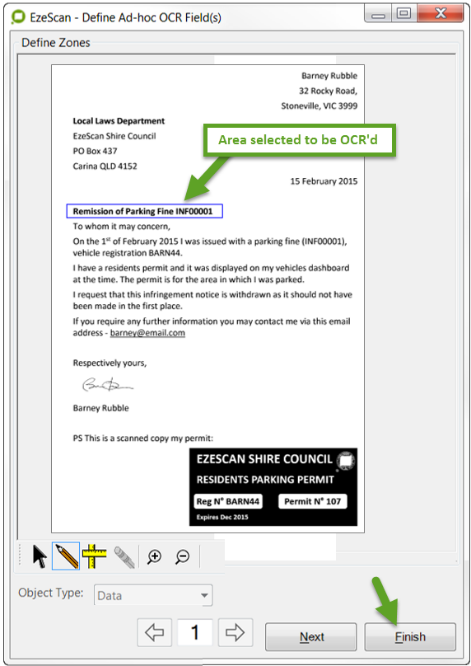
This step is repeated for each page in the document
Click Finish to continue
When the OCR is completed the OCR results are displayed as follows:
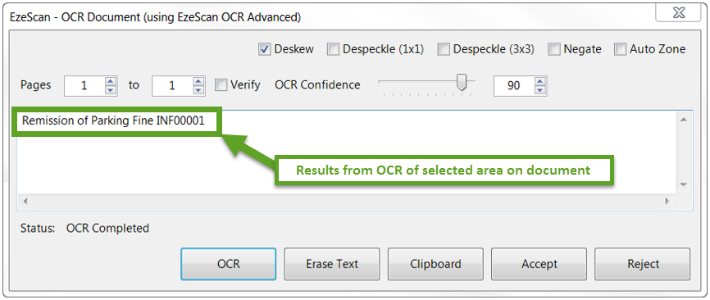
The operator can select to apply image enhancement options such as deskew, despeckle (1x1), despeckle (3 x3), negate and remove black border.
And then simply press the OCR button again to redisplay the new results.
The operator can select to OCR all pages, or just pages 1-1, skip page 2, and then 3-4.
The OCR results from each OCR are simply added to the bottom of the OCR text window.
The Erase Text button will clear the OCR text window.
The Copy Clipboard button will copy the OCR text to the clipboard from where it may be cut and pasted into other windows applications.
The Accept button will force EzeScan to create an OCR output file in the default output directory named Image_OCR_1.txt.
This file can be used by other windows application. It is also used by the EzeScan TRIM integration to populate the TRIM Notes field. It then closes this window.
The Reject button will discard the OCR text and close this window.
The sample document shown OCR'ed here was scanned at 300 dpi. Scanning at 300 dpi can help to improve OCR recognition results.
The accuracy of the OCR process is dependent of many variables such as image quality, image darkness and font types.Due to the large variation in these parameters it is impossible to quote an expected OCR accuracy figure.
Identifiers Tab
The Identifiers tab - used for managing the generation of (scanning) batch numbers
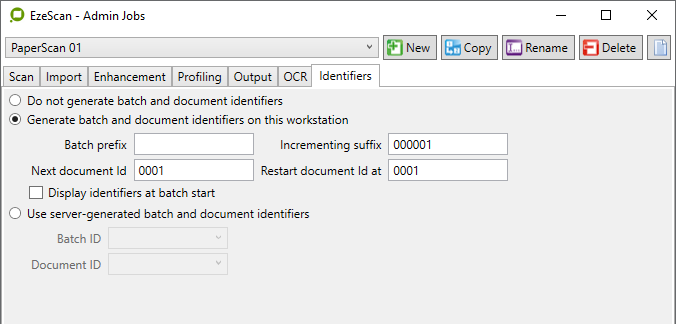
Generate batch identifiers
Use the Radio buttons to activate the batch numbering process.
Batch Prefix
The name to be given to the batches. This can be an alpha numeric value and is fixed for each batch.
Placeholders (<<S10>> or <<(Batch Prefix)>>)
Incrementing suffix
Enter a batch suffix numeric value. This will increment by 1 as batches are processed.
Placeholders (<<S11>> or <<(Batch Suffix)>>)
Next Document ID
During batch processing the next batch document ID will be used (e.g. 0002). This number can both increment and decrement depending on how many documents are in a batch.
Placeholders (<<S13>> or <<(Batch Doc ID)>>)
Restart Document ID at
The document ID will always begin with this number when a new batch is started. Typically this would be set to something like 0001 for the first document of a batch.
Display identifiers at batch start
Tick the box to display a batch identifier message before the start of a new batch to be scanned.
Use Server Generated Batch and Document Identifiers
Select if choosing to use global counters from an EzeScan Authority Web Server.
The counters to use are then chosen from the two dropdowns.
The Server Batch ID and Document ID must exist on the Web Server, additionally the Web Server needs to be configured in the EzeScan "Main Viewer | Workstation Options | Config | Authority Server URL"
Naming Example using Job identifier placeholders.
<<(Date Processed)(yyyy-mm-dd)>> <<(Batch Prefix)>>-<<(Batch Suffix)>>_<<(Batch Doc ID)>>
2021-08-23 A-000285_0001.pdf
2021-08-23 A-000285_0002.pdf
2021-08-23 A-000286_0001.pdf
2021-08-23 A-000286_0002.pdf
2021-08-23 A-000286_0003.pdf
2021-08-23 A-000287_0001.pdf
2021-08-23 A-000287_0002.pdf
Scanning / Importing and Profiling Images
When scanning is performed using either the Operator Action Form or the Job Button Interface can be used.
In the example below we will be using the Operator Action Form.
Press the F2 shortcut key OR use the File > Scan > Scan & Import Jobs menu option OR press the Scan toolbar button.
The following form displays:
The default EzeScan Scan screen
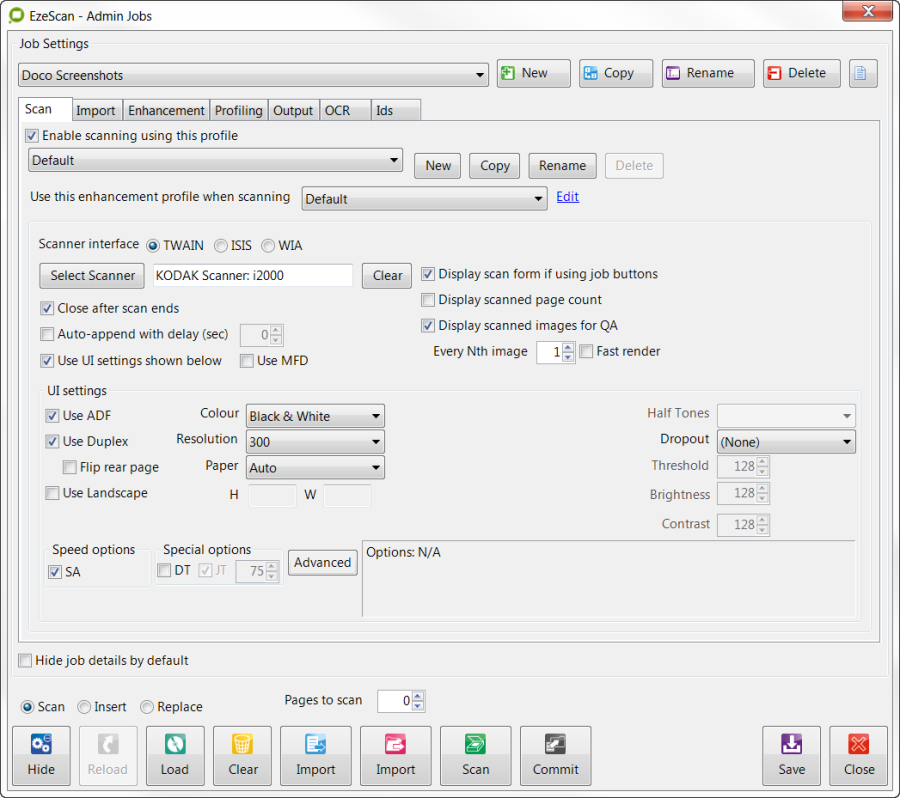
Tips
When EzeScan is first installed it is preconfigured with one scanning job type called _Default.
This job type is setup to scan batches using black separator pages between each of the documents in the batch.
The settings on the Scan, Import, Enhancement, Profiling, Output, and OCR tabs have been preconfigured with sensible default values.
Therefore this is a good job to base new ones on.
Initial Setup
The first step is to create and name the EzeScan Job.
Press the F6 Shortcut key or select the Admin menu and select Jobs
In the Admin Jobs form Click New and name your job accordingly
Click Save.
Selecting the Scanner
EzeScan can utilise the scanner TWAIN / ISIS interface. This saves the operator having to use the vendor settings for each scan as EzeScan can have them all set as default.
Before the scanner is used with EzeScan, please make sure that the vendor supplied application is installed and works ok.
If the scanner is not TWAIN or ISIS compliant it may be have options to save documents to a network path. Please see the Using a Network Scanner section on page for information on importing files.
Before scanning commences the operator must select the appropriate scanner.
EzeScan can support multiple scanners connected to one workstation.

On the Scan tab press the Select Scanner button.
The following Scanner selection form displays:
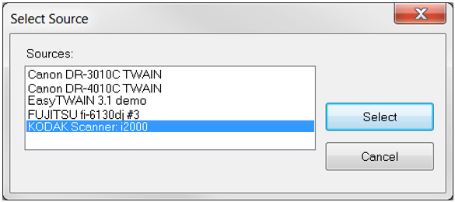
Select which compatible scanner you wish to use.
Don't select a Scanner that starts with WIA. WIA drivers aren't intended for use with EzeScan.
Click on the Select button.
You are now returned back to Operator Actions form, where your scanner is now selected.
Scanner has been selected
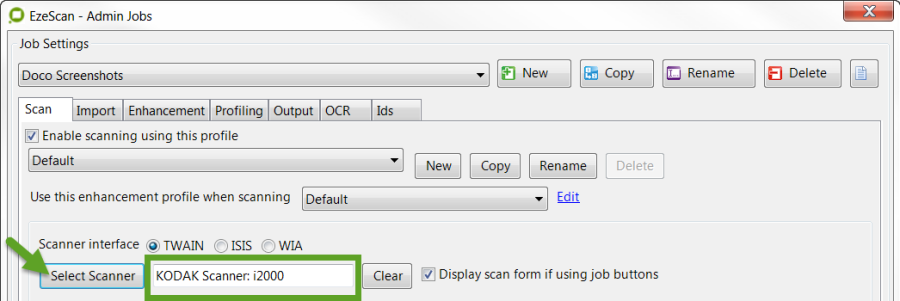
Setting the other scanning options
The default settings will usually allow you to scan documents.
If your scanner has an ADF (Automatic Document Feeder) then:
Tick the Use ADF option on the UI Settings panel.
It is also advisable to tick SA if scanning multiple documents through the ADF. SA (Scan Ahead) will automatically feed the 2nd and rest of the documents in the feeder.
Setting the paper size to Auto is also good practice. This saves the operator having to setup a separate job for different paper sizes, as when the scanner is set to Auto it will auto detect the page size when being scanned.
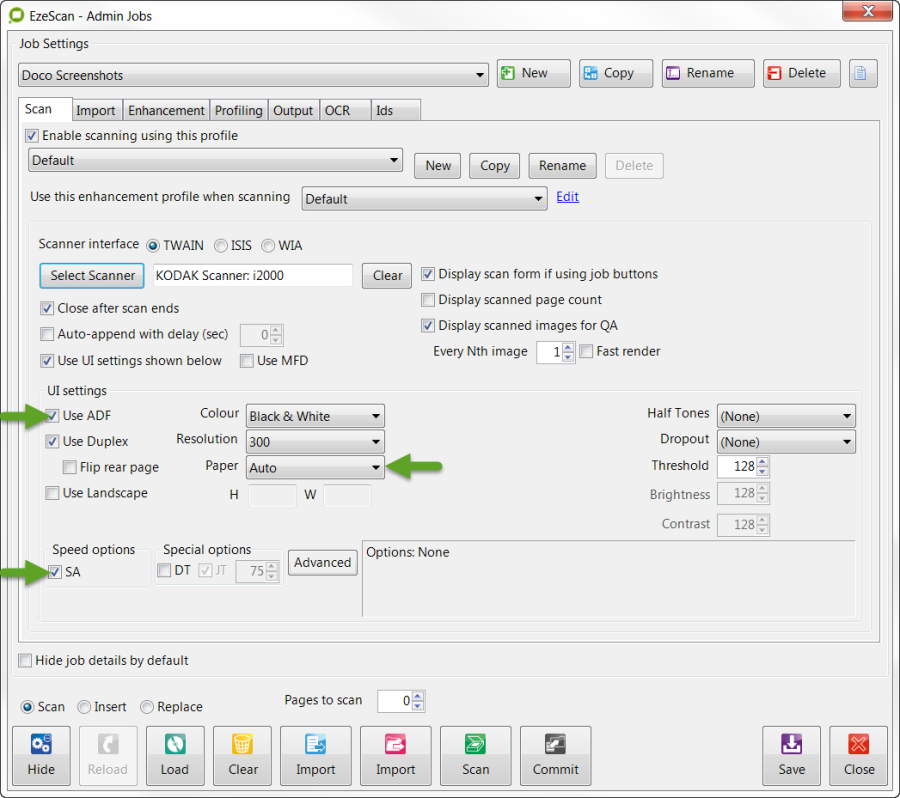
Selecting basic scanning options
Using a Network Scanner
If the scanner is not TWAIN or ISIS compliant, it will most likely have the ability to scan to a network path. In this instance the Scan option is not used in EzeScan.
As the files reside on a network location, EzeScan will import the images.
Select the Import tab, Click the button and choose the import folder. (this is where the scanner is saving the images)

EzeScan can be configured to import images two ways.

Import File - When selecting a file to import, EzeScan will prompt the operator to select a file in the defined Import Folder.
EzeScan will also keep the image in the import folder after profiling is completed.
Its main use is to import files for demo or test purposes.
Import Folder - When selecting a folder to import, EzeScan will not prompt the operator for a file.
EzeScan will simply import the oldest file in the defined import folder and will remove the image as soon as it is imported into the EzeScan viewer.
If the operator closes the document before prompting, EzeScan will display a prompt to release the file back into the import folder
There are two buttons available for these import types.
Profile Settings
The following settings on the F6 Admin Jobs > Profiling tab will determine what mode of page detection is used during scanning:
There are four scanning modes as follows:
1 - Document scanning, no page separation detection
In this mode, EzeScan will consider that the scanned pages represent just 1 document.
No detection of document start & finish pages using separator pages or fixed page count will occur. The thumbnail borders remain uncoloured in this mode.
You may use File > Save, File > Save As or Profile F4 to save the document in the default output directory.
2 - Batch scanning, using separator pages
In this mode, EzeScan will consider that the scanned pages may contain multiple documents.
EzeScan will run its separator page detection logic to attempt to locate the start & finish of documents in the batch.
Document page thumbnails are displayed with a yellow border, whilst separator pages have red borders.
A % Fill can be set. If using a black separator page set this to 10%, if using a white separator page set this to 99.70%.
If using white separator pages it is advised to test your documents before setting a % fill level
The operator must use Profile F4 to process the batch of documents and save each document in the default output directory.
3 - Batch scanning, using a fixed page count
In this mode, EzeScan will consider that the batch of scanned pages contains multiple documents. EzeScan will break the scanned pages into separate documents based on the fixed page count value.
Document page thumbnails in the first document are displayed with a yellow border. The batch is not expected to contain any separator pages.
The operator can double click on a page to add or remove it from the highlighted document set before it is profiled.
The operator must use Profile F4 to process the batch of documents and save each document in the default output directory.
4 - Batch scanning, using bar-coded documents
In this mode, EzeScan will expect the file that has been opened contains multiple documents.
Each document is expected to have 1 barcode (label or pre-printed) somewhere on the first page of the document or use a barcode cover sheet.
The first bar-coded document will have its pages shown in the thumbnails with yellow borders.
The file is not expected to contain any separator pages.
The operator can double click on a page to add or remove it from the highlighted document set before it is profiled.
The operator must use Profile F4 to process the batch of documents and save each document in the default output directory.
This option requires the additional Barcode Module.
Refer to the Profiling Tab - Barcode section on page for further details about setting up barcode separators.
Output Settings
Output Location - default
By default EzeScan will pre-select an output folder on a new job. It is created in a certain location on the client PC C drive which will include the job name.
The default path is…
C:\ProgramData\Outback ImagingEzeScan\Output{color}<<Job>>
A new folder will be created when the user clicks on save (replacing the <<Job>> with the new folder)
For example…
C:\ProgramData\Outback ImagingEzeScan\Output{color}My Job
Output Location - user defined
You can also select your own output location. In the output tab, specify the output folder of where the images will be saved to.Click on the button and navigate to the desired location to output the files


Base filename - user defined
The base filename can be changed and can also have a number sequentially generated per job. If required change to your naming requirements.

If the name of the file is going to be different for every image then untick Use Auto Naming. EzeScan will prompt the operator to name the file for each image.

In the File Type specify the file format the image is to be saved as.

If searchable PDF is required, tick the Options button and select Text Searchable.
Scanning a batch of documents
Take your batch of documents and place a black separator page between each document (In the Profiling Tab for your job confirm it is set to Separator Pages)
The simplest way to create a black separator page is to lift the lid on your photocopier and press copy, and out pops a black sheet of paper.
Alternatively black paper can be purchased from an office supplies company.
Place the batch in the scanner ADF the right way up.
In this worked example we are scanning 11 pages consisting of
Document 1 (4 pages),
Separator page,
Document 2 (2 pages),
Separator page,
Document 3 (3 pages).
Then press the Scan Button or if using a network scanner the Import Folder Button.
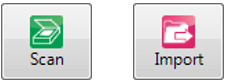
EzeScan scans all 11 pages, and loads the first 5 of 11 pages into the thumbnails.
It auto detects the first separator (black paper) and Document 1 is now ready to be profiled.
EzeScan viewer screen with thumbnails on LH side
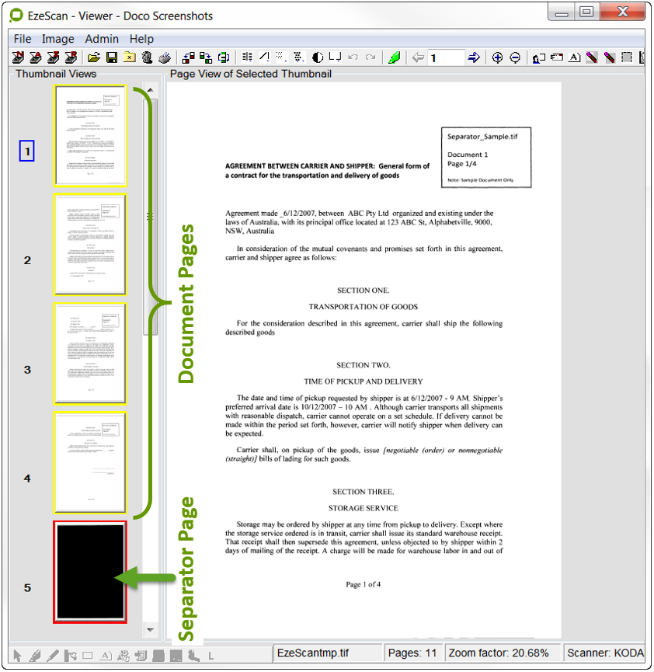
The image is loaded into EzeScan.
The left-hand pane shows thumbnail views of the first 5 of 11 pages in this batch document.
The right hand pane is the viewer window where the selected thumbnail displays
the thumbnail number with the blue box - eg 1
The thumbnails highlighted in yellow are the document pages.
The thumbnail highlighted in red is the separator page.
EzeScan has automatically detected the separator.
The operator can click on each page, to QA it, up to the separator page.
By using black separator pages there is no confusion as to whether a page is a separator or not.
The operator can right click on the viewed image and select from a number of image options including deskew, despeckle, negative, scale to gray, rotate, zoom, copy and undo.
These options allow the operator to view the image to make sure that it meets their QA requirements.
The operator can right click on the thumbnail and select from a number of image options including rotate all pages, select all, append, delete, insert, replace, make separator, and clear separator.
These options allow the operator to rotate pages scanned in upside down, and to delete and replace pages in the image as required.
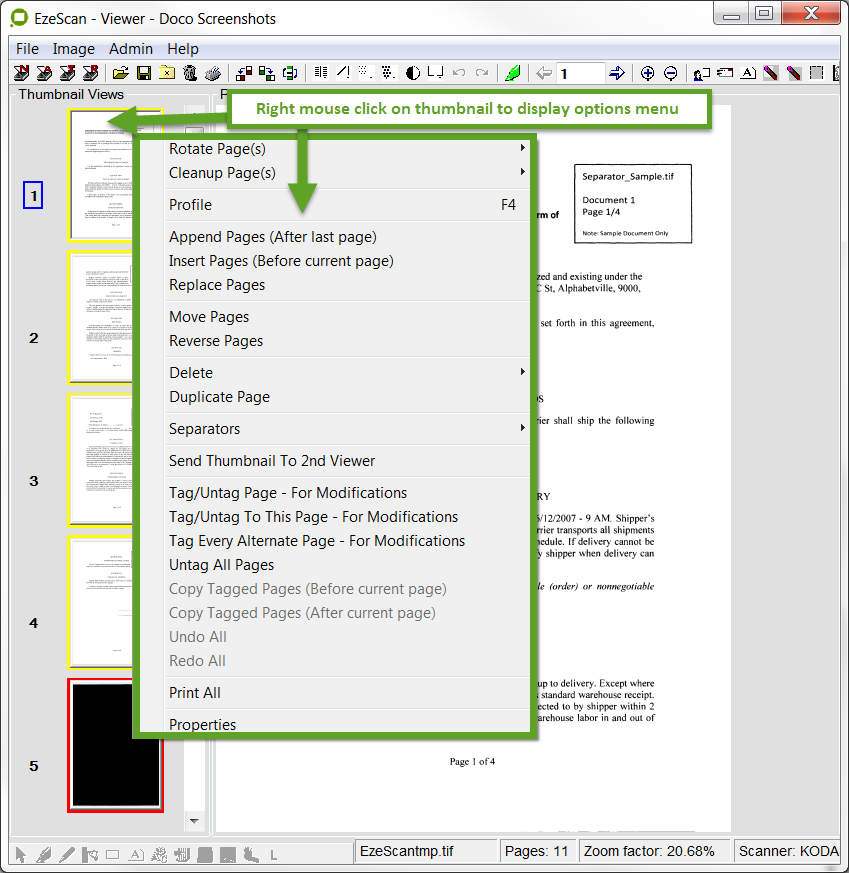
Right mouse click on the image to view operator options
Assuming images 1-4 are okay, you can now profile these pages as a separate document by pressing F4.
EzeScan automatically saves the first document from the batch and places it into the output directory (as configured on the Input/Output tab on the Operator Action form).
After saving the document EzeScan then removes 5 pages (4 pages + 1 separator) from the displayed image.
It renumbers the old pages 6-11 as 1-6.
It then auto detects the next separator page.
The operator can now see document 2 (2 pages) and its separator page.
Note how easy it is to profile when you use black separator pages.
The 2 pages above the separator will be processed next. Black separator page is deleted by process
The operator can click on each thumbnail and see the image clearly displayed in the viewer pane.
Use the F4 shortcut key or press the Profile icon to profile this second document.
After saving the document. EzeScan then removes 3 pages (2 pages + 1 separator) from the displayed image.
It renumbers the old pages 1-6 as 1-4 and auto detects the next separator page.
The operator can see document 3 (3 pages).

The last set of pages is then profiled. The above example has profiled 3 separate documents
The operator can click on each thumbnail and see the image clearly displayed in the viewer pane.
Use the F4 shortcut key or press the Profile icon to profile this third document.
After saving the document. EzeScan then removes 3 pages from the displayed image. There are no more images left in the set. EzeScan will return to the main viewer screen.
Check the output folder specified for this job and the images will appear in there.
Increasing Profiling Throughput
There are several ways to increase the throughput of the EzeScan application.
Auto Profiling
The first is to enable the Auto Profiling option on the Operator Actions forms job type Profiling tab.
When Auto Profiling is enabled we recommend that you always confirm that the output files have been correctly produced by EzeScan. It is the scanner operators' responsibility to do this.
Tick the Use auto profiling box on the Profiling tabThis automatically re presses the F4 shortcut key for the operator to profile the next http://document.It should be used with care, as in Auto Profile mode the operator is relying 100% on EzeScan's ability to locate batch documents based on the current job type settings. If you incorrectly set the job type settings then you may not get the results from Auto Profiling that you expected.
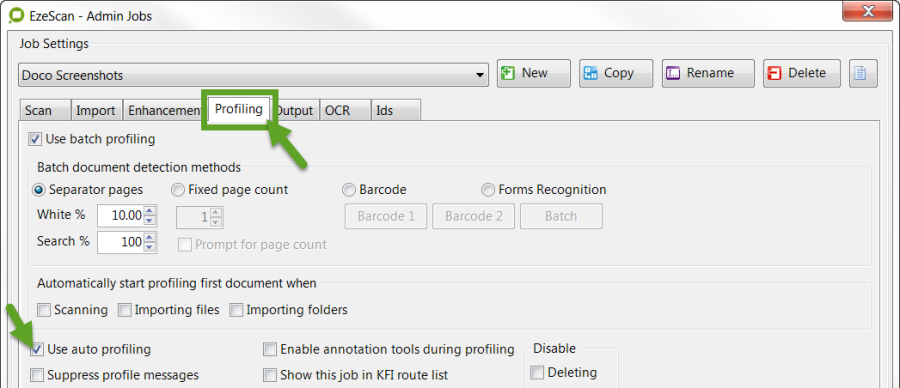
Suppress Profile Messages
The second is to enable the Suppress Profile Messages option on the Operator Actions forms job type Profiling tab.
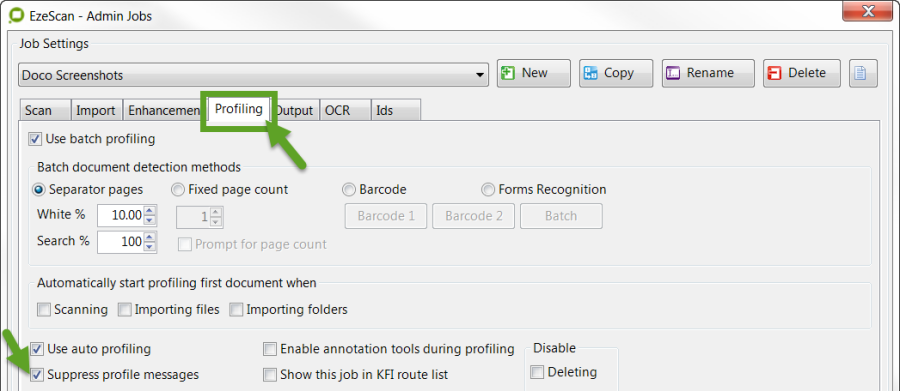
Select the Supress Profile Messages checkbox. EzeScan will discard the following messages it normally displays to the operator as each document is profiled.
Whilst informational messages are suppressed, error messages are never suppressed.
Viewer
Full Page Panel
The right hand panel contains a large rendition of the image that has been most recently selected in Thumbnail Panel.
Image editing and viewing operations such as rotation, deskew, despeckle and zoom, can be performed on the image in the Full Page Panel.
When you right click your mouse button anywhere over the Full Page Panel, a menu of commands that can be actioned only against the Full Page Panel will be displayed.
Full Page Panel Pop-up Menu
EzeScan provides a pop-up menu for image editing operations on objects loaded into the Full Page Panel.
Press the right hand mouse button over an image in the Full Page Panel. The following menu will be displayed:
The following tables explains each of these functions:
Menu Option | Description |
|---|---|
Rotate | This option rotates the current image in the Full Page Panel. There are 4 predefined rotation options:  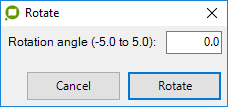
|
Clean-up-> | 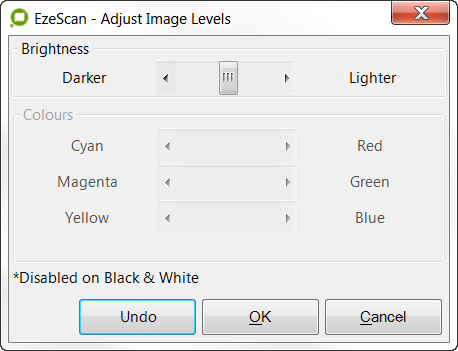 This option is used to adjust the brightness on greyscale and colour images. |
Clean-up > | EzeScan will look at the amount of colour pixels on the image and automatically decide if the image is black and white or colour. If it thinks it is a black and white image it will convert to black and white, if not it will leave the image as is. |
Clean-up > | This option will force a colour image into a grayscale image. |
Clean-up > | This option will force a colour or grayscale image into a black and white image. |
Clean-up > | This option is used to correct a scanned image that is slightly skewed. |
Clean-up > | This function is used to eliminate noise or small black areas in a document image. |
Clean-up > | This function is used to eliminate noise or small black areas in a document image. |
Clean-up > | 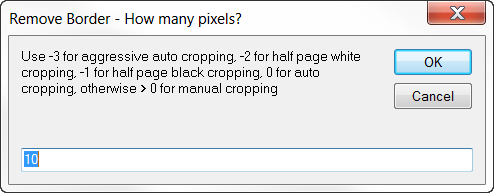 This function is used to remove a border of specified size from the outer edge in a document image. It is useful for removing black border areas from around the outside edges of documents. The following screen is displayed to allow the operator to select the number of pixels to remove. |
Negative | This option converts the image into its negative. |
Mirror | This option mirrors the image around a vertical axis. |
Resize | This option resizes the image to a pre-defined paper size (legal, letter, A0-A5) or by a resize percentage (e.g. 50,200) |
Edit > Copy Full Page To Clipboard |  This option will copy the image into the Clipboard. It can then be pasted into other applications. The following message will appear when this option is used. |
Edit > Copy Displayed Area To Clipboard |  This option will copy the displayed part of the image to the clipboard. It can then be pasted into other applications. The following message will appear when this option is used. |
Edit > Copy Selected Area To Clipboard |  This option will copy the selected area to the clipboard. When selected, the operator will need to draw the area to select. When completed the following message will appear. |
Paste > | 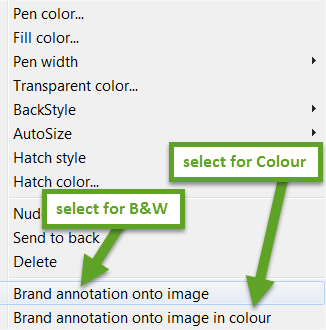 This option will paste the clipboard image into the image on the currently selected page. Please Note: When the clipboard image is pasted it must be burnt into the image otherwise it will not be saved. Right click on the annotation, and select "Brand annotation onto image" If the annotation is in colour, select "Brand annotation onto image in colour" |
Duplicate Page | This option will duplicate the currently selected page. It will insert it underneath the current page. A thumbnail is also inserted underneath as well. |
Image Crop / Erase > | This option will allow the operator to select an area of the current image and then EzeScan will crop the area outside of it. |
Image Crop / Erase > | This option will allow the operator to select an area of the current image and then EzeScan will erase the area outside of it. |
Image Crop / Erase > | This option will allow the operator to select an area of the current image and then EzeScan will erase it. |
Select Area To Send to 2nd Viewer |  This option will allow the operator to select an area of the current image and then will send it into the EzeScan Secondary Image Viewer. Example… |
Send Page To Second Viewer | This option will send the current page into the EzeScan - Secondary Viewer |
Scale To Grey | Ticked by default, this will scale the image to grey. |
Zoom | This option proportionally resizes the current display image. When you position the cursor to this option, a submenu displays. The currently used zoom factor is shown as ticked. There are a number of predefined scaling factors that you can select: 25%, 50%, 100% and 200%. These zoom factors will resize your image accordingly, e.g. if you select 50% then the image will be 50% of the width and 50% of the height of the original image. You can also select Other and the Zoom Factor window will be launched: The current zoom factor will be displayed and you can then enter a specific zoom factor expressed as a percentage of the original image size. The last zoom factor options are: 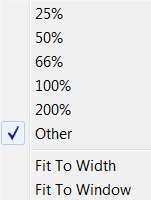
|
Undo | This option will undo the last editing operation that has been performed. |
Redo | This option will redo the last editing operation that has been performed. |
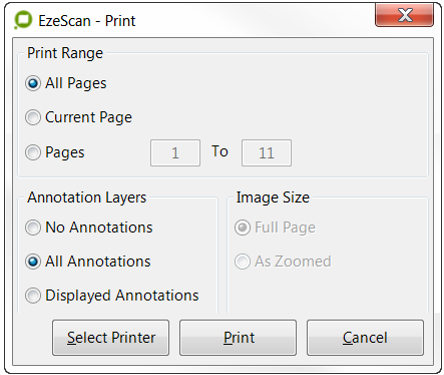 This option will launch a print screen that will allow the user to print the current page, selected pages and specific pages. The operator can also select whether to print annotations and what image size. | |
Ruler |  This option will allow the operator to select an area in the image and EzeScan will define the size in pixels. e.g. |
Measure Legend | This option will ask the operator to draw a line along the whole plan / map legend. |
Measure Distance | This option will ask the operator to draw a line on the plan / map. It will then display the distance of the selected length. |
Properties | This option will launch a message box that displays the following information about the current page in the viewer to the user:
|
The Viewer Toolbar
The EzeScan Viewer toolbar provides toolbar icons, which give access to the most used functions.

The table below describes the function and operation of each toolbar option.
Icon | Option | Action | |
|---|---|---|---|
 | Scan New | Same as the File > Scan > Scan New menu item | |
 | Scan Append | Same as the File > Scan > Scan Append menu item | |
 | Scan Insert | Same as the File > Scan > Scan Insert menu item | |
 | Scan Replace | Same as the File > Scan > Scan Replace menu item | |
 | Open | Same as the File > Open menu item | |
 | Save | Same as the File > Save menu item | |
 | Close | Same as the File > Close menu item | |
 | Delete | This option will delete the currently displayed images | |
 | Same as the File > Print menu item | ||
 | Rotate -90 | Rotates All Thumbnail Pages –90 degrees. Once the function has been applied it cannot be undone unless you use the Undo All option immediately | |
 | Rotate +90 | Rotates All Thumbnail Pages +90 degrees. Once the function has been applied it cannot be undone unless you use the Undo All option immediately | |
 | Rotate 180 | Rotates All Thumbnail Pages 180 degrees. Once the function has been applied it cannot be undone unless you use the Undo All option immediately | |
 | Remove Border | Removes Border from All Thumbnail Pages at the pixel width entered. Once the function has been applied it cannot be undone unless you use the Undo All option immediately | |
 | Deskew | Deskews All Thumbnail Pages. Once the function has been applied it cannot be undone unless you use the Undo All option immediately | |
 | Despeckle Fine | Despeckles All Thumbnail Pages using the fine filter (1x1 pixel) filter. Once the function has been applied it cannot be undone unless you use the Undo All option immediately | |
 | Despeckle Rough | Despeckles All Thumbnail Pages using the rough (3x3 pixel) filter. Once the function has been applied it cannot be undone unless you use the Undo All option immediately | |
 | Negative | Negates All Thumbnail Pages. Once the function has been applied it cannot be undone unless you use the Undo All option immediately | |
 | Mirror | This option will prompt the operator to mirror pages. Options are Current, 1st Doc and All Docs | |
 | Undo | Undoes the previous action | |
| Redo | Redoes the previous action | |
 | Show Tool Palette | Same as the Annotate | Show Tool Palette menu item |
 | Previous Page | Display the previous thumbnail in the Full Page Panel | |
 | Page Number | Currently displaying this page number in the Full Page Panel. Type a number to change this value and press Enter to display another page in the Full Page Panel. | |
 | Next Page | Display the next thumbnail in the Full Page Panel | |
 | Zoom In | Zooms in by a factor of 1.5 | |
 | Zoom Out | Zooms out by a factor of 1/1.5 | |
 | Profile | Same as the Image | Profile menu item |
 | Launches the Email form that allows the operator to send the displayed image or batch to an email recipient. Please refer to the documentation section titled "Scan To Email" for my details. | ||
 | OCR | Launches the OCR form that allows the operator to manually OCR the batch document. This functionality has been superseded by using text searchable PDF's | |
 | Erase Area on Current Page | This option will allow the operator to select an area of the current image and then EzeScan will erase it. | |
 | Erase Border on Current Page | This option will allow the operator to select an area of the current image and then EzeScan will erase the area outside of it. | |
 | Crop Border on Current Page | This option will allow the operator to select an area of the current image and then EzeScan will crop the area outside of it. | |
 | Binarise Pages | This option will convert the images to black and white. The operator will be asked if to Auto Detect or force to black and white. | |
 | Rotate Pages Using OCR | This option will OCR the pages and rotate to what the OCR engine believes is the correct way up. | |
 | Adjust Brightness | This option will allow the operator to adjust the brightness of the document. The following screen will display to allow the operator to make the document lighter or darker. Note: This option is disabled for Black and White documents. | |
 | Apply Job Image Enhancements To All Pages | This will run all the enhancements that are set on the respective job Enhancement tab. Usually this process is run when the document is scanned or imported, but if the options to run during import or not enabled the operator can run from here. |
Viewer Status Bar
At the bottom of the EzeScan viewer window, a status bar displays containing useful information to the user.

Status Bar fields from left to right are:
Status Bar Field | Contents |
|---|---|
File Name | This is the temporary file name of the image in EzeScan |
Pages | The number of pages in the Batch or Document |
Zoom Factor | Current zoom factor applied in the Full Page Panel |
Scanner | The currently selected scanner name |
Annotation Marker |  If any page in the document has annotation applied then this field will contain a graphic otherwise the field will be empty. The image below is how it appears when the annotation toll has been selected on the main menu. |
Thumbnails
For more information please see Thumbnail Menu
Undo or Redo Changes

Changes made using the menu items as described above can be undone or redone via the Tool Bar options of Undo or Redo, thus allowing an Operator to move back and forth through the changes they have made should there be a need.
Navigating the Thumbnail and Image Viewer Panels
The left hand Thumbnail panel is a scrollable series of thumbnail images where a current maximum of 5 thumbnail images are displayed to the operator.
The right hand Main Viewer panel displays the currently selected thumbnail for viewing.
There are a number of ways to navigate in these panels:
Action | Result |
|---|---|
Left Arrow on toolbar | This selects the page of the image that is immediately before the Page Number on the toolbar. |
Right Arrow on toolbar | This selects the page of the image that is immediately after the Page Number on the toolbar. |
Page Up on the keyboard | This selects the page of the image that is 5 images before the currently selected image. |
Page Down on the keyboard | This selects the page of the image that is 5 images after the currently selected image. |
End | The thumbnail panel will jump down to the last image and display it in image viewer. |
Ctrl + Page Down on the keyboard | (Only where Black Separator Pages are in use) |
Ctrl + Page Up on the keyboard | (Only where Black Separator Pages are in use) |
Insert | Launches the Operator Action form that allows the user to select whether to Append, Insert or Replace pages in the document. |
Delete | Launches the Operator Action form that allows the user to select whether to delete pages from the document. |
Numpad Left Arrow | When the image viewer displays a horizontal scrollbar, this key moves the current page left in the viewer window. |
Numpad Right Arrow | When the image viewer displays a horizontal scrollbar, this key moves the current page right in the viewer window. |
Numpad Up Arrow | When the image viewer displays a vertical scrollbar, this key moves the current page up in the viewer window. |
Numpad Down Arrow | When the image viewer displays a vertical scrollbar, this key moves the current page down in the viewer window. |
Numpad + | Zooms In on the current page in the image viewer. |
Numpad - | Zooms Out on the current page in the image viewer. |
Ctrl + Click | Toggles the selection of a thumbnail / page for modifications. |
Shift + Click | This will select up to a thumbnail / page for modifications. |
Annotations
The EzeScan PUBLISH module enables the annotation toolbar.
The toolbar will only activate if you are using an EzeScan PRO license.
The Show Annotation Palette button on the top toolbar is only enabled when an image is loaded into the viewer.
It is recommended that all annotations are performed before the indexing of the image.
The Show Annotation Palette button can be pre-set in the Profiling Tab for the respective job or the operator can click it which will enable the toolbar.
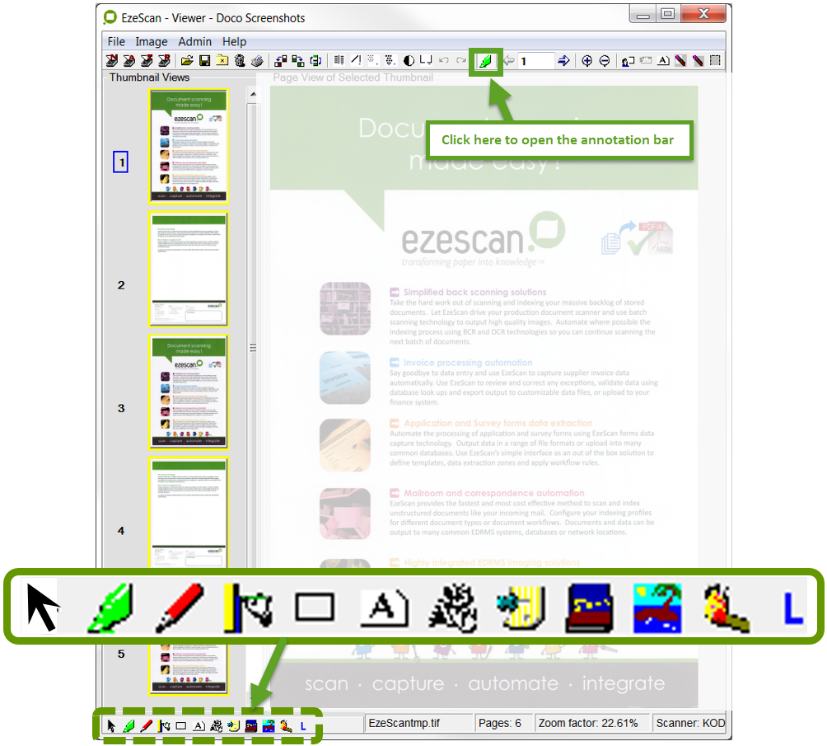
The annotations bar is activated from the main menu once an image has been loaded
Annotation Layers
Annotations are added in layers. Each annotation layer can be thought as a transparency upon which text, lines, highlighting etc can be drawn. These "transparencies" are layered on top of the original document giving you a view of stacked annotations.
Importantly, the annotation layers do not change the original document.
An annotation layer could be added to just one page of the document or to each of any number of pages in the document during a single edit session.
The Profile, Save and Save As menu items will save the annotation layer(s) added during the edit session for the document.
Annotation Palette Toolbar

To select an annotation tool, left click on the icon for that tool. The annotation tools can have various properties set, such as colour, size etc.
To set a property for the annotation tool, right click on the icon for that tool.
The table below explains what each annotation palette tool does:
Icon | Action | Properties |
|---|---|---|
 | Selection Tool | None. |
 | Highlighter Tool | A right click on the icon will display the properties menu for this tool: 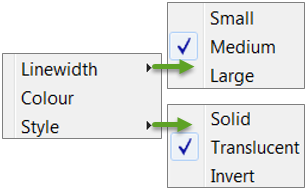
|
 | Freehand Drawing Tool0 | A right click on the icon will display the properties menu for this tool: 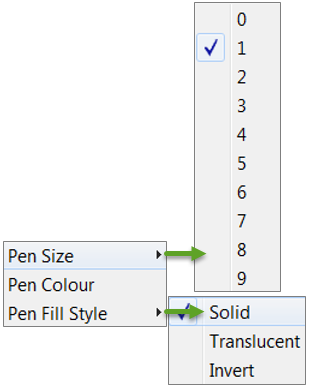
|
 | Straight Line Drawing Tool | A right click on the icon will display the properties menu for this tool: 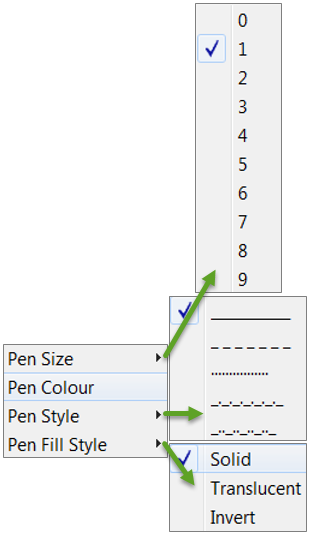
|
 | Box Drawing Tool | A right click on the icon will display the properties menu for this tool: 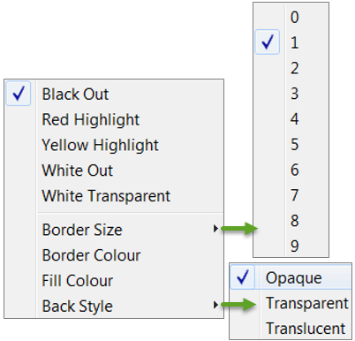
|
 | Redact Words Via OCR Tool | 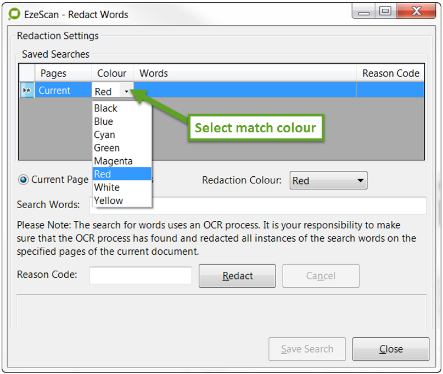
|
 | Text Tool | A right click on the icon will display the properties menu for this tool: 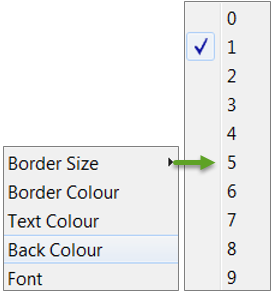
|
 | Sticky Note Tool | A right click on the icon will display the properties menu for this tool: 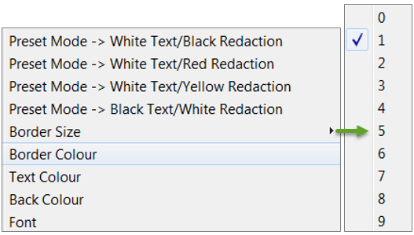
|
 | Rubber Stamp Tool | A right click on the icon will display the properties menu for this tool: 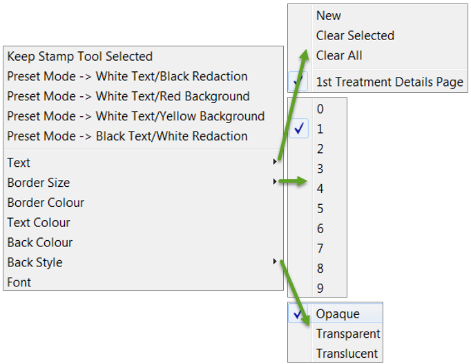 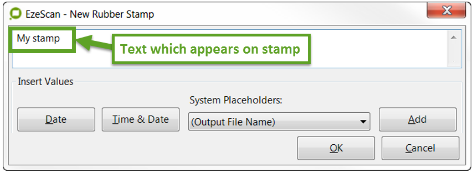
|
 | Picture Tool | 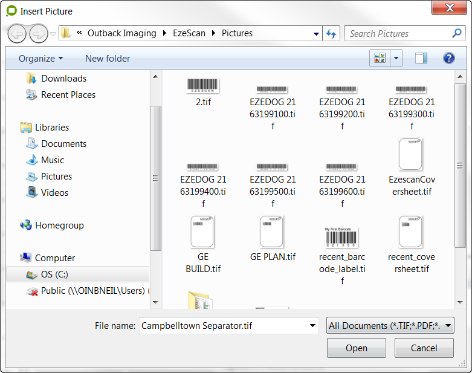 When this option is selected the operator will see the following screen. Searching for a barcode to insert The operator can then browse for an image to insert into EzeScan. The following image formats are supported: TIF, PDF, BMP, GIF, JPG, PNG |
 | Burn Annotation Tool | This tool with burn all the annotations into the image. This is recommended to be clicked last after all annotations have been made. |
 | Show/Hide Layers Window | This tool will either show or hide the annotation layers window. This window is launched when you select the Annotation Palette Show/Hide Layers Window button: This window contains the annotation layers that have been added to the document in chronological sequence. Each layer is identified by the date the annotation was added. Adjacent to each annotation layer line is a tick box. When this box is checked for an annotation layer, that annotation layer displays over the document in the EzeScan Viewer. You can toggle the status of each of these option boxes to toggle the display of that annotation layer. Additionally there are two buttons: 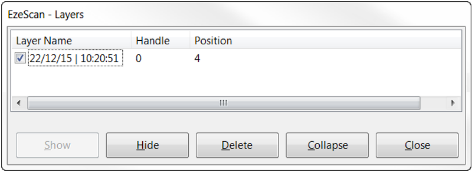
|
Help Menu Options
About
Select Help > About. Displays information about EzeScan.
The following screen displays:
To check the EzeScan Version information click the More Details button.The following screen displays:
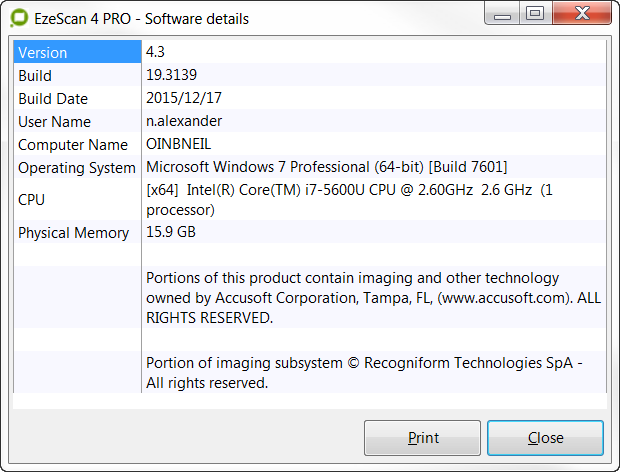
Logging Support Calls
The payment of the yearly support maintenance fee entitles the user to be able to log support calls for product defects. If you log a support call, you may be asked for the version number of EzeScan that you are running. In the example above the version is 4.2 Build 120.1477.
Support calls should be logged by contacting the reseller that you bought the product from.
Useful product FAQ's can be found at our website http://www.EzeScan.com/faqs/ webpage.
Shortcut Keys
Select Help > Shortcut Keys. Displays a PDF file that shows the functions that the EzeScan shortcut keys perform. It is good practice to print this document and keep handy near the EzeScan PC.
These function key shortcuts are conveniently arranged in the order that is most productive when scanning and indexing documents.The most common keys in EzeScan are
F2 to begin Scanning or Import File / Folder
Use the down arrow key to check the images QA
Press F4 to profile the batch.
User Guide
The User Guide indicates which versions of EzeScan support the features listed in this user guide. If your EzeScan version is lower in number, you may not have access to all of the latest features mentioned in this guide.
Select Help > User Guide.
Displays an online copy of this PDF file titled "EzeScan_PRO_User_Guide.pdf".
Standard EzeScan Pro User Guide (PDF)
Customised User Guide
You can launch your own customized user guide from with EzeScan.
Simply place a file called EzeScan_Custom_User_Guide.pdf in the C:\Program Files (x86)\Outback Imaging\EzeScan\Documentation directory.
The file must be called EzeScan_Custom_User_Guide.pdf
Then from within EzeScan select Help > Custom User Guide.
This will displays an online copy of this PDF file titled "EzeScan_Custom_User_Guide.pdf".
Example of the EzeScan_Custom_User_Guide
EzeScan Pro Appendices
Command Line Options
EzeScan can be made to open and go to a specific Job, Route or Upload from the command line or from a shortcut.
You can copy the Desktop shortcut that is created by EzeScan, Select the Properties and modify the target Path.
EzeScan also has some specific in built tasks that can be run as a command line option.The below switches must be defined after the EzeScan.exe process.
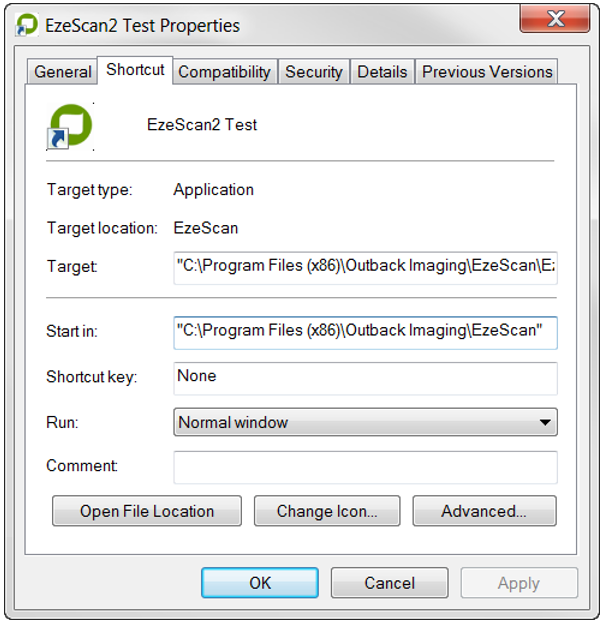
other batch files can also be run from the command line option.
Opening a JOB when Starting EzeScan
If you wish to open EzeScan and go directly to a job, you can use the following samples to create a shortcut and EzeScan will load and go directly to that job.
You can copy the Desktop shortcut that is created by EzeScan, Select the Properties and modify the target Path.
If the Job Button interface is enabled you must use the Job Button Mode option.
Scanning Mode
C:\Program Files (x86)\Outback ImagingEzeScanEzeScan.exe - scan <<the_scan_job_type_name>>
Example:
C:\Program Files (x86)\Outback ImagingEzeScanEzeScan.exe - scan Invoices
Import Folder Mode
C:\Program Files (x86)\Outback ImagingEzeScanEzeScan.exe - import <<the_import_job_type_name>>
Example:
C:\Program Files (x86)\Outback ImagingEzeScanEzeScan.exe - import Scan Folder
Job Button Mode
C:\Program Files (x86)\Outback ImagingEzeScanEzeScan.exe - button <<the_button_number>>
Example:
C:\Program Files (x86)\Outback ImagingEzeScanEzeScan.exe – button 2
Opening a SERVER ROUTE when Starting EzeScan
If you wish to open EzeScan and go directly to a route, you can use the following samples below to create a shortcut and EzeScan will load and go directly to that route
You can copy the Desktop shortcut that is created by EzeScan, Select the Properties and modify the target Path.
The EzeScan Routing Module is required to use this feature.
You can copy the Desktop shortcut that is created by EzeScan, Select the Properties and modify the target Path.
If the Job Button interface is enabled you must use the Job Button Mode option.
C:\Program Files (x86)\Outback ImagingEzeScanEzeScan.exe - route <<the_route_type_name>>
Example:
C:\Program Files (x86)\Outback ImagingEzeScanEzeScan.exe -route Server – Batch
Opening an UPLOAD when Starting EzeScan
If you wish to open EzeScan and go directly to an upload, you can use the following samples below to create a shortcut and EzeScan will load and go directly to that upload.
You can copy the Desktop shortcut that is created by EzeScan, Select the Properties and modify the target Path.
The EzeScan UPLOAD Module is required to use this feature.
You can copy the Desktop shortcut that is created by EzeScan, Select the Properties and modify the target Path.
If the Job Button interface is enabled you must use the Job Button Mode option.
C:\Program Files (x86)\Outback ImagingEzeScanEzeScan.exe -upload <<the_upload_type_name>>
Example:
C:\Program Files (x86)\Outback ImagingEzeScanEzeScan.exe -upload General Mail
If running as a scheduled task add the following switches:
-uploadindex "name of index file.txt" -closeotherinstances -closeafter
This will run the specific KFI output file, close any EzeScan instances and will also close EzeScan after the batch upload has completed.
Example:
Use C:\Program Files (x86)\Outback ImagingEzeScanEzeScan.exe -upload General Mail output.txt -closeotherinstances -closeafter
Please refer to the EzeScan UPLOAD documentation for more information.
Merge TIF or PDF Files
Below is an example of the command line that can be used to perform a Merge of PDF or TIFF files in an EzeScan Job or Routing.
This command line is configured on the Routes Import tab > Command Line. Alternatively it can be configured at the Jobs Import Tab > Run command.
Here are the details of the arguments:
"C:\Program Files (x86)\Outback ImagingEzeScanEzeScan.exe"
…forces EzeScan to be run in the background when the import command is run.
–MERGETIFS or -MERGEPDFS
This argument is used to run EzeScan in merge mode.
C:\merge\input -MERGETO C:\merge\output\merged.tif
…will merge all of the files in the Input directory into the 'Merged.tif' in the Output directory.
–MERGEDELETE will then delete all of the original files in the input directory.
Arguments:
-MERGETIFS <source file or folder paths>
-MERGEPDFS <source file or folder paths>
-MERGETO <target path>
-MERGEDELETE (Will delete source files on success)
Example - Tif images
This command will grab all the TIF images in c:\merge\input merge them and save as merged.tif in c:\merge\output and then delete the source TIF images in c:\merge\input
"C:\Program Files (x86)\Outback ImagingEzeScanEzeScan.exe" -MERGETIFS c:\merge\input -MERGETO c:\merge\output\merged.tif –MERGEDELETE
Example - PDF
This will merge 3 source PDF files and keep the provided files in c:\merge\input.
"C:\Program Files (x86)\Outback ImagingEzeScanEzeScan.exe" -mergepdfs "C:\Merge\input\Image_56.pdf" "C:\Merge\input\Image_57.pdf" "C:\Merge\input\Image_58.pdf" -mergeto "C:\Merge\Output\Merge.pdf"
This will Merge and der.pdf along with all files in C:\Temp\Merge and output merged.pdf in c:\merge\output\merged.pdf
"C:\Program Files (x86)\Outback ImagingEzeScanEzeScan.exe" -mergepdfs "C:\Temp\header.pdf" "C:\Temp\Merge\" -mergeto "C:\Merge\Output\Merged.pdf"
Split PDF Files
Below is an example of the command line that can be used to perform a Merge of PDF or TIFF files in an EzeScan Job or Routing.
This command line is configured on the Routes Import tab > Command Line.
Alternatively it can be configured at the Jobs Import Tab > Run command.
Here are the details of the arguments:
"C:\Program Files (x86)\Outback ImagingEzeScanEzeScan.exe"
Forces EzeScan to be run in the background when the Route's import is run.
–SPLITPDF this argument is used to run EzeScan in Split PDF mode.
–SPLITINPUTFILEPATH "C:\PDFs_To_Be_Split*.pdf" this is the input file path of the PDF that will be split. Note: the *.pdf identifies that all PDF files should be imported.
–SPLITOUTPUTDIRECTORY "C:\Split PDFs\" this is the directory where the PDFs will be split to (i.e. DOC1_1.pdf, DOC1_2.pdf, etc) – this path should point to the import directory of the route if it is to be imported into EzeScan for processing.
–SPLITSIZEINBYTES 2000 this identifies the max size in bytes of the split PDFs – 20mb is roughly 20971520 (20 x 1024 x 1024).
And the following is the details of the optional arguments:
–SPLITPDTXT this identifies that the PDFs TXT file should also be split.
–SPLITPDFCSV this identifies that the PDFs CSV file should also be split.
–SPLITDELETEPDF use this to delete the original PDF after it has been split.
–SPLITDELETETXT use this to delete the original TXT after it has been split.
–SPLITDELETECSV use this to delete the original CSV after it has been split.
Example
This command will get of the PDF files in C:\PDFs_To_Be_Split* and split them up into 2MB files into the *C:\Split_PDFs folder.
"C:\Program Files (x86)\Outback ImagingEzeScanEzeScan.exe" -SPLITPDF -SPLITINPUTFILEPATH " C:\PDFs_To_Be_Split*.pdf " -SPLITOUTPUTDIRECTORY "C:\Split_PDFs\" -SPLITSIZEINBYTES 2000000
Command Line Notes:
The EzeScan viewer is not displayed during the merging or splitting process.
The Command Line Interface may return immediately to the calling application, even though the merge is still in progress.
The calling application should test for the creation of the split or merged document, before it commences any further processing.
This functionality has been incorporated to allow support to quickly merge PDF or TIFF or split PDF files.
Ensure the service has the required permissions to execute EzeScan.exe, copy rename and delete files in the Input and Output directories.
Ensure that you are using a production license otherwise EzeScan.exe may prompt with evaluation dialog in service mode and therefore cause the server to hang.
Open EzeScan.exe manually and ensure that you are not getting a confirmation prompt to run EzeScan, if you are this needs to be disabled as this will also hang the routing service.
Appendices
EzeScan Shortcuts keys
EzeScan uses various shortcut keys to provide faster processing of your invoices and documents.
To print off a full set of shortcut keys; do the following:
Close the button screen - bottom right hand corner of window > Close
Select Help > Shortcut Keys
he PDF version will open (1 single page)
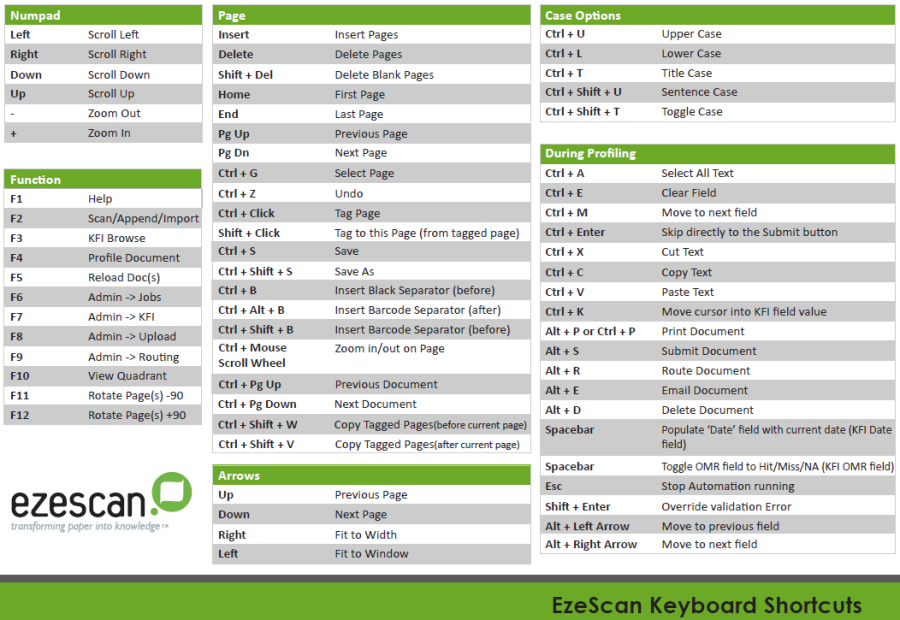
EzeScan Product Documentation
The EzeScan product documentation is available from the main Viewer Help menu and will list documentation specific to the product licensing of EzeScan.
The list will contain PDF format documentation as well as useful links to items on the EzeScan website.
The EzeScan Standard "User Guide" can be opened via the F1 key when the EzeScan Viewer is open.
EzeScan Support
First point of call for support should be your local EzeScan product administrator, as it is they who will have specific local knowledge regarding your Organisation's EzeScan installation.
Should the initial request lead to a need for additional support, EzeScan direct product support (for in maintenance customers) is provided via the following details.
Support Hours
8:00 AM to 5:30 PM EST Australia
Support out of hours is available at special request.
For timely and tracked support use the EzeScan support email address to generate a case in the EzeScan helpdesk system.
Emailed support will generate a case number and place the support request into the EzeScan helpdesk system where it will be queued for the next available support technician.
support@ezescan.com.au
Phone
Need to speak with an EzeScan representative?
1300 393 722
Phone support is available at the above 1300 low fixed rate number (fixed rates not applicable to mobile phones).
From outside Australia, +61 1300 393 722 or +61 7 3051 5890
EzeScan Website
The EzeScan website provides a wealth of information such as FAQs, as well as the latest software downloads and release notes.
https://ezescan.com.au
https://ezescan.com.au/faqs
For access to EzeScan software downloads an Oganisation will need to register at the EzeScan website via a web form, an approval process will then be performed and access will be granted where appropriate.
Most Organisations using EzeScan products will likely already be registered, please first confirm with your local EzeScan product administrator and / or local I.T.
https://ezescan.com.au/user/register
Countries Outside of Australia
Please refer to the Contact Us web link below.
https://ezescan.com.au/contact-us