Barcode Printing
This option allows an operator to print a barcode or a batch of barcodes. The barcodes can be printed as labels or alternatively the barcode can be placed in a coversheet and printed as an A4 document.
The following screen is displayed.

Print Barcode Window
List of Barcode Jobs

Use this list box to select an existing Barcode job from the available list.
The system comes with built in job called 'Default'. This can be altered and then cloned to create as many Barcode jobs as you'll need.
Simply select the Barcode job you want to use and the barcode settings will be updated with values for that job.
Creating a Barcode job
Use the New button to create a new Barcode job.

Give it a name (e.g. My First Barcode)
Copying a Barcode job
Select a Barcode job from the drop down list, and then use the Copy button to copy the Barcode job.

Give it a name (e.g. My Second Barcode)
Renaming (an existing) Barcode Job
Select a Barcode job from the drop down list, and then use the Rename button to rename the job

Give it a new name (e.g. My Real Barcode)
Deleting a Barcode job
Use the Delete button to delete a Barcode job. Select the barcode to delete first.

Saving a Barcode job
Once the desired configuration/settings have been completed; click the Save Button on the bottom of the form.

Printer Settings
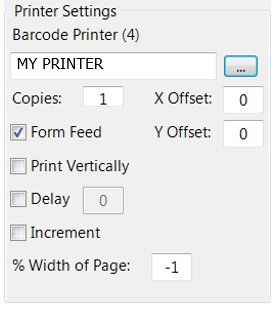
RH side of Barcode Printing screen
Barcode Printer
This option allows the operator to select which printer and options before printing an image. Click on the browse ![]() button to select from a list of installed printers.
button to select from a list of installed printers.
Copies
This is the number of copies to print.
X Offset
This option is moved to move the barcode to the left of right.
i.e. to move left 20 pixels would be "-20"
to move right 20 pixels would be "20"
Y Offset
This option is moved to move the barcode from top to bottom.
i.e. to move up 20 pixels would be "-20"
to move down 20 pixels would be "20"
Print Vertically
This will print the barcode vertically.
If unticked it will print the barcode horizontally
Increment
This option is used with the suffix of the Barcode name.
It will increment the value by 1 for each barcode printed.
Form Feed
This will perform a Form Feed after every barcode is printed.
Delay
This option will delay printing between each barcode. The values can be adjusted in seconds.
Width of Page
This option will allow the operator to shorten the barcode if it is too big for the label.
-1 is the default which is Auto size.
If the barcode needed to be shortened a little set to 98%, keep testing until the barcode fits.
Also scan the barcode to make sure it detects ok.
Barcode Settings
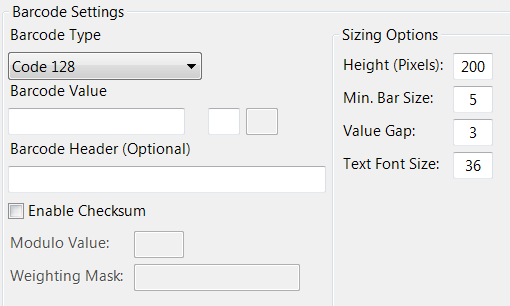
Choose the Barcode Type
Use the drop-down list to select a barcode type.
This is the barcode font to be used.
Enter the Barcode Value
This is the value of the barcode. e.g. EZI

If an incorrect barcode value has been entered (for the selected font), the text will be shown in red indicating that the barcode style does not accept the value entered.

Enter the Barcode Value Suffix
If the operator needs to print a batch of barcodes with an incrementing number a suffix can be used.
i.e. if 0001 to 00199 needs to be printed the follow suffix would be used.

The "Increment" option must also be enabled before printing.
Optional Heading
This will print an option heading above the barcode.
The option is only recommended if the barcode is printed on an A4 document.
Height
This is the height (in pixels) of the barcode
Min. Bar Size
This is the size of the bars in the barcode.
Value Gap
This option positions the text barcode value (in pixels) underneath the barcode. The higher the gap the further lower the text is.
Text Font Size
This is the font size of the text which displays underneath the barcode and on top if a header is used.
Input Method: Print by Query
Barcode values and settings can be imported from an ODBC database by clicking on the "Print by Query" button.

Import Settings
To import from the database, click on the ODBC Settings button:
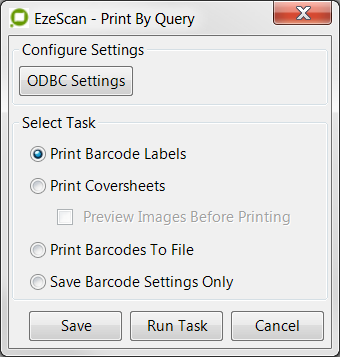
Screen appears after clicking on "Print by Query" button
Click on 'Settings' to bring up the ODBC connection dialog.
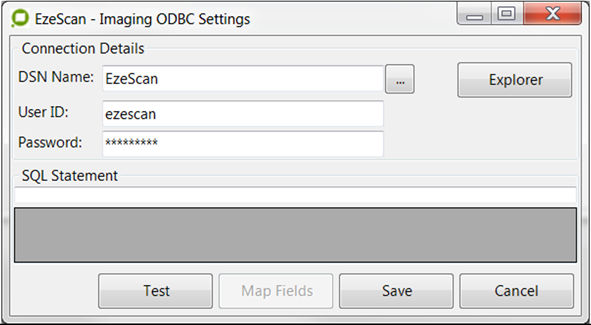
Setting up the ODBC Connection
Make sure that a DSN data source has been created.
Enter DSN name for the database which holds the barcode table information.
Type in SQL credentials used when creating the ODBC data source for this DSN. In the SQL Statement box, type in a SQL statement that will retrieve the barcode data from the barcode table which you created.
Click on the 'Test' button which will then display the results in the grid below.

E.g. in this example we are getting the result of the barcode value from the transactions table. The barcode value (00000934) is being assigned the "Barcode Value" value to be printed.
All other information in the below SQL query is static.
SELECT '' as BarcodeName,
   200 AS Height,
   barcodenumber AS BarcodeValue,
   '' AS Suffix,
   12 AS FontSize,
   'Code 39 Extended Wide' AS BarcodeStyle,
  3 AS ValueGap, 5 AS BarSize,
'EzeScan Barcode' AS BarcodeHeading,
   0 As '2DWidth',
   0 As '2DColumns',
   0 As '2DRows',
   0 As '2DErrorCorrection',
   5 as Printer,
   1 as PrintVertically
FROM EzeScandb.dbo.transactions
Mapping values
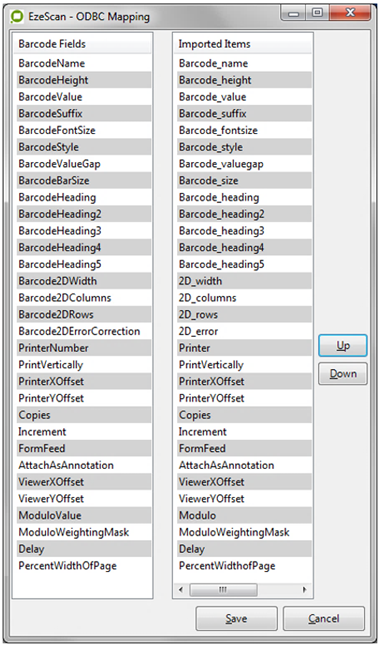
Once the data is loaded, the 'Map Fields' button becomes active. Clicking on it will bring up the ODBC mapping dialog. Match the imported items with the system barcode fields by selecting the value and selecting the 'up' and 'down' buttons.
Please refer the table at right for an explanation on all the field mappings.
Once the fields have been mapped, select 'Save'.
Select 'Save' again to accept the import barcode settings.
Click on an import action from the drop-down list.
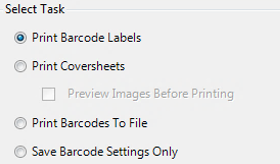
Select the task
Print Barcode Labels - Prints the imported barcodes
Print Coversheets - Prints a coversheet for the imported barcodes(s).
Print Barcodes To File - Saves an image of the imported barcode(s) onto the local drive.
Save Barcode Settings Only - Saves a job for each barcode name imported.
Click 'Run Task' at the bottom of the dialog to proceed with the selected import action.
Detailed explanation on the ODBC barcode settings.
Column Name | Data Type/Accepted Values | Description |
|---|---|---|
BarcodeName | String | If wanting to save the settings as a Barcode printing job then specify a name. Set the Import Action to "Save Barcode Settings" otherwise if printing barcodes this value can be left blank. |
BarcodeHeight | Number | Barcode Height (in pixels) |
BarcodeValue | String | The Barcode value |
BarcodeSuffix | Number | Suffix Value (if required) |
BarcodeFontSize | Number | Barcode Font Size |
BarcodeStyle | Number (0-21). Number corresponds to drop-down list for Barcode Styles. | The Barcode Font to be used. |
BarcodeValueGap | Number | Value Gap, used for EAN-8, EAN-13, UPC-A and UPC-E barcode Fonts |
BarcodeBarSize | Number | Min width in each bar in the barcode. |
BarcodeHeading | String | Adds an optional heading above the barcode |
Barcode2DWidth * | Number | Used for 2D barcodes only e.g. PDF417 & Data Matrix |
Barcode2DColumns* | Number | Used for 2D barcodes only e.g. PDF417 & Data Matrix |
Barcode2DRows* | Number | Used for 2D barcodes only e.g. PDF417 & Data Matrix |
Barcode2DErrorCorrection* | Number | Used for 2D barcodes only e.g. PDF417 & Data Matrix |
PrinterNumber | Number |  This is the printer to print to, the number is displayed on the Barcode Printing form e.g. This is barcode printer 4. |
PrintVertically | Boolean/String (True/False) | Prints the barcode in Portrait (True) or Landscape (False or NULL) the True / False options are case sensitive |
PrinterXOffset | Number | Horizontal offset (in pixels) to be printed on the page |
PrinterYOffset | Number | Vertical offset (in pixels) to be printed on the page |
Copies | Number | Number of copies of the barcode |
Increment | Boolean/String (True/False) | Works in conjunction with the "Copies" and "Suffix" options. When set to True the suffix will increase by 1 for each new |
FormFeed | Boolean/String (True/False) | Prints a blank page between each barcode. |
AttachAsAnnotation | Boolean/String (True/False) | For use with the import action "Save Barcode Settings" this will allow the barcode to be attached to the current image loaded in the EzeScan viewer. |
ViewerXOffset | Number | For use with the import action "Save Barcode Settings" and Attach As Annotation. This is to set the horizontal offset in pixel of where the barcode will be attached to the current image loaded in the EzeScan viewer. |
ViewerYOffset | Number | For use with the import action "Save Barcode Settings" and Attach As Annotation. This is to set the vertical offset in pixel of where the barcode will be attached to the current image loaded in the EzeScan viewer. |
ModuloValue | Number | Checksum Modulo Value |
ModuloWeightingMask | Number | Checksum Weighting Mask |
Delay | Number | Delay (secs) before printing each barcode |
PercentWidthOfPage | Number | % width of the barcode to stretch across the page. |
The column names do not have to be named as stated in the table. Imported columns will still need to be mapped. If the columns cannot be added in the table, the operator can use the "as" clause to define static values.
Checksum Settings

Checksum screen
The barcode checksum is used to detect if there has been any accidental errors when printing the barcode.
Tenable checksum, check the box next to 'Enable Checksum'.
Enter the Modulo Value and the Weighting Mask which will be used to define the checksum value.
Attachment Settings
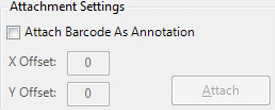
Attachments screen
This option will attach the barcode to the currently displayed image in the EzeScan Viewer.
The operator can specify X and Y coordinates of where the barcode is to be placed on the image.
To attach the barcode, tick the checkbox next to 'Attach barcode as annotation'.
The 'Attach Barcode' button will then become active.
Click this button to add the barcode as an annotation to the currently displayed page.
Preview Screen
At the bottom of the barcode printing page a preview window will allow users to view the barcode to be printed.
Once a valid barcode value has been entered, the preview is automatically populated.
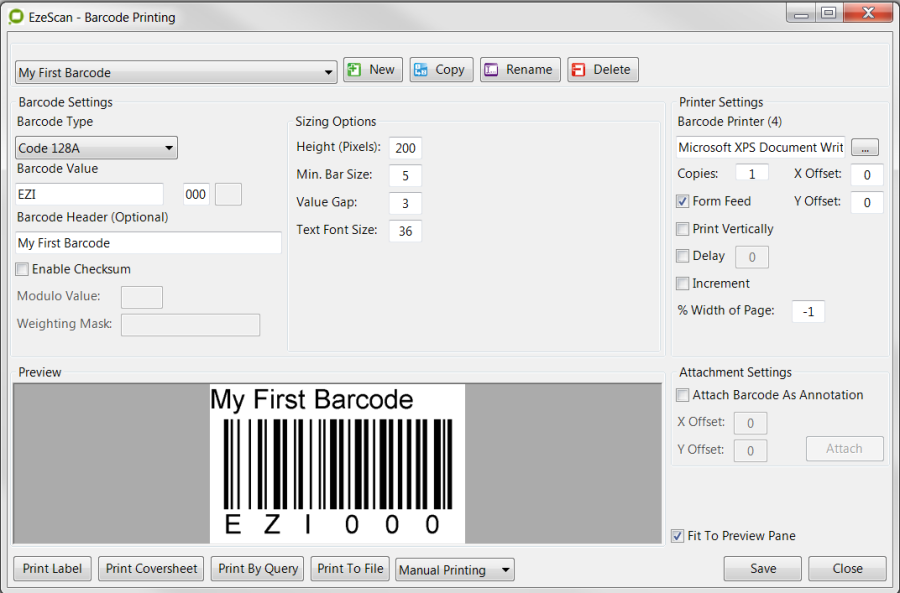
Barcode Preview Window
Coversheet
This option allows the operator to print the barcode on a pre-defined EzeScan cover sheet.
Please refer to the Coversheet Printing section on page for more information.
Save Image
This option will let the operator save the barcode image onto the file system.
Save
This will save the barcode settings job.
This will print the barcode to the selected printer.
It will also save the barcode as a TIF image.
The image is named "recent_barcode_label.tif" and will reside in:
C:\Program Data\Outback ImagingEzeScan\Pictures
Close
Closes the Print Barcode Form
Coversheet Printing
This option will create a coversheet with the specified barcode placed within the coversheet.
Click on the Cover Sheet button on the bottom left corner of the Barcode Printing page to activate settings for the use of barcode printing on a separate cover sheet.
Print preview of barcode cover sheet
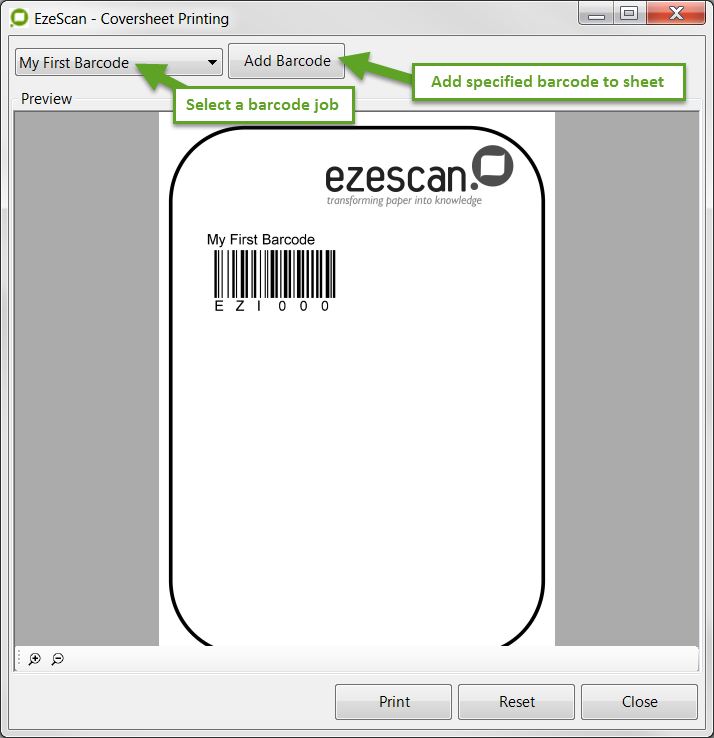
Use the drop-down list to select which job to generate the barcode from.
Click "Add Barcode" to then add the specified barcode to the coversheet.
The operator can add multiple barcodes to the coversheet.
Zoom
Use the +/- buttons to zoom in or out of the window.
Reset
Clears the cover sheet and removes any barcodes which have been added.
This button will print the cover sheet.
Close
This button closes the Cover Sheet printing dialog.
