
✨ Added in EzeScan v5.1.37
Overview
Endpoint Requests allow EzeScan to query, submit, or upload data to a web service or REST endpoint from within EzeScan workflows.
Use Endpoint Requests when you need EzeScan to communicate with another system, for example:
-
Querying a REST API to look up information during indexing.
-
Returning a value to a KFI field.
-
Extracting multiple named values for later placeholder use.
-
Uploading JSON or XML metadata and a document file to another system during Upload.
-
Calling internal or external APIs that require Basic authentication, OAuth, API keys, or custom headers.
Endpoint Requests are configured separately from the Connection Profile that defines the target service Base URL and authentication settings. This allows multiple requests to reuse the same connection details.
Once an Endpoint has been created the Endpoint Request form provides various tabs to configure the Endpoint for use.
Key concepts
|
Concept |
Description |
|---|---|
|
Connection Profile |
Defines the Base URL and authentication settings for a web service or REST endpoint. |
|
Endpoint Request |
Defines a specific HTTP request, such as a GET or POST, that is sent using a Connection Profile. |
|
Placeholder |
A dynamic value inserted into a request URL, header, body, metadata field, or file setting. |
|
Extract Property |
A value extracted from the response body using a transform such as a JSON selector or XML selector. |
|
Transform |
A processing step applied to a value, such as JSON selector, XML selector, Base64 encoding, or Append/Prepend. |
Finding the Endpoint Requests admin form
Endpoint Requests are configured from the EzeScan administration area.
-
Open EzeScan.
-
Open the Admin menu.
-
Locate the Endpoint Requests menu option.
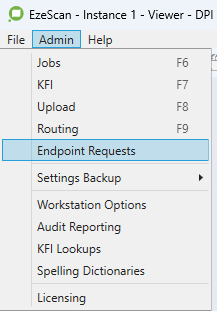
-
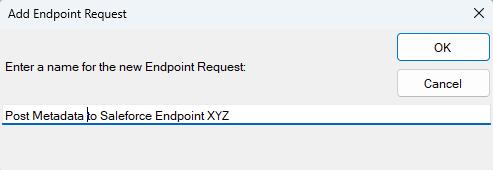
Use this form to add a new Endpoint Requests.
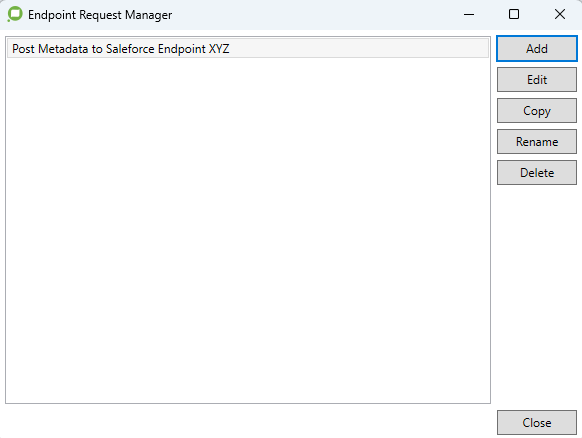
The Endpoint Request Manager displays the configured Endpoint Requests in a list. From this window you can use Add, Edit, Copy, Rename, or Delete an Endpoint Request.
The Endpoint Request Editor is where you configure the request details.

It includes:
-
Endpoint section: Method and Address.
-
Connection tab: Connection Profile and Dynamic Profile Name.
-
Parameters tab: query or request parameters.
-
Headers tab: request headers and transforms applied to the selected header.
-
Body tab: JSON, XML, or Multi-part.
-
Response tab: expected status code range and Extract Properties.
-
Test Results tab: request, response, and extracted value test output.
Use the Test button in the editor to test a request, Ok to save changes, or Cancel to close without saving.
Managing Endpoint Request configurations
Use the Endpoint Requests administration form to add, edit, copy, rename, or delete request configurations.
Add an Endpoint Request
-
Open the Endpoint Requests administration form.
-
Select Add.
-
Enter a clear request name that describes what the request does.
-
In the Endpoint section, configure the Method and Address.
-
On the Connection tab, select the required Connection Profile.
-
Configure Parameters, Headers, Body, and Response settings as required.
-
Select Test to test the request with representative placeholder values before using it in a KFI Field or Upload configuration.
-
Select Ok to save the Endpoint Request.
Edit an Endpoint Request
-
Open the Endpoint Requests administration form.
-
Select the existing Endpoint Request you want to change.
-
Select Edit and then update the required settings.
-
Select Ok to save the Endpoint Request.
Copy an Endpoint Request
-
Open the Endpoint Requests administration form.
-
Select the Endpoint Request you want to copy.
-
Select Copy.
-
Enter a clear name for the copied request.
-
Edit the copied request as required.
-
Select Ok to save the copied Endpoint Request.
Rename an Endpoint Request
-
Open the Endpoint Requests administration form.
-
Select the Endpoint Request you want to rename.
-
Select Rename.
-
Enter the new request name.
Use clear names that describe what the request does, such as Graph - Lookup User Display Name or Upload Document to Contoso API.
Delete an Endpoint Request
-
Open the Endpoint Requests administration form.
-
Select the Endpoint Request you want to delete.
-
Select Delete.
-
Confirm the deletion when prompted.
Before deleting a request, check where it is used as this operation cannot be undone.
Creating a Connection Profile
Connection Profiles are configured in Workstation Options and are used by Endpoint Requests to determine the target service and authentication method.
Open Workstation Options
-
Open EzeScan.
-
Open Workstation Options.
-
Select the Connection Profiles tab.
Add a Connection Profile for Endpoint Requests
-
Select New.
-
Enter a clear Name for the profile.
-
Set Connect to to the Endpoint Request connection target.
-
In Connection Settings, enter the Base URL for the service.
-
Select the required Authentication option.
-
Configure the authentication fields that appear for the selected option.
-
Save the Workstation Options changes.
If you need another profile with similar settings, select the existing profile and use Copy.
Set the Base URL
Set the Base URL to the root URL of the service you want to call.
Examples:
|
Service |
Example Base URL |
|---|---|
|
Microsoft Graph |
|
|
Salesforce |
|
This value prefixes the Address of Endpoint Requests linked to this Connection Profile. The Endpoint Request Address is treated as a path and appended with a forward slash delimiter, even if absent.
Example:
|
Setting |
Value |
|---|---|
|
Connection Profile Base URL |
|
|
Endpoint Request Address |
|
|
Final request URL |
|
Duplicate forward slashes are automatically removed when joining the Base URL and Endpoint Request Address.
Authentication options
Connection Profiles can include authentication settings that are reused by Endpoint Requests.
Common options include:
-
No authentication.
-
Basic authentication.
-
OAuth authentication.
If the target service uses a custom API key or another header-based authentication scheme, configure the required values on the Endpoint Request Headers tab instead.
Basic authentication
Use Basic authentication when the target service expects a username and password to be sent using the HTTP Authorization header.
If you need to construct the Basic authentication header manually, see Manually constructing a Basic Authorization header.
OAuth authentication
Use OAuth when the target service requires an access token.
EzeScan supports OAuth flow options such as:
-
Authorization Code.
-
Client Credentials.
Authorization Code flow
Authorization Code flow is user-interactive.
Use this flow when:
-
A user needs to sign in interactively.
-
The API call is made on behalf of a user.
-
The service requires delegated permissions.
-
The access granted depends on the signed-in user.
Typical examples:
-
Calling Microsoft Graph as a signed-in user.
-
Querying user-specific resources.
-
Accessing data where a user consent or login is required.
In this flow, the user is redirected to the identity provider to sign in and authorize access. EzeScan then receives tokens that can be used by Endpoint Requests.
Client Credentials flow
Client Credentials flow is headless and does not require an interactive user login.
Use this flow when:
-
EzeScan needs to call an API as an application or service account.
-
The workflow runs unattended.
-
The request is made from a server-side process or background upload.
-
The target API supports application permissions.
Typical examples:
-
Uploading documents to a line-of-business system.
-
Calling an internal API from an automated workflow.
-
Running scheduled or unattended integrations.
In this flow, EzeScan uses the configured client ID, client secret, token endpoint, and scopes to obtain an access token without prompting a user.
Linking a Connection Profile to an Endpoint Request
After creating a Connection Profile, link it to each Endpoint Request that should use it.
-
Open the Endpoint Requests administration form.
-
Create or edit an Endpoint Request.
-
Open the Connection tab.
-
Select the required Connection Profile.
-
If the profile must be resolved dynamically during processing, use Dynamic Profile Name instead.
-
Select Ok to save the Endpoint Request.
The Endpoint Request will use the selected Connection Profile for Base URL and Authentication.
Using Endpoint Requests from KFI Field Admin and Upload Admin
After an Endpoint Request has been created, it must be linked to the area of EzeScan that should run it.
Link an Endpoint Request to a KFI Field
Use this option when a KFI field should run an Endpoint Request during indexing, such as looking up a value from a REST API. In KFI Field Admin, this type of lookup is referred to as Integration Browse.
-
Open the Admin menu → KFI Admin.
-
Select the KFI type.
-
Open the Fields tab.
-
Click Edit on the field that should run the Endpoint Request.
-
Open the Integration tab.
-
Set the Alternative Integration selection to Endpoint Request.
-
Open the Endpoint Request tab that now appears.
-
Check the Enable Endpoint Request Browse Button option.
-
Select the Endpoint Request to be used on this field.
-
Use the Manage Endpoint Requests button if you need to create, edit, rename, or delete Endpoint Request configurations without leaving KFI Field Admin.
-
Save the KFI field configuration.
-
Test the field using a value that matches the placeholders used by the request.
For example, if the Endpoint Request URL contains <<F1>>, the value from Field 1 is inserted into the request URL when the request runs.
When an Endpoint Request is used from a KFI field, the first Extract Property is returned as the KFI Field value. Extract properties can also be accessed using a field column placeholder <<F#@ColumnName>> where ColumnName is the name of the property.
On the Automation tab, the Automatically Show Browse Form setting controls whether Integration Browse runs automatically. If this is set to Always, the Endpoint Request is re-executed when another field referenced by its placeholders changes. For example, if an Endpoint Request looks up a user by ID and the field containing that user ID changes, the lookup is run again using the updated value.
Link an Endpoint Request in Upload Admin
Use this option when an Endpoint Request should run during Upload, such as sending metadata and a document file to another system.
-
Open Upload Admin.
-
Select the Upload configuration to edit, or create a new Upload configuration.
-
In the Upload properties, set Upload To to Endpoint Request.
-
In the Endpoint Request property that appears, select the Endpoint Request profile to run during Upload.
-
Use the Manage Endpoint Requests button if you need to create, edit, rename, or delete Endpoint Request configurations without leaving Upload Admin.
-
Configure the Index File and Document Path mappings as required.
-
Save the Upload configuration.
-
Test with a sample document and representative input field values.
When an Endpoint Request is used from an Upload, the Extract Property values are captured as document references via the <<S15(PropertyName)>> placeholder. This allows passing them to the next upload in the chain. This is useful when a workflow includes multiple Endpoint Requests, each needing details from the previous response.
Placeholders used by Endpoint Requests
Endpoint Requests support placeholders so request values can be generated dynamically at runtime.
|
Placeholder |
Description |
Example use |
|---|---|---|
|
|
Unique GUID generated per request. |
Use as a correlation ID or as part of a custom API key. |
|
|
The current date and time with an optional format pattern. For example, |
Map timestamp into a JSON/XML upload body. |
|
|
KFI Field value, where |
Map metadata into a JSON/XML upload body or the request URL. |
|
|
Upload input field value when using CSV index, where |
Map metadata into a JSON/XML upload body or the request URL. |
|
|
Upload XML input value where |
Map metadata into a JSON/XML upload body or the request URL. |
|
|
Upload XML input value where |
Map metadata into a JSON/XML upload body or the request URL. |
|
|
Upload XML input value where |
Map metadata into a JSON/XML upload body or the request URL. |
|
|
Full path to the document being uploaded. For example:
Supports these format options:
|
Use as the binary file source or filename. |
|
|
Full path to the index being uploaded (upload only). For example:
Supports these format options:
|
Use as the binary file source or filename. |
Placeholder availability depends on where the Endpoint Request is run:
-
Input field placeholders such as
<<IF#>>,<<IXN{#}>>,<<IXR{#}>>, and<<IXX{#}>>are only available in the context of Upload. -
Upload document placeholders such as
<<UploadDocumentFile>>and<<UploadIndexFile>>are only available in the context of Upload. -
Field placeholders such as
<<F#>>are only available in the context of a KFI Field, or when field values are available to an Upload that runs immediately after the KFI workflow. -
<<RequestID>>is always available in the context of an Endpoint Request.
JSON and XML request bodies
Endpoint Requests can send JSON or XML as request body.
When the main request body is configured as JSON or XML, EzeScan automatically populates the Content-Type header:
|
Request body type |
Automatically populated |
|---|---|
|
JSON |
|
|
XML |
|
The charset is currently hardcoded to utf-8 for JSON and XML request bodies.
JSON and XML multipart parts
When JSON or XML is configured within the context of a multipart part, EzeScan does not emit the charset value on that part's content type.
This is done for compatibility with servers that do not expect a charset value on multipart JSON or XML parts.
For example, a JSON multipart part uses:
application/json
rather than:
application/json; charset=utf-8
This behavior is currently not configurable.
Placeholders inside JSON
When placeholders are used inside JSON, the placement of the placeholder matters.
If a placeholder is embedded inside JSON string quotes, EzeScan escapes the replacement value as a JSON string literal.
Example:
{
  "customerName": "<<IF1>>"
}
This is the safest option for normal text values.
If a placeholder is used outside JSON string quotes, the replacement value is treated as raw JSON.
Example:
{
  "metadata": <<IF2>>
}
Use raw JSON placeholders only when the placeholder value already contains correctly formatted JSON. It is your responsibility to ensure the final request body is valid JSON.
Placeholders inside XML
When placeholders are used inside XML, EzeScan escapes the replacement value according to where the placeholder appears.
|
XML placeholder location |
Escaping behavior |
|---|---|
|
Element text |
Escaped as XML text. For example, |
|
Attribute value |
Escaped as an XML attribute value. The surrounding quote type is also handled. |
|
CDATA section |
Inserted as CDATA text. |
This means normal placeholder values can be safely used in XML text and attributes without breaking the XML document.
It is not currently possible to inject raw XML markup using a placeholder. Placeholder values are treated as values, not as XML structure.
Example 1: Configure a GET request to query an object from a KFI Field
This example shows how to look up a user's display name from Microsoft Graph using a user ID entered into KFI Field 1.
Scenario
A user enters or scans a user ID into KFI Field 1. EzeScan calls Microsoft Graph to look up that user and returns the user's display name.
Example request:
GET https://graph.microsoft.com/v1.0/users/<<F1>>
Example response body:
{
  "id": "user@example.com",
  "displayName": "Example User",
  "mail": "user@example.com"
}
Prerequisites
Before configuring the request:
-
Create a Connection Profile for Microsoft Graph.
-
Set the Base URL to:
https://graph.microsoft.com
-
Configure OAuth authentication using the appropriate OAuth flow.
-
Ensure the OAuth permissions allow user lookup.
Configure the Endpoint Request
-
Open the Endpoint Requests administration form.
-
Create a new Endpoint Request.
-
Select the Microsoft Graph Connection Profile.
-
Configure the request method as
GET. -
Configure the Address as:
/v1.0/users/<<F1>>
-
Save the request.
The <<F1>> placeholder injects the value from KFI Field 1 into the URL. For example, if Field 1 contains user@example.com, the Address becomes:
/v1.0/users/user@example.com
Configure response extraction
To return the user's display name, add an Extract Property.
|
Setting |
Value |
|---|---|
|
Extract Property name |
|
|
Transform |
|
|
JSON selector |
|
The JSON selector $.displayName extracts the displayName value from the JSON response body.
To return the entire JSON response as the extracted value, use $ as the JSON selector.
Returning values to the KFI field
When an Endpoint Request is used from a KFI Field, the first Extract Property is returned to the KFI field.
For this example, because DisplayName is the first Extract Property, the extracted display name is returned to the KFI field.
Using other extracted values
In addition to returning the first Extract Property to the KFI field, all extracted properties are tracked silently on the field. These values can be reused using <<F#@PropertyName>> style placeholders.
Example:
<<F2@DisplayName>>
This allows multiple values to be injected into other KFI fields cleanly, avoiding the need to concatenate and later split values using delimiters.
Example 2: Configure a POST request to upload JSON metadata and a binary file
This example shows how to upload JSON metadata and the scanned document file to another system during Upload.
Scenario
During Upload, EzeScan sends:
-
A JSON metadata part containing values from upload input fields.
-
A binary file part containing the uploaded document.
Configure the Connection Profile
-
Open Workstation Options.
-
Create a Connection Profile for the target system.
-
Set the Base URL, for example:
https://api.contoso.local
-
Configure the required authentication, such as Basic or OAuth Client Credentials.
-
Save the Connection Profile.
Configure the Endpoint Request
-
Open the Endpoint Requests administration form.
-
Create a new Endpoint Request.
-
Select the Connection Profile for the target system.
-
Configure the request method as
POST. -
Configure the Address, for example:
/documents/upload
-
Open the Body tab.
-
Configure the Body Type as
MultiPartFormData
Configure JSON metadata
Use <<IF#>> placeholders to map upload input field values into the JSON metadata.
In the Endpoint Request Editor:
-
Open the Body tab.
-
Set Body type to a multipart body option.
-
Add a new body part for the metadata.
-
Set the part type or content type to JSON.
-
Enter the JSON metadata body.
Example JSON metadata body:
{
  "documentType": "<<IF6>>",
  "customerNumber": "<<IF7>>",
  "invoiceNumber": "<<IF8>>",
  "invoiceDate": "<<IF9>>",
  "notes": "<<IF10>>"
}
Example mapping:
|
Placeholder |
Upload input field |
|---|---|
|
|
Document Type |
|
|
Customer Number |
|
|
Invoice Number |
|
|
Invoice Date |
|
|
Notes |
Configure the binary file part
Use the upload document placeholders for the file part.
In the Endpoint Request Editor:
-
Open the Body tab.
-
Add another body part for the document file.
-
Set the part type to a binary file part.
-
Set the binary file source to
<<UploadDocumentFile>>. -
Set the file name to
<<UploadDocumentFile(Name)>>.
|
File part setting |
Value |
|---|---|
|
Binary file source |
|
|
File name |
|
<<UploadDocumentFile>> resolves to the full path of the document being uploaded.
<<UploadDocumentFile(Name)>> resolves to the file name of the upload document and should be used as the filename of the file part.
Typical multipart upload structure
A typical multipart POST request contains:
|
Part |
Purpose |
Example value |
|---|---|---|
|
Metadata part |
JSON metadata from Upload input fields |
JSON body using |
|
File part |
Binary document content |
Source: |
|
File name |
Name sent for the binary file part |
|
Example 3: Configure a POST request to upload XML metadata and a binary file
This example shows how to upload XML metadata and the scanned document file to another system during Upload.
Scenario
During Upload, EzeScan sends:
-
An XML metadata part containing values from upload input fields.
-
A binary file part containing the uploaded document.
Configure the Endpoint Request
Use the same general POST request setup as the JSON upload example:
-
Create or select the Connection Profile for the target system.
-
Configure the request method as
POST. -
Configure the Address required by the target system.
-
Add an XML metadata body or XML multipart part.
-
Add the binary file part.
Configure XML metadata
Use <<IF#>> placeholders to map upload input field values into the XML metadata.
Example XML metadata body:
<DocumentMetadata>
  <DocumentType><<IF1>></DocumentType>
  <CustomerNumber><<IF2>></CustomerNumber>
  <InvoiceNumber><<IF3>></InvoiceNumber>
  <InvoiceDate><<IF4>></InvoiceDate>
  <Notes><<IF5>></Notes>
</DocumentMetadata>
When XML is used as the main request body, EzeScan automatically sets the content type to application/xml; charset=utf-8.
When XML is used as a multipart part, EzeScan uses application/xml without the charset value.
Configure the binary file part
Use the upload document placeholders for the file part.
|
File part setting |
Value |
|---|---|
|
Binary file source |
|
|
File name |
|
<<UploadDocumentFile>> resolves to the full path of the document being uploaded.
<<UploadDocumentFile(Name)>> resolves to the file name of the upload document and should be used as the filename of the file part.
Using <<RequestID>> for request correlation
<<RequestID>> is a unique GUID generated for each Endpoint Request execution.
Use it when the target system requires a unique request identifier, or when you need to correlate logs between EzeScan and an external service.
Correlation ID header
Add a custom header such as:
|
Header name |
Header value |
|---|---|
|
|
|
The receiving system can log this value and use it to trace the request.
Salting a custom API key value
Some APIs require a generated key, token, or salted value that includes a unique request identifier.
Example header:
|
Header name |
Header value |
|---|---|
|
|
|
Each request receives a different value because <<RequestID>> is unique per request.
Manually constructing a Basic Authorization header
Some integrations require manually constructing the HTTP Authorization header rather than using built-in Basic authentication settings.
Basic authentication uses this format:
Authorization: Basic base64(username:password)
For example, the raw credential value is:
myuser:mypassword
After Base64 encoding, it becomes:
bXl1c2VyOm15cGFzc3dvcmQ=
The final header is:
Authorization: Basic bXl1c2VyOm15cGFzc3dvcmQ=
Configure this using transforms
Create a header with the raw username and password value, then apply transforms in this order:
-
Base64 transform.
-
Prepend transform.
Example configuration:
|
Setting |
Value |
|---|---|
|
Header name |
|
|
Initial header value |
|
|
Transform 1 |
Base64 |
|
Transform 2 |
Prepend |
|
Prepend value |
|
The Base64 transform converts myuser:mypassword to its Base64 representation.
The Prepend transform adds Basic to the front of the encoded value.
The final header value sent to the service is:
Basic bXl1c2VyOm15cGFzc3dvcmQ=
Placeholders can be used in the header value inject the username and password dynamically.
Chaining XML selector and JSON selector transforms
Some services return XML where one XML node contains JSON as inner text.
In this case, chain transforms so that EzeScan first extracts the XML node text, then extracts a JSON property from that text.
Example response
<Response>
  <Status>OK</Status>
  <Payload>{"result":{"documentId":"DOC-12345","status":"Accepted"}}</Payload>
</Response>
The Payload XML node contains JSON text.
Required extraction
To extract the documentId value, configure an Extract Property with chained transforms:
|
Order |
Transform |
Selector |
|---|---|---|
|
1 |
XML selector |
|
|
2 |
JSON selector |
|
Processing occurs as follows:
-
The XML selector extracts the inner text of the
Payloadnode. -
The extracted text is treated as JSON.
-
The JSON selector extracts
$.result.documentId.
Final extracted value:
DOC-12345
This pattern is useful when a legacy SOAP or XML service wraps a JSON payload inside an XML response node.
Recommended configuration workflow
Use the following order when setting up a new Endpoint Request.
-
Identify the target API endpoint and HTTP method.
-
Create or select a Connection Profile.
-
Configure the Base URL.
-
Configure authentication.
-
Create the Endpoint Request.
-
Link the Endpoint Request to the Connection Profile.
-
Configure the request Address.
-
Add required headers.
-
Add request body, metadata, or file parts if required.
-
Add Extract Properties for response values.
-
Test the request with representative placeholder values.
-
Link the request into the KFI Field or Upload workflow.
-
Confirm the values are returned from placeholders where expected.
Known limitations
Usage limitations
Endpoint Requests are not currently supported for:
-
Use as a field validation query.
-
Returning a list of values to a KFI field.
OAuth limitations
The following OAuth options are not currently supported:
-
Custom authorization endpoint request parameters.
-
Custom token endpoint request parameters.
-
Custom
Content-Typevalues for token endpoints that incorrectly enforce versioning in their JSON content type.
Request formatting limitations
The following items are not currently supported:
-
application/x-www-form-urlencodedrequests. -
Custom headers on individual multipart parts.
-
Automatic retry on
429 Too Many Requestsor503 Service Unavailablestatus codes. -
Configuring a charset other than
utf-8for JSON or XML request bodies. -
Emitting a charset on JSON or XML multipart parts.
-
Embedding a Base64 encoded file into JSON or XML data.
-
Injecting raw XML markup using a placeholder.
Troubleshooting
Use the test button to inspect request and response details
The Endpoint Request Editor includes a test button that can help diagnose bad URLs, incorrect headers, request formatting issues, authentication failures, and unexpected responses.
When you test a request from the editor, EzeScan displays details such as:
-
Request URL.
-
Request headers.
-
Request body.
-
Response headers.
-
Response body.
-
Extracted property names and values.
Use this information to confirm that placeholders are resolving as expected, the final URL is correct, the request body is valid, the target service is returning the expected response, and Extract Properties are returning the expected values.
If testing in the editor is not possible because the required placeholders are only available during a KFI Field or Upload execution, capture the same type of information using debug logs with the Trace logging level enabled.
Trace logging can be useful when the request only works in its real workflow context.
The request URL is incorrect
Check:
-
The Connection Profile Base URL.
-
The Endpoint Request Address.
-
Whether placeholders such as
<<F1>>or<<IF#>>contain the expected values. -
The request URL shown by the Endpoint Request Editor test result or Trace-level debug logs.
Authentication fails
Check:
-
The selected Connection Profile.
-
Basic authentication username and password.
-
OAuth client ID, client secret, scopes, and token endpoint.
-
Whether Authorization Code or Client Credentials is the correct flow.
-
Whether the target API has granted the required permissions.
The KFI field is not receiving the expected value
Check:
-
The Endpoint Request is linked to the correct KFI Field.
-
The response body contains the expected JSON or XML.
-
The first Extract Property is the value that should be returned to the KFI field.
-
The JSON selector or XML selector is correct.
Column placeholders are blank
Check:
-
The Extract Property names match the column names used in placeholders.
-
The placeholder format uses
<<F#@ColumnName>>. -
The Endpoint Request completed successfully.
-
The response extraction returned values.
File upload fails
Check:
-
The request method is
POSTor the method required by the target API. -
The JSON metadata uses the correct
<<IF#>>placeholders. -
XML metadata is used instead of JSON when required by the target API.
-
The file source is
<<UploadDocumentFile>>. -
The file name is
<<UploadDocumentFile(Name)>>. -
The target API expects multipart upload, raw binary upload, or another specific format.
-
Required headers such as
Content-Typeare configured correctly. -
The request headers and request body shown by the Endpoint Request Editor test result or Trace-level debug logs.
Extracting from XML-wrapped JSON fails
Check:
-
The XML selector returns only the JSON inner text.
-
The JSON text is valid JSON after XML extraction.
-
The JSON selector is applied after the XML selector.
-
The JSON selector path matches the extracted JSON structure.
Quick reference examples
GET user display name from Microsoft Graph
|
Setting |
Value |
|---|---|
|
Connection Profile Base URL |
|
|
Method |
|
|
Address |
|
|
Extract Property |
|
|
Transform |
|
|
Selector |
|
|
Returned to KFI Field |
First Extract Property |
POST metadata and file during Upload
|
Setting |
Value |
|---|---|
|
Method |
|
|
Metadata format |
JSON or XML |
|
Metadata placeholders |
|
|
Binary file source |
|
|
File name |
|
Correlation header
|
Header name |
Header value |
|---|---|
|
|
|
Manual Basic Authorization header
|
Step |
Value |
|---|---|
|
Initial value |
|
|
Transform 1 |
Base64 |
|
Transform 2 |
Prepend |
|
Final header |
|
Summary
Endpoint Requests provide a configurable way for EzeScan to communicate with web services and REST endpoints.
They can be used to:
-
Query external systems from KFI fields.
-
Return response values directly to fields.
-
Extract multiple named response values for later placeholder use.
-
Upload JSON or XML metadata and binary documents during Upload.
-
Authenticate using Basic, OAuth, or custom headers.
-
Use placeholders and transforms to create dynamic request values.
By separating Connection Profiles from Endpoint Requests, EzeScan allows common service connection and authentication settings to be reused across multiple request definitions.