
The following information details the connectivity and functionality offered by the EzeScan integration with Objective eDRMS solution. It details the available options and how to configure an EzeScan job into Objective.
Developed for Ezescan Release: 5.0.30 and Objective
 System Requirements
The Objective server is required to be licensed with the EzeScan Integration and if importing documents, the ECM Integration - API/Web Services (WebTalk) module.
Please contact your Objective account manager in regard to licensing these modules and obtaining the install files.
At time of writing the EzeScan bitness for integration via the Objective VB / C ++ dlls is 32 bit (x86). This is due to the Objective dlls currently being limited to 32 bit themselves.
The connection to Objective varies depending on the version installed. Please see two sections below.
For EzeScan integration to Objective up to 10.5.x the following is required:
|
EzeScan 5.0.28 x86 (or above) |
Objective version 10.5.x (up to) |
|
Objective |
Objective Developers Kit (installer) Files to be copied to EzeScan computer: 1. All .dll files in the \Objective\Developers Kit\VB folder must be copied into
2. The objapi.dll file in the \Objective\Developers Kit\C++ must be copied into
|
For EzeScan integration to Objective 10.6.3.1 and above the following is required:
|
EzeScan 5.0.28 x86 (or above) |
Objective version 10.6.3.1 (and above)
Requirements are different due to changes in the Objective authentication design with the addition of further dlls, some of which carry the same name as those used by EzeScan albeit a different version.
|
|
Objective |
Objective Developers Kit (installer) Files to be copied to EzeScan computer:
1. All .dll files in the \Objective\Developers Kit\VB folder must be copied into
The copy process will overwrite the following files in the EzeScan root. Microsoft.IdentityModel.JsonWebTokens.dll
2. As there are now different version system files (the overwritten dlls), a series of Binding Redirections will need to be added to inform EzeScan to use the different versions of the 4 overwritten files. 3. The Binding Redirects will need to be added to the following config file located in C:\Program Files (x86)\Outback Imaging\EzeScan EzeScan.exe.config
Please see here for the Binding Redirects configuration.
1. The objapi.dll file in the \Objective\Developers Kit\C++ must be copied into
|
|
|
If there is a requirement to import documents directly from Objective into EzeScan then the following is required.
|
EzeScan 5.0.28 x86 (or above) |
1. Objective WebTalk URL e.g. https://objective:8443/ 2. Authentication Type (Basic, Windows Single Sign On) |
Binding Redirection
Binding Redirection is a specific configuration for instructing the EzeScan executable to reference particular dll versions and is applied as xml into the following file.
C:\Program Files (x86)\Outback Imaging\EzeScan\EzeScan.exe.config
The EzeScan.exe.config file is an xml file and will requires the following xml lines inserted into the end of the existing xml.
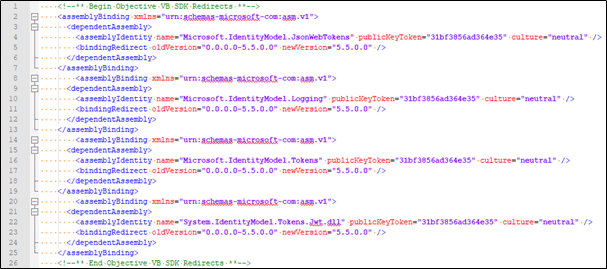
Where the result will look as per below. 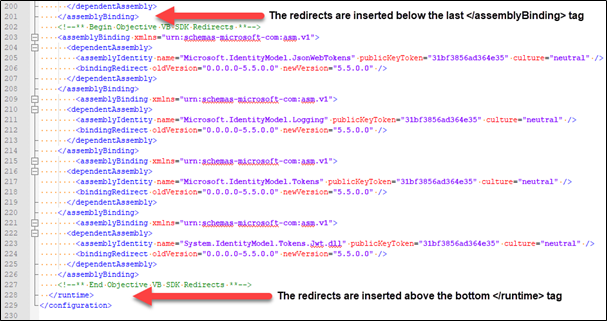
The EzeScan.exe.config is a text based xml file and can be edited in Windows Notepad or an alternate performance text editor like Notepad++
TIP: Contact support@ezescan.com.au quoting Case 50671 to request BindingRedirects.txt containing the required redirections to be inserted into the exe.config file.
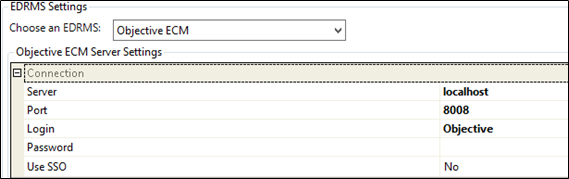
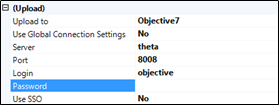
Configuring Connection Settings
When configuring a Job, KFI or Upload the Objective connection settings panel must be filled in. If using a single Objective server, it is recommended that the Objective connection settings are configured globally. This means that when configuring a new KFI and UPLOAD the settings can be inherited from here.
To do this:
-
Click the Admin menu, choose Workstation Options.
-
Click the EDRMS tab and choose the Objective ECM option from the drop down list that appears.
-
Enter the following information:
|
Field |
Description |
|
Server |
Specify the name or IP address of the Objective Server. |
|
Port |
Specify the port of the Objective Server. |
|
Login |
Specify the login name, if using SSO authentication then leave blank. |
|
Password |
Specify the password, if using SSO authentication then leave blank. |
|
Use SSO |
If using SSO authentication then set to Yes. |
 Job Settings
There are two ways that EzeScan can integrate with Objective.
-
Importing documents – This is performed via a WebTalk connection.
-
Saving documents – This is performed via the Client SDK.
EzeScan uses the KFI and UPLOAD modules for these tasks. They are detailed further below in the KFI Field Settings.
Import documents from Objective
To enable importing documents from Objective into EzeScan the following needs to be performed.
-
Go into the Job -> Import tab -> Import file processing -> Import Sources and click

-
Enter the WebTalk Server URL e.g. https://obj10server:8443/
-
Enter the Authentication Type:
If using Windows (Single Sign-On) the Domain, Username and password fields can be left blank.
For example: 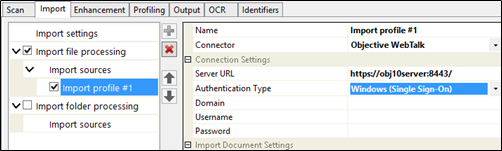
To run the job click on the Import file button 

A screen like this will display to allow the operator to search for a document. 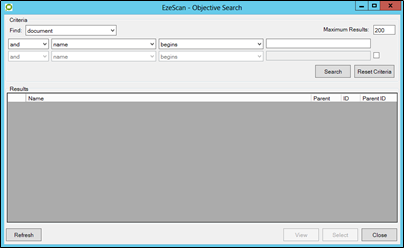
Upon searching they can click select on a result and the document will be imported into EzeScan.
KFI Field Settings
The KFI Field Settings allow the operator to browse into Objective during KFI indexing so the operator can then select folders and object metadata to be applied to the document.
The following functionality requires that the EzeScan workstation be licensed for the EDRMS as well as KFI and UPLOAD modules.
Enabling browse options
The Objective settings must be configured before a KFI field can use the Objective browse functionality.
-
Press F7 to display the KFI form.
-
Click the EDRMS
-
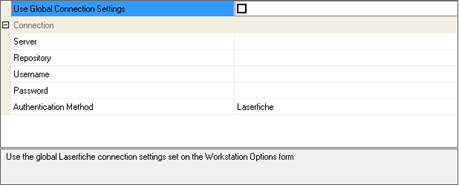
If using the global connection settings from the Workstation Options, tick the Use Global Connection Settings box; otherwise fill in the Connection settings.

-
Click the Fields
-
To enable a field to access Objective you need to:
-
Click the edit link under Properties for the field.
-
Click the Objective7
-
Tick the Enable Objective7 Browse Button
-
The browse parameters will become active.
-
Click OK.
-
Configuring browse parameters
Browse Mode
This option determines the type of Objective Browser that is shown when the Browse button (F3) is pressed during indexing.
Choose from one of the following five options:
|
Option |
Description |
|
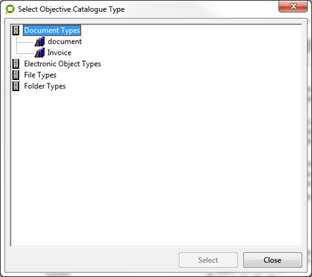
Catalogue Types |
Enables the operator to browse the available catalogue types on the Objective Server. This option would mainly be used for setup and troubleshooting catalogue types. |
|
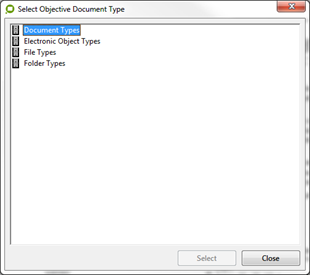
Document Types |
Enables the operator to browse the available catalogue types on the Objective Server. This option would mainly be used for setup and troubleshooting document types. |
|
Fields |
Enables the operator to browse the available fields on the Objective Server. This option would mainly be used for setup and troubleshooting fields. |
|
Field Lookup |
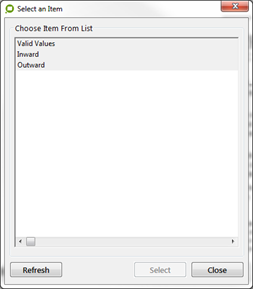
Enables the operator to browse an Objective List Validation field. Click the button on the Lookup List Field option. Browse through the Document Types, Catalogue Types, to select your field. Click Select and the Field ID will be stored. During indexing the operator will be shown a screen similar to below which will display the available items in the validation list. The operator can then choose an item and click Select. |
|
Folder and Files |
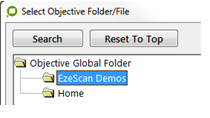
Enables the operator to browse for a Folder \ File or document. If the operator wishes to select a document, set Display Documents to Yes. If the operator wishes to browse from a specific folder ID in the Objective Folder structure, click this button for the Start at Parent ID, and select the folder that you wish the browse is to start from. e.g. If the operator would like the search results to be expanded to show the child objects tick the option “Expand Search Results” |
|
Groups |
Enables the operator to browse and select an Objective Group. If the operator wishes to browse from a specific Group ID in the Objective Folder structure, click the Select the group that you want the browse to start from. |
|
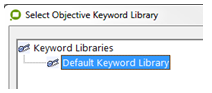
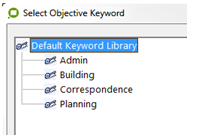
Keywords |
Enables the operator to browse and select an Objective Keyword. If the operator wishes to browse from a specific Keyword library, click the for the Start at Parent ID. Select the keyword library that you wish to browse from. During indexing the operator will see a screen similar to below. The operator can then select the respective keyword and then click Select. |
|
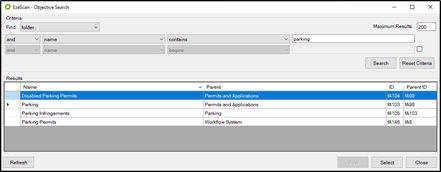
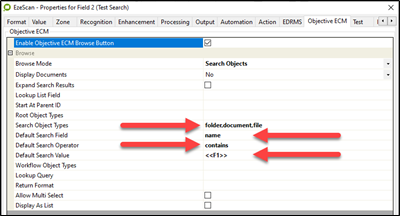
Search Objects |
Enables the operator to search for specific Objective Objects. Click the If no object types are specified the form will display all available types. During indexing the operator will be shown a similar screen to below. TIP: Search Objects supports the following options for default search form configuration. Search Object Types: List of default items displayed in the Find dropdown where the first item in the comma separated list is the default item displayed in the Find dropdown. Default Search Field: Predefined search object field. Default Search Operator: e.g. begins, contains, is, is not. Default Search Value: A default value to search for, can be a previous field’s placeholder. e.g. <<F1>> Using the above a search form can be defined with required defaults to enable preconfigured and targeted searching. |
|
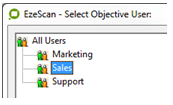
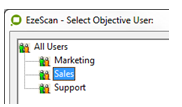
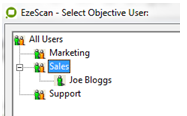
Users |
Enables the operator to browse and select an Objective User. If the operator wishes to browse from a specific Group ID in the Objective structure, click the Select the group that you wish to browse is to start from. During KFI run time the operator will be shown a similar screen as below. They can then double click in the group to see its users. For example: |
|
Workflows |
Enables the operator to browse and select an Objective Workflow. The operator can use the Workflow Object Types setting to browse and select the workflows. |
|
Get Current User ID |
This option will return the current Objective User ID. This could be used to then pass onto another Objective field. E.g. Owner. |
|
Lookup Value |
This option will allow for returning data back from an object. For example the Title could be bought back from a File. Use the “Lookup Query” and “Return Format” options. It supports two lookup formats <ObjectType>/<SearchField>/<SearchValue> <ObjectType>/<SearchField>/<SearchOperator>/<SearchValue>
NOTE: Search operators can be used exactly like the ones in the Navigator client. E.g. contains, contains (complete words), does not contain, does not contain (complete words), ends, is blank, is exactly, is not, is not blank.
The Return format is what data to bring back from the search. e.g. {CatalogueId:FieldName} would be something lick {cA12:Field Name}".
Example 1 - This will bring back the title of Document ID A406 Lookup Query - Document/ObjectID/A406 Return Format – {name}
Example 2 - This will bring back the Handy folder for that user. Lookup Query - user/user signon/contains/<<username>> Return Format – {id_handy_folder}
Example 3 – This will bring back the name and id from a search on an object. Lookup Query - Box/name/contains/<<F41>> Return Format - {name} {id_object} |

Upload Settings
The UPLOAD module will obtain the KFI output data to pass into Objective saving the document into the respective file / folder and applying metadata information.
The following functionality requires that the EzeScan Workstation be licensed for the EDRMS and KFI and UPLOAD modules.
Configuring connection parameters
-
Open the Upload Form (F8).
-
Choose the Upload Type you want to configure.
-
On the left hand side in the Upload Properties pane choose Objective7 in the Upload To
-
If using the global connection settings from the Workstation Options. Set the Use Global Connection Settings option to Yes; otherwise fill in the Connection
-
If using SSO authentication, leave the Login and Password blank and set Use SSO to Yes.
Configuring upload parameters
The following parameters are listed directly underneath the connection parameters. It is recommended that the parameter values not be modified unless you are familiar with their functionality. For further information please see the table below. 
|
Parameter Name |
Description |
||||||
|
Duplicate Names |
Use this to specify the policy that should be applied when a duplicate document name is detected in the upload folder/file. The following options are available –
|
||||||
|
Bypass Document Upload |
Set this option to Yes to not upload the document. This option is intended for chaining together Uploads for creating sub folders. |
||||||
|
Create Missing Folder/File |
If the operator is using the mappings “Parent Folder New” or “Parent File New” this option can be used to not create the Folder / File for if there is no results. Setting the option to Yes will create the Folder / File and save the document into it. |
Configuring built-in upload fields
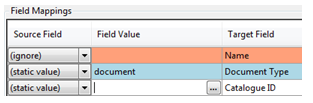
The following fields will appear after choosing Upload To Objective option in the Upload Properties pane. These are the default Objective fields.
Each field can have its input set using the Source Field cell, noting that the Name and Document Type fields can't be set to ignore. 
|
Target Field |
Description |
|
Name |
This is the Objective Name field |
|
Document Type |
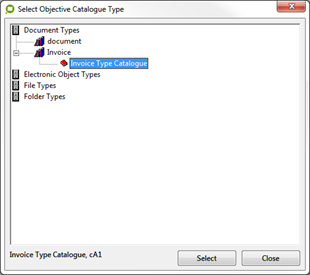
This is the Objective Document Type that the document will be saved as. Set this value to “Static” then click inside the field value and a ... button will appear. When clicking this button the available Objective Document types will be displayed. Select the Document Type, then click “Select Doc Type”. |
|
Catalogue ID |
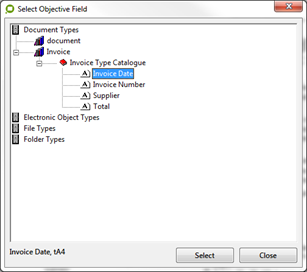
This is the Objective Catalogue ID. This option is used to set EzeScan to apply this catalogue to the saved document. Note: If applying data across multiple catalogues do not set this option, leave it as ignore. Use the Auto Populate button and it will display all catalogues associated to the Objective Document Type. If the Source Field is set to a Static Value a browse button will appear. For example: When selected, EzeScan will display a screen which will contain all the available Objective, Document Types, Catalogue Types, Fields. For example: The operator can select a Catalogue and then click select to apply the setting. |
|
Classification |
This is the Objective Classification field. |
|
Comment |
This is the Objective Comment field. |
|
Corporate Value |
This is the Corporate Value field. This would usually be set with Y (Yes) or N (No). |
|
Create Sub File |
This will create an Objective File and then place the saved document into it. A Parent Folder must be specified for EzeScan to know where to save the file to. When applying this field, EzeScan requires the Object ID of the File type then three pipe values, then name of the file, three pipe values and the repository number. For example: dotdA11|||EzeScan File|||rA1 If the File also requires Catalogue fields to be populated they need to be appended after the file details. Two pipes must be specified to do this. For example: dotdA11|||EzeScan File|||rA1|||cA1||Invoice Number||123456 |
|
Create Sub Folder |
This will create an Objective Folder and then place the saved document into it. If using multiple levels of sub folders the document will be placed in the lowest level folder.
Note: A Parent Folder must be specified for EzeScan to know where to save the folder to.
To apply this, EzeScan requires the Object ID of the folder then three pipes and then the name of the folder. For example: dotdA12|||Scanned Documents
If more than one level of sub folders is required to be created then four pipes must be used to separate the folders. For example: dotdA12|||Sub Folder||||dotdA12|||Sub Sub Folder
If the Folder requires Catalogue fields to be populated they need to be appended after the file details. Two pipes must be specified to do this. For example: dotdA12|||EzeScan Folder|||cA1||Invoice Number||123456 |
|
Create File Sub Folder |
This will create an Objective Folder within the File that is created using the Create Sub File field. The upload document will then be placed within this Folder. To apply this, EzeScan requires the Object ID of the folder then three pipes and then the name of the folder. For example: dotdA12|||Scanned Documents
If the Folder requires Catalogue fields to be populated they need to be appended after the file details. Two pipes must be specified to do this. For example: dotdA12|||EzeScan Folder|||cA1||Invoice Number||123456 |
|
File Series ID |
This is the Objective File Series to be used with the newly created Objective File. This option can only be used in conjunction with the “Create Sub File” target mapping. |
|
Keywords |
This will apply an Objective Keyword to the saved document. The keyword must be from an Objective Keyword library. |
|
Link To |
This will apply an Objective Keyword to the saved document. The keyword must be from an Objective Keyword library. |
|
Link To (Reference) |
This will apply a Reference link to the uploaded document. The link is another Objective Object, i.e. another document, file, folder etc. |
|
Link To (Depends On) |
This will apply a Depends On link to the uploaded document. The link is another Objective Object, i.e. another document, file, folder etc. |
|
Link To (Compound With) |
This will apply a Compound With link to the uploaded document. The link is another Objective Object, i.e. another document, file, folder etc. |
|
Link To (Is Required By) |
This will apply a Is Required By link to the uploaded document. The link is another Objective Object, i.e. another document, file, folder etc. |
|
Link To (Former) |
This will apply a Former link to the uploaded document. The link is another Objective Object, i.e. another document, file, folder etc. |
|
Link To (Later) |
This will apply a Later link to the uploaded document. The link is another Objective Object, i.e. another document, file, folder etc. |
|
Link To (Cross-Reference) |
This will apply a Cross-Reference link to the uploaded document. The link is another Objective Object, i.e. another document, file, folder etc. |
|
Link To (Rendition) |
This will apply a Rendition link to the uploaded document. The link is another Objective Object, i.e. another document, file, folder etc. |
|
Link To (Duplicate) |
This will apply a Link To link to the uploaded document. The link is another Objective Object, i.e. another document, file, folder etc. |
|
Note |
This is the Objective Note Field, this value can only be populated on revision of a document (Parent Document mapping). |
|
Owner |
This field is the Objective User that owns the uploaded document. |
|
Parent Document |
This is the Objective document ID. When specified EzeScan will upload the image as a new version of this document. |
|
Parent Document / Parent Folder |
This is the Object Document or Folder ID. If a document is specified, EzeScan will upload a new version of the document. If a Folder is specified EzeScan will upload the document into the folder. |
|
Parent Folder |
This is the Objective Folder ID. When specified EzeScan will upload the document into the respective folder. |
|
Parent Folder New |
If the folder does not exist, this option will search for the folder (anywhere in Objective). If it does not exist, EzeScan will create an Objective Folder and then place the saved document into it. To apply this, EzeScan requires the Object ID of the folder type then three pipes and then the name of the folder. For example: dotdA12|||Scanned Documents
It also allows the operator to perform a search on a catalogue field to see if the folder already exists. If it does, EzeScan will store the document into the folder, if not EzeScan will create the folder and put the document into it. For example: this is searching for a folder that has a catalogue field of “Box Number” set to “0001” dotdA12|||Scanned Documents|||Box Number||is exactly||0001
The operator can perform an “is exactly” or “begins with” search.
Please Note: A Parent Folder (using the Parent Folder mapping) must be specified for EzeScan to know where to create the new folder for if it does not exist. |
|
Parent Folder New Fields |
This option works in conjunction with “Parent Folder New”. When a new folder is created catalogue fields can be applied to it.
This will require the value to be populated as follows. Catalogue||Field Name||Field Value e.g. cA1||Box Number||0001
The operator can also populate multiple values, e.g. cA1||Box Number||0001||cA1||Document Type||Internal |
|
Parent File New |
If the file does not exist, this option will search for the file (anywhere in Objective). If it does not exist, EzeScan will create an Objective File and then place the saved document into it.
Note: A Parent Folder must be specified for EzeScan to know where to save the folder to.
To apply this, EzeScan requires the Object ID of the file type then three pipes and then the name of the folder. For example: dotdA11|||Scanned Documents
It also allows the operator to perform a search on a catalogue field to see if the folder already exists. If it does, EzeScan will store the document into the folder, if not EzeScan will create the folder and put the document into it. For example: this is searching for a folder that has a catalogue field of “Box Number” set to “0001” dotdA11|||Scanned Documents|||Box Number||is exactly||0001
The operator can perform an “is exactly” or “begins with” search.
Please Note: A Parent Folder (using the Parent Folder mapping) must be specified for EzeScan to know where to create the new folder for if it does not exist. |
|
Parent File New Fields |
This option works in conjunction with “Parent File New”. When a new file is created catalogue fields can be applied to it. This will require the value to be populated as follows. Catalogue||Field Name||Field Value e.g. cA1||Box Number||0001 The operator can also populate multiple values, e.g. cA1||Box Number||0001||cA1||Document Type||Internal |
|
Parent File Number |
This is the Objective Parent File Number. When specified EzeScan will use this as the root File when determining the directory to upload the document to. (Example qA12) Use this option when the file number is always known or being searched for within the KFI, otherwise considering using the Parent File New to create a new File. |
|
Reason For Change |
When uploading a document as a new version, Objective has a Reason. If this is populated EzeScan will store this into this field. |
|
Run Workflow |
This will start an Objective Workflow for the uploaded document. The workflow can be specified from the KFI indexing process or set as a static value in Upload. The format required for the Upload Field is as follows - Workflow Slip ID || Workflow Slip Owner || Workflow Slip Title || Workflow comment For example, dwflA132 || uA1 || Approve Invoice || EzeScan Initiated Workflow
The Workflow Slip Title is optional and therefore will be automatically generated by EzeScan if left blank. If the Workflow Slip Definition has been configured to automatically generate the Slip Title then the value NO_NAME should be used. For example, dwflA132 || uA1 || NO_NAME || EzeScan Initiated Workflow
Please Note: If browsing for workflows EzeScan will only display workflows set to auto start. |
|
Status |
This is the Objective Document status. e.g. Draft or Published. |
Configuring custom template fields
After selecting the Document Type or Catalogue ID to assign to the uploaded document, click the Auto Populate button at the bottom of the screen.
This will result in the Objective connector returning a list of custom fields that relate to that Document Type or Catalogue ID.
It is then a matter of setting the source values of those fields to the target values of the custom fields.
The Auto Populate button appears under the Field Mappings grid. 
Populating date time fields
To populate Objective Date Time fields the operator can use the <<(Time Processed)(HH:MM:SS)>> placeholder as a suffix in the value.
When populating a date time field value in a KFI date field. Add the following to the KFI field output tab (Note the space at the start of the value). This will pass through the current time of scan. 
Inheriting metadata
If the operator is required to inherit the data from a parent folder, folio (Objective File) or a User, the respective options need be set in the Field Value.
To inherit from the parent Folder
Set the Source Field to (static value) and the Field Value to INHERIT_FROM_FOLDER 
To inherit from the Folio (Objective File)
Set the Source Field to (static value) and the Field Value to INHERIT_FROM_FOLIO 
To inherit from a User
Set the Source Field to (static value) and the Field Value to INHERIT_FROM_USER 
If the catalogue name from the inherited object is different to the catalogue name that the document is being uploaded to, the operator will need to define the ID of the catalogue to inherit from.
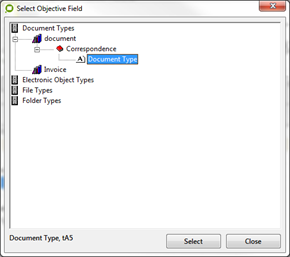
For example if the field to inherit from is called Document Type from a catalogue called File Type Catalogue, but when uploading the Document it needs to populate the Document Type field from the Correspondence catalogue. The operator will need to specify the ID of the catalogue to search for.
e.g. in this example the File Type Catalogue is cA2. 
The target field is configured correctly by specifying the catalogue name and field.
Applying KFI Output Data to Target Field Data
To pass through the KFI output data into the Upload module the operator is required to set the source field data to the target field data.
-
In the Upload type, set the Column names from option to the name of the KFI job Type.

-
In the Field Mappings Grid the operator can apply the Source Field settings to the Target Field settings. In the example below the Objective Target Field Name is being populated by the KFI Source Field Document Name.

-
When all the mappings are complete, click Apply.
-
Click OK to save the changes.
SERVER Routing Settings
The Routing module is another way of configuring EzeScan to use the KFI and UPLOAD modules to upload documents to Objective. As it can be configured to run as a windows service it is recommended for jobs that do not require operator intervention. For example, automated workflows like barcoding of forms with exception handling enabled so they can be processed on an EzeScan desktop or using another external process.
The following functionality requires that the EzeScan to be licensed for the SERVER product.
Configuring a route to upload
-
Click Admin and Choose Routing (F9)
-
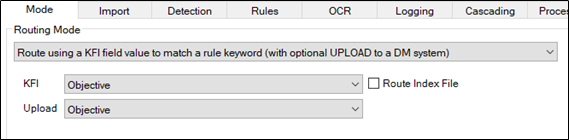
Create a new Route and set the mode to “Route using a KFI Field value to match a rule keyword”
-
In the KFI drop down list, select the KFI that will be used with the Route.
-
In the UPLOAD drop down list select the UPLOAD that will be used with the Route.
The route can then be tested using the 
Please refer to the Routing User Guide from the help menu for more information on Routing.
Running a Job for Saving Using KFI and Upload
To run a job to Objective using the KFI and UPLOAD modules, confirm that the Other Destination is set to KFI and the respective KFI and UPLOAD types are selected.
In the example below the KFI\UPLOAD types have been configured for a:
-
Document Name (Name of document)
-
Folder (Folder in the repository)
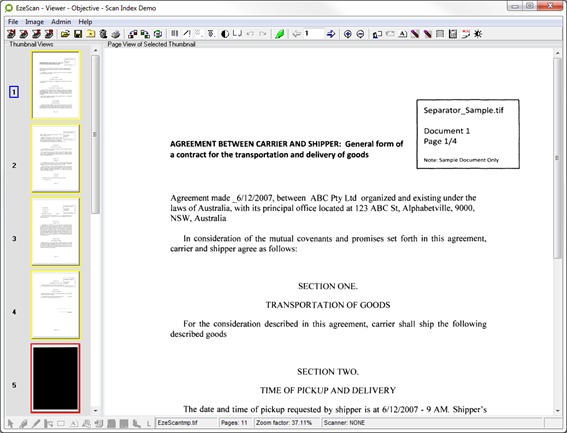
The image below shows a job using the KFI and upload modules. 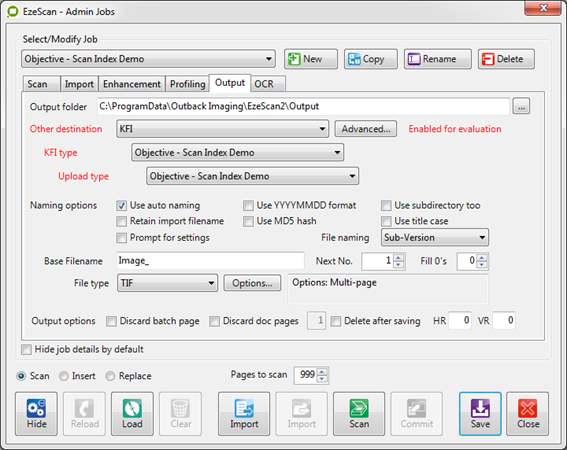
To run a job to Objective using the KFI and UPLOAD modules:
-
Click the scan/import or job button to load the image into the EzeScan viewer.
-
Press the F4 key or click the Profile button to index the document. The KFI screen will appear below the page view.
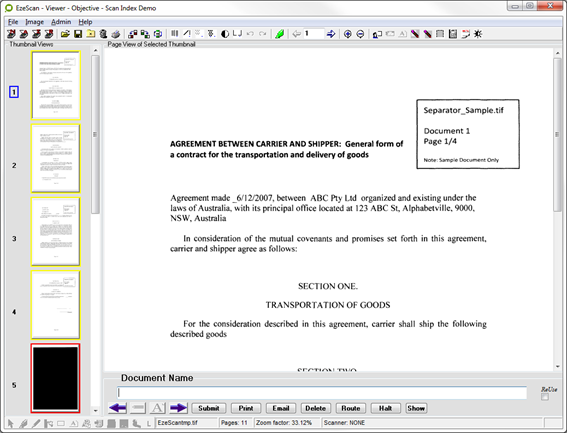
-
The operator can enter the Document Name.
-
When complete the operator can press Enter or click the

-
After the operator has completed the Document Name field, the next field will appear.

-
The operator will be prompted to select a folder.
-
When complete, press Enter and the submit button will highlight.
-
Press Enter or click

-
The document will be saved into the respective Objective folder and metadata applied.
There is sample Objective KFI / UPLOAD jobs in the downloads section on the EzeScan web site.
Running a Job for Saving Using SERVER Routing
The Routing module can be run in two ways:
-
In the EzeScan UI by selecting Admin -> Routing, selecting the respective Route and clicking the Run Routing button. This is good for testing or troubleshooting issues.
-
As a windows service. To do this the EzeScan Server service must be installed and started.
Please refer to the EzeScan Routing user guide on how to install and run the service.
Display Record Number After Saving Record
To enable this setting, please refer to the How to articles.
Objective Placeholders
<<OBJECTIVEUSERID>> - EzeScan will return the ID of the current Objective user, which can then be assigned to a User type field such as ‘Owner’.