
The following information details the connectivity and functionality offered by the EzeScan integration with the OpenText Content Manager electronic document records and management system (EDRMS) solution. Formerly known as Micro Focus Content Manager, HP Content Manager, HP Records Manager, and HP TRIM. It details the available options and how to configure an EzeScan job or Server workflow into the EDRMS.
For information on the OpenText Content Manager EDRMS solution please refer to the Micro Focus website - https://www.microfocus.com/en-us/home
For information on EzeScan please refer to the EzeScan website - https://ezescan.com.au
For details on the minimum requirements for OpenText Content Manager integration with EzeScan, please see below:
This EzeScan integration uses the COM SDK and requires the following:
-
Up to OpenText Content Manager 23.4 (Build 23.4.0.58)
-
The OpenText Content Manager Client (x86 or x64 must match the EzeScan installation bitness)
-
For versions 9.4.0 and above the COM Components must also be installed.
This is a separate installer, and advised to install the same bitness as the client. E.g. CM_COMComponents_x64.msi or CM_COMComponents_x86.msi -
Depending on the Content Manager version you may have to register a DLL.
-
Please refer to this https://ezescan.atlassian.net/wiki/spaces/EKB/pages/104890636/139.+COM+class+registration+issue+after+upgrading+to+Content+Manager+9.1.2.1108+and+above#.
-
Developed for EzeScan Release: 5.0
References to HPE Records Manager / TRIM have been updated in this information below to reflect the change of name in 2016 to Micro Focus Content Manager. Abbreviated Terms used within this information:
Micro Focus = MF
Micro Focus Content Manager = MFCM
Configuring Connection Settings
When configuring a Job, KFI or Upload to use the Content Manager connector, the connection settings panel must be filled in.
TIP: If only using a single Repository, it is recommended that the Micro Focus Content Manager connection settings are configured globally.
-
Click Admin menu, choose Workstation Options.
Click the EDRMS tab and choose the Micro Focus Content Manager option from the drop-down list that appears.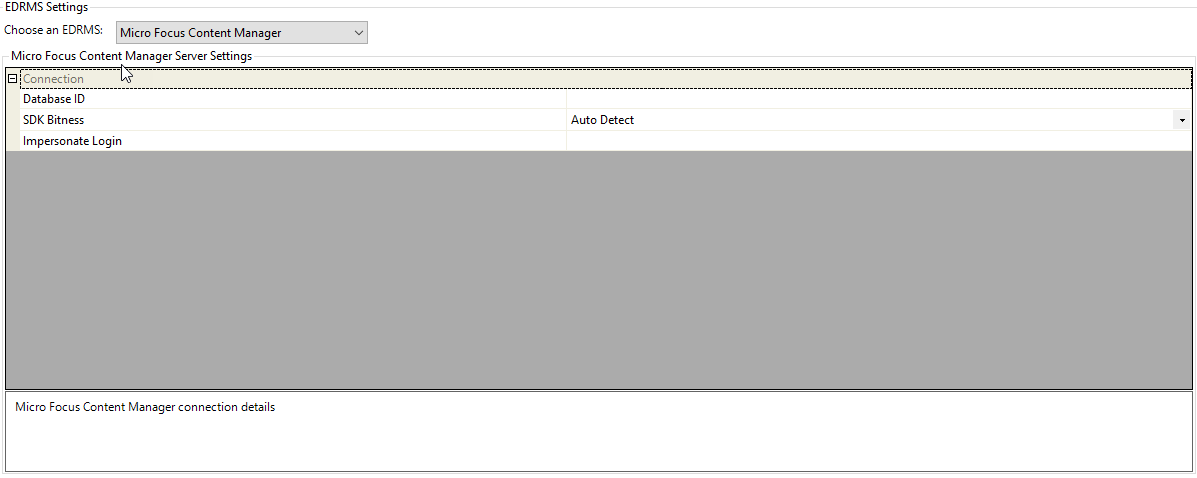
-
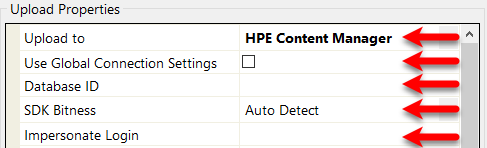
Enter the following information:
-
SDK Bitness - select the bitness of MF Content Manager SDK that is installed. Auto Detect will look for x86 first. If using x64 it is best to apply the setting to x64
-
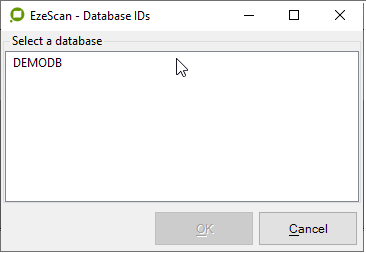
Database - click the browse button ... to display the available Content Manager datasets.
-
Select the dataset to be used with EzeScan and then click OK
-
The dataset ID will display in this setting.
-
-
Impersonate Login – This is used mainly in server environments. The operator may require to use another username to impersonate when searching and uploading records. The username will need to be configured with impersonate access in the Content Manager Enterprise Studio.
-
-
Click on Save button to complete and close the Workstation options screen.
Authentication
The authentication used when connecting to Content Manager server is not configurable within EzeScan, it is instead managed within the Content Manager Desktop application.
Any authentication methods requiring user interaction (e.g. Explicit Windows Auth and OpenID Connect) can only be used in the EzeScan desktop application.
Explicit Windows Auth and OpenID Connect are currently not supported in EzeScan Server and their use may result in the application deadlocking.
Job Settings
There are two ways the EzeScan connector can integrate with MFCM:
-
Using a simple output to MFCM new record form - This can be created with a Job only, commonly used for low volume or ad hoc type scanning.
-
Using the KFI and UPLOAD modules - This would be used for specific workflows that utilise EzeScan KFI to assist in minimal data entry, reusing data, forms extraction and setting workflow defaults.
The EzeScan to MFCM new record form functionality requires that the EzeScan Workstation be licensed with the EDRMS module.
Output documents using new record form
To enable MFCM output functionality on an EzeScan Job, without using a KFI and Upload:
-
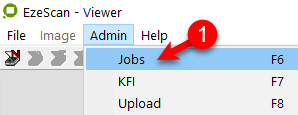
Click Admin and choose Jobs (F6)
-
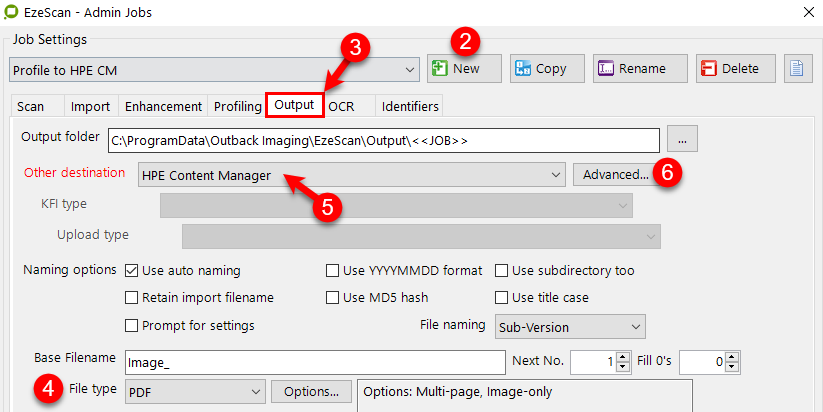
Click on the New button and save the job as (for example) Profile to MF CM
-
Click the No button if prompted to “also create a new KFI”
-
-
Click the Output tab
-
Select the File Type (e.g. PDF) to be saved into MF Content Manager
-
Choose the MF Content Manager option from the Other Destination dropdown
-
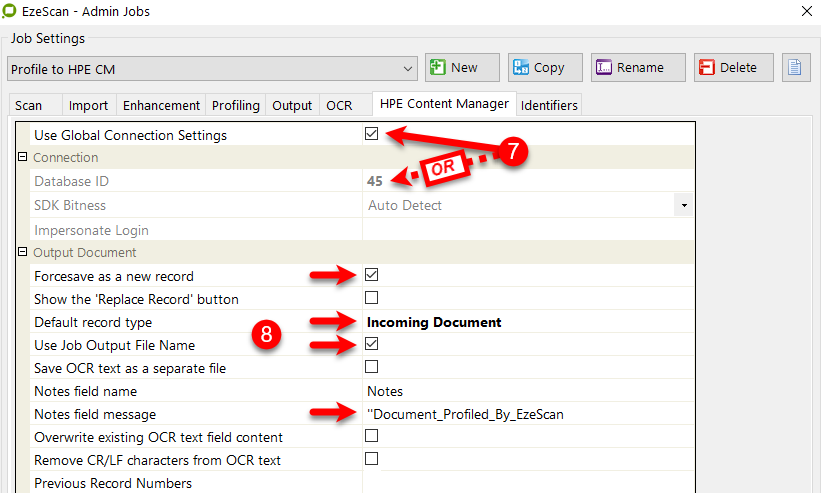
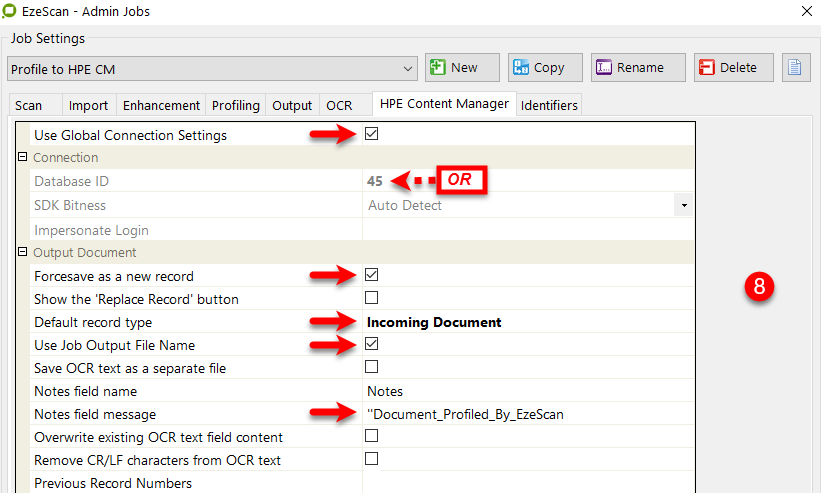
Select the MF Content Manager dataset. Select either the Global Connection settings OR specific Database ID.
-
Specify the Output Document settings. These settings are used if the operator wishes to save the OCR text into a MF Content Manager defined field.
-
If the operator wishes to always have the EzeScan job save as a specific record type, tick the “Force save as new record”
-
Then click the browse button ... on Default record type which will display the available electronic record types. Select the required record type and then click OK.
-
If a record type is not selected; the operator will be prompted to select the record type as the 1st step in the process

-
-
Add other settings as required
-
-
After modifying these settings click the Save button, otherwise the changes will be lost.
The Job is now configured to save scanned or imported documents into MF Content Manager.
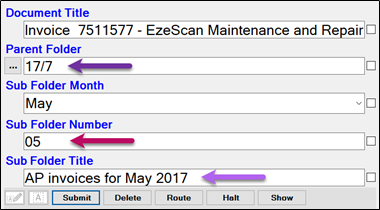
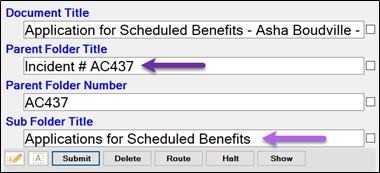
What the job looks like when it is run:
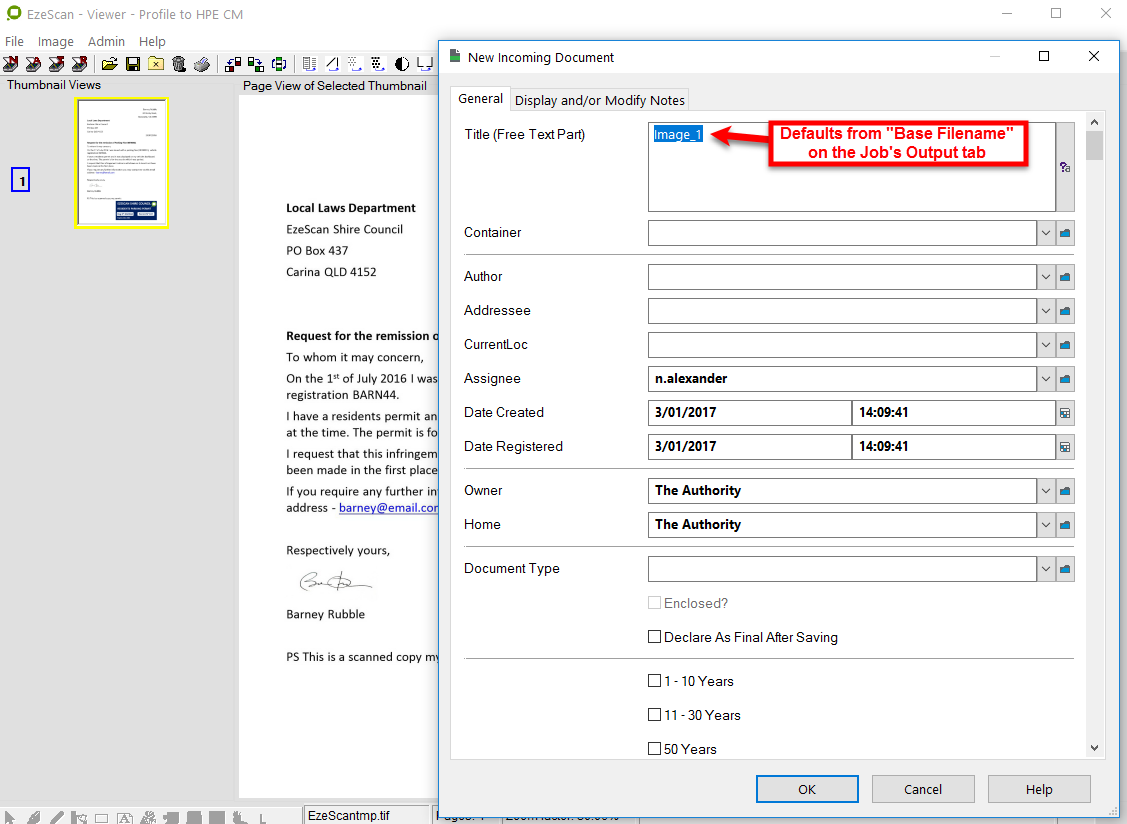
Some important points to note:
-
The Title will default from the "Base Filename" on the Job's Output tab
-
All mandatory fields need to be completed
-
All default fields set on the record type will auto populate the form (e.g. Assignee, Owner etc)
Import documents using browser
If there is a requirement to import documents from MF Content Manager into EzeScan, (e.g. for mark-up/redaction purposes) an EzeScan job can be configured to do this.
This would usually be a separate EzeScan job - one job to scan and save to MF Content Manager, then another to import from MF Content Manager, mark-up/redact and save back to MF Content Manager as a new revision or document.
The “Import documents” functionality on a Job is only available when Output to MF Content Manager is configured - please refer to Output documents using new record form on how to enable this.
To enable Import File functionality on a Job:
-
Click Admin and choose Jobs (F6)

-
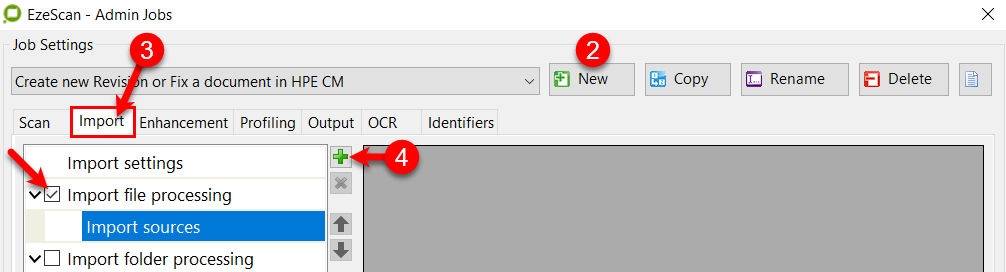
Select the Job you want to modify OR click on the New button and save the job as (for example) Create new Revision or Fix a document in MF CM
TIP: Click the No button if prompted to “also create a new KFI”
-
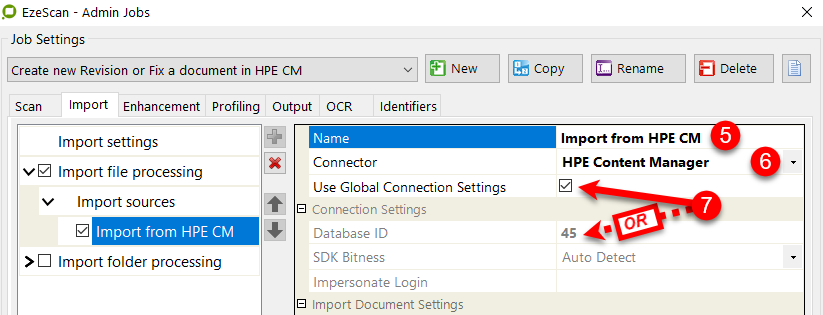
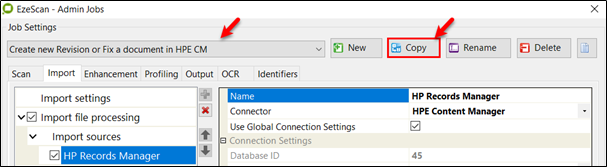
Click the Import tab and select Import file processing option
-
Click on the add

-
Give the new Import a name (e.g. Import from MF CM)
-
Select the MF Content Manager Connector from the list
-
Set the database to use
-
After modifying these settings click the Save button, otherwise the changes will be lost.
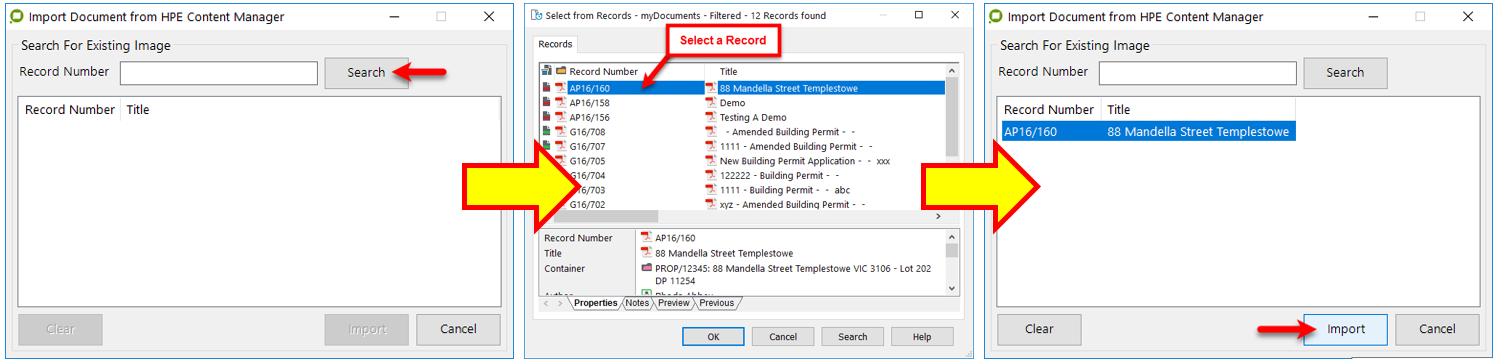
What the job looks like when the Import button is selected:
-
Search for the record
-
Select the record
-
Import the record
-
Make the necessary changes/modifications to it…
-
Insert new pages
-
Rotate pages
-
Re-sort pages
-
-
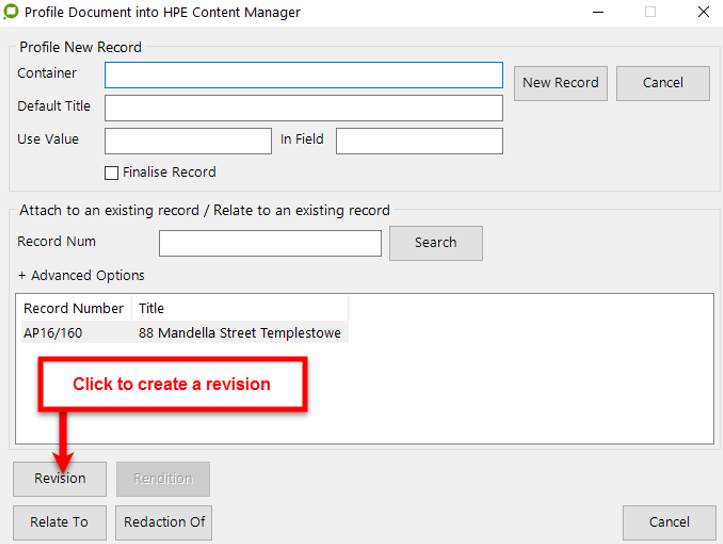
Click on the Profile icon

Wanting to create a Rendition? Please refer to the Create a “Text Rendition” of an existing MF Content Manager Document section.
KFI Field Settings
The KFI Field Settings allow the operator to browse into MF Content Manager during KFI indexing so the operator can select a record, container and other object types to be applied to the document.
The following functionality requires that the EzeScan workstation be licensed for the EDRMS as well as KFI and UPLOAD modules.
Enabling browse options
The MF Content Manager settings must be configured before a KFI field can use the MF Content Manager browse functionality.
-
Open the respective KFI (press F7) form.
-
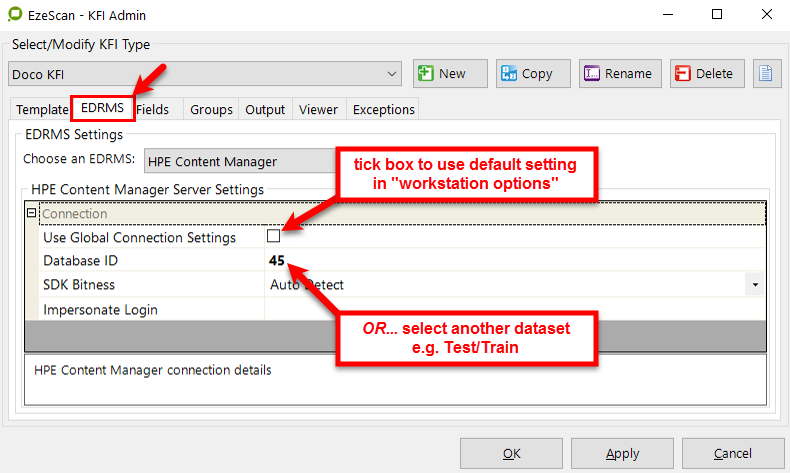
Click the EDRMS tab.
-
If using the operator has set to use MF Content Manager in the Workstation options (see Configuring Connect Settings), MF Content Manager will appear automatically.
-
If this was has not set to then select from the pull down list to use MF Content Manager
-
Click the browse button ... to display the available MF Content Manager datasets.
-
Select the dataset to be used with EzeScan and then click OK.
-
The dataset ID will display in this setting.
-
-
-
Click the Fields tab.
-
To enable a field to access MF Content Manager you need to:
-
Click the edit link under Properties for the field.
-
Click the MF Content Manager tab.
-
The browse parameters will now become active.
-
The following section covers how to configure the various options available on the MF Content Manager tab.
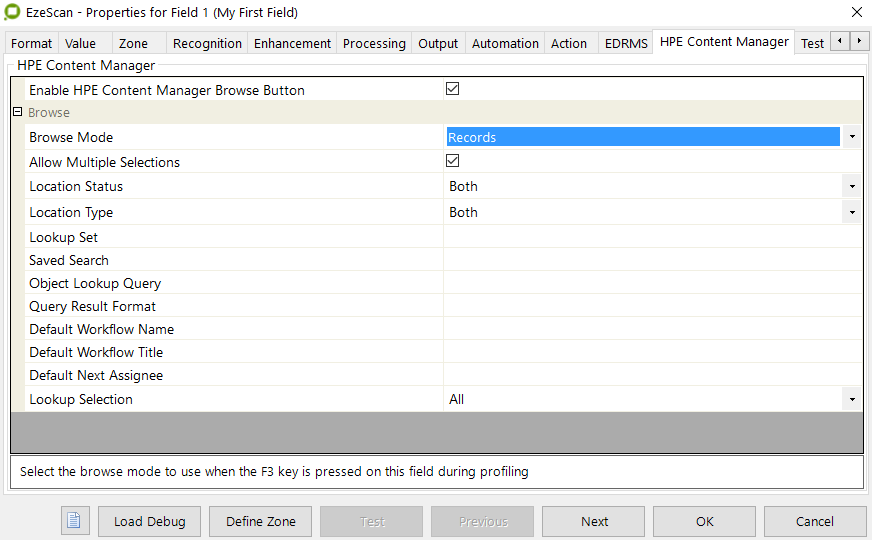
TIP: To activate the browse function you must tick the Enable MF Content Manager Browse Button box at top of the window
There is an option at the bottom of the screen called “Lookup Selection”, which has 2 options; depending on the Browse method used:
All - Will display all items e.g. all locations
Favourites - Will display the logged in user’s Favourites e.g. only locations in their favourites
Using the Favourites option may cause problems, especially if the operator is not using the favourites options in MF Content Manager
Configuring browse parameters
Browse Mode
When selected this option enables the MF Content Manager Classification Browse button ... on the EzeScan Viewer KFI indexing panel during indexing.
Choose from one of the following options:
Option
|
Description
|
|---|---|
|
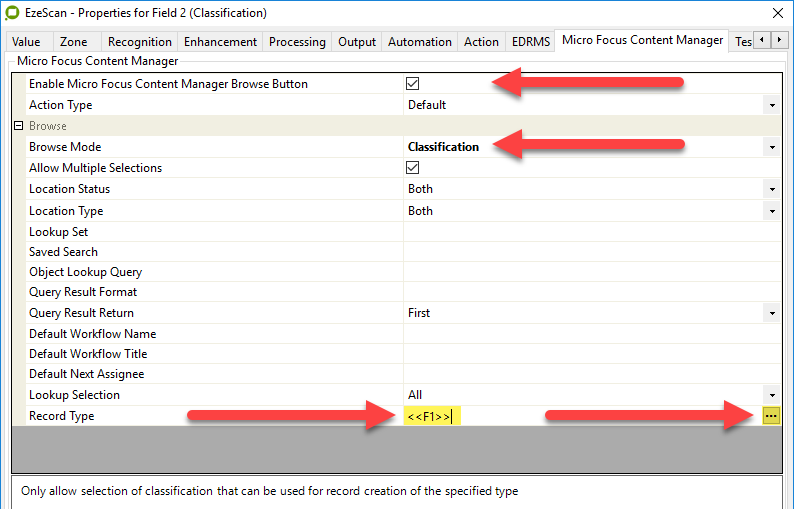
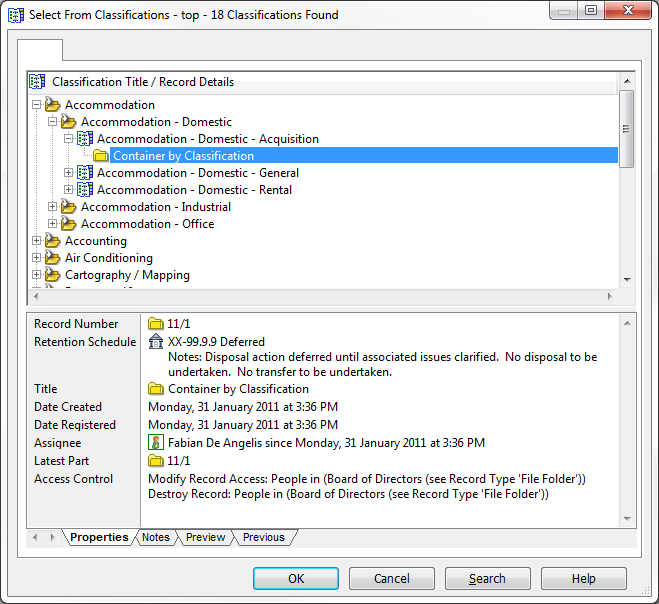
CLASSIFICATION |
The Classification function allows an operator to browse and select a Classification from the list of available Content Manager Classifications.
The function also includes the option of a Record Type for when the Classification is directly defined to a particular Record Type. The Record Type value can be hardcoded (chosen via a browse button), or can be the contents of a previous field’s value.
The below example pic shows the Record Type as being defined in KFI field 1, alternatively a Record Type can be hardcoded via selecting using the Browse button on the right. |
|
LOOKUP CLASSIFICATION |
The Classification function also has an Action Type of “Lookup Classification” where a query can be built to return a particular Classification value. TIP: This functionality requires Content Manager sdk 8.2 and above. Supported output property placeholder values are: IdNumber - The code for the Classification e.g. 122/600/ Name - The name of a Classification node e.g. Accounting Title - The full title of the Classification e.g. Accounting - Accounting Stores in Transit URI - The MFCM Uri number assigned to the found item. e.g. 94
Supported search property placeholders: title - The full title of the Classification name - The names of a Classification node number - The Classification number
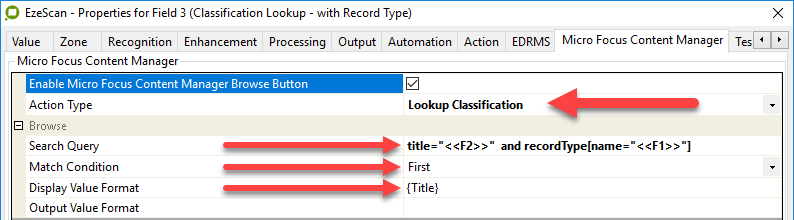
The Example query as shown below will search for the Classification Title value where there is a required Record Type attached to the Classification.
Search Query: title="<<F2>>" and recordType[name="<<F1>>"] Display Value Format: {Title}
The “First” option will return the first returned result where there are multiple results. The “Single Only” option requires the search return exactly one result only, where there is more than a single result a null value will be returned.
The Classification below as it exists in MFCM (no Record Type assigned).
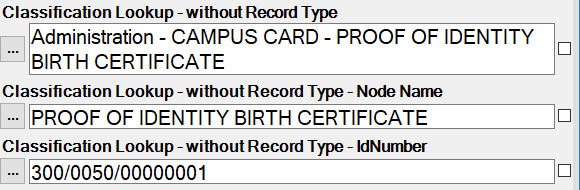
The above Classification Lookup example results in EzeScan.
The fields examples are populated based on a lookup of a Classification title with each field returning a different value. Search Query: title="<<F2>>" Display Value Format: {Title} Search Query: title="<<F2>>" Display Value Format: {Name} Search Query: title="<<F2>>" Display Value Format: {IdNumber}
Searches can also be joined with the and/or operators.
The Classification lookup functionality also includes the option of an “Output Field Value” as show by the Green arrow.
The default is not populated, however if populated with one of the standard output property placeholders, the following will occur.
A special hidden and linked field will be automatically created as the following field suffixed with “ID”.
The auto created field will populate with the output value of the Placeholder in the “Output Value Format” of the preceding field.
The functionality is to provide additional data return options, for example to lookup and display a Classification Title while also returning the Classification’s number, or vice versa. Once created the two fields are forever linked and deleting one will automatically delete the other.
|
|
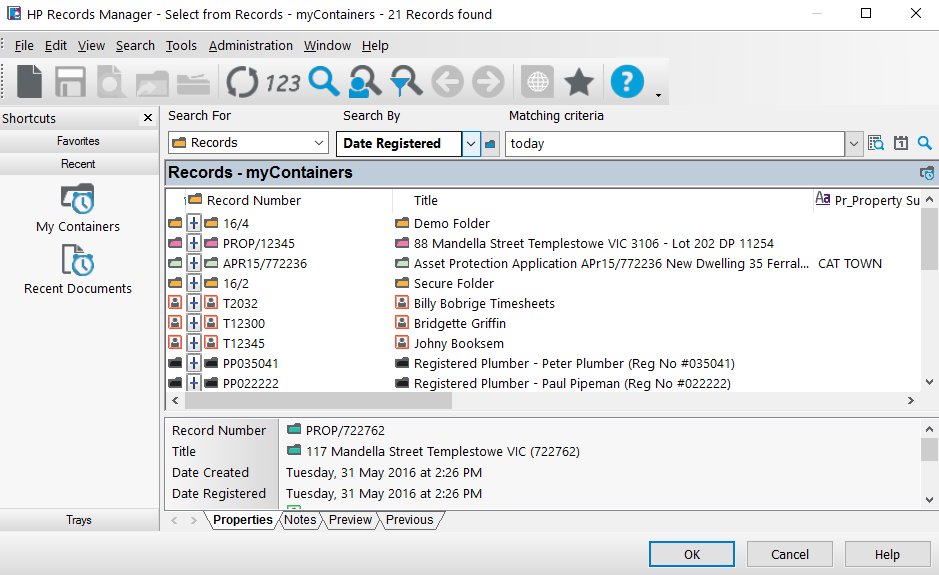
CONTAINER RECORD UI |
This will allow the KFI operator to choose which MF Content Manager Container to attach the document to.
During profiling, when the KFI browse button ... is clicked by the operator, the Select From Records - My Containers screen is displayed.
The operator can then select the item from the list, or search for a container (and with the correct upload mapping) which will apply the Container value to the saved document. |
|
CONTAINERS |
This will allow the KFI operator choose which container to attach the document to. During profiling, when the KFI browse button ... is clicked by the operator, the Select From Records - My Containers screen is displayed.
The operator can then select the item from the list, or search for a container (and with the correct upload mapping) which will apply the Container value to the saved document. TIP: This method provides the operator with the ability to search for a container if it’s not in the list; whereas the Container Record UI function does not.
|
|
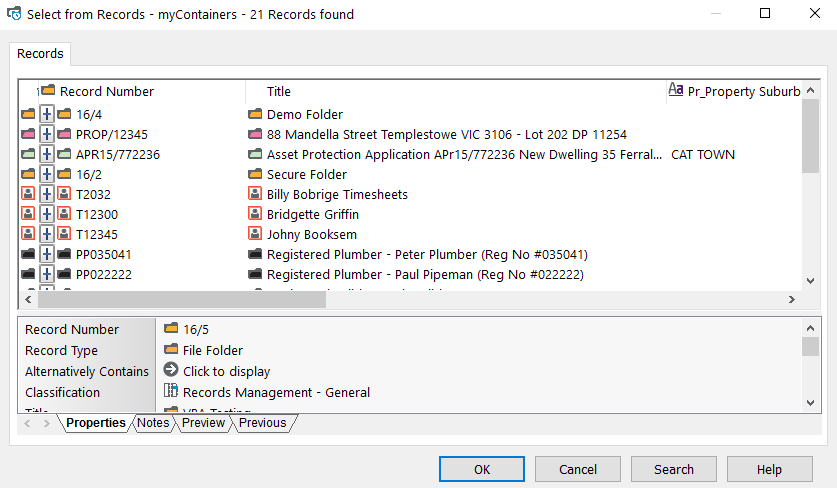
CONTAINERS BY CLASSIFICATION |
This will allow the KFI operator choose which container to attach the document to.
During profiling, when the KFI browse button ... is clicked by the operator, the Select From Records - My Containers screen is displayed.
The operator can then select the item from the list, or search for a container via classification (and with the correct upload mapping) which will apply the Container value to the saved document. |
|
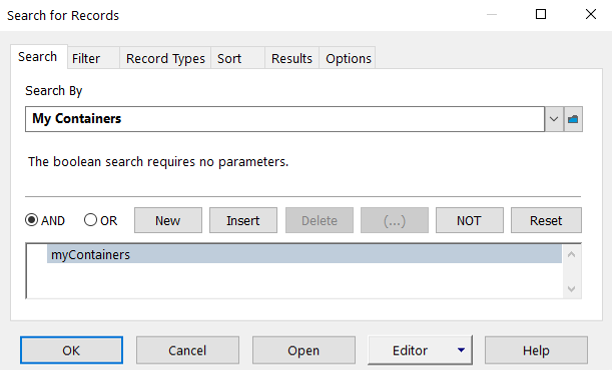
CONTAINERS BY QUERY |
This will allow the KFI operator choose which container to attach the document to. The operator can use the search methods required to find the respective container.
The operator can then search for a Container and select the item from the list (and with the correct upload mapping) which will apply the Container value to the saved document. |
|
EXECUTE QUERY |
This option will allow returning of data from a Record or Location type object.
There are four settings in this option:
The query field needs to be run after the field it is looking up e.g. If the Record/Location is Field 3 then this execute query field would have to be from either Field 4 or onwards.
TIP: Examples are provided in section Execute Query statements
|
|
LOCATIONS |
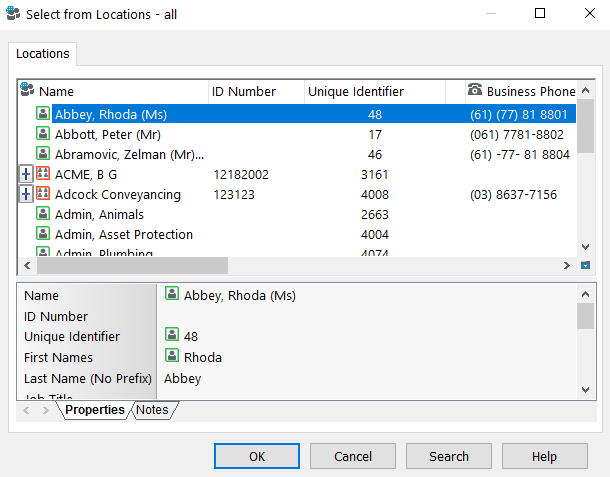
This will allow the KFI operator to choose which location to apply to a location type attribute applied to the document. TIP: The operator can also filter the location types to only display active or inactive locations and internal or external locations (or the default of both). When they click on the browse button ... in the KFI they should see this screen…
The operator can then select the item from the list, or search for a location (and with the correct upload mapping) which will apply the location value to the saved document. |
|
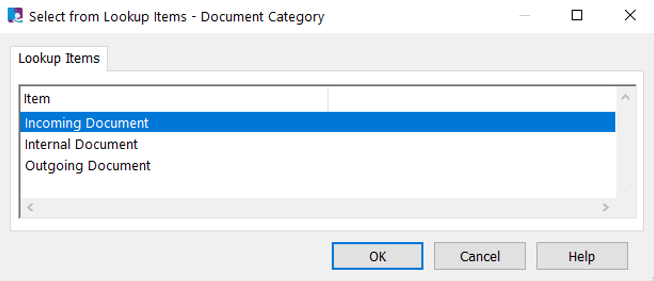
LOOKUP SET |
Follow these steps…
TIP: You may have to run a search (using the Search button) to locate the Lookup Sets.
When the operator clicks on the browse ... button in the KFI they should see this screen; based on the Lookup Set selected in the settings (above)…
The operator can then select the item from the list (and with the correct upload mapping) which will apply the item value to the saved document. |
|
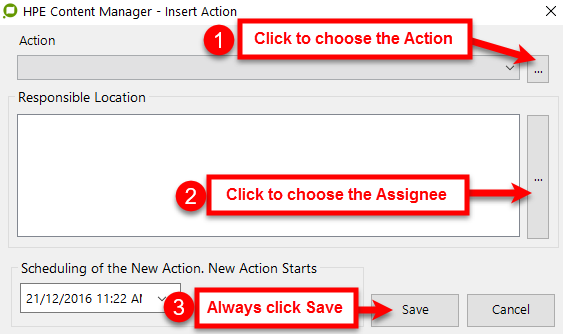
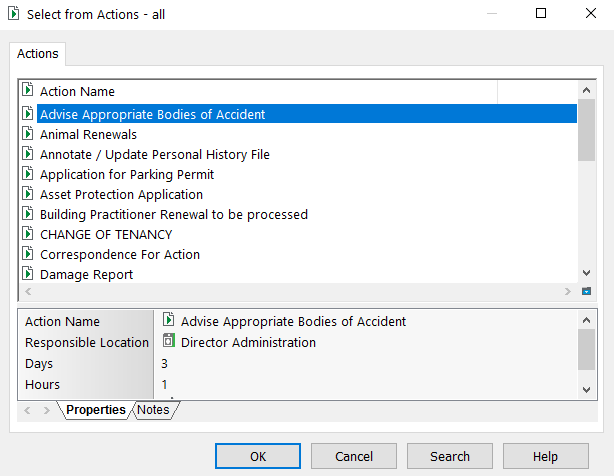
RECORD ACTIONS |
This will allow the KFI operator to choose an existing MF Content Manager Record Action to apply to the document. During profiling, when the KFI browse button ... is clicked by the operator, the EzeScan - Insert Action screen is displayed…
The Action (with the correct upload mapping) will be applied to the saved document. The selected Action must have the “Action can be attached to a Record” box ticked on the Action in MF Content Manager and the “Responsible Location” have the appropriate security access to process the action; otherwise the upload process may fail.
|
|
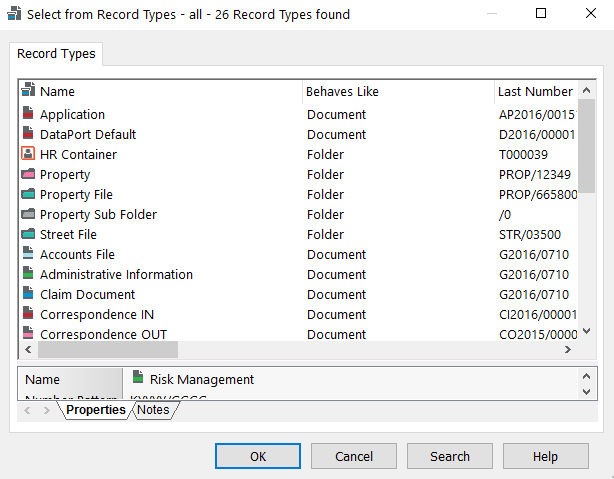
RECORD TYPES |
This will allow the KFI operator to select a record type for the document. When they click on the browse button ... in the KFI they should see this screen…
The operator can then select the item from the list (and with the correct upload mapping) will apply the record type to the saved document. |
|
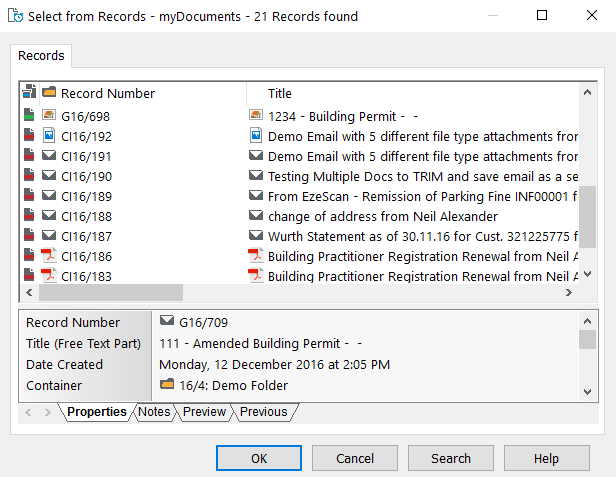
RECORDS |
This will allow the KFI operator to choose an existing Record to attach the document to. This option is commonly used to apply a new revision or relate a record with the scanned document.
This will display “document” type records not Containers.
During profiling, when the KFI browse button ... is clicked by the operator, the Select From Records - Recent Documents (myDocuments) screen is displayed.
The operator can then select the item from the list (and with the correct upload mapping) which will apply the record revision or relationship to the saved document. |
|
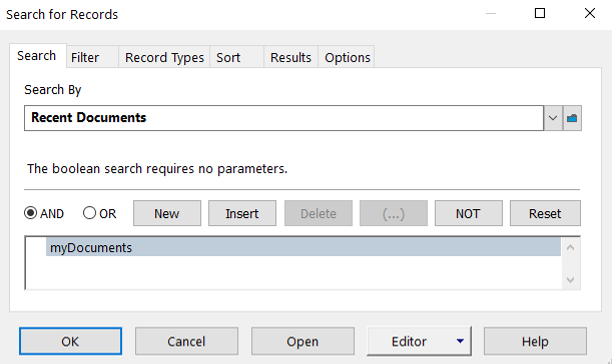
RECORDS BY QUERY |
The operator can use the search methods required to find the respective record. When they click on the browse button ... in the KFI they should see this screen…
The operator can then search for a Record and select the item from the list (and with the correct upload mapping) which will apply the Record value to the saved document. |
|
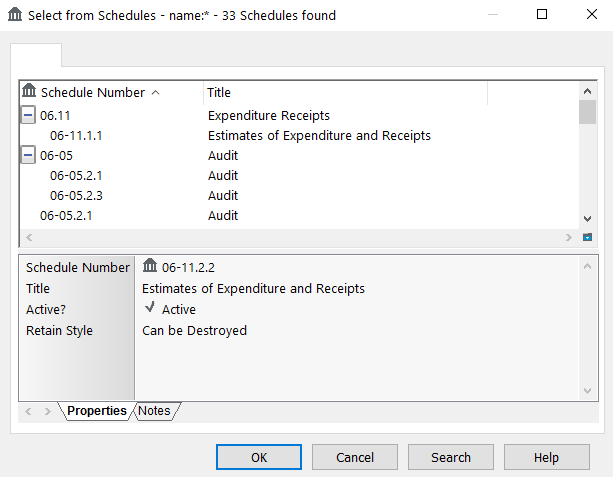
RETENTION SCHEDULES |
This will allow the KFI operator to select a Retention Schedule for the document. TIP: You may have to run a search (using the Search button) to locate the schedules. When they click on the browse button ... in the KFI they should see this screen…
The operator can then select the item from the list (and with the correct upload mapping) which will apply the schedule to the saved document. |
|
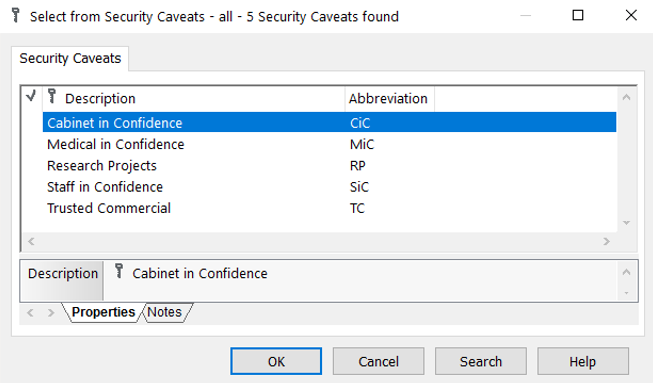
SECURITY CAVEATS |
This will allow the KFI operator to select a Security Caveat for the document. When they click on the browse ... button in the KFI they should see this screen…
The operator can then select the item from the list (and with the correct upload mapping) which will apply the security caveat value to the saved document. |
|
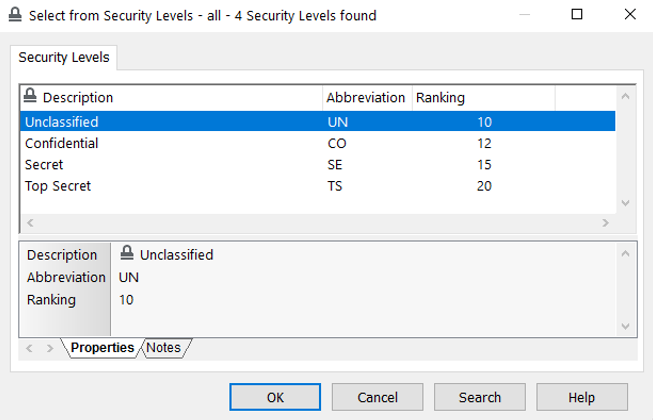
SECURITY LEVELS |
This will allow the KFI operator to select a Security Level for the document. When they click on the browse ... button in the KFI they should see this screen…
The operator can then select the item from the list (and with the correct upload mapping) which will apply the security level value to the saved document. |
|
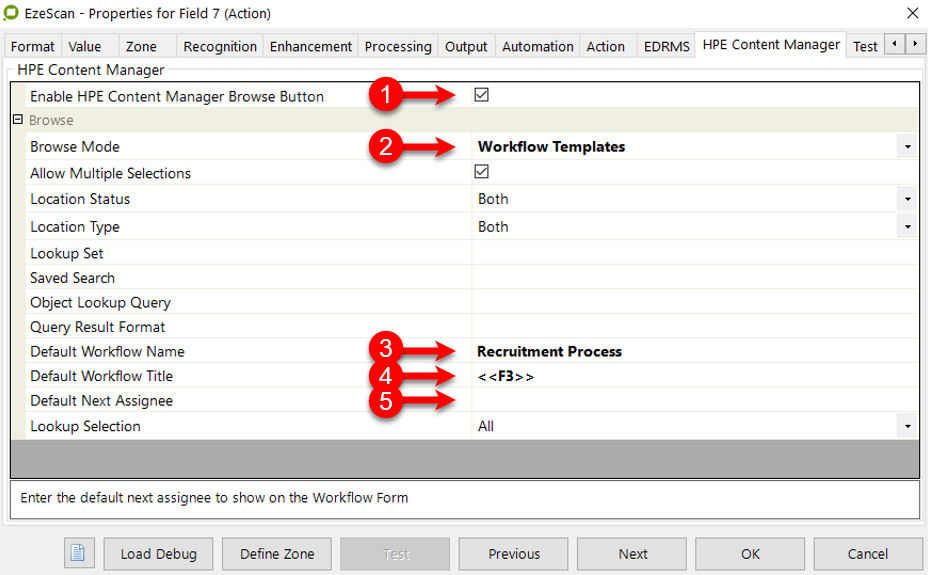
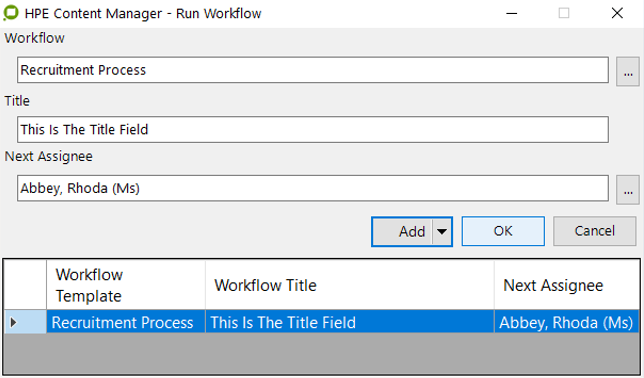
WORKFLOW TEMPLATE |
This will allow the KFI operator to select a Workflow for the document.
On the MF Content Manager Content Manager tab…
When the operator clicks on the browse button in the KFI they should see this screen…
The operator can then select the workflow item from the list (and with the correct upload mapping) which will apply the workflow to the saved document. |


Integrations to other applications/systems
The KFI fields may be configured to browse other systems either via the respective EzeScan API or via ODBC connections using SQL type queries.
This section is not exhaustive but is designed to provide a basic understanding of the functionality.
Please refer to the relevant integration guides for further details specific to your system. Also refer to the EzeScan KFI User Guide for details on setting up DSN/ODBC etc.
Inbuilt EzeScan API's
The integration user guides cover the majority of processes which may be used.
Systems such as:
-
Authority Property System
-
Infor Pathway Property System
Using SQL queries into other systems
Other systems such as TechnologyOne’s Property and Rating system do not have an EzeScan API so we must rely on using an ODBC connection and then running database queries on that system’s tables.
There are two ways to retrieve data:
-
Having a “View” created from the required database tables (preferred option)
-
Directly reading from database tables (difficult to set-up)
Both will require “read only access” to the required views and/or tables.
This section will cover the “view” option. The examples provided are generic, but are designed to “paint the picture” as to what is required. Please contact your EzeScan consultant for further advice in regards to this functionality.
Technology Property and Rating (P&R)
Contact Details
On the “Search Name” KFI Field > Format tab > click on ODBC button and set up the ODBC DSN etc; add the view name; then click on the Configure Search button
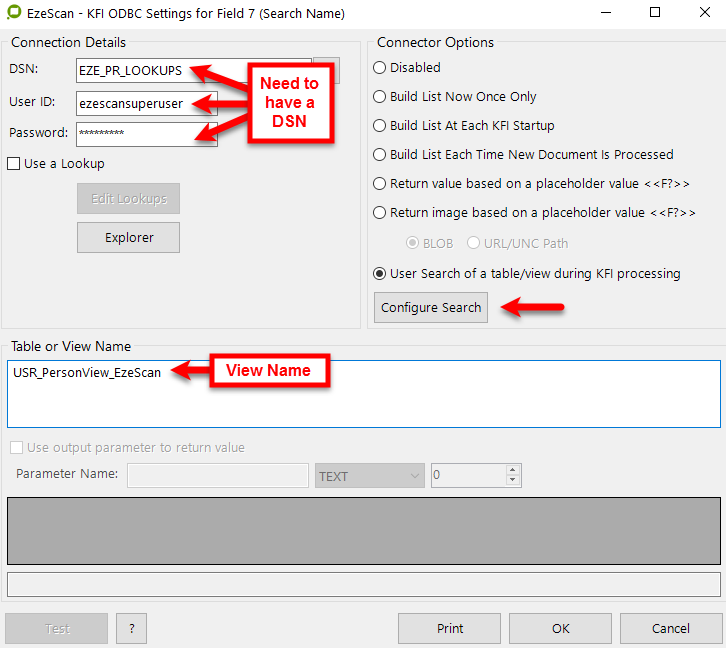
Set-up the ODBC Search similar to that shown below, depending on what your search and metadata requirements are:
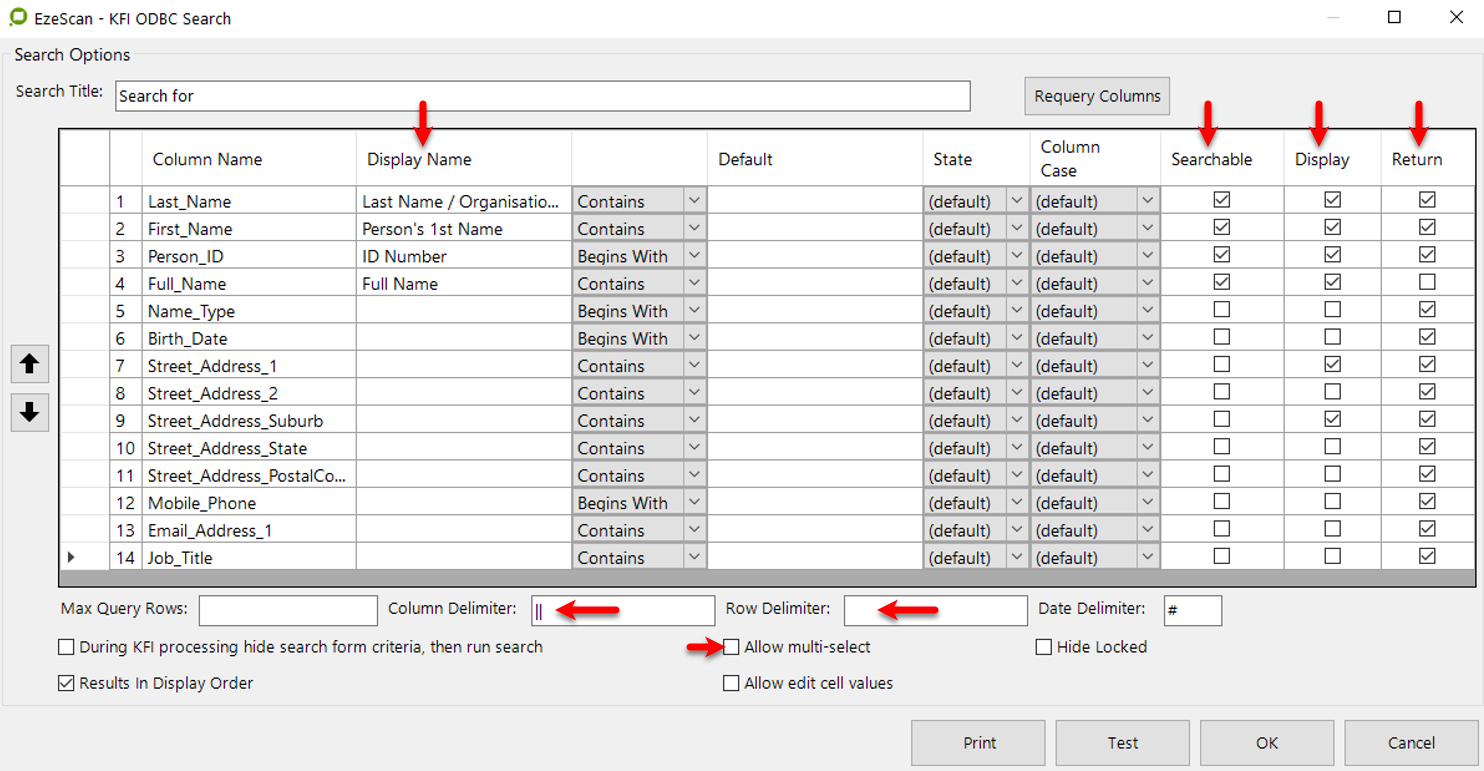
Some important tips are:
-
Create your own “Display Names” so the operator has a clear idea what is on the search form
-
Only display the values the operator needs to see and only return the values you require
-
Use a pipe | or a double pipe || as the column delimiter
-
If using the “Allow Multi-select” option use a hash # as the row delimiter
There is more to do with the Location Creation process as we have to add the Location field names to the field for uploading into MF Content Manager…
-
You need to separate the string (see example text above) into separate KFI fields. This is how you do it (based on the search example used above)…
Field Name
|
Extract From
|
Extract Item
|
Spit Delimiter
|
|---|---|---|---|
|
Name ID |
Search Name |
3 |
|| |
|
Last Name |
Search Name |
1 |
|| |
|
1st Names |
Search Name |
2 |
|| |
|
Full Name |
This is a Custom Extract - see details below |
||
|
Name Type |
Search Name |
4 |
|| |
|
Name DOB |
Search Name |
5 |
|| |
|
Name Address 1 |
Search Name |
6 |
|| |
|
Name Address 2 |
Search Name |
7 |
|| |
|
Name Address Suburb |
Search Name |
8 |
|| |
|
Name Address State |
Search Name |
9 |
|| |
|
Name Address Postcode |
Search Name |
10 |
|| |
|
Name Street Address |
This is a Custom Extract of the 5 fields above - see details below |
||
|
Name Mobile |
Search Name |
11 |
|| |
|
Name Email |
Search Name |
12 |
|| |
|
Job Title |
Search Name |
13 |
|| |
|
Contact Type |
This is a “List” of contact types - see details below |
||
|
MF CM Contact Details |
This is a Custom Extract - see details below |
||
|
The Full Name field is not actually used in the Location creation. It is there for use in the document Title (if required) Custom Extract: <<1st Names>> <<Last Name>> |
|
The Name Street Address field is a concatenation of the 5 fields above and will used for the Location’s address. Custom Extract: <<Name Address 1>> <<Name Address 2>>,<<Name Address Suburb>>,<<Name Address State>>,<<Name Address Postcode>> |
|
The Contact Type field is simply a list (created on the Format tab) and generally contains these values - Author; Addressee; Client; Other. It is used in the final process (below). The operator would select one of these values when processing the document. |
|
The MF CM Contact Details field is a concatenation of the fields required to create the Location in MF Content Manager. The Name ID is the key.
Custom Extract: IdNumber||<<Name ID>>||Surname||<<Last Name>>||GivenNames||<<1st Names>>||Type||<<Name Type>>||DOB||<<Name DOB>>||STREETADDRESS||<<Name Street Address>>||MOBILE||<<Name Mobile>>||EMAILADDRESS||<<Name Email>>||Job Title||<<Job Title>>||ContactType||<<Contact Type>> The resulting field would look like this: IdNumber||912211||Surname||Flintstone||GivenNames||Fred||Type||Person||DOB||||STREETADDRESS||66 Rubble Way,BEDROCK,NSW,2442||MOBILE||||EMAILADDRESS||||Job Title||||ContactType||Author In the above example some of the fields did not return a value which caused multiple pipes (||||). This will not affect the upload process.
|
Property Address
On the KFI Field > Format tab > click on ODBC button and set up the ODBC DSN etc; add the view name; then click on the Configure Search button.
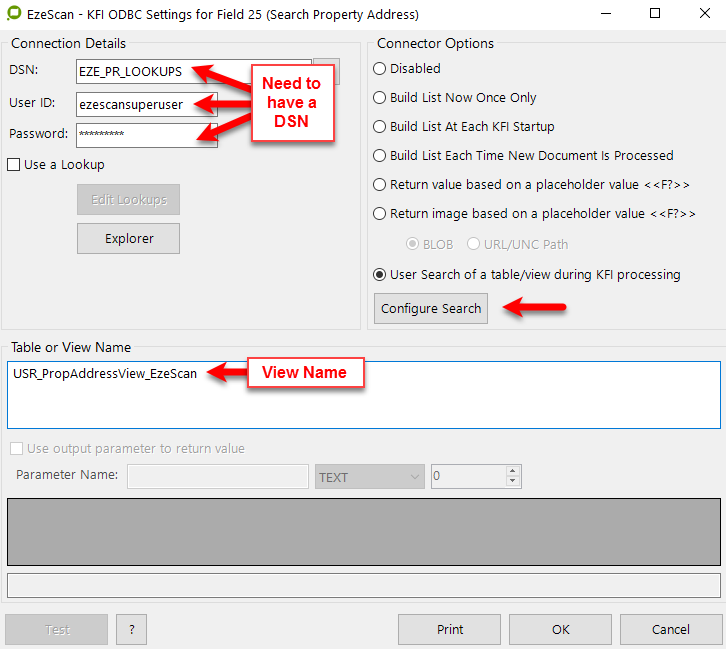
Set-up the ODBC Search similar to that shown below, depending on what your search and metadata requirements are:
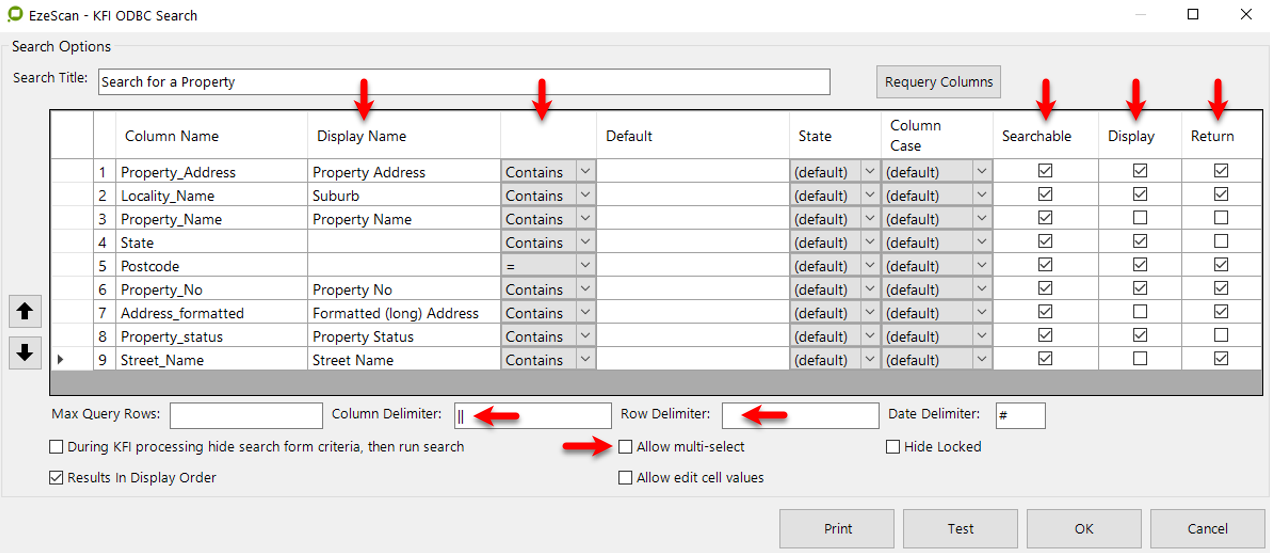
Some important tips are:
-
Create your own “Display Names” so the operator has a clear idea what is on the search form
-
Only display the values the operator needs to see and only return the values you require
-
Use a pipe | or a double pipe || as the column delimiter
-
If using the “Allow Multi-select” option use a hash # as the row delimiter
An example of a returned value (based on the search criteria above) would look like…
11 Dirty Drive||LOAMVILLE||2999||223322||11 Dirty Drive LOAMVILLE NSW 2999||
Upload Settings
The UPLOAD module will obtain the KFI output data to pass into MF Content Manager saving the document into the respective folder and applying the (KFI’s) metadata information.
The following functionality requires that the EzeScan Workstation be licensed for the EDRMS and KFI and UPLOAD modules.
Configuring connection and property parameters
Selecting which EDRMS to Upload to (i.e. MFCM)
Open the Upload Form (F8).
Property
|
Description
|
|---|---|
|
Upload Type |
Should be displaying DocuShare
Change it to MF Content Manager |
|
Use Global Connections Settings |
This option is off by default (unticked box). Tick this option |
|
Database ID |
If Global Settings are ticked
If Global Settings are not ticked (unticked box), you then must select the appropriate MF Content Manager dataset using the browse ... button.
|
|
SDK Bitness |
If Global Settings are ticked
If Global Settings are not ticked |
|
Impersonate Login |
If Global Settings are ticked
If Global Settings are not ticked |


About the Upload Parameters
Property
|
Description
|
|---|---|
|
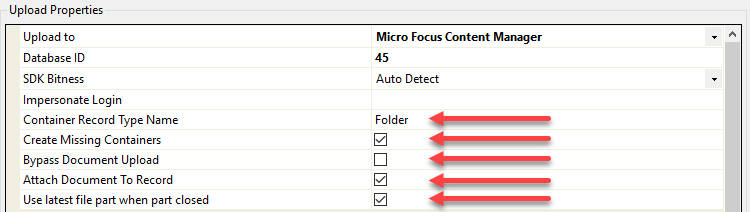
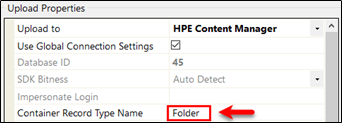
Container Record Type Name |
Set to Folder by default
If the operator is using the Container Barcode / Record Barcode Upload mapping, they will be required to enter the Record Type name for the Container.
This is so EzeScan can determine whether the barcode value belongs to a Record or a Container. |
|
Create Missing Containers |
Ticked by default
If the operator is using the Container New Upload mapping to search by metadata to store the document into it, this option can be used to not create the container for if the search returns 0 results.
The operator will be displayed an error message notifying them that there is no container with those results.
Setting to Yes will create the container and store the document into it. |
|
Bypass Document Upload |
Off by default (unticked box).
This option will bypass uploading the document and create a container only.
This option is designed only for jobs that are creating containers.
This feature would usually be used with the upload option “Pass to Upload” where a second upload would run to upload the document. |
|
Attach Document To Record |
Ticked by default
If this is turned off (untick box), the record is created without attaching a document to it.
This would be used if no documents are required to be uploaded or if a record needs to be created to obtain the record number and then a secondary upload is called (using Pass to Upload - e.g. Burn Doc ID) to upload the document with the Record Number marked up on the image. |
|
Use latest file part when part closed |
Ticked by default
If this is turned off (untick box), the record will be uploaded to the defined file/container part.
Use this upload function to pass a defined file/container and part value. If enabled and a file/container has parts and no part value has been defined, the default will save to the first returned value, typically part 1 (e.g. 19/1234-001), therefore a part value should always be defined where using files/containers with parts. |
Configuring built-in upload fields
The following fields will appear after choosing Upload to MF Content Manager Context option in the Upload Properties pane. These are the default MF Content Manager fields.
Each field can have its input set using the Source Field cell.
TIP: Please refer Applying KFI Output Data to the Target Field Data to see how this can be configured to allow ease of use data mapping.
Target Field
|
Description
|
|---|---|
|
ALTERNATIVE CONTAINER |
This is the Alternative Container field.
|
|
AUTHORLOC |
This is the Author contact type Location field.
OR
Instead of supplying a Name and URI (as shown above), this field can be configured to search and create a location.
The search can be done by searching by…
Refer to the following examples
OPTION 1 Option (1) The operator can use the below specific search fields for the search. IDNUMBER, SURNAME, GIVENNAMES, INITIALS, HONORIFIC, INTERNAL, and TYPE An example search would be like the following…
IdNumber||1282075||Surname||Smith||GivenNames||Barbara||Initials||B|| Type||Person
The 2 pipes “||” are used as a delimiter.
OPTION 2 Option (2) The operator can use the below specific search fields for the search. SURNAME, GIVENNAMES, INITIALS, HONORIFIC, INTERNAL, and TYPE An example search would be like the following…
Surname||Smith||GivenNames||Barbara||Initials||B||Type||Person||Internal||N
The 2 pipes “||” are used as a delimiter.
The following custom fields can also be applied. EMAILADDRESS BUSINESSPHONE MOBILE HOMEPHONE FAX STREETADDRESS CITY STATE REGION POSTCODE COUNTRY P_STREETADDRESS P_CITY P_STATE P_REGION P_POSTCODE P_COUNTRY
The search string could be built up using the KFI Custom Extract option (please refer to the KFI User Guide for more information) or as a static value using <<IF>> placeholders. Type should be populated with either Company or Person and… Internal should be populated with either Y or N
|
|
AUTOLOC |
This mapping is used if Locations are selected with different Contact Types in the Location field details being uploaded; as covered in the examples.
Some of the Property Systems which use the EzeScan API (e.g. Infor - Pathway) browse function “Chose NAR Link for MF Content Manager” allows the operator to choose the Contact Type.
e.g. Select Author, Addressee, Client or Other before they browse the NAR. |
|
ADDRESSEELOC |
This is the Addressee contact type Location field.
OR
e.g. Abbott, Peter (Mr) -lu 17
e.g. Abbott, Peter (Mr) -lu 17||Smithers, Betty -lu1234 |
|
CLIENTLOC |
This is the Client contact type Location field.
OR
e.g. Abbott, Peter (Mr) -lu 17
e.g. Abbott, Peter (Mr) -lu 17| |Smithers, Betty -lu1234 |
|
OTHERLOC |
This is the Other contact type Location field.
OR
e.g. Abbott, Peter (Mr) -lu 17
e.g. Abbott, Peter (Mr) -lu 17| |Smithers, Betty -lu1234 |
|
CLASSIFICATION |
This is the Classification field.
OR
|
|
CONTAINER |
This is the Container field.
OR
The container upload field can accept either of the following values.
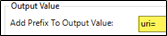
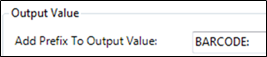
If using the URI the value must be passed to the Container upload field with the prefix of “uri=” i.e. uri=123456789
The prefix can be added via multiple methods in EzeScan KFI where the simplest would be via the “Output / Add Prefix To Output Value”. Alternately the upload field can be direct set as static with uri=<<IF9>> where <<IF9>> contains the URI value from the KFI index field number.
Container Record Number or URI value? As to whether the Container Record Number or URI would be the more ideal to pass to Upload, the URI being the Unique Identifier value would be the more accurate, whereas the use of a Container Record Number would be less accurate due to Content Manager potentially allowing duplicated numbering.
|
|
CONTAINER BARCODE |
This is the Container Barcode field. The Container Barcode fields are derived from the MF Content Manager client under File, Print Report |
|
CONTAINER BARCODE / RECORD BARCODE |
This is the Barcode value for a Container or a Record.
The operator is required to enter the “Container Record Type Name” in the Upload properties. This is so EzeScan will know what Container Record type to look for. |
|
CONTAINER NEW |
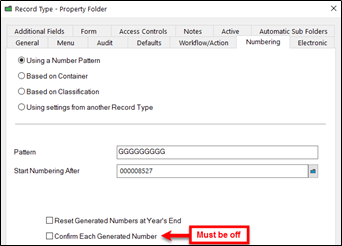
For this feature to work the option in the MF Content Manager Record Type / Numbering tab “Confirm Each Generated Number” must be ticked OFF. This option will create a new container. In the UPLOAD field value the Name of the container must be specified and then the Container Record Number value.
There are multiple ways to search for a container before EzeScan will attempt to create it.
TIP: Use one of the following 3 options to set-up the “Container New” option
|
|
CONTAINER NEW - SEARCH OPTION 1 - USE A TITLE SEARCH |
This option will use a Title search to find a container with the value supplied. If not found it will create a new one.
It must be configured as follows. Container Type||Container Field Value
Example in UPLOAD:
|
|
CONTAINER NEW - SEARCH OPTION 2 - USING A CUSTOM FIELDCONTAINER NEW - SEARCH OPTION 2 - USING A CUSTOM FIELD |
If the operator would like to search on a Container custom field instead of the Container title. TIP: It is recommended searching on a custom field rather than a title search It must be configured as follows. Container Type||New Container Title||Container Field||Container Field Value
Example in UPLOAD:
In the example above we are searching for a File Folder object and by the Student Number field which must be what is defined in the index file field value. If a container is found EzeScan will save the document into this Container.
If not a new Container will be created and then the document will saved into it. |
|
CONTAINER NEW - SEARCH OPTION 3 - USING THE “G” NUMBER PATTERN |
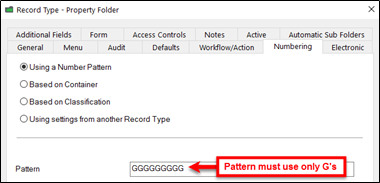
If the Numbering Pattern of your Folder Record type is set to “GGGGGGGGG” EzeScan can create the Container with the supplied record number for you.
This is particularly useful means of creating a container which has a specific number to be used; such as a property number, supplier code, person’s ID number etc There are two ways the search can be performed; shown below… |
|
1 - Search by the Container Record Number |
This will use the KFI value supplied to search if the record number exists. It must be configured as follows; Container Type||New Container Title||SBRN(New Container N°)
Example in UPLOAD:
e.g. Property Folder||88 Mandella Street Templestowe||SBRN(260638) |
|
2 - Search Custom Container field |
To search on a container custom field. It must be configured as follows; Container Type||New Container Title||Container N°||Container Field||Container Field Value
Example in UPLOAD
|
|
CONTAINER NEW - INSIDE AN EXISTING CONTAINER WITH SYSTEM GENERATED CONTAINER NUMBER |
If a Container needs to be created inside an existing (parent) container and there is no requirement for a pre-determined container number then structure the upload string like this…
New Child Container Type||Parent Container N°\New Container Title Notes:
The parent’s “container level” must be higher in value than the child’s e.g. Parent is set to 4 and child is set to 3
|
|
CONTAINER NEW - INSIDE AN EXISTING CONTAINER WITH PRE-DETERMINED CONTAINER NUMBER |
TIP: This will require the new container record type to have a Numbering Pattern set to “GGGGGGGGG” before EzeScan can create the Container with the supplied record number for you. If a Container needs to be created inside an existing (parent) container and there is a requirement for a pre-determined container number (unlike the previous example, which used a system generated number) then structure the upload string like this…
New Child Container Type||Parent Container N°\New Container Title||SBRN(New Container N°)
Notes:
The parent’s “container level” must be higher in value than the child’s e.g. Parent is set to 4 and child is set to 3
|
|
CONTAINER NEW - INSIDE ANOTHER WITH PRE-DETERMINED NUMBER FOR BOTH |
If a new container needs to be created in another container then use 3 pipes ||| to separate the creation methods…
Container Type||New Container Title||SBRN(New Container N°)|||Container Type||New Container Title||SBRN(New Container N°)
Notes:
The parent’s “container level” must be higher in value than the child’s e.g. Parent is set to 4 and child is set to 3
|
|
CONTAINER NEW - ACCESS CONTROLS |
This option will apply access controls to the new container that will be created.
Example: ViewDocument||Private||Abbey, Rhoda (Ms) -lu 48|Abbott, Peter (Mr) -lu 17
Further locations can be added to the specified access type via the format of, <Single Pipe>Additional Location<Single Pipe>Additional Location
e.g. “|Additional Location|Additional Location|Additional Location”
|
|
To apply an access control |
Example 1 1 - To set an Access Type and Access Setting (e.g. View Document, Private)
Example 2 2 - To set an Access Type, Access Setting and a Location TIP: Use the location URI (-lu + Unique ID) in the location e.g. -lu 17 This removes any issues where there may be multiple locations with exactly the same name. Example 3 3 To define two or more different Access Types use the following syntax (example). Access Type||Access Setting||Location URI|||Access Type||Access Setting||Location URI
ViewDocument||Private||Abbey, Rhoda (Ms) -lu 48|||UpdateMetadata||Private||Abbey, Rhoda (Ms) -lu 48 In the below additional example two Access Types have been defined using two locations on each Access Type, with the distinct Access Types separated by three pipes. Three pipes (|||) are used to separate each of the Access Controls used.
TIP: Use the location URI (-lu + Unique ID) in the location e.g. -lu 17 This removes any issues where there may be multiple locations with exactly the same name. TAKE NOTE: If setting access controls at the Container level, please check to see if the respective Document Type (That EzeScan is saving the document as) is inheriting from it as a default. Otherwise please specify to inherit the access controls using the “Record Access Controls” Upload mapping. |
|
CONTAINER NEW - CLASSIFICATION |
This will apply a Classification to the new container being created.
The Classification can be passed through from the KFI module OR …
|
|
CONTAINER NEW - FIELD |
If the container being created has field/s to be populated then this option can be used. In the UPLOAD Field value the name of the field, the type of field and then the value
It must be configured as follows;
Field Name||Field Type||Field Value Example in UPLOAD <<IF7>> is the index file field value for the 2nd KFI field You may need to change this to suit the KFI field you will be using. e.g. Student Number||String||00001 If a second custom property needs to be populated then the operator can specify it after the first. e.g. Student Number||String||00001||Student Active||String||Yes
The following container properties are supported in addition to user defined fields:
** Property is applied after container creation. |
|
CONTAINER NEW - RETENTION SCHEDULE |
This will apply a Retention Schedule to the newly created container.
The Retention Schedule can be passed through by the KFI module or set in the Upload Source field to Static Value, a browse button ... will appear and the operator can then apply a static Retention value for the job. |
|
Container New Record Action |
This will assign a Record Action to the container when created using Container New functionality.
This can be set from the KFI Record Action browse feature or set in the Upload Source field to Static Value and a browse button ... will appear and the operator can then apply a static Record Action for the job. The record action will not be applied when Container New functionality finds an existing container.
|
|
CURRENTLOC |
This is the Current Location Field (also can be known as the Assignee field). This can be set from the KFI Location browse feature and a browse button ... will appear which the operator can then apply a static location for the job. An alternative is to set the Upload Source field to Static Value. This will contain the respective location Name and URI. e.g. Abbott, Peter (Mr) -lu 17 If the operator wishes to use the current user’s login as the Current Location then set this mapping to static with a value of <<TRIMUSER>>
|
|
CUSTOM1LOC
|
These are the Custom contact type location fields that can be assigned to a record. The custom fields will be different to names displayed. The administrator will need to check in the MF Content Manager client for the correct name.
|
|
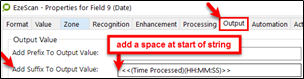
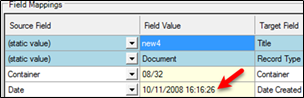
DATE CREATED |
This is the Date Created field.
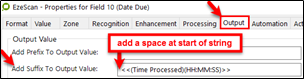
MF Content Manager requires the date to be in DD/MM/YYYY Format. If the time needs to be passed the operator will need to use the KFI Suffix option for this field. The following suffix must be applied. e.g. “ <<(Time Processed)(HH:MM:SS)>>” This needs to be set-up in the KFI field being used for the “Date Created” value and there is a space in the start of this suffix…
In the KFI: This is how it will carry through in UPLOAD: |
|
DATE DUE |
This is the Date Due field. MF Content Manager requires the date to be in DD/MM/YYYY Format. If the time needs to be passed the operator will need to use the KFI Suffix option for this field. e.g. “ <<(Time Processed)(HH:MM:SS)>>” This needs to be set-up in the KFI field being used for the “Due Date” value and there is a space in the start of this suffix…
In the KFI: This is how it will carry through in UPLOAD: |
|
EXTERNAL ID |
This is the External ID Field. |
|
FINALISE RECORD |
This is the Declare as Final After Saving field. It can be passed with a…
This can be set from a KFI field OR set in the Upload Source field to Static Value From the KFI field… From the Upload Static Value setting… |
|
HOMELOC |
This is the Home Location field.
This can be set from the KFI Location browse feature or set in the Upload Source field to Static Value and a browse button ... will appear and the operator can then apply a static location for the job. From the KFI setting… From the Upload Static Value setting… |
|
NOTES |
This is the Notes field This is generally set from a KFI field but may also be set via an Upload “Static Value” TIP: Use the Notes with User Stamp (see below) as it will also add the user stamp.
|
|
NOTES WITH USER STAMP |
This is the Notes Field with a User Stamp.
This is generally set from a KFI field but may also be set via an Upload “Static Value”
If the operator fills out a note in the KFI field the User Stamp will also be placed before the note. e.g. If the note was “Hello World” the note in the Record property will appear as…''Tuesday, 5 May 2016 at 3:16:36 PM (GMT+10:00) Surname, First Name:'' Hello World |
|
OWNERLOC |
This is the Owner Location field.
This can be set from the KFI Location browse feature or set in the Upload Source field to Static Value and a browse button ... will appear and the operator can then apply a static location for the job. From the KFI setting… From the Upload Static Value setting… |
|
PRIMARYCONTACTLOCPRIMARYCONTACTLOC |
This is the Primary Contact Location field This can be set from the KFI Location browse feature or manually set in the Upload Source field to Static Value and the operator can then apply a static location for the job. |
|
RECORD |
This is the Record field.
This would be used if selecting a Record from a KFI browse or getting the record number by data extraction as a KFI zone value.
|
|
RECORD NUMBER PATTERN |
This option will allow the operator to specify the Record Number of the document to be saved into MF Content Manager.
When the number is passed through to UPLOAD, EzeScan will save the record as this specific number. If the Record number already exists EzeScan will display an error. For this option to work the Record Type must be set to a pattern like ANNNNNNZ where…
|
|
RECORD ACCESS CONTROLS |
This option will apply access controls to the new record that will be created. The access controls can be applied in three different ways.
1. AccessType||AccessSetting Multiple locations can be separated using 1-pipe delimiter…
2. AccessType||AccessSetting||Location1|Location2|etc Multiple access controls can be separated with 3-pipe delimiter (with multiple locations separated by single pipes)…
3. AccessType||AccessSetting||Locations|||AccessType||AccessSetting||Locations
|
|
To apply a Record Access Control |
Example 1 1 - To set an Access Type and Access Setting (e.g. View Document, Private)
Example 2 2 - To set an Access Type, Access Setting and a Location
Single pipes (|) are used to separate each location used. Example 3 3 - If the operator needs to specify two or more Access Types then use the following syntax. Three pipes (|||) are used to separate each of the Access Controls used.
TIP: Use the location URI (-lu + Unique ID) in the location e.g. -lu 17
|
|
RECORD ACTION |
This will assign a Record Action to the uploaded document. This can be set from the KFI Record Action browse feature or set in the Upload Source field to Static Value and a browse button ... will appear and the operator can then apply a static Record Action for the job. |
|
RECORD BARCODE |
This is the Barcode value of a record. If supplied, UPLOAD will upload the document as a new version of this Record |
|
RECORD BARCODE - TO APPEND TO |
This is the Barcode value of a record. If supplied, UPLOAD will append the pages of the scanned document to the record that is already in MF Content Manager. The MIME type must be the same for this to work. E.g. a PDF document in MF Content Manager being appended by a PDF scanned Document.
|
|
RECORD BARCODE - TO PREPEND TO |
This is the Barcode value of a record. If supplied, UPLOAD will append the pages of the scanned document to the record that is already in MF Content Manager. The MIME type must be the same for this to work. E.g. a PDF document in MF Content Manager being prepended by a PDF scanned Document.
|
|
RECORD BARCODE - IS REDACTION OF |
This will use the Record Barcode supplied (during the KFI indexing) and update this respective MF Content Manager record with a “Was Redacted To” relationship to the new document uploaded which will have a “Redaction Of” relationship. |
|
RECORD BARCODE - IS RELATED TO |
This will use the Record Barcode supplied (during the KFI indexing) and update this respective MF Content Manager record with a “Related To” relationship to the new document uploaded which will also have a “Related To” relationship. |
|
RECORD BARCODE - TO REPLACE |
This will use the Record Barcode supplied (during the scan) and replace the record in MF Content Manager. |
|
RECORD - REDACTION OF |
This will use the Record Number supplied (during the KFI indexing) and update this respective MF Content Manager record with a “Was Redacted To” relationship to the new document uploaded which will have a “Redaction Of” relationship. |
|
RECORD IS RELATED TO |
This will use the Record Number supplied (during the KFI indexing) and update this respective MF Content Manager record with a “Related To” relationship to the new document uploaded which will also have a “Related To” relationship. |
|
RECORD TO APPEND TO |
This is the Record Number a record. If supplied, UPLOAD will append the pages of the scanned document to the record that is already in MF Content Manager. The MIME type must be the same for this to work. E.g. a PDF document being appended by a PDF scanned Document.
|
|
RECORD TO PREPEND TO |
This is the Record Number a record. If supplied, UPLOAD will append the pages of the scanned document to the record that is already in MF Content Manager. The MIME type must be the same for this to work. E.g. a PDF document in MF Content Manager being prepended by a PDF scanned Document.
|
|
RECORD TO REPLACE |
This will replace the specified Record on the MF Content Manager server with the current scanned image. Please use this option with caution, it does not update the document as a revision, it will replace the record. If the document needs to be updated as a revision, please refer to the “Record” upload mapping. |
|
RETENTION SCHEDULE |
This will populate the Record with a Retention Schedule value. This can be set from the KFI Retention Schedule browse feature or set in the Upload Source field to Static Value and a browse button ... will appear and the operator can then apply a static Retention for the job. |
|
RECORD TYPE |
This is the Record Type that the document will be saved as. This can be set from the KFI browse feature or set in the Upload Source field to Static Value.
Setting the Record Type in the Upload:
|
|
SECURITY CAVEAT |
This will set a Security Caveat on the document that is being uploaded. This can be set from the KFI Security Caveat browse feature or set in the Upload Source field to Static Value and a browse button ... will appear and the operator can then apply a static Security Caveat for the document. |
|
SECURITY LEVEL |
This will set a Security Level on the document that is being uploaded. This can be set from the KFI Security Level browse feature or set in the Upload Source field to Static Value and a browse button ... will appear and the operator can then apply a static Security Level for the document. |
|
TR5 FILE NAME |
If the operator would like to create a .TR5 file then the name of the TR5 file is configured in here. The TR5 File Path setting must also be configured to tell EzeScan where to save the file (see below)
|
|
TR5 FILE PATH |
This is the path of where the .TR5 file will be created. |
|
WORKFLOW TEMPLATE |
This will assign a Workflow to the uploaded document. This can be set from the KFI Workflow browse feature or set in the Upload Source field to a Static Value. TIP: Please refer to the Workflow Template in the table under section Configuring Browse Parameters for details of setting the Workflow Template in the KFI. Setting the Workflow Template in the Upload:
The operator can also apply a custom Name to the workflow, e.g. a KFI field value. To do this use the following syntax:
Workflow Name||Title Of Workflow
In Upload you can also pass index field value.
If using a default KFI CSV output
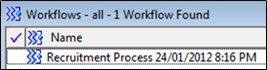
If passing the workflow name only it will appear in MF Content Manager with the name and the date and time. For example…
|


Configuring custom record fields
The MF Content Manager connector can obtain all metadata fields from a from a MF Content Manager record type.
You must have the Database ID selected (either Global or specific DB ID) as well as the Record Type being used by the Upload, as shown below…

Click the Auto Populate button at the bottom of the screen.
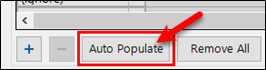
This will result in the MF Content Manager connector returning a list of custom fields that relate to the respective record type.
It is then a matter of setting the source values of those fields to the target values of the custom fields.
Applying KFI output data to target field data
To pass through the KFI output data into the Upload module the operator is required to set the source field data to the target field data.
1. In the Upload type, set the Column names from option to the name of the KFI job Type.
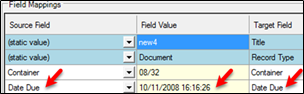
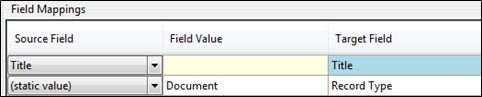
2. In the Field Mappings Grid the operator can apply the Source Field settings to the Target Field settings.
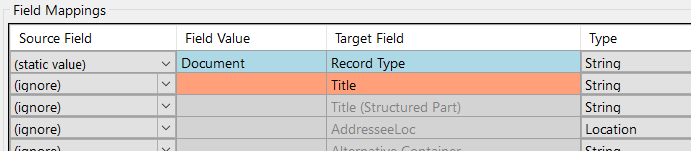
In the example below the Target Field Title is being populated by the KFI Source Field Title and the Target Field Record Type is set to a static value of “Document”
3. When all the mappings are complete, click Apply.
4. Click OK to save the changes.
Routing Settings
The Routing module is another way of configuring EzeScan to use the KFI and UPLOAD modules to upload documents to MF Content Manager.
As it can be configured to run as a windows service it is recommended for jobs that do not require operator intervention.
The following functionality requires that the EzeScan workstation or Server to be licensed for the SERVER product. Please refer to the EzeScan Routing guide on how to install and run the service
Configuring a route to upload
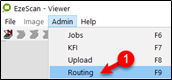
1. Click Admin and choose Routing (F9)
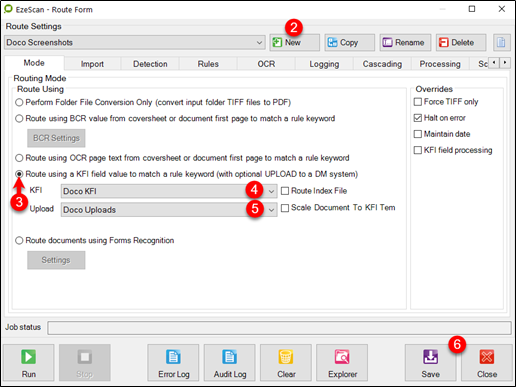
2. Create a new Route
3. Set the mode to “Route using a KFI Field value to match a rule keyword”
4. In the KFI drop down list, select the KFI that will be used with the Route
5. In the UPLOAD drop down list, select the UPLOAD to be used with the Route
6. Click Apply and then Close
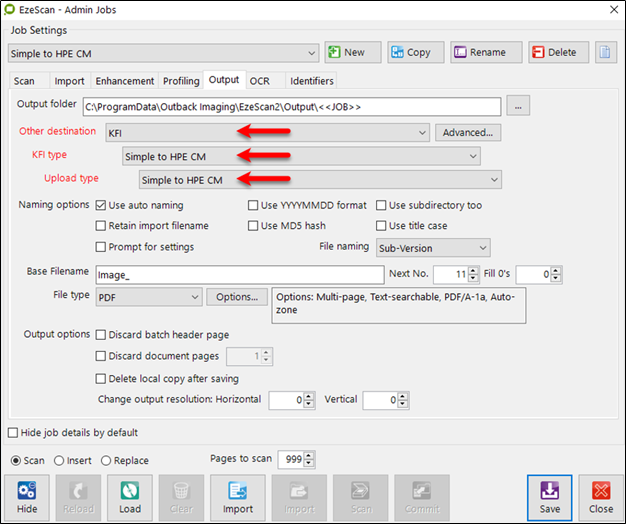
Running a Job Using KFI and Upload
To run a job to MF Content Manager using the KFI and UPLOAD modules, confirm that the Other Destination is set to KFI and the respective KFI and UPLOAD Types are selected.
Please refer to the standard EzeScan PRO Old, KFI and Upload guides as well as this specific information for the details on how to configure Jobs, KFI and Uploads.
In the example below the KFI\UPLOAD types have been configured for the following values…
-
Title (Title of document)
-
Container (Container in the repository)
-
Date Received
-
Author (Author of the document)
The image below shows a job using the KFI and upload modules.
To run a job to MF Content Manager using the KFI and UPLOAD modules:
1. Click the scan/import or job button to load the image into the EzeScan viewer.
2. Press the F4 key or click the Profile button 
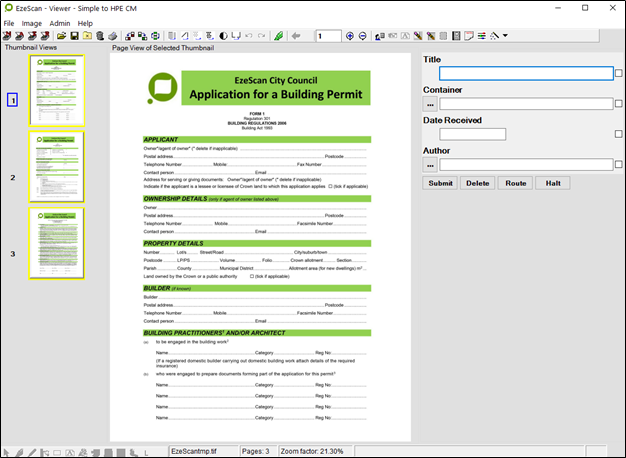
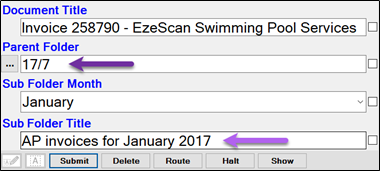
3. The operator can enter the Title
4. The operator can then search for the Container using the browse button ...
5. The operator can then add the Date Received
6. The operator can then search for the Author using the browse button ... to select a Location
7. When complete, press Enter and the submit button will highlight.
8. Press Enter or click Submit.
There is sample MF Content Manager KFI / UPLOAD jobs in the downloads section on the EzeScan web site (Simple to MF Content Manager CM).
Display Record Number After Saving Record
To enable this setting, please refer to the How to articles.
Create "Text Rendition" of Existing Content Manager Document
TIP: This process will require a new EzeScan job to be set-up. You should have already created a job to “Import documents using a MF Content Manager Browser” (refer Job Settings section). If not then it is recommended to create that job first then copy it to create the Rendition job.
Create the job
1. Create a new EzeScan job or copy the one set-up in the “Import documents using a MF Content Manager Browser” section.
TIP: If creating a new Job from scratch, ensure you click the No button if prompted to “also create a new KFI”
2. Give it a name like “Create a Text Rendition of a MF Document”
3. On the Output tab change the File type to TXT
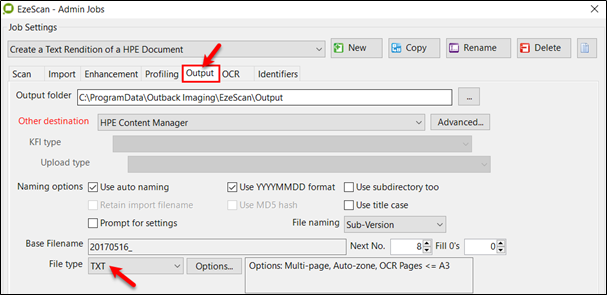
4. Click the Save button to complete the set-up
5. Assign a button on the button screen, if needed.

Run the job
1. Click on the job button to run the new job and the window below should appear, either…
-
-
Enter the Document’s Record Number into the field
-
Click the Search button and Document’s Record Number
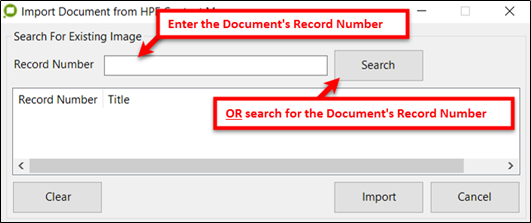
Enter the Document’s Record number OR click on the Search ButtonEnter the Document’s Record number OR click on the Search Button
Record Number refers to the “Document’s Record Number”. If searching using a Container/Folder number then use the standard search function for “Search using Container” which can be accessed via the standard MF Content Manager Search button.
-
2. Perform a search for the document to be Rendered in MF Content Manager.
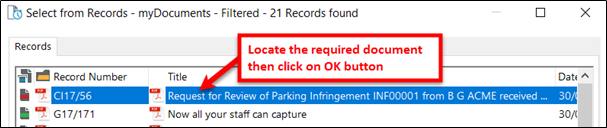
Click the OK button to import the required document from MF Content Manager
3. Once it is located click on the OK button to import it into EzeScan
4. Then select it and click the Import button

5. Then press the F4 key or click on the Profile 
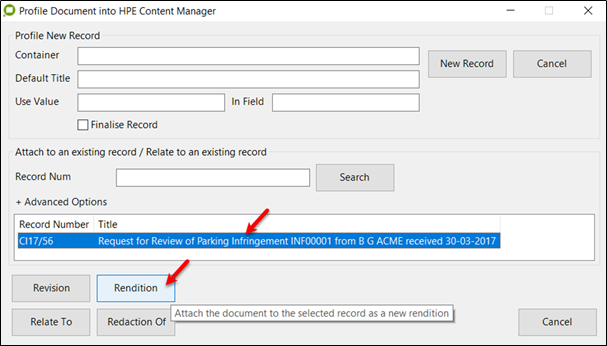
6. Select the document then click the Rendition button
7. The window below appears. Either type your own Description or use the default one shown
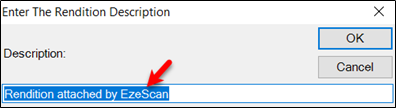
8. Click OK to complete the process
9. Locate the document in MF Content Manager and right mouse click; select Properties and click on the Renditions tab. The new rendition should appear as a text file. Right mouse click to View, Extract or Print the rendition
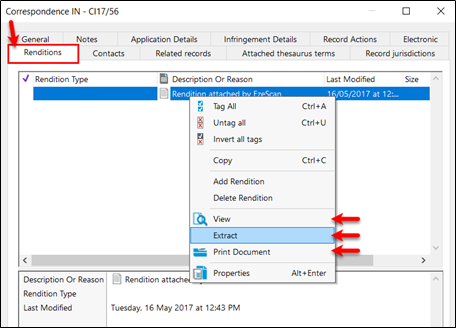
10. Right mouse click to View, Extract or Print the rendition.
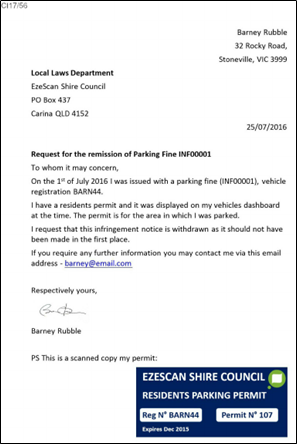
An example of the original PDF document and the resulting Rendition Text File is shown below.
|
ORIGINAL PDF DOCUMENT |
RENDITION AS A TEXT FILE |
|---|---|
|
|
If the “Burn Doc ID” function is being used the Record Number should appear as shown in the above example (CI17/56)
|

TIP: The same process may also be used to create other types of renditions such as redacted documents.
MF Content Manager Placeholders
|
<<DOCID>> |
This is the Record Number of the previously saved record by EzeScan
|
|
<<DOCURI>> |
This is the URI of the previously saved record by EzeScan
|
|
<<TRIMUSER>> |
This is the MF Content Manager User that is logged into the PC
This value still refers to TRIM and must be used instead of MF CM or similar
|
Examples of Execute Queries for use in KFIs
The following are examples of Execute Query statements which may be used to locate things such as Record, Container, and Location details. This is not an exhaustive list and will grow as new examples are developed.
All queries have the 1st field shown in the example but this will naturally be different in your queries. The query needs to look for a field above; e.g. the query may be in Field 4 but can only use a value from field #1, #2 or #3. It is expected that the query will only find one item and not multiple items.
Options for use in queries and results
RECORD OBJECTS
For a Record object the options that can be used in the lookup query are…
-
Title
-
Number
-
LongNumber
-
DateClosed (operator can be “blank” or if using a date needs to be like 22~/08~/2019)
To specify an exact record type to query use the record type name in place of the word Record in the Object Lookup Query (for example, File Folder/Number/<<F1>>).
The fields that can be returned into the query result can be…
-
Title
-
Title (Free Text Part)
-
Number
-
LongNumber
-
Recordtype
-
Uri
-
Edit Status
-
Author
-
AUTHORLOC
-
ADDRESSEELOC
-
CLIENTLOC
-
OTHERLOC
-
REPRESENTATIVELOC
-
CUSTOM1LOC
-
CUSTOM2LOC
-
CUSTOM3LOC
-
CUSTOM4LOC
-
CUSTOM5LOC
-
CUSTOM6LOC
-
CUSTOM7LOC
-
CUSTOM8LOC
-
CUSTOM9LOC
-
CUSTOM10LOC
-
User defined fields
If needing to return back multiple location values Use [0] as the first location and [1] as the second and so on. Example to return the second Addressee {ADDRESSEELOC[1]}
LOCATION OBJECTS
For a Location object the options that can be used in the lookup query are…
-
IdNumber
-
LoginName
-
EmailAddress
-
Uri
The fields that can be returned into the query result can be…
-
FormattedID (FormattedID simply returns a location string - i.e. Abbot Peter -lu 123)
-
IdNumber
-
EmailAddress
-
Uri
-
Internal (Will return a True or False)
-
Location Type – Will return:
-
0 (Unknown)
-
1 (Organisation)
-
2 (Group)
-
3 (Position)
-
4 (Person)
-
5 (Project Team)
-
6 (Committee)
-
7 (Venue)
-
8 (Workgroup)
-
Examples for use in queries and results
The following examples may be used to build various queries. In each instance the query runs on <<F1>>; please make sure you change this to the field number you will do your search on.
TIP: If you insert any new KFI fields above your query field then it may affect your query so always check after inserting new fields that the field number is still correct (e.g. <<F7>> may now actually be <<F8>>)
If you run the query and the field (expecting the result) is blank then there is either an issue with your query or the value you are querying does not exist.
EXECUTE QUERY - FIND A CONTAINER NUMBER USING THE CONTAINER'S TITLE
This performs a “contains search” on the title field to bring back the Container number.
In this example the Property Address is in the container’s title field e.g. 118 Queens Road
|
Object Lookup Query |
Record/Title/Contains/<<F1>> |
|
Query Result Format |
{Number} |

EXECUTE QUERY - FIND A CONTAINER NUMBER USING THE CONTAINER'S TITLE WITH A 'CONTAINS WORDS' SEARCH
This performs a “contains search” on the title field but will look for individual words to match to. It will bring back the Container number.
In this example we are looking for a result based on 118 and Road
|
Object Lookup Query |
Record/Title/ContainsWords/118 Road |
|
|
Query Result Format |
{Number} |
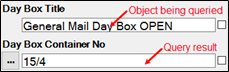
EXECUTE QUERY - FIND THE DAY BOX CONTAINER NUMBER - USING THE TITLE WHICH CONTAINS OPEN
In this example the record title would contain a value (in a non-broken string) which will provide the container number. The concept would be to have a value in the “searched” field with a title like - General Mail Day Box OPEN
This search criteria is subject to the following rules:
-
When a new (physical) Day Box is created, a corresponding container is created in MF Content Manager.
-
The new Day Box Title contains the word OPEN e.g. General Mail Day Box OPEN
-
The old (full Day Box) Title is changed from OPEN to CLOSED e.g. General Mail Day Box CLOSED
-
-
There can only be ONE Day Box container with this name as EzeScan will always look for the container with the word OPEN in the string.
-
Some organisations use multiple types of Day Boxes like below…
-
General Mail Day Box OPEN
-
Planning Day Box OPEN
-
Building Mail Day Box OPEN
-
-
The name may come from the EzeScan_Profiles spreadsheet or from a Lookup Set or a List.
-
|
Object Lookup Query |
Record/Title/Contains/<<F1>> |
|
Query Result Format |
{Number} |
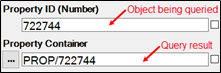
EXECUTE QUERY - CONTAINER USING A USER DEFINED FIELD
In this example the query requires the type of container and its User Defined Field name.
The value used in the query will be the value presented in the User Defined field.
|
Object Lookup Query |
Container Type/User Defined Field name/<<F1>> |
|
|
Query Result Format |
{Number} |
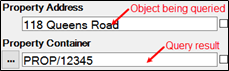
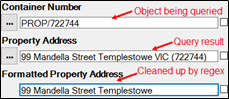
EXECUTE QUERY - CONTAINER TITLE USING THE CONTAINER RECORD NUMBER
To extract the title from a container using its Record Number; for example a property address based on the container’s Record Number.
The screenshot below also shows the Container Title has been “cleaned up” by a regex which is in the “Formatted Property Address”
|
Object Lookup Query |
Record/Number/<<F1>> |
|
|
Query Result Format |
{Title} |
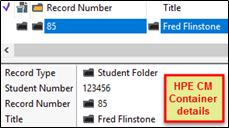
EXECUTE QUERY - STUDENT CONTAINER USING A DEFINED FIELD
In this example we are looking for the Container Number using a specific Container Record Type (Student Folder) together with a value which is in a User Defined Field called Student Number
This example has actually been used twice; one to find the student’s name & one to find the container…
|
Object Lookup Query |
Student Folder/Student Number/<<F1>> |
|
|
Query Result Format |
1.Value for Student Name use................. {Title} 2.Value for Container use.................. {Number} |

EXECUTE QUERY - FIND A CONTAINER BARCODE USING THE CONTAINER'S RECORD TYPE AND RECORD NUMBER
This performs a search on the Record Type and Container Record Number to return the Container Barcode number.
|
Object Lookup Query |
Record Type/Number/Container Number |
<<F9>>/Number/<<F5>> Facilities/Number/WG21/1234 |
|
|
Query Result Format |
{Content Manager Barcode} |
R4500004A0 |
EXECUTE QUERY - FIND A CONTAINER URI USING THE CONTAINER'S RECORD TYPE AND RECORD NUMBER
This performs a search on the Record Type and Container Record Number to return the Container URI number.
|
Object Lookup Query |
Record Type/Number/Container Number |
<<F9>>/Number/<<F5>> Facilities/Number/WG21/1234 |
|
|
Query Result Format |
{URI} |
123456789 |
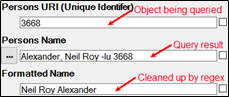
EXECUTE QUERY - OBTAINING A NAME/LOCATION USING THEIR LOCATION ID NUMBER
MF Content Manager Locations have a field named as Location ID. This is generally populated from integrated third party systems such as a Property System with the ID number typically being the unique number of the third party system.
This query is extremely useful where the ID number has been sourced from the third party system into an EzeScan KFI field (e.g. Person ID Number)

TIP: The Name/Location must exist in MF Content Manager for this to work AND have an ID Number assigned!
Although the number in the example is the same as the URI number (e.g. the “-lu <number>”), this may not necessarily be the case in a real life implementation. Check the MFCM “Id Number” field of the Location to confirm the numbering in use.
|
Object Lookup Query |
Location/IdNumber/<<F1>> |
|
|
Query Result Format |
{FormattedID} |
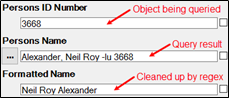
The query will return the name with the “Formatted ID” included in the string e.g. Alexander, Neil -lu 3668
An addition field could be added, e.g. “Formatted Name” (see above) and the Persons Name may be “cleaned up” using a regex, for use in other fields (e.g. Title). More details below.
EXECUTE QUERY - OBTAINING A NAME/LOCATION USING THEIR LOCATION URI
In this example the Name is being obtained by searching using their Location’s Unique ID.
TIP: The Name/Location must exist in MF Content Manager for this to work!
|
Object Lookup Query |
Location/URI/<<F1>> |
|
|
Query Result Format |
{FormattedID} |
The query will return the name with the “Formatted ID” included in the string e.g. Alexander, Neil -lu 3668
An addition field could be added, e.g. “Formatted Name” (see above) and the Persons Name may be “cleaned up” using a regex, for use in other fields (e.g. Title). More details below.
EXECUTE QUERY - OBTAINING A NAME/LOCATION USING THEIR EMAIL ADDRESS
In this example the Name is being obtained by searching using their email address for the Location
TIP: The Name/Location must exist in MF Content Manager for this to work!
|
Object Lookup Query |
Location/EmailAddress/<<F1>> |
|
|
Query Result Format |
{FormattedID} |
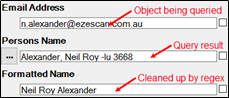
The query will return the name with the “Formatted ID” included in the string e.g. Alexander, Neil -lu 3668
An addition field could be added, e.g. “Formatted Name” (see above) and the Persons Name may be “cleaned up” using a regex, for use in other fields (e.g. Title). More details below.
CLEANING UP THE PERSON'S NAME (IN THE FORMATTED NAME FIELD)
-
The Formatted Name field value will be “extracted from” the Name field;
set in the Formatted Name field’s Value tab -
The Formatted Name field value also needs to be changed using one of these REGEXes;
set in the Formatted Name field’s Processing Choose one of the following based on the desired result:
|
Required Format |
REGEX |
Result |
|
1st Name then Last Name |
"-(lu [0-9]+)",""," *([(][^()]*[)])","","([^,]+),([^,]+)","$2$1","^ *","" |
Neil Alexander |
|
Last Name then 1st Name |
"-(lu [0-9]+)",""," *([(][^()]*[)])","","([^,]+),([^,]+)","$1$2","^ *","" |
Alexander Neil |
|
Last Name only |
" -(lu [0-9]+)",""," *([(][^()]*[)])","","([^,]+),([^,]+)","$1","^ * ","" |
Alexander |
|
1st Name only |
" -(lu [0-9]+)",""," *([(][^()]*[)])","","([^,]+),([^,]+)","$2","^ * ","" |
Neil |
Miscellaneous Tips 'n' Tricks
Adding multiple lines in "Notes"
MF Content Manager Notes permits the addition of up to approximately 60,000 characters (a limit of 64KB). You can add the KFI fields into the notes on a record very easily.
This example was developed for a Local Government department who wished to have details about infringements loaded in the record’s notes against the “Request for Infringement review” correspondence. There are 22 lines in it so the best way to do this is to type it up in notepad or word first to create the “string” to be used.
Create the “string”
1. Begin with the 1st line and then add a <<BR>>
2. Then the next line ending with a <<BR>>
3. Repeat this until finished.
-
NO <<BR>> is needed on last line
4. Example below…(green text is static text; blue text is KFI field names; <<BR>> is the line feed)[1]
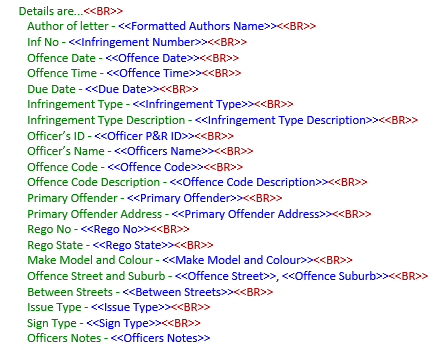
TIP: Putting a space at start of all but first line creates a type of indent to the text
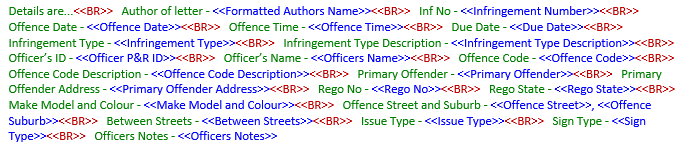
5. Once you have created your lines you must remove the paragraph/carriage returns so that the text becomes one string of text; like this…
Add to the KFI
-
Create a Notes field as one of the last fields in your KFI
-
On the Value tab
-
Insert the text you have developed (like the one on previous page) into the Custom Extract field
-
Click OK
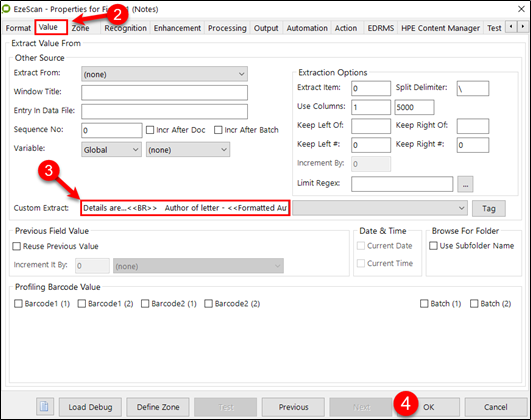
It’s easier to compile your Custom Extract string in word or Notepad and paste into the fieldIt’s easier to compile your Custom Extract string in word or Notepad and paste into the field -
In the associated Upload…
-
Match the KFI Notes Source field to the Notes With User Stamp Target field

[1] Colouring of text is for display purposes only