The following information details the connectivity and functionality offered by the EzeScan integration with the MAGIQ Documents EDRMS solution. It details the available options and how to configure an EzeScan job into MAGIQ Documents.
For information on MAGIQ Documents please refer to the MAGIQ software website - https://www.magiqsoftware.com
For information on EzeScan please refer to the EzeScan website - https://ezescan.com.au
The following are the minimum requirements for the integration of EzeScan and MAGIQ Documents:
Connector
|
|
|---|---|
|
MAGIQ Documents |
The MAGIQ Documents connection URL. A suitable account to enable connection with EzeScan. |
|
EzeScan License |
An EzeScan license that includes the MAGIQ Documents integration will be required. |
|
EzeScan Version |
The latest version of EzeScan is recommended as additional functionality and updates are regularly added to EzeScan releases. This documentation was developed based on EzeScan version 4.3.17272 |
Developed for Ezescan Release: 4.3
It is assumed that the operator is familiar with EzeScan Job, KFI and UPLOAD modules and understands their functionality.
It is also assumed that the operator is experienced with the MAGIQ Documents product. Should EzeScan familiarity not be the case please refer to the EzeScan PRO, KFI and UPLOAD guides.
For MAGIQ Documents familiarity please refer to the MAGIQ Documents documentation or discuss further with your MAGIQ Documents administrator and/or MAGIQ representative
MAGIQ Documents is a web / cloud based Electronic Documents Records Management System (EDRMS) EDRMS system sold throughout the Asia Pacific region.
The EzeScan connector integration leverages the API functionality of MAGIQ Documents to enable searching, retrieving, updating and saving to MAGIQ Documents seamlessly over http / https for both on premise and cloud based instances of MAGIQ Documents.
As the MAGIQ Documents EDRMS system utilises the infoRouter backend there will be references to both MAGIQ Documents and InfoRouter included in the information detailed below. This can be referred to interchangeably unless otherwise noted. 
Configuring Connection Settings
EzeScan supports three different Authentication methods with MAGIQ Documents:
-
Standard infoRouter Authentication
-
Impersonation Authentication
-
Native Windows Transparent Authentication
Each authentication method, its requirements and configuration are described in the information below.
Global vs. individual
A global connection refers to a single master connection configuration within EzeScan where differing jobs / KFI and uploads will point for their connection configuration vs. individual where EzeScan modules have their connection configured separate to the global configuration.
The main advantage to configuring a global EzeScan connection is each Job, KFI and Upload need only to be pointed to the global connection configuration and should there be a need to change the connection details, all the components of EzeScan will automatically use any changed global settings.
Whereas if individual Job, KFI and Upload connections settings are used, each individual EzeScan Job, KFI and Upload component will need to be manually configured and updated to suit any changed settings.
EzeScan does support the use of a combination of Global and Individual configurations.
There can be good reasons for using individual Job, KFI and Upload connection settings to cater for specific configurations, for example:
-
If a different connection URL is required (there maybe multiple websites)
-
If a different username / password is required (rights levels and alternate websites)
-
If a different authentication schema is required (impersonation or transparent Windows NT)
However unless there is a specific need, configuring a global connection is the preferred method.
Global EzeScan
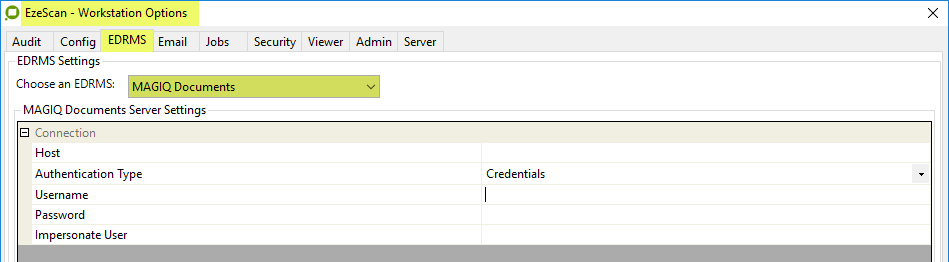
From the Admin menu item choose Workstation Options, then choose the EDRMS tab and select the required EDRMS system from the dropdown. 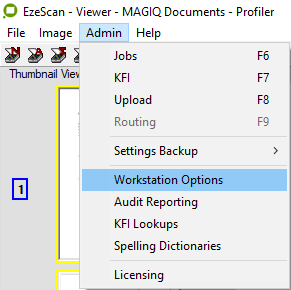
Refer to Available Authentication Methods for configuration usage.
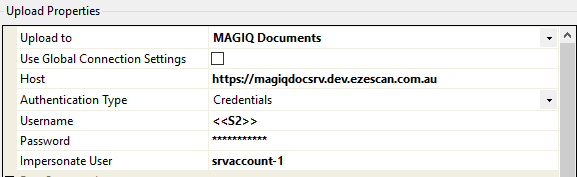
When configured, a “Use Global Connection Settings” checkbox will display in KFI and Upload.
Global KFI and Upload
Once a Global EDRMS system has been configured a checkbox option is displayed in a KFI or Upload’s connection settings.
The checkbox allows the KFI or Upload to optionally use the Global Connection settings or if left unticked individual settings can be configured.
KFI
The checkbox is ticked rendering the individual settings greyed out with the active connection now being the Global Connection Settings. 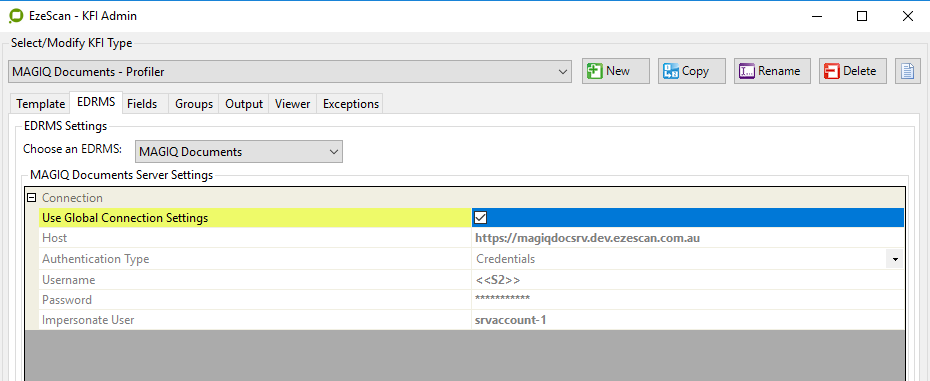
Upload
The checkbox is ticked rendering the individual settings greyed out with the active connection now being the Global Connection Settings. 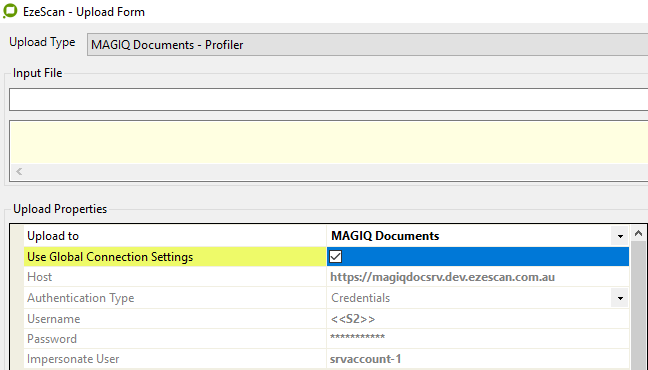
Individual KFI and Upload
Individual connections are where each job, KFI and Upload are configured to not use the global connection settings.
Instead each connection is configured individually. This is useful for where different types of connections outside of the main Global connection settings are required.
For example if different URLs are in use, or if different authentication methods or credentials are required.
EzeScan strongly recommend the items using individual authentication methods be documented for reference purposes, thus allowing for easy identification during a change operation.
Such documentation will assist in avoiding potential issues and outages where the individual connection updates may otherwise be missed.
Refer to Available Authentication Methods for configuration usage.
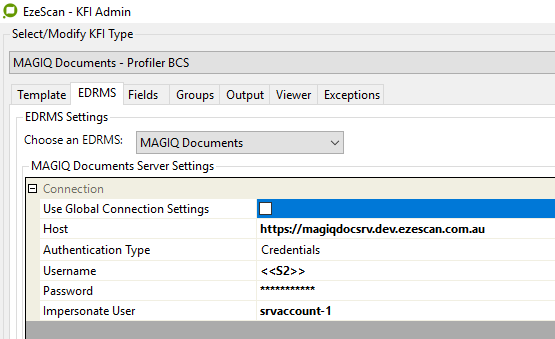
KFI
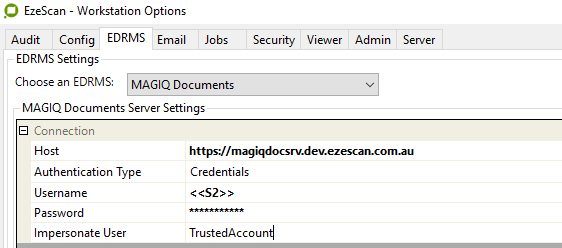
In the below KFI the following individual configuration is set.
-
The chosen EDRMS is MAGIQ Documents.
-
The Use Global Connection Settings check box is unticked.
-
A Host URL has been entered.
-
The Authentication Type is set as Credentials (infoRouter authentication).
-
The Username is set to the <<S2>> placeholder which translates to the Windows account name of the currently logged in Workstation user.
-
Impersonate User is in use as indicated by the field being populated with the name of the Impersonation account defined within MAGIQ Documents.
-
The Password in this instance is that of the Impersonation user account.
Upload
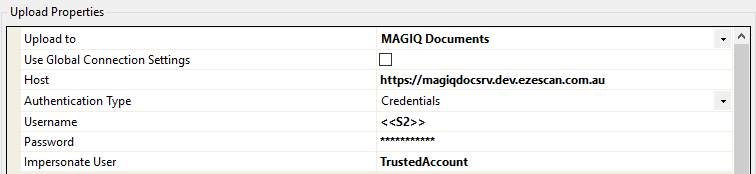
In the below Upload the following individual configuration is set.
-
The Upload to selection is MAGIQ Documents.
-
The Use Global Connection Settings check box is unticked.
-
A Host URL has been entered.
-
The Authentication Type is set as Credentials (infoRouter authentication).
-
The Username is set to the <<S2>> placeholder which translates to the Windows account name of the currently logged in Workstation user.
-
Impersonate User is in use as indicated by the field containing the name of the Impersonation account defined for MAGIQ Documents.
-
The Password in this instance is that of the Impersonate User account.
Available Authentication Methods
Standard InfoRouter
When configuring a Job, KFI or Upload to use the MAGIQ Documents standard infoRouter Authentication method, the following details will be required:
Field
|
Description
|
|---|---|
|
Host |
Specify the URL of the MAGIQ Documents Server. |
|
Authentication Type |
Set to Credentials. |
|
Username |
Specify the username to access MAGIQ Documents. |
|
Password |
Specify the password associated with the username. |
|
Impersonate User |
Leave as blank. |
Standard infoRouter Authentication is defined and usable when (in MAGIQ Documents) a user account has “INFOROUTER” or a defined LDAP domain name e.g. “MAGIQDEV” set as their authentication type AND the MAGIQ Documents website is NOT configured for Native Windows Transparent Authentication.
Essentially EzeScan “Credentials” authentication is where a user name and password is required and passed across to the infoRouter engine to authenticate by whatever method within infoRouter is specified for the user account, e.g. “INFOROUTER” or “DOMAIN NAME” or “MAGIQDEV” etc.
TIP: The domain names used in this document are examples only and an EzeScan administrator should configure using the *actual* name as defined within the MAGIQ Documents instance being connected to. Discuss with the local MAGIQ Documents administrator should name clarification be required.
The below pics are two examples of “Credentials” type authentication configured within MAGIQ Documents / infoRouter. 

The infoRouter authentication engine can also have specific rules applied regarding passwords and what can and cannot be used via its own password policy, (e.g. lengths, character mixes, weak password list, expiry etc.) and it is best to confirm with the MAGIQ Documents administrator as to any specific requirements regarding.
If using a single MAGIQ Documents web instance (a single URL), it is recommended that the MAGIQ Documents connection settings are configured globally, Refer to the Global vs. Individual connection settings for specific details.
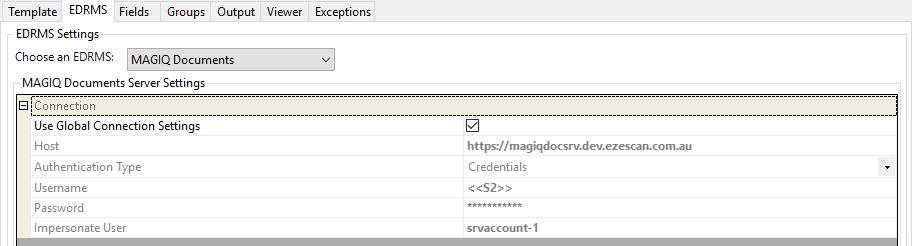
Below the EzeScan global connection settings are configured with a named MAGIQ Documents infoRouter authenticated account. 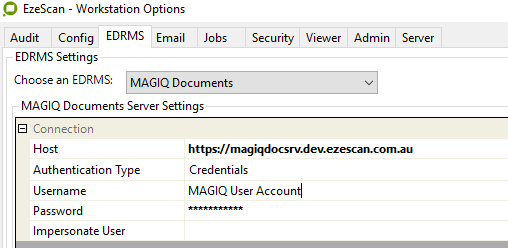
Impersonation
Impersonation authentication is a type of authentication method where a Trusted Windows Domain account is configured for use in the infoRouter web.config file and subsequently enables the generation of website authentication tickets on behalf of the user being impersonated.
When passing the credentials of the specified Trusted Windows Domain Account, EzeScan is then provided with an authentication ticket generated on behalf of the user being impersonated.
Impersonation will be available only when the MAGIQ Documents website is NOT configured for Native Windows Transparent Authentication.
MAGIQ / InfoRouter configuration
In order to use impersonation within EzeScan, the following MAGIQ Documents / infoRouter requirements must be met:
-
The MAGIQ Documents / infoRouter website must NOT be configured for Native Windows Transparent Authentication.
-
The MAGIQ Documents / infoRouter LDAP authentication web service must be installed, configured and functional. This web service authenticates a user name against a pre-defined Windows Domain and can be configured to support multiple authentication domains.
-
A Trusted Windows Domain account must be configured in the infoRouter\Site\Web.config file.
-
Accounts for users of EzeScan must exist in MAGIQ Documents / infoRouter as matching their Windows login account names.
TIP: Install and configuration of the LDAP authentication web service is outside of EzeScan configuration and would typically be handled by MAGIQ or the site themselves, noting for most MAGIQ sites, the LDAP authentication web service should already exist as part of a standard install.
The below example shows the Impersonation service account as added in the infoRouter web.config file and includes an example of the LDAP authentication service configured within the same file.
The file is typically located in the path of \infoRouter\Site\Web.config
<configuration>
<appSettings>
~
<add key="TrustedLDAPAccount" value="TrustedAccount@MAGIQDEV" />
~
<add key="AUTHENTICATIONAUTHORITIES" value="MAGIQDEV" />
<add key="MAGIQDEV" value="https://magiqdocs.magiq.com.au/infoRouterLDAPAuth/irAuthenticationSrv.asmx" />
~
</appSettings>
MAGIQDEV and its associated URL value are examples only and should be replaced with the actual configured AUTHENTICATIONAUTHORITIES value and matching URL as used at site.
EzeScan configuration
In EzeScan the configuration is quite simple and can be either configured globally or individually for each KFI and / or Upload instance as required.
Field
|
Description
|
|---|---|
|
Host |
Specify the URL of the MAGIQ Documents Server. |
|
Authentication Type |
Set to Credentials. |
|
Username |
Specify the username as the <<S2>> placeholder. |
|
Password |
Specify the password associated with the impersonation account. |
|
Impersonate User |
Specify the impersonation account as defined in the infoRouter web.confg file. |
The EzeScan <<S2>> placeholder passes the current logged in Windows user account name to MAGIQ Documents / infoRouter, thus allowing a dynamic account name configuration for user impersonation.
The current Windows logged in user account must exist in the same format (i.e. an identical name) within the MAGIQ Documents / infoRouter instance.
EXAMPLE GLOBAL CONFIGURATION FOR CONNECTING TO MAGIQ DOCUMENTS USING IMPERSONATION
For most organisations impersonation via the <<S2>> placeholder would be the most preferred method and would enable a dynamic EzeScan configuration alleviating the need to otherwise specify a singular named account and password.
The result of using the <<S2>> placeholder and impersonation will be documents uploaded into MAGIQ Documents as the user name who is currently logged into the local Windows workstation.
This similarly will apply to EzeScan Server, where the EzeScan connection would be set to impersonate and the username and documents would be then passed from EzeScan client to EzeScan server, uploaded into MAGIQ Documents and registered as the client user name.
Impersonation Results
Here a document has been uploaded into MAGIQ Documents using impersonation where the uploaded document has the owner specified as the user being impersonated. 
Same document’s properties showing the attributes of Owner, Registered by and Modified by values as having all been applied via the impersonation configuration. 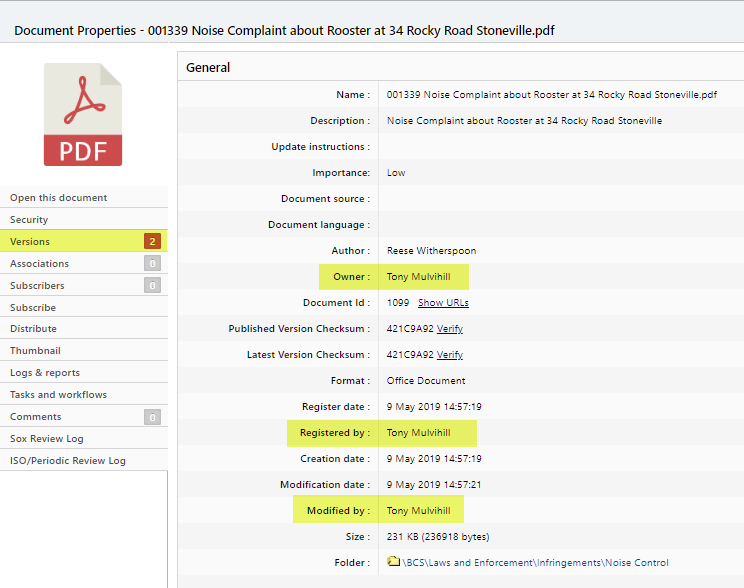
Native windows transparent
Native Windows Transparent Authentication is where EzeScan is able to authenticate to the MAGIQ Documents website as the current workstation logged in user, without the need to specify any username / password combination.
Essentially Windows Native Domain Authentication applies via Windows AD / NT authentication and Windows group memberships but only if the MAGIQ website is configured to suit.
The current Windows logged in user account must also exist in the same format (i.e. an identical name) within the MAGIQ Documents / infoRouter instance.
For EzeScan to be able to use Native Windows Transparent Authentication the MAGIQ Documents / infoRouter website must first be configured for Native Windows Transparent Authentication, noting once configured as such the website will not support any alternative method of authentication.
MAGIQ Documents sites will often also run an alternative website not configured for Native Windows Transparent Authentication to cater for functionality where such an authentication method will not apply.
TIP: MAGIQ website infrastructure configuration is outside the scope of this document’s intention and an organisation should refer to their local I.T. and / or their MAGIQ Documents / infoRouter representative for any required configuration.
For EzeScan itself configuration is very simple to configure and as per the other types of authentication, can be applied either globally or at a Job / KFI / Upload level.
Field
|
Description
|
|---|---|
|
Host |
Specify the URL of the MAGIQ Documents Server. |
|
Authentication Type |
Set to Windows. |
|
Username |
Leave as blank. |
|
Password |
Leave as blank. |
|
Impersonate User |
Leave as blank. |
EzeScan Global settings configured for Native Windows Transparent Authentication. 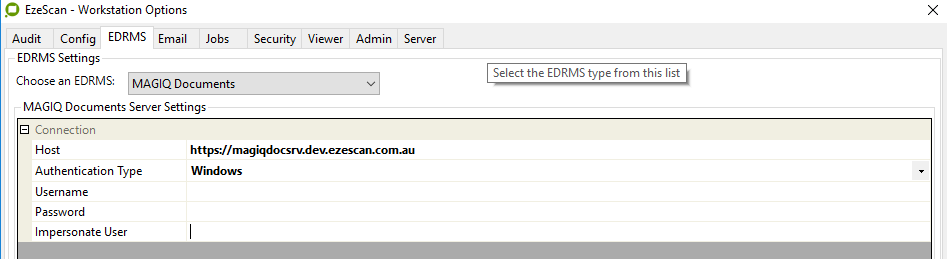
EzeScan Server and EzeScan Web Apps (EWA) Authentication
EzeScan Server
MAGIQ / infoRouter authentication in EzeScan Server is configured as per an EzeScan Client being either Globally or Individually within the KFI and Uploads that EzeScan Server will use.
However a point of difference will be related to the use of Native Windows Transparent Authentication where the account the EzeScan Server Service runs as will need to be configured as a Windows Active Directory account able to connect to the MAGIQ Documents website, along with suitable MAGIQ Documents internal rights.
EWA
As EzeScan Web Applications (EWA) is a separate Microsoft IIS (Internet Information Services) web services application, its authentication method is configured internally within EWA.
-
Login to EWA as an Admin Account.
-
Enter the Admin webpages.
-
Select the Integrations option for the LHS list of Admin functions.
-
Select the Add New button and choose MAGIQ Documents from the dropdown.

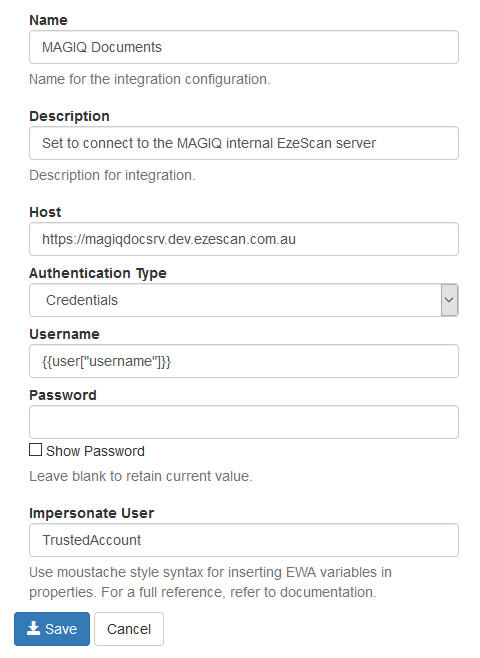
The MAGIQ Documents Configuration window will open allowing configuration. 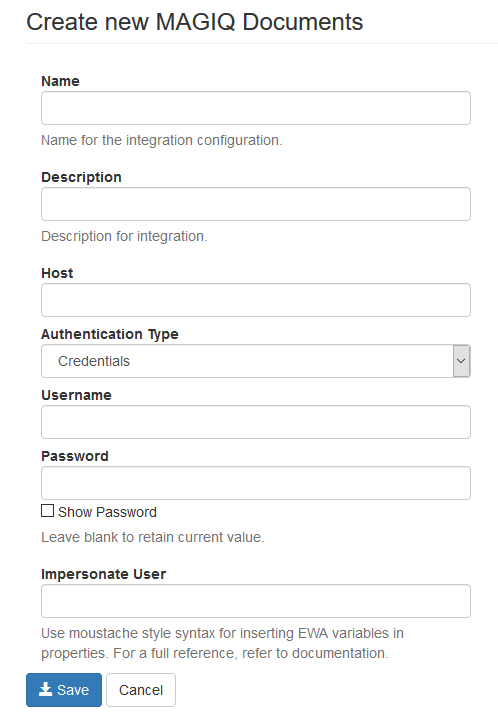
Similar configuration options will be available (as per EzeScan client / server).
Field
|
Description
|
|---|---|
|
Name |
The configurable name assigned by the configuring administrator. |
|
Description |
The configurable description of the connection assigned by the configuring administrator. |
|
Host |
Specify the URL of the MAGIQ Documents Server. |
|
Authentication Type |
Set to Credentials for Named or Impersonation use. |
|
Username |
Specify {{user["username"]}} as the placeholder for the currently logged on user. Alternatively a Named Account and Password can be defined. |
|
Password |
Specify the password associated with the impersonation or named account. |
|
Impersonate User |
Specify the impersonation account as defined in the infoRouter web.confg file should Impersonation be required. |
EzeScan Integration Services (EIS)
EzeScan Web Apps also has a dependency on EzeScan Integration Services (EIS) for providing connectivity to the MAGIQ Documents API (Application Programmers Interface), which in turn will require an install of EzeScan specifically configured with the EzeScan Integration Services Windows Service configured.
Please refer to the EzeScan Routing Guide for the details on installing the EIS service.
Once installed the EIS will require configuration within EzeScan and EWA.
Configuration
Requirements:
-
Microsoft .Net 4.7.1+
-
EzeScan (latest version recommended)
-
EIS Windows Service installed.
-
URL, Port and DNS configuration for defined EIS web services endpoint use.
-
SSL certificate for the EIS website endpoint in the PFX format with private key.
Field
|
Description
|
|---|---|
|
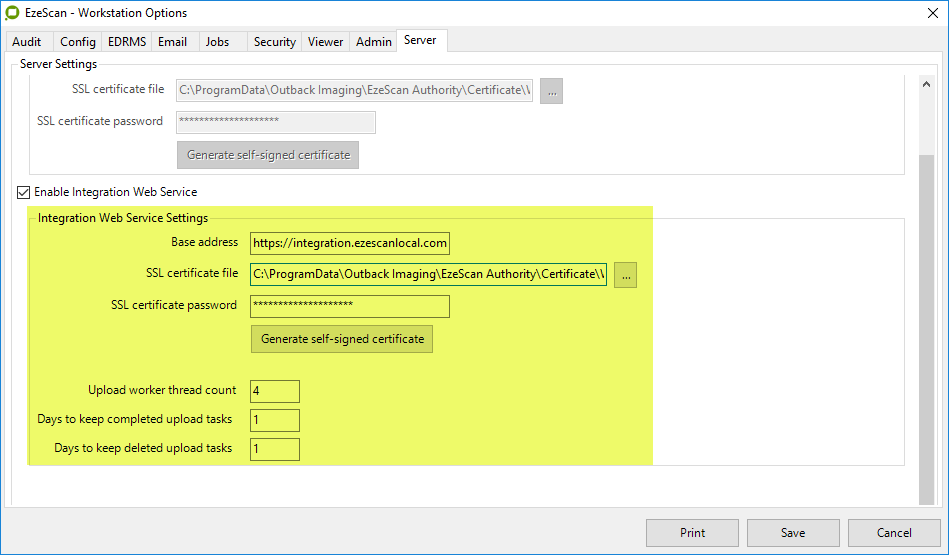
Base Address |
The URL and port combo as used for the EIS web services endpoint, e.g. https://integration.ezescanlocal.com.au:32390 |
|
SSL certificate File |
The location of the website SSL PFX certificate (with private key). |
|
SSL Certificate Password |
Password of the PFX certificate. |
|
Generate self-signed certificate |
A button option to create a self-signed SSL certificate. Not recommended as most web browsers have depreciated self-signed certificates. |
|
Upload worker thread count |
The number of threads used for uploading - the recommended and default value is 4. |
|
Days to keep completed upload tasks |
The number of days a completed upload listing will be kept, the recommended and default value is 1. |
|
Days to keep deleted upload task |
The number of days a deleted upload listing will be kept, the recommended and default value is 1. |
TIP: Certificate usage will require site management as certificates have a limited life span and will expire, thusly a certificate will require renewal on a regular basis.
Certificates are typically either generated by an organisation’s internal Certificate Authority or purchased via an external 3rd party Certificate Authority.
An organisation will need to include certificate renewal as part of their standard EzeScan I.T. maintenance processes.
To access the EIS website for review purposes use the defined endpoint URL which will include links to review Integration functionality and upload tasks. 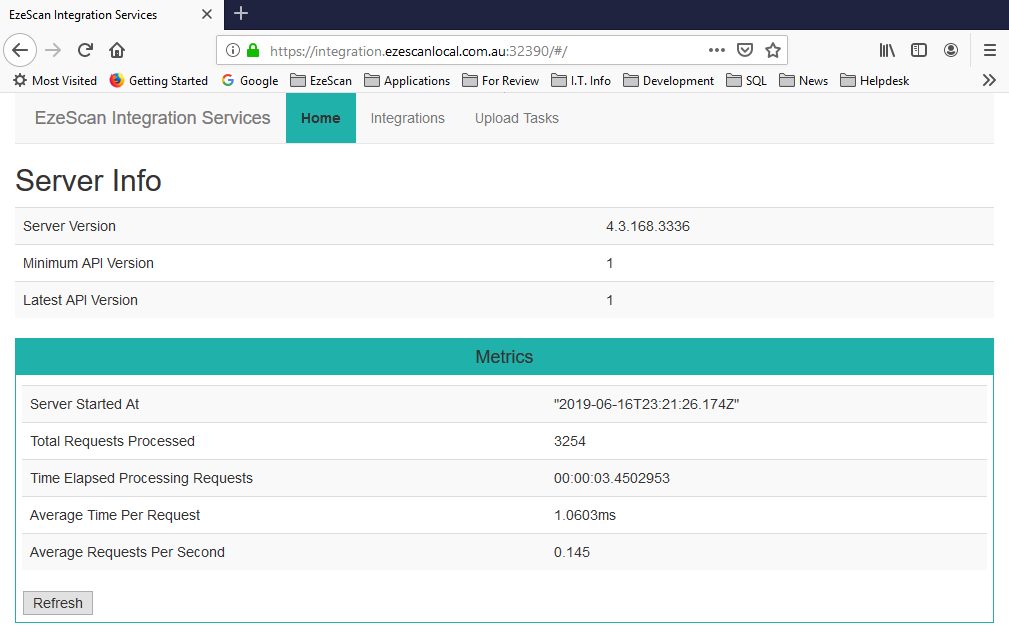
EWA EIS configuration
EWA will require the EIS web services endpoint assigned within the Integrations configuration as shown below.
The value is that as defined within the EzeScan -> Admin -> Workstation Options -> Server -> Integration Web Service Settings -> Base address
Leave the Service API Key value blank unless otherwise advised by an EzeScan Representative. 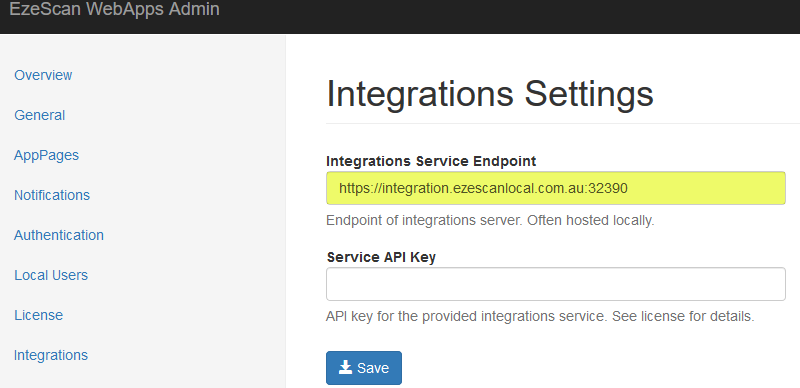
Below is shown a configured set of EWA integration settings that includes Micro Focus Content Manager and MAGIQ Documents along with the EIS server status. 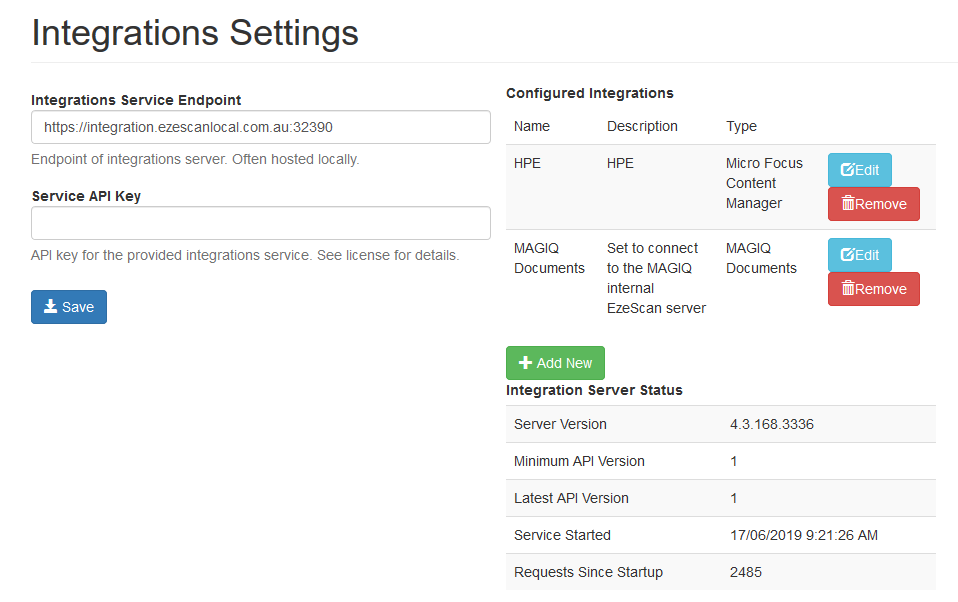
Job Settings
There are two ways the EzeScan MAGIQ Documents connector can integrate with MAGIQ Documents:
-
Using a simple output to MAGIQ Documents Form:
-
The form is configured as a KFI output on a Job, and is commonly used for low volume scanning or ad hoc type scanning and registering.
-
-
Using the KFI and UPLOAD modules:
-
KFI and Upload module configurations would be used for specific workflows that utilise EzeScan KFI to assist in structured data entry, automated data entry, reusing data, forms extraction and setting workflow defaults.
-
The EzeScan to MAGIQ Documents Profile Form functionality requires that the EzeScan Workstation be licensed to include the MAGIQ EDRMS module.
Output documents using profile form
To enable MAGIQ Documents Profile Forms output functionality on a Job:
-
Click Admin and choose Jobs (F6).
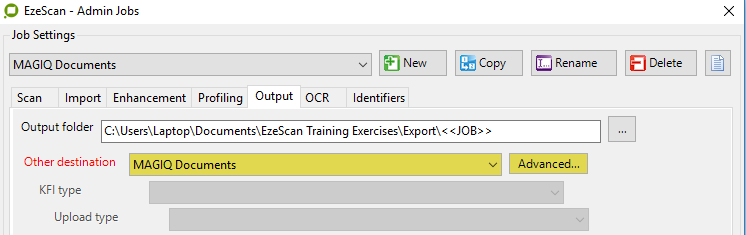
-
Click the Output tab and then choose the MAGIQ Documents option from the Other Destination dropdown.
-
Click the Advanced button. The following fields are available for configuration noting the connection configuration can be either pointed to the global connection settings or be individually configured. Refer to Available Authentication Methods for connectivity type details.
Field
Description
Action Type
Output Document (currently the only option).
Use Global Connection Settings
Tick to use the global connection configuration.
Host
Specify the URL of the MAGIQ Documents Server.
Authentication Type
Specify the Authentication Type, either Credentials or Windows.
Username
The name of the connecting account.
Password
The name of the connecting account.
Impersonate User
Specify the impersonation account as defined in the infoRouter web.confg file.
Default Folder
Set a default path for the form to display. Leave blank to force a user to browse, noting a user can in any case always browse and select a path.
Reuse Last Folder
Use the last used folder path and also tick the option to “Reuse this folder for all documents in this batch” on the Save Document dialog.
Last Folder
View or set a Last Folder path value. Leave blank to use the actual last used folder path. Requires Reuse Last Folder to be checked.

-
After modifying these settings click the Job’s Save button, otherwise the changes will be lost.
-
The Job is now configured to save documents into MAGIQ Documents.
Import documents using browser
If there is a requirement to import documents from MAGIQ Documents into EzeScan, (e.g. for markup/redaction purposes) a specific EzeScan job can be configured to cater.
This would be a separate EzeScan job configured to import from MAGIQ Documents, any markup/redaction would be performed as required and then either saved to MAGIQ Documents as a new version of the original document, or as a document with a new name and optionally in a different folder.
MAGIQ Documents Import functionality is only available when a Job has “Output to MAGIQ Documents” configured as the “Other Destination” type.
To enable Import File functionality on a Job:
-
Click Admin and choose Jobs (F6).
-
Create new Job or select the Job you want to modify.
-
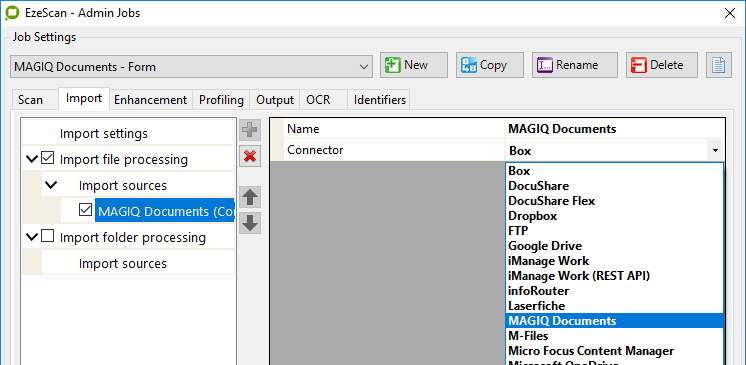
Click the Import tab, enable the Enable Import File Processing
-
Click the Green plus symbol to add a new Import Source.
-
Provide a short descriptive name for the source (optional).
-
Choose the MAGIQ Documents Connector.
-
Configure the connection settings as required and optionally define a Root Level Source Library / folder.

TIP: If a root level library or folder is configured the Operator will be limited to browsing just that particular path when importing from MAGIQ Documents.
Although it will still be possible for an Operator to use their MAGIQ Favourites or choose to perform a search of alternate paths.
-
To change the import default settings, click the Output tab.
-
After modifying these settings click the Save button, otherwise the changes will be lost.
KFI Field Settings
The KFI Field Settings allow the operator to browse into MAGIQ Documents during KFI indexing thus the operator can then select folders and object types to be applied to the document.
Enabling browse options
The MAGIQ Documents settings must be configured before a KFI field can use the MAGIQ Documents browse functionality.
-
Press F7 to display the KFI form.
-
Click the EDRMS tab.
-
If using the global connection settings from the Workstation Options, tick the Use Global Connection Settings box; otherwise fill in the Connection settings:
-
Click the Fields tab.
-
To enable a field to access MAGIQ Documents you need to:
-
Click the Edit link under Properties for the field.
-
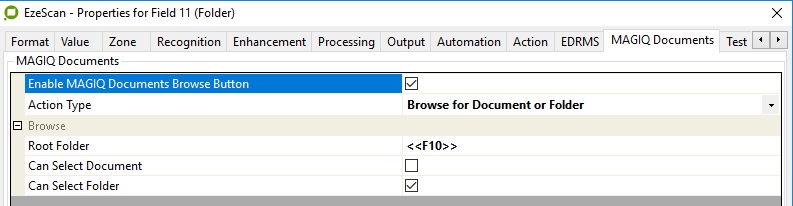
Click the MAGIQ Documents tab
-
Tick the Enable MAGIQ Documents Browse Button box.
-
The browse parameters will become active and a Browse button will display next to the field when in Profiling mode.
-
-
Click OK.
Configuring browse parameters
Browse Method
This option determines the type of MAGIQ Documents Browser that is shown when the Browse button (F3) is pressed during indexing.
Choose one of the following six options: 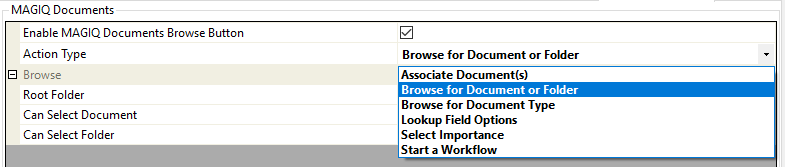
Option
|
Description
|
|---|---|
|
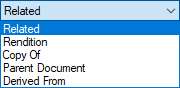
Associate Document(s) |
Enables the Operator to browse or search and select a document to associate with.
When the OK button is clicked by the operator, the full path of the selected item is returned as the value.
The type of association can also be selected from a dropdown on the bottom of the form. |
|
Browse for Document or Folder |
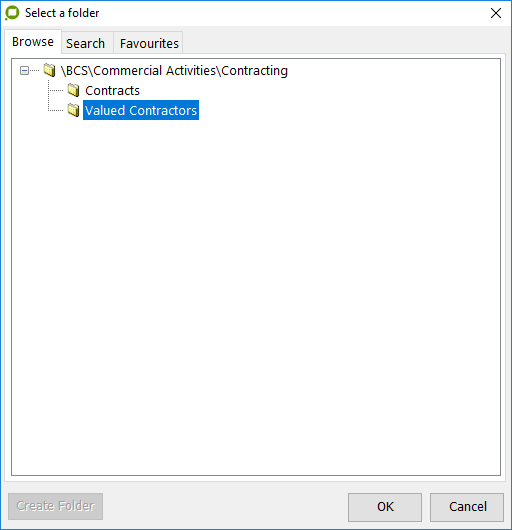
Enables the operator to browse the Library/Folder structure of the MAGIQ Documents Server.
Use the ‘Default Path’ parameter to specify the starting Folder path of this browser.
When the OK button is clicked by the operator, the full path of the selected folder or document is returned as the value. |
|
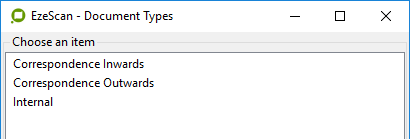
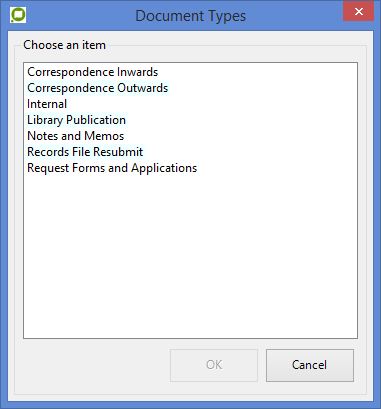
Browse for Document Type |
This option enables the operator to choose a document type for the document.
The following screen will be displayed with the respective document types configured on the server.
The value returned will need to then be applied to the Document Type mapping in the EzeScan upload. Document Types typically also have a custom property set requirement, which itself may have a mandatory data requirement. |
|
Lookup Field Options |
Enables the operator to select from a list of values for a Property Set Lookup Field.
Use the ‘Lookup Field’ parameter to specify which field will be used to retrieve these values.
There are quite a few specific options when configuring and using a lookup, these are covered further in this document.
When the OK button is clicked by the operator, the selected item is returned as the value. |
|
Select Importance |
This option allows a specific choice in the selection of the value of the Importance flag applied to a document.
e.g. Low, Normal, High, Vital
Refer to the MAGIQ Documents documentation on its usage. |
|
Start a Workflow |
Enables the operator to select from a list of available Workflows noting this requires a value to be specified in the ‘Default Path’ parameter.
When the OK button is clicked by the operator, the selected Workflow’s Name and ID is returned as the value. |
Browse Features
Features of the Document and Folder Browse and Search window. There are three main tabs across the window with the title bar advising if the Window is in File mode or Folder mode. 
In the Browse Tab an Operator can browse for either Documents or Folders depending on the mode of the Window.
In Folder Mode only libraries and folders are visible to choose from where as in File Mode documents are the items able to be selected (favourites excepted as all a user’s favourites will display). 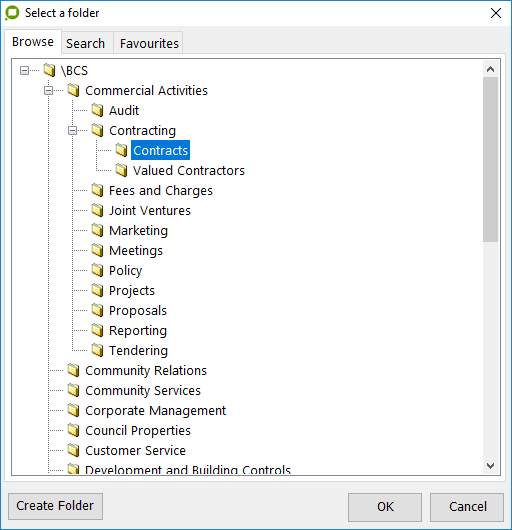
Folder Mode also includes an option to enable a new folder to be created.
TIP: Creating a New Folder will depend on the Operator’s rights within the Library and if any specific MAGIQ folder rules exist for allowing a folder to be created.
Lookup Field Options
This option is used to specify a List or Combo Custom Property Set that will be used when the Browse Methods is set to Lookup.
To set the value click inside the text box, and then click on the … button that appears. 
Field
|
Description
|
|---|---|
|
Action Type |
Lookup Field Options. |
|
Folder Path |
Set the folder path the Custom Property Set is assigned to (if not global). |
|
Property Set |
The name of the Custom Property Set as defined in MAGIQ Documents.
At time of writing only custom Property Sets tied to a Document Type are able to be referenced. |
|
Lookup Field |
The name of the field with the lookup or combo applied. |
|
Return All Columns From Lookup |
Return all the columns from the lookup result (not just the single targeted lookup field).
Note this option will return all the columns as returned by the lookup in MAGIQ Documents which may not necessarily be all the actual Custom Property Set columns.
For example the MAGIQ Documents Lookup may have been built to return all, most or just one column from the target Custom Property Set or third party database.
It is best to review the custom property set configuration and SQL behind the Lookup and confirm what is returned in MAGIQ Documents itself if the results are not as would be expected. |
|
Display As List |
Display the results as a dropdown list in EzeScan.
Not usually a practical choice for a lookup result as there can be many columns and hundreds of lines of data, otherwise is fine for a combobox or a specifically defined single column lookup. |
|
Allow Multiple Selections |
Will allow an Operator to choose multiple selections of the returned results via ticking check boxes. |
|
Prefix Field Names |
Will prefix the returned data with their column names. e.g. SURNAME=
This type of naming format is used to specifically string together Custom Property Set returned data into a single line in order to support single line uploads into MAGIQ Documents.
With this method multiple complete correspondent data sets can also be uploaded as a single line entry in EzeScan Upload with the multiple sets of data separated by the use of ##
With the option unticked the result will be a || separated list of the columns returned by the lookup. |
Using Lookups and the Prefix Field Names Option
Using Prefix Field Names and stringing together multiple Custom Property Set data for a single line upload are very powerful options allowing for such things as attaching multiple correspondent data sets to a document via a single upload line.
However there are a few items to be aware of when configuring an EzeScan KFI to build a single line of data and also when pulling data out of a line to populate other KFI fields.
First is the line of data can be very long as it will contain not only data, but also the MAGIQ CPS column name the data belongs with.
The below example is a single line of returned data for a single correspondent and has a length of 546 characters noting not all the field names are populated with data in this instance (as there was no data returned by the Lookup for the field).
ORGANISATION=Outback Imaging Pty Ltd||SURNAME=Mulvihill||GIVEN_NAME=Tony||TITLE=Mr||POSITION=Consultant||ADDRESS_LINE1=Suite 7 - Office 106 - Level 1, 486 Lower Heidelberg Road||ADDRESS_LINE2=||ADDRESS_LINE3=||ADDRESS_CITY=Heidelberg||ADDRESS_STATE=VIC||ADDRESS_POSTCODE=3084||EMAIL=T.Mulvihill@ezescan.com.au||PHONE=61 3 8637 7157||MOBILE=0415 161 271||FAX=61 7 3117 9471||URL=https://www.ezescan.com.au||EXTERNAL_ID=||ADD_ADDRESS_LINE1=PO Box 437 Carina QLD 4152||ADD_ADDRESS_LINE2=1A/828 Old Cleveland Road Carina QLD 4152||ADD_ADDRESS_LINE3=
TIP: Field Names and values are separated by double pipes (||)with the Field Name itself always ending in an equals sign (=)
Here the fields have been broken down by their separators to better review the data:
ORGANISATION=Outback Imaging Pty Ltd||
SURNAME=Mulvihill||
GIVEN_NAME=Tony||
TITLE=Mr||
POSITION=Consultant||
ADDRESS_LINE1=Suite 7 - Office 106 - Level 1, 486 Lower Heidelberg Road||
ADDRESS_LINE2=||
ADDRESS_LINE3=||
ADDRESS_CITY=Heidelberg||
ADDRESS_STATE=VIC||
ADDRESS_POSTCODE=3084||
EMAIL=T.Mulvihill@ezescan.com.au||
PHONE=61 3 8637 7157||
MOBILE=0415 161 271||FAX=61 7 3117 9471||
URL=https://www.ezescan.com.au||
EXTERNAL_ID=||
ADD_ADDRESS_LINE1=PO Box 437 Carina QLD 4152||
ADD_ADDRESS_LINE2=1A/828 Old Cleveland Road Carina QLD 4152||
ADD_ADDRESS_LINE3=
In this example there are 19 fields having been returned by the lookup result.
As can be seen there is plenty of data in just this single result set meaning the EzeScan KFI field will need to be of a suitable length. Additionally given multiple result sets can be strung together via the use of double sharps (##), there will be a need to make allowances for the additional field lengths required if the design calls for stringing multiple sets of data together.
Calculating the Required Field Length
The calculation of a required maximum possible length can be performed by the following formula.
((field length values total) + For Each(length of field name + equals + double pipes)) - one set of double pipes) = max required field length
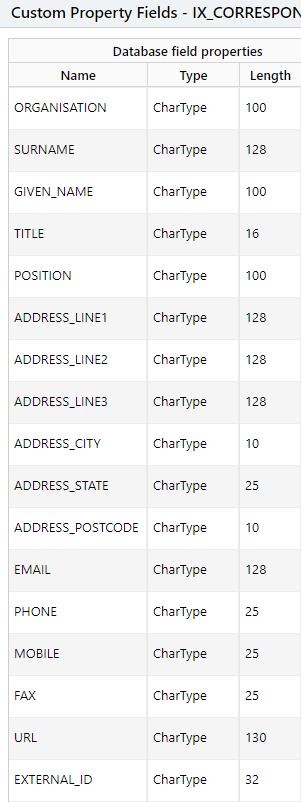
So based on the example IX_CORREPONDENT custom property, set at below image, we would have the following results.
((1238) + (266)) -2 = 1502
Therefore, the EzeScan KFI field length would be set to 1502 to cater for all possible maximum data lengths.
If the intention were to string together multiple data returns (three in the example) the formula would be.
((max required field length + double sharps) x number of expected custom property sets) - one set of double sharps = new field length
((1502 + 2) x 3) - 2 = 4510
TIP: In reality it would be rare for the maximum field data length to be reached in normal usage, however it is wise to plan for the possible contingency.
EzeScan Field KFI Configuration Examples
All examples are based on the previously listed IX_CORREPONDENT custom property set
Setting a single result return KFI field Maximum Length: 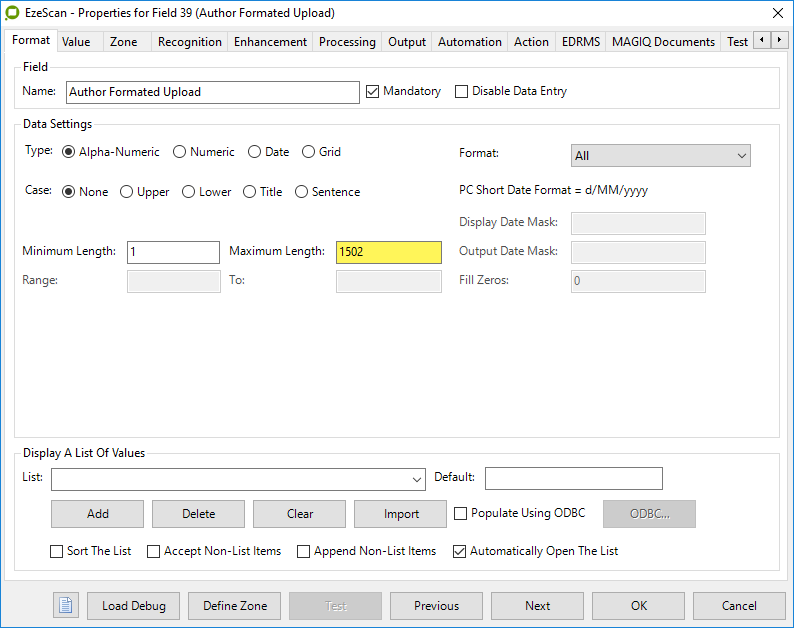
There might also be a need to set a matching value in the Extraction Options/Use Columns size: 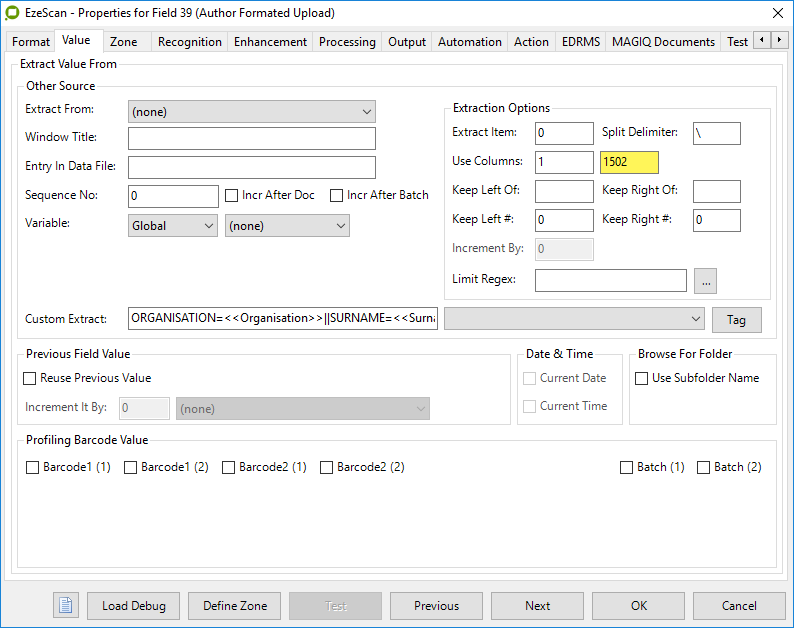
When pulling apart a returned result set the Extraction Options should be used:
The Split Delimiter is the double pipe, the Use Columns default size of 255 should be fine as it exceeds the max length of the field name + data item max length.
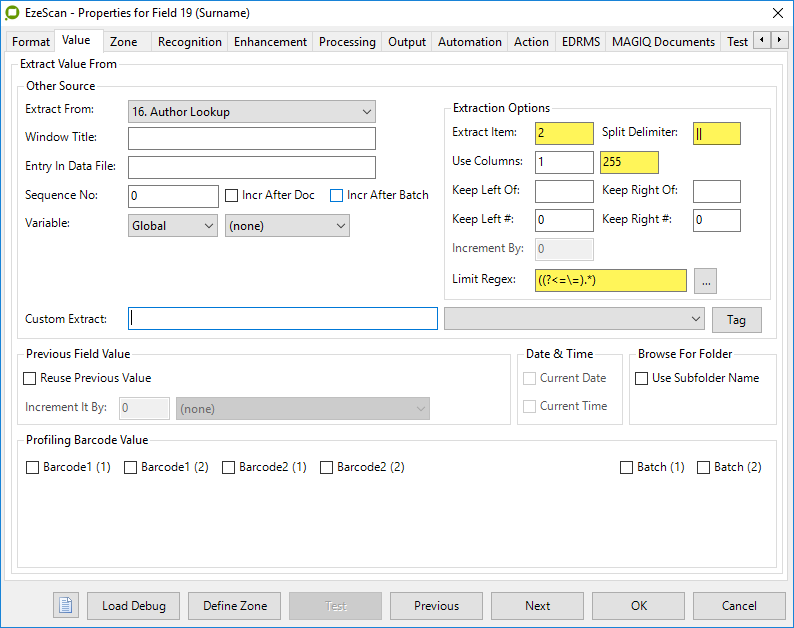
A Limit Regex is used to remove the Field Name and equals sign leaving just the actual data.
((?<=\=).*)
The regex is a positive look behind meaning it looks for the equals sign and returns everything behind it i.e. the data.
With the above example settings a return data set can be pulled apart into individual fields to allow for an Operator to update and then reassembled back into a single line for passing to the EzeScan Upload module.
To reassemble the pulled apart values an additional KFI field is utilised to rebuild the single line using custom extract values as,
Custom Property Set Field Name=<<EzeScan KFI Field Name>>|| and so on till the full line is rebuilt as the example below shows.
ORGANISATION=<<Organisation>>||SURNAME=<<Surname>>||GIVEN_NAME=<<Given Name>>||TITLE=<<Title>>||POSITION=<<Position>>||ADDRESS_LINE1=<<Address_Line1>>||ADDRESS_LINE2=<<Address_Line2>>||ADDRESS_LINE3=<<Address_Line3>>||ADDRESS_CITY=<<Address_City>>||ADDRESS_STATE=<<Address_State>>||ADDRESS_POSTCODE=<<Address_Postcode>>||EMAIL=<<Email>>||PHONE=<<Phone>>||MOBILE=<<Mobile>>||FAX=<<Fax>>||URL=<<URL>>||EXTERNAL_ID=<<External_ID>>||ADD_ADDRESS_LINE1=<<Add_Address_Line1>>||ADD_ADDRESS_LINE2=<<Add_Address_Line2>>||ADD_ADDRESS_LINE3=<<Add_Address_Line3>>

Custom property set specifics
Custom Property Sets are custom tables of database columns created by the MAGIQ Documents administrator and can have specific data lengths, datatypes, captions, control types and display field lengths.
The control type of Lookup will have a SQL statement behind itself.
The SQL statement can reference MAGIQ itself, or a third party database, or a combination of both.
The Lookup may return all custom property set columns or may return just a subset.
Custom Property Sets can apply to Folders, Documents and/or Users as well as be restricted to selected Libraries or apply to all Libraries Globally.
A Private Custom Property Set is excluded from non-authenticated user interaction. 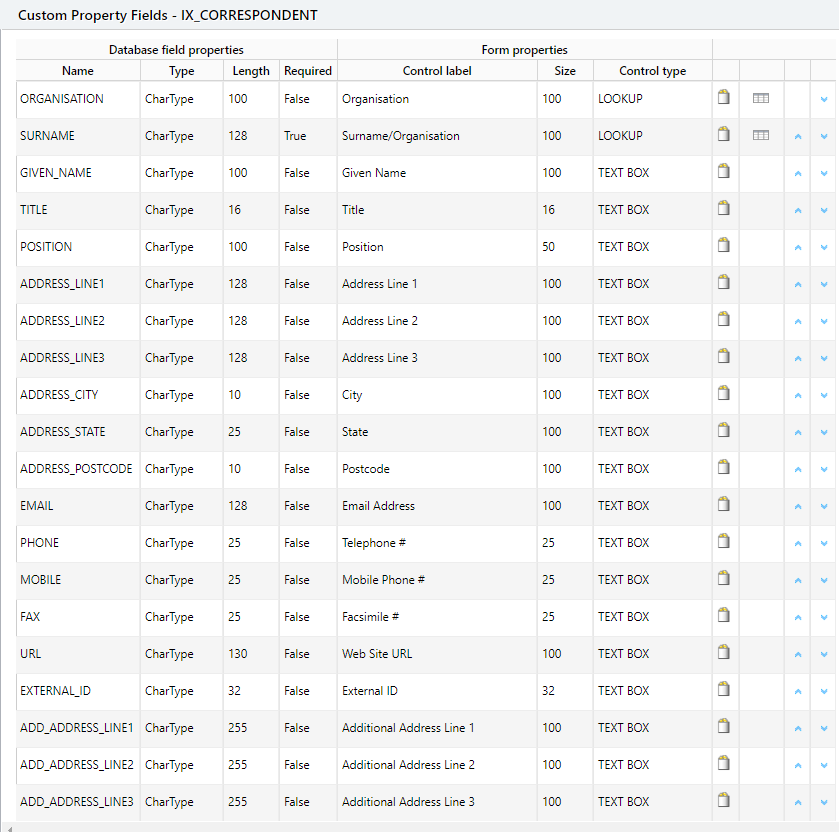
The default Lookups “lookup” and return data from the MAGIQ Documents system itself.
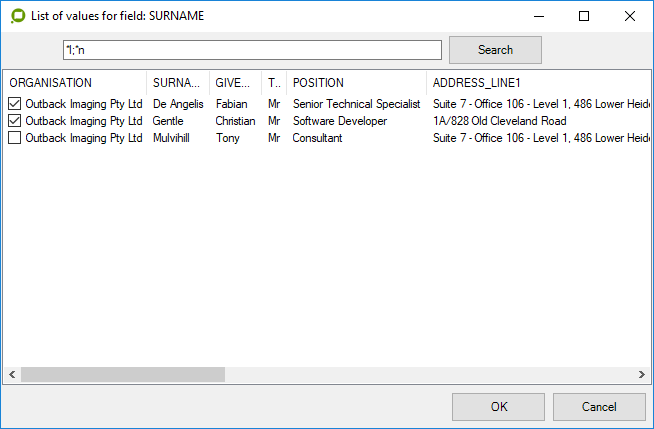
For example the default IX_CORREPONDENT CPS has two Lookup columns and will return a Top 500 distinct list of data. The two Lookup Columns are ORGANISATION and SURNAME.
The default SURNAME Lookup SQL has been designed to enable a search result using either surname, given name or both.
The search is typically case insensitive and can be either via Given or Surname or both using a “;” as an optional separator where the format is <surname>;<given name>
;tony return all given names beginning with “Tony”
Mul;Tony return all surnames beginning with “Mul” with a given name beginning with “Tony”
Mul or Mul; return all SURNAMES beginning with Mul
Upload Settings
The UPLOAD module will obtain the KFI output data to pass into MAGIQ Documents saving the document into the respective folder and applying metadata information.
Configuring connection parameters
-
Open the Upload Form (F8).
-
Choose the Upload Type you want to configure.
-
On the left hand side in the Upload Properties pane choose MAGIQ Documents in the Upload To list.
-
If using the global connection settings from the Workstation Options. Tick the Use Global Connection Settings option; otherwise fill in the Connection settings.
Configuring the built-in fields
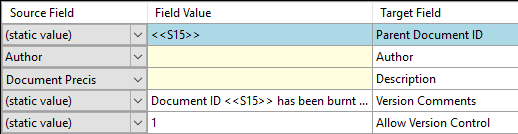
The following fields will appear after choosing Upload To MAGIQ Documents option in the Upload Properties pane. These are the default MAGIQ Documents fields.
Each field can have its input set using the Source Field cell, noting that the Folder and Document Name fields can not be set to ignore. 
MAGIQ Documents Custom Property Sets can be specifically Auto Populated as Target Fields by first adding Static fields for Folder and Property Set.
The … button can then be used to first select a Folder Path and then select a Custom Property Set, at which point the Auto Populate button can be used to pull in the custom fields for upload usage. 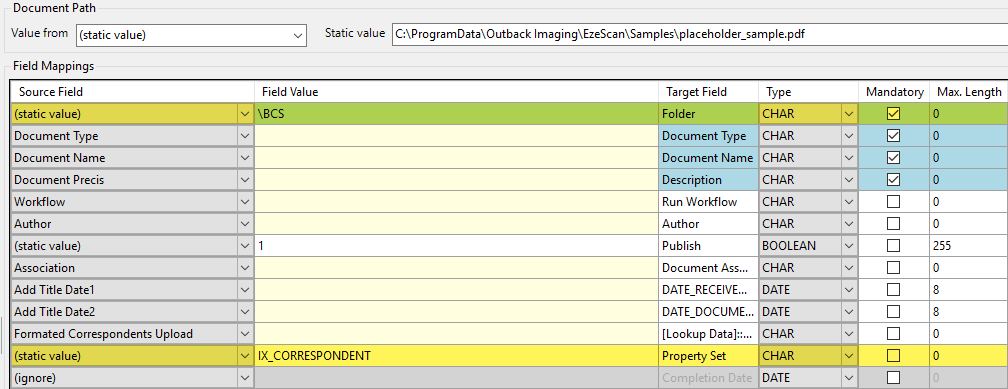
Where Single Line KFI output (where the data is prefixed with the field name) a specific Target Field Type is configured.
For example:
[Lookup Data]::IX_CORRESPONDENT::0 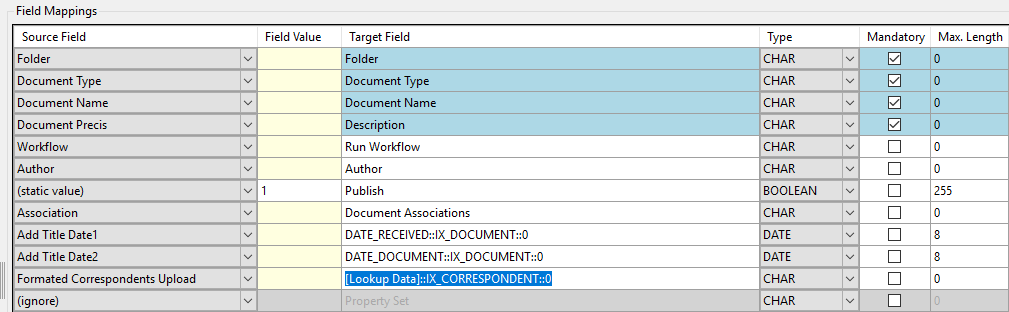
The field can take any number of prefixed and chained data sets for the targeted Custom Property Set, thus allowing the easy adding of multiple sets of IX_CORREPONDENT CPS data to the document.
For example the Formated Correspondents Upload field is built from two separate KFI fields.
<<Author Formated Upload>>##<<Additional Correspondents>>
Where <<Author Formated Upload>> is built from individual fields for each CPS column.
And <<Additional Correspondents>> is built from a lookup allowing multiple correspondent selections.
With both chained together via the “##” double sharp joiner.
Available options
Target Field
|
Description
|
|---|---|
|
Folder |
Use this field to specify the MAGIQ Documents folder path that the upload document will be saved to.
To browse for a folder, set the Source Field to Static Value, click into the Field Value cell and click the ... button that appears. |
|
Document Type |
Use this field to specify the Document Type that will be assigned to the uploaded document.
To select a Document Types, set the Source Field to Static Value, click into the Field Value cell and click the ... button that appears. When the OK button is pressed the selected Document Types’ Name and ID is returned as the value. For example, TIP: Document Types can also have a mandatory Custom Property Set requirement.
|
|
Run Workflow |
Use this field to specify the Workflow that should be started when the upload document is saved to MAGIQ Documents. |
|
Property Set |
Use this field to specify the Custom Property Set that should be used to populate custom upload fields when the Auto Populate button is pressed. |
|
Author |
Use this field to specify the Author of the upload document. |
|
Completion Date |
Use this field to specify the Completion Date of the upload document. |
|
Description |
Use this field to specify the Description of the upload document. |
|
Document Language |
Use this field to specify the Language of the upload document. |
|
Document Source |
Use this field to specify the Source of the upload document. |
|
Importance |
Use this field to specify the Importance of the upload document. This field accepts the following values
0 = Low; 1 = Normal; 2 = High; 3=Vital |
|
Percent Complete |
Use this field to specify the Percent Complete of the upload document. This field accepts a value of 0 to 100. |
|
Retention Date |
Use this field to specify the Retention Date of the upload document. |
|
Retention Status |
Use this field to specify the Retention Status of the upload document. This field accepts the following values –
0 = No Retention; 1 = Forever; 2 = Until Specified Date |
|
Update Instructions |
Use this field to specify the Update Instructions of the upload document. |
|
Version Comments |
Use this field to specify the Version Comments of the upload document. |
|
Owner |
Use this field to specify the Owner of the upload document. |
|
Keywords |
Use this field to apply keywords into the keywords field of the upload document. |
|
Comments |
Use this field to specify the Comments of the upload document. |
|
Allow Version Control |
Use this field to allow if the document can have a new version applied to it. To set to Yes put a Y in the field. To set to No put an N in the field or leave the source value on ignore. |
|
Publish |
This option will set the document to a published status. To set to Yes put a Y in the field. To set to No put an N in the field or leave the source value on ignore. |
|
Parent Document |
This option is used if a document needs to be updated as a new revision. The full path of the document must be supplied. E.g. \scans\scan.pdf |
|
Parent Document ID |
Use this option to pass a doc ID value instead of defining a path and doc name.
Is useful for updating a document version where the name may have been changed by the infoRouter engine (during upload) in the instance of a long doc name auto truncated with a series of random characters added as a suffix. |
|
Document Associations |
Associate a document to another document. |


Configuring custom property fields
After selecting the Document Type (Document Type Field) or Property Set (Property Set Field) to assign to the uploaded document, click the Auto Populate button at the bottom of the screen.
This will result in the MAGIQ Documents connector returning a list of custom fields that relate to that Document Type / Property Set.
It is then a matter of setting the source values of those fields to the target values of the custom fields.
The Auto Populate button appears under the Field Mappings grid. 
Applying KFI output data to target field data
To pass through the KFI output data into the Upload module the operator is required to set the source field data to the target field data:
-
In the Upload type, set the Column names from option to the name of the KFI job Type.

-
In the Field Mappings Grid the operator can apply the Source Field settings to the Target Field settings.
In the example below the MAGIQ Documents Target Field Document Name is being populated by the KFI Source Field Title.
-
When all the mappings are complete, click Apply.
-
Click OK to save the changes.
Display Record Number After Saving Record
To enable this setting, please refer to the How to articles.
Running a Job Using the Profile Form
-
To run a job for saving to MAGIQ Documents with the profile form, confirm that the Other Destination is set to MAGIQ Documents.

-
Click the scan/import or job button to load the image into the EzeScan viewer.
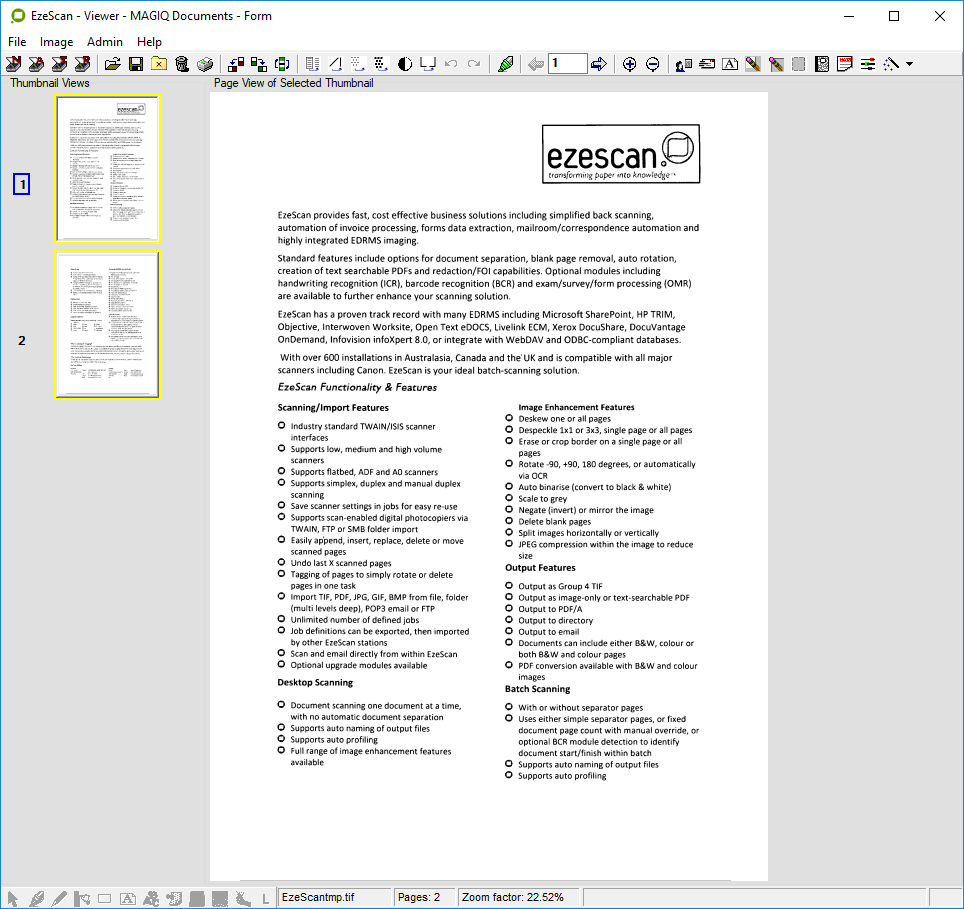
-
Press the F4 key or click the Profile button

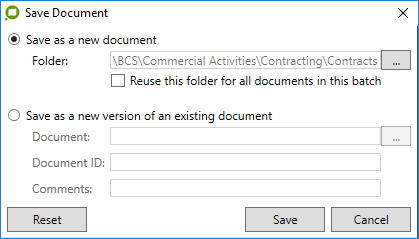
-
The Save New Document form will open where the operator can then select a Folder, Name the document, and apply other metadata to the document.
TIP: When a Document Type is chosen any mandatory Custom Property Set will automatically display in the right hand side of the form.

-
Click Save and the document will be uploaded into MAGIQ Documents.
Contact your EzeScan representative for example job configurations that can be used to build upon.
Running a Job Using KFI and Upload
To run a job to MAGIQ Documents using the KFI and UPLOAD modules, confirm that the Other Destination is set to KFI and the respective KFI and UPLOAD types are selected.
KFI and Upload module configurations will be specifically built to suit an Organisation’s usage of EzeScan and MAGIQ Documents. Please refer to the standard EzeScan PRO Old, KFI and Upload guides as well as this specific information for the details on how to configure Jobs, KFI and Uploads.
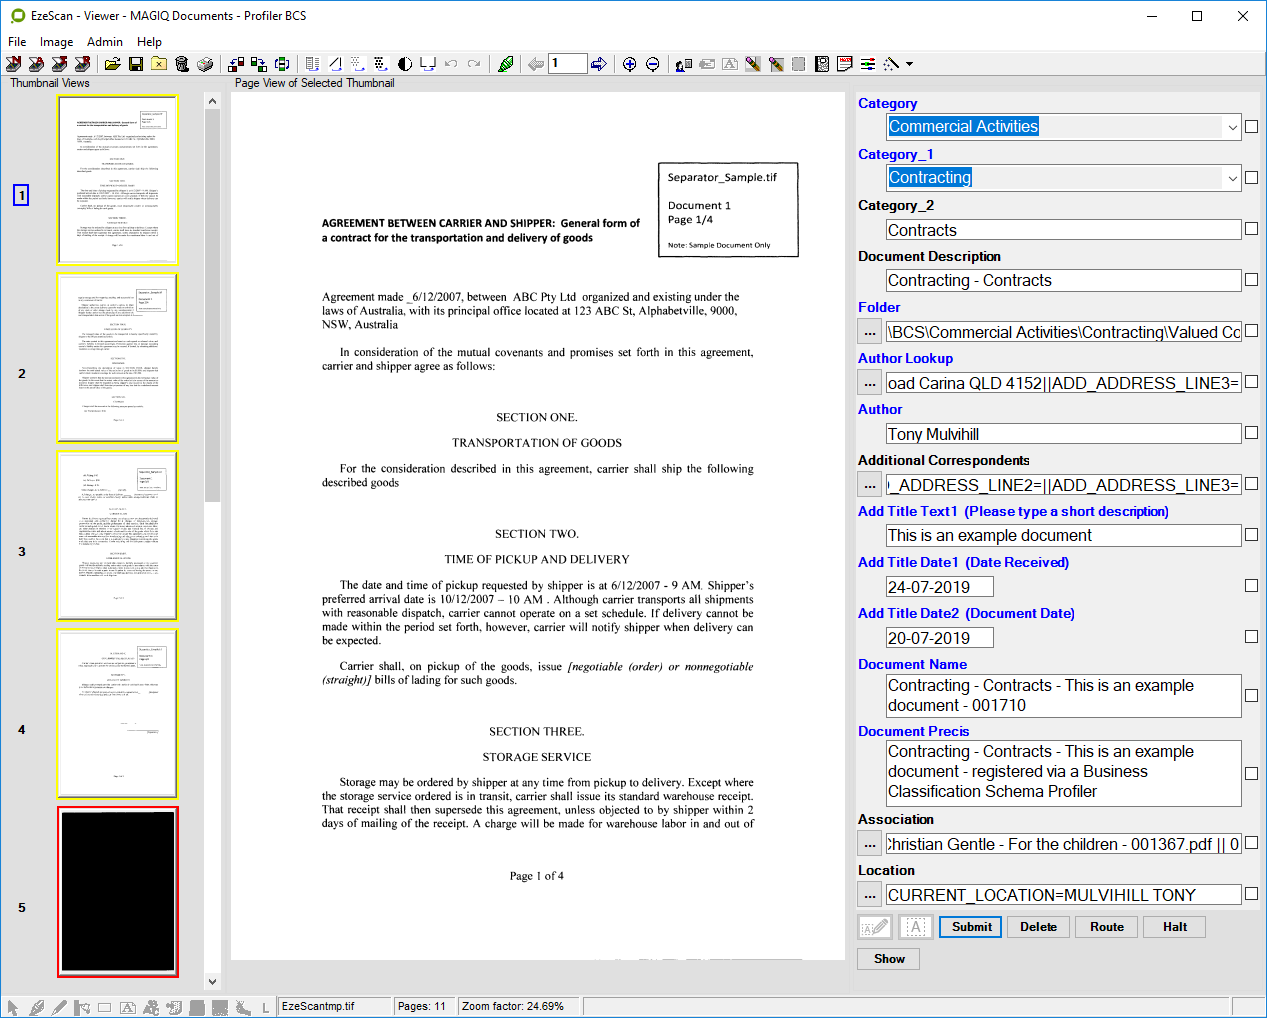
In the example below the KFI\UPLOAD types have been configured using an EzeScan Authority based Profiler lookup table using a folder based Business Classification Schema (BCS).
The image below shows a job configured using the KFI and UPLOAD modules. 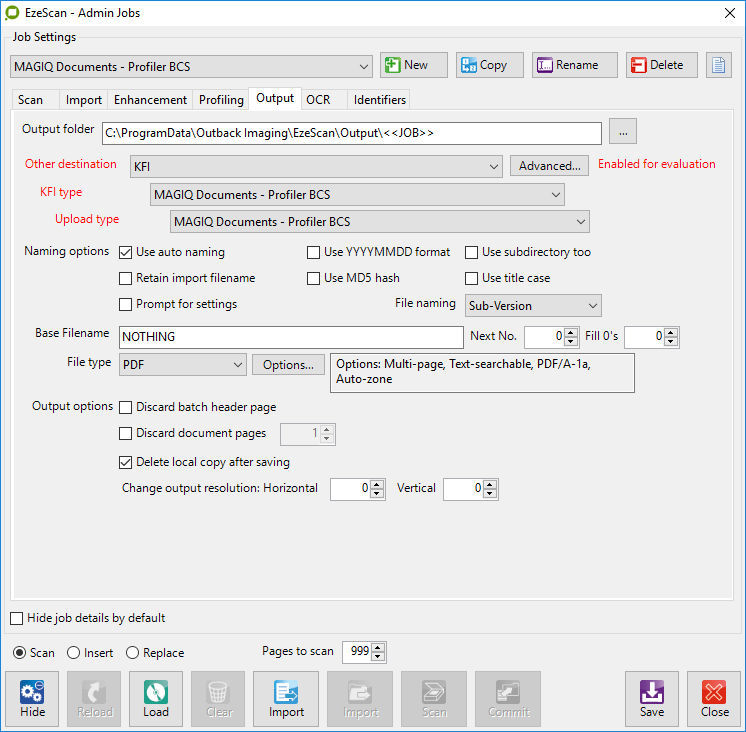
To run a job to MAGIQ Documents using the KFI and UPLOAD modules:
-
Click the scan/import or job button to load the image into the EzeScan viewer.
-
Press the F4 key or click the Profile button

-
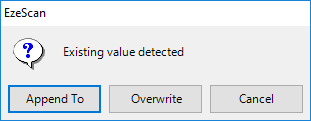
When a Custom Property Set field is configured to allow multiple selections there will be a prompt to append or overwrite the fields existing contents with the new selections.
-
When complete, press the Enter key and the Submit button will highlight.
-
Press Enter again or click Submit.
-
The document will be saved into the respective MAGIQ Documents folder and metadata applied.
Contact your EzeScan representative for example job configurations that can be used to build upon.
EWA Configuration Options
This section assumes a degree of familiarity with EWA and is intended as reference examples for those who are tasked with configuration EWA.
EWA supports direct integration to MAGIQ Documents / InfoRouter via the EIS which must be configured prior to the use in EWA.
EWA can also be configured to output to a folder path and include the output metadata as a matching xml file.
EzeScan Server can optionally be configured to pickup and process the EWA output files using the xml metatdata file in a KFI for processing and uploading to MAGIQ Documents.
Infact there are many ways to configure EWA Output just as there are many ways to configure EzeScan and EzeScan Sever and your EzeScan representative can provide further advice and example configurations for build guidance.
Configure RIA field for a CPS lookup
In this example the IX_CORRESPONDENT custom property set (CPS) will form the basis.
Creating an RIA app page field
Add the field choosing the type as Integration Find (Search and Browse).
Although the Integration Lookup might sound like a more logical field type choice, it would be incorrect due to that type being limited in its functionality. 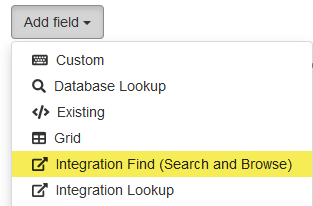
Provide a name for the field noting the field id will auto populate.
TIP: Field names are required to be unique within a particular EWA page.
Set whether the field is required or not.
TIP: It should be confirmed within MAGIQ Documents / InfoRouter as to if the custom property set is a mandatory requirement for the doctype being used for the document, as well as if the CPS has its own mandatory fields requirements.
Select the Integration as MAGIQ Documents. There will be two Tabbed selections available, a Browse and a Search. Disable the Browse and enable the Search 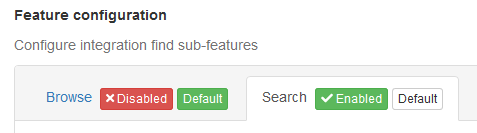
Set the search Action as Search Field Options. 
Leave the Display options fields as default (they will be empty) and move to the Integration Settings. In Integration Settings set the Lookup Field and Property Set name. 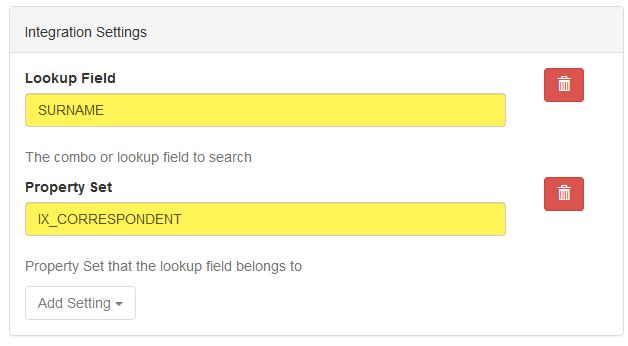
In Value Configuration the Use All Properties is not selected (button will become Green if selected).
In the Display property add CPS columns as a “;” separated list of values you’d like the user to see.
Ensure the Format option is EzeScan KFI (the format will return the data with column name prefixes). 
If using TITLE;GIVEN_NAME;SURNAME as the Display Property values the data will display to the Operator as the below pic. 
Noting behind the scenes all the returned property set column data will be output by EWA. EWA’s XML Output for the lookup field will be similar to the following:
<author_who name="Author (Who)" type="single" display="Tony | Mulvihill">ORGANISATION=Outback Imaging Pty Ltd||SURNAME=Mulvihill||GIVEN_NAME=Tony||TITLE=Mr||POSITION=Consultant||ADDRESS_LINE1=Suite 7 - Office 106 - Level 1, 486 Lower Heidelberg Road||ADDRESS_LINE2=||ADDRESS_LINE3=||ADDRESS_CITY=Heidelberg||ADDRESS_STATE=VIC||ADDRESS_POSTCODE=3084||EMAIL=
T.Mulvihill@ezescan.com.au||PHONE=61 3 8637 7157||MOBILE=0415 161 271||FAX=61 7 3117 9471||URL=https://www.ezescan.com.au||EXTERNAL_ID=||ADD_ADDRESS_LINE1=PO Box 437 Carina QLD 4152||ADD_ADDRESS_LINE2=1A/828 Old Cleveland Road Carina QLD 4152||ADD_ADDRESS_LINE3=</author_who>
Example full RIA field configuration
The Integration is set to MAGIQ Documents.
The Feature Configuration has Browse disabled and Search enabled.
The action is set to Search Field Options. The Lookup field is set to Surname as the lookup field defined in MAGIQ Documents.
The Custom Property Set is IX_CORREPONDENT. The Value Configuration is set to Record with the Use All Properties option not enabled.
Given_Name and Surname are populated to enable display to the Operator.
The Format is EzeScan KFI for prefixed field names, alternatively Piped can be chosen. 
Configure EWA RIA for EIS upload
An example Action configuration for upload to MAGIQ Documents via EIS and assumes the EIS configuration in EzeScan and EWA is functional.
All field / column names are specific and will need to be as defined in the RIA page.
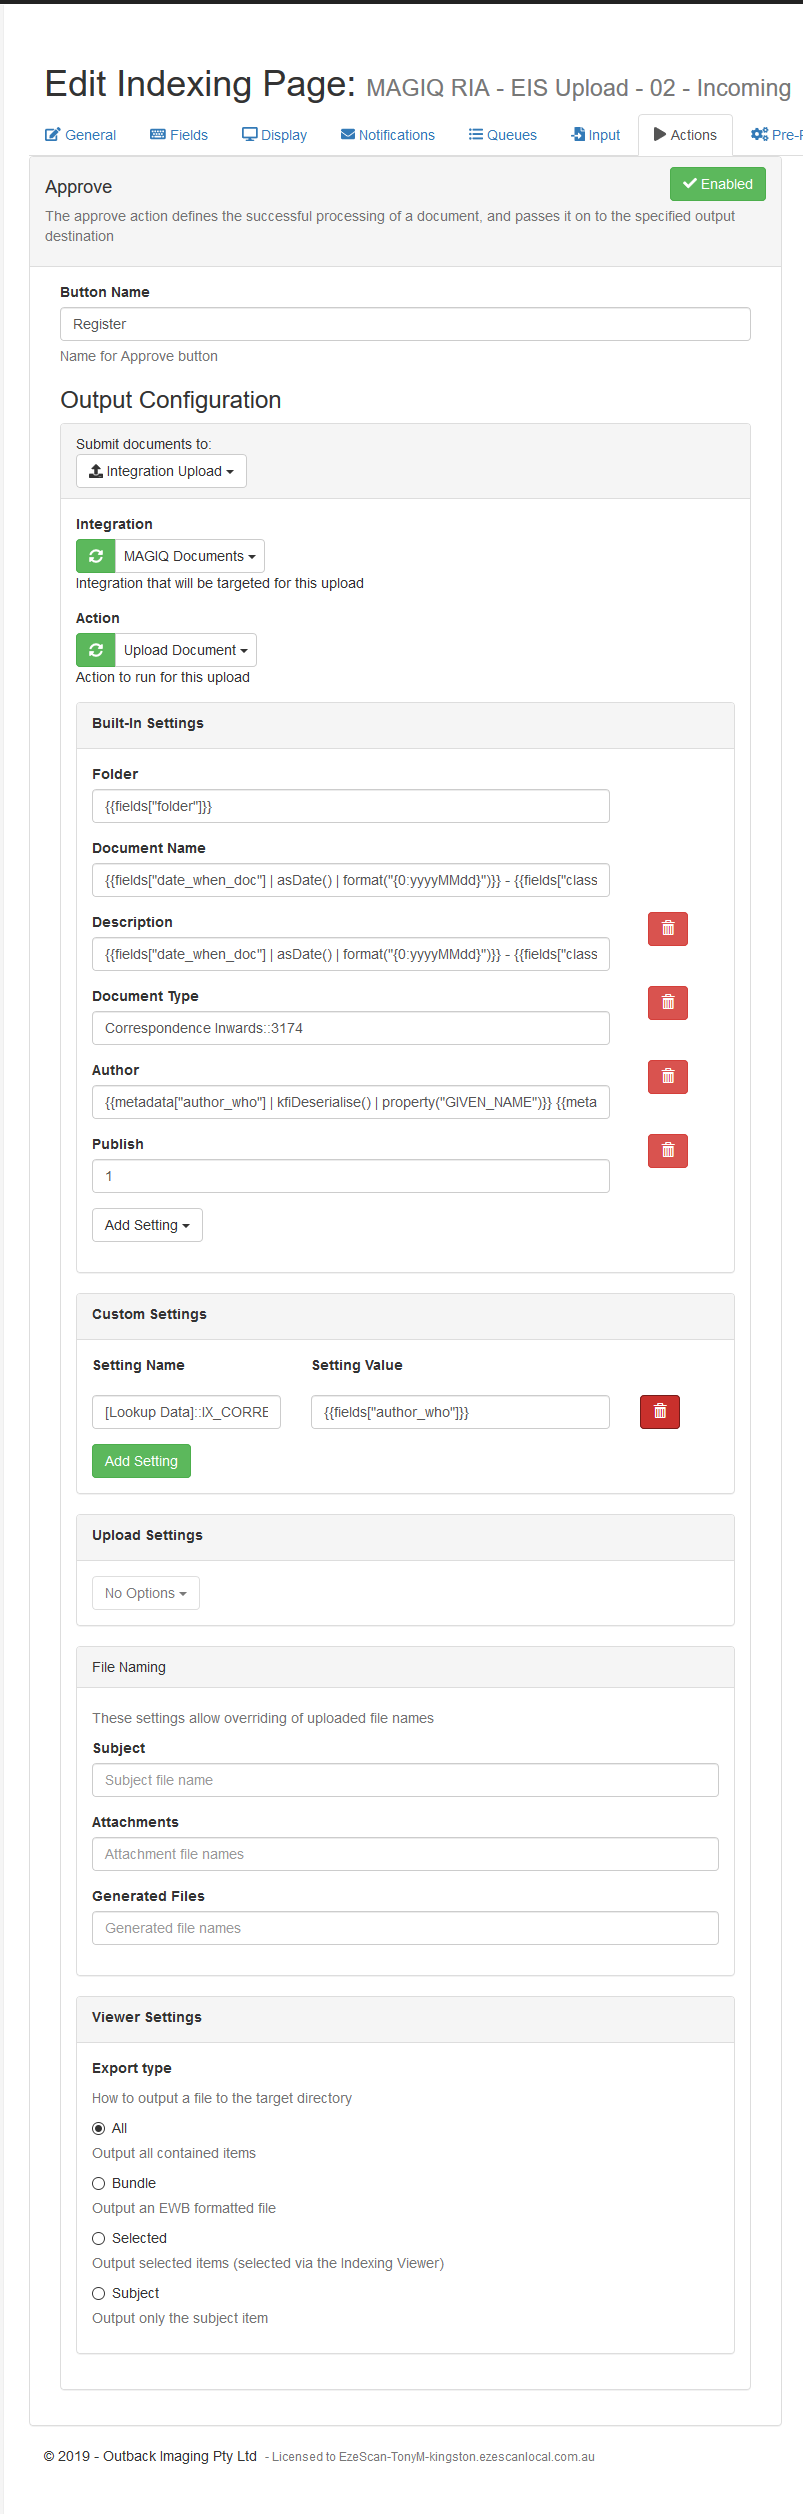
Set the Output Configuration to Integration Upload
Set the Integration to MAGIQ Documents and Action to Upload Document.
The Built-In Settings are the InfoRouter API items for upload functionality and uses placeholders for returning field data.
Folder
{{fields["folder"]}}
Document Name
{{fields["date_when_doc"] | asDate() | format("{0:yyyyMMdd}")}} - {{fields["classification_what"]}} - {{metadata["author_who"] | kfiDeserialise() | property("GIVEN_NAME")}} {{metadata["author_who"] | kfiDeserialise() | property("SURNAME")}} - {{time}}
Description
{{fields["date_when_doc"] | asDate() | format("{0:yyyyMMdd}")}} - {{fields["classification_what"]}} - {{metadata["author_who"] | kfiDeserialise() | property("GIVEN_NAME")}} {{metadata["author_who"] | kfiDeserialise() | property("SURNAME")}} - {{fields["description_type_the_description"]|trim()}}
Document Type
Correspondence Inwards::3174
Author
{{metadata["author_who"] | kfiDeserialise() | property("GIVEN_NAME")}} {{metadata["author_who"] | kfiDeserialise() | property("SURNAME")}}
Custom Settings relate to the use of the EzeScan KFI format from a lookup field where the Setting Name value is as per the standard EzeScan single line CPS upload configuration.
[Lookup Data]::IX_CORRESPONDENT::0
{{fields["author_who"]}}