
Installing the license file
-
Please contact EzeScan or your reseller to obtain a concurrent license file.
The operator must supply the full server name details ( e.g. SERVER1.ACME.COM) to order a concurrent license for EzeScan.
The license file can be named as per your requirements…
-
if using license pools it is best to give the license file a descriptive name…
-
for example by business unit Accounts.lic
-
if just using one license file call it Default.lic
-
-
it might also be handy to include the expiry date and seat count.
-
E.g. "Records_Expire_20191215_seats_06.lic".
-
The default folder path license files reside in is…
install drive\programdata\outback imaging\ezescan authority\LicensePools
The License Management tab is where the management of (client PC) Concurrent Licenses are handled.
-
"Named" Licenses (workstation licensing) are not set up on the License Management tab; they are set up on the "Config Profiles" tab. Please refer to the Adding Named Licenses to the Authority Server section on page for details.
Concurrent User License Installation
-
Please contact EzeScan or your reseller to obtain a concurrent license file.
Please refer to the Configuring the Authority Service section on page for details on configuring the License file on the server.
-
If the License is not appearing on the License Management tab - click + Import License
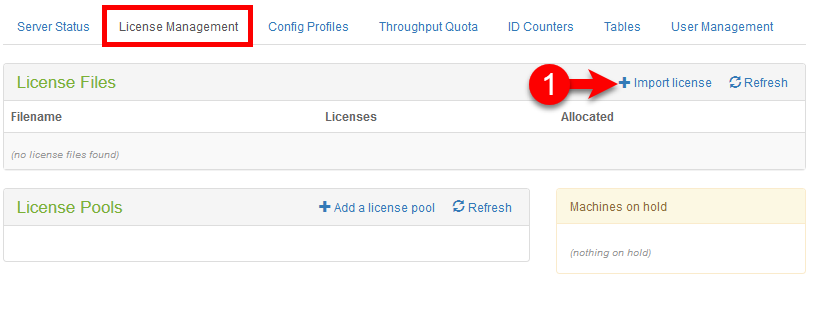
Figure 12
-
Browse for the license file
-
Click the + Import button once it has been located
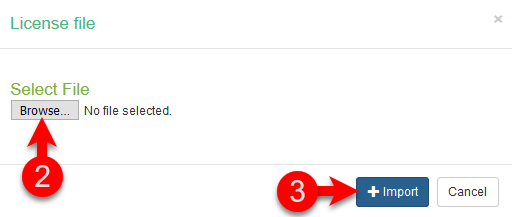
Figure 13
-
The screen should now look like the sample shown in Figure 14
Concurrent User License already Saved to Server
-
Click Refresh license files
-
The license filename should appear
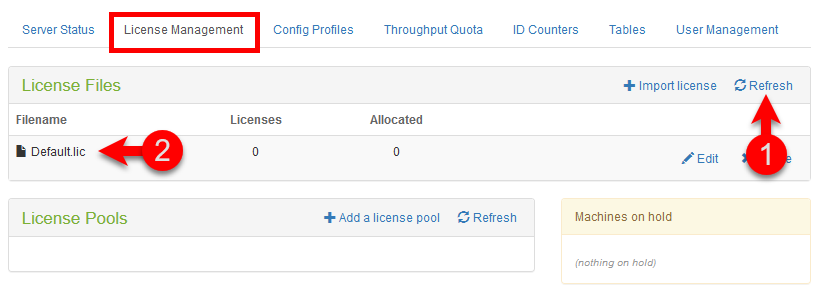
Figure 14
Add License Pools
-
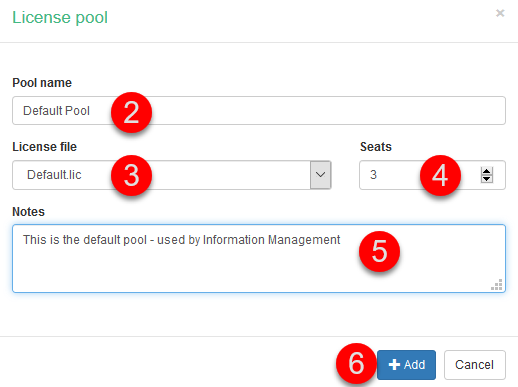
Click the + Add a license pool link
-
Give the pool a name e.g. Default Pool
-
If you are splitting the concurrent license over several departments then you may wish to be more specific with your naming.
-
Information Management
-
Human Resources
-
Finance
-
-
-
Select the license file - browse to server
-
Enter the number of users the license file is licensed for and click update
-
In this example 3 seats are being allocated to Information Management and other departments (i.e. why it's called Default)
-
-
Add notes as required
-
Click + Add button to complete
-
Add additional License pools as required
-
It is important to understand that you can only allocate the number of licenses based on the number purcahsed.
Edit the Pool Details or Remove the Pool
-
Click on the

icon to edit the pool details
-
Click on the

icon to delete the Pool (confirmation will be requested)
Add Machines to a Pool
Adding machines to a pool allows the administrator to manage who is using EzeScan. For example…
-
in the default Pool set-up above there are 3 licenses allocated to the pool
-
This provides the possibility for 9 PC clients to concurrently use those 3 licenses
-
i.e. any 3 PCs of the nominated 9 can used EzeScan at once
-
-
Once a machine is added the pool, it will now only accept connections from matching machine names.
You can use another pool without reserved machine names as a catch all. However this requires allocating some of the available concurrent license seats to the second pool.
To allocate the PC's to the pool…
-
Add the Machine (PC) name
-
Click the +Add button to add it to the pool as shown below…
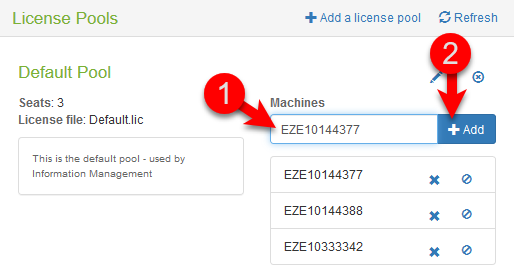
Figure 15 - Adding machines to a pool
-
Continue adding until the pool is full
Remove Machines from a Pool
-
Just select the machine to be removed by clicking on the X
-
Then click on 2nd X to confirm the removal
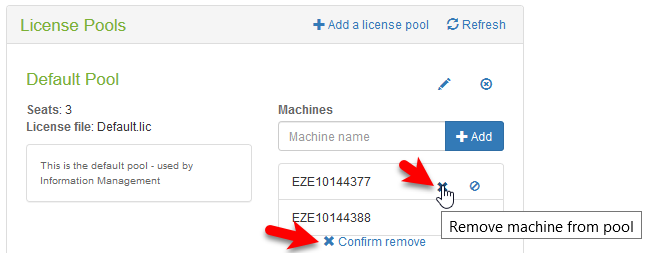
Figure 16 - Removing machines from a pool
Placing a Machine (PC) on hold
There may be the occasion when one of the PC's in the pool has been locked (person at lunch or in a meeting) and the license is unnecessarily being used up.
To place the machine on hold click on the 
Unlocking it is a matter of clicking on it in the Machines on hold window to release it.
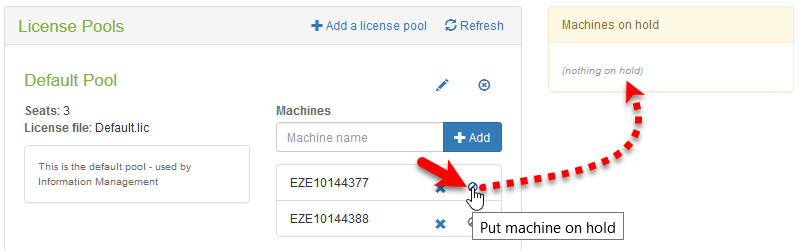
Figure 17 - Placing a machine on hold to free up the pool
-
Each PC running as a concurrent license MUST have the Override.ini file configured to point to the EzeScan Authority Server. For further details please refer to the Setting up the "Override.ini" in a new configuration section on page .