
The Config Profiles tab does not have any user interaction (i.e. nothing can be changed on it) as it provides a view of both EzeScan Config Profiles and Named Licenses which have been added into the folder on the EzeScan Authority Server.
-
The override.ini file on the client PC's must be updated to connect to the Authority Server.
Adding EzeScan Config Profiles to the Authority Server
-
On the server share out the following folder… C:\ProgramData\Outback Imaging\EzeScan Authority\Config Profiles
-
It is recommended to give the users read access to the share.
-
It is recommended to give users who may be updating the configuration write access to the share.
-
-
Create a folder in the share (e.g. Index, Scan or Accounts etc) and upload an EzeScan configuration to it.
-
You can either copy a backup from another folder (e.g. ezescan.cfg and subfolders) and paste into the new server folder
-
OR
-
-
On the EzeScan client - select Admin -> Settings Backup -> Export and select the server config folder location then select "Backup Entire EzeScan Configuration" and complete the export.
-
-
Please ensure that all folders (Job Buttons, Lookups, Separator Pages & Templates) are included in the above copy / backup process.
Adding Named Licenses to the Authority Server
Named client licenses (stand-alone workstation licenses) may also be saved to the EzeScan Authority Server. This is a great way to centrally manage your licenses instead of needing to update each machine individually.
The process is not the same as adding a Concurrent License (as shown in the License Management (Concurrent Licenses) section on page ); Named licenses are managed by creating a folder on the Authority Server in the C:\ProgramData\Outback Imaging\EzeScan Authority\Config Profiles directory named the same as the PC netbios host name.
-
The folder must be the same as the name of the PC the license is being used on. For example: C:\ProgramData\Outback Imaging\EzeScan Authority\Config ProfilesPC123456
Follow these steps:
-
Create the folder to hold the license on the Authority Server (folder to be same as PC name)
-
Locate the EzeScan license for the PC involved and rename it to EzeScan.lic The license MUST be renamed to EzeScan.lic otherwise the process will not work
-
Update the Override.ini file on the PC as per here
-
Stop and restart in services on the Authority Server.
Updating the override.ini file on the client PC
-
Edit the override.ini file which resides in C:\Program Files (x86)\Outback Imaging\EzeScan folder of the client PC (default EzeScan set-up).
-
This requires Local Admin rights to edit. Easiest way to do this is to move the file to the PC Desktop, edit it and then move it back to its folder.
-
Change the 2 lines shown highlighted (in yellow) below:
-
The ProfileServer is the address of your Authority Server ending with :32380
-
The Profiles will be the name of the folder where the EzeScan.cfg resides. Please refer to the previous section regarding details about the Config Profiles.
-
[Configuration]
; To automatically download per-workstation configuration from an EzeScan Authority Server,
; uncomment the following settings and fill in the correct values.
; ProfileServerUrl is the URL to the Authority Server instance, including the port.
*ProfileServerURL=http://yourserver:32380/* Make sure you remove the semi-colon at start of these rows!
; ProfilePath is the UNC path that EzeScan clients should use to access configuration files.
; profilePath=\\servername\Config Profiles
; Profiles lets you optionally specify which configuration profiles to download on this machine.
Profiles=Index
-
Save the updated override.ini file to *C:\Program Files (x86)\Outback Imaging\EzeScan*
-
Load EzeScan and it will pull down the configuration profile to the current client.
-
To check the configuration profile go to… Admin menu > Licensing > Additional Options box and it should tell you the configuration profile that it has loaded. (e.g. Index)
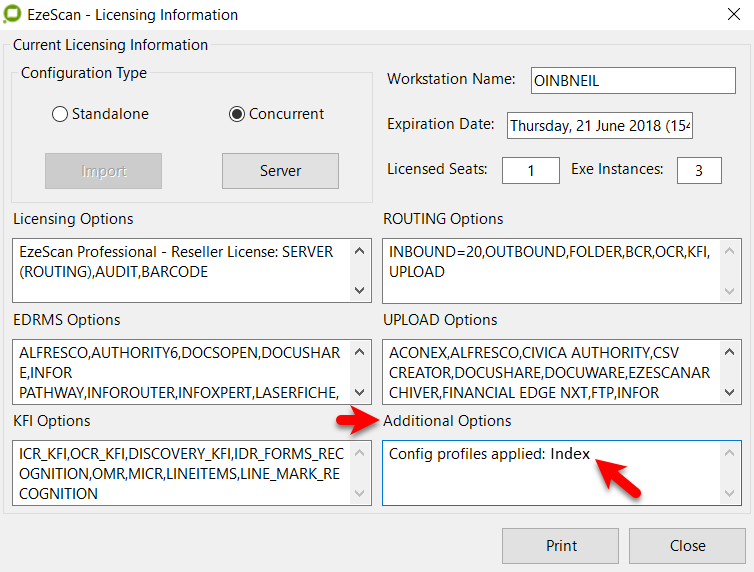
Figure 18 - Example of a Client PC License information
-
If the additions and/or changes made do not reflect on the Authority Server you may need to stop the EzeScan Authority Server Services and restart them (on the server)
Example of Config and Named License as displayed in the Config Profiles tab
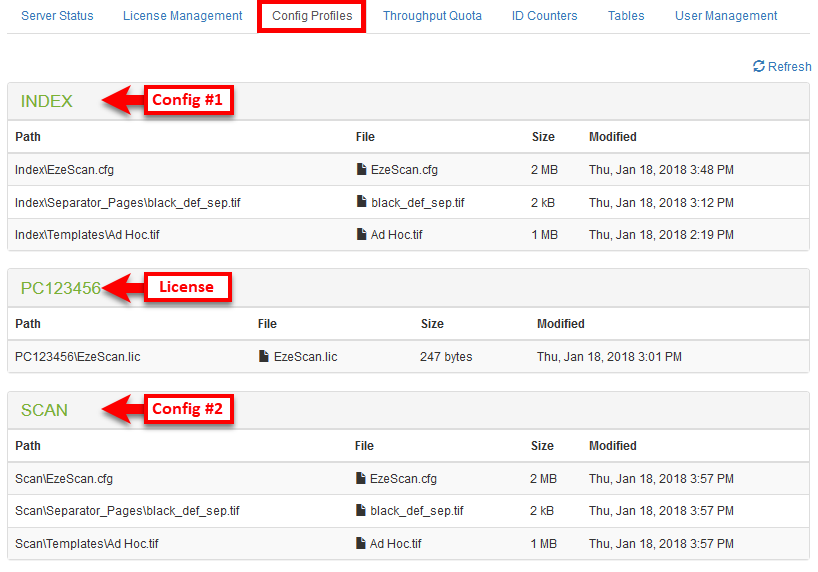
Figure 19 - Named PC added to the Config Profiles tab along with 2 Configs
-
Repeat the above process for any other Named PC's who are using EzeScan.
-
Whenever a license needs to be renewed just rename the newly received license to EzeScan.lic and replace the old one it its respective folder.