
The following information details the connectivity and functionality offered by the EzeScan integration with the TechnologyOne ECM solution. It details the available options and how to configure an EzeScan job into TechnologyOne ECM.
For information on TechnologyOne ECM please refer to the TechnologyOne website - https://www.technologyonecorp.com
For information on EzeScan please refer to the EzeScan website - https://ezescan.com.au

System Requirements
EzeScan version 5.0.120 or higher.
EzeScan supports integration using the DAS client (versions 4.03 and below) and CMIS versions
|
ECM Connect (DAS) |
The DAS client must be installed on the EzeScan PC. An ODBC (read only) connection is required to pull back the document schema from the TechnologyOne ECM Server. |
|
CMIS |
The ECM server must be on CiAnywhere with at least release 2016B. |
Configuring Connection Settings
When configuring a Job, KFI or Upload to use the TechnologyOne ECM connector the connection settings panel must be filled in. There are two ways this can be achieved:
-
If only using a single repository, it is recommended that the TechnologyOne ECM connection settings are configured at workstation level, in the Workstation Options.
-
If not, the configuration can be set in the respective JOB, KFI and UPLOAD eDRMS options instead.
Workstation Options
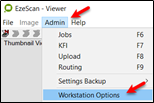
The screenshot shown in Figure 1 below provides a pictorial view of the following steps.
-
Click on Admin and choose Workstation Options
-
Click the EDRMS tab
-
Select the TechnologyOne ECM option from drop down list
-
Enter the Server Name…
-
eg. for DAS http://TechnologyOne ECM server name:port/
-
eg. for CMIS https://website/T1Default/CiAnywhere/Web/Prod/
For the CMIS make sure you remove the /Workplace from the end of the URL.
-
-
Select Connector type from drop down list…
-
Choose ECM Connect for 4.03 (or below) using the DAS client OR
-
Choose CMIS for CiAnywhere sites
-
-
Enter the Repository ID.......... e.g. T1 (CMIS Only)
-
Select the required Authentication Methods from drop down list… (CMIS Only)
-
Choose Default which means the operator will need to enter a username / password OR
-
Choose Claims-based which uses the SAML authentication method.
-
-
Enter a Username................. this is the username for the ECM Server.
-
Enter a Password................... this is the user password - need to remember it is case sensitive.
If multiple users are using the EzeScan PC or the operator wishes to use the login from the DAS client, keep the Username and Password blank.
-
Click into the ECM Settings File field and then click the Browse … button to begin the creation of the XML file to be used by the KFI’s.
-
This file creation process is documented in the Setting the XML Document Schema section.
-
-
Click Save to complete the Global Settings.
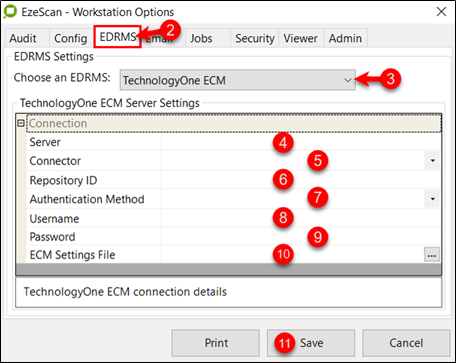
Figure 1 - Setting the TechnologyOne ECM Global Settings in the Workstation Options
Applying the Global Settings to a Job, KFI or Upload
These options are only available if the Global Settings have been set in the Workstation Options.
Jobs
-
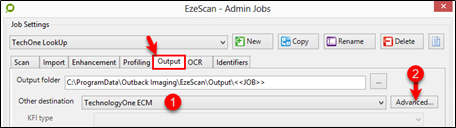
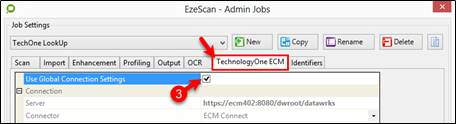
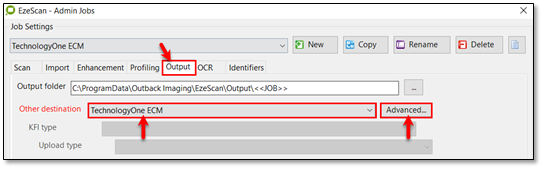
Output tab............................ select Other Destination = TechnologyOne ECM from drop down list
-
Click the Advanced button and select the TechnologyOne ECM tab

-
Tick the Use Global Connection Settings box

KFIs
-
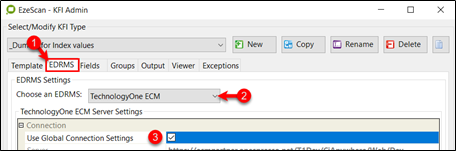
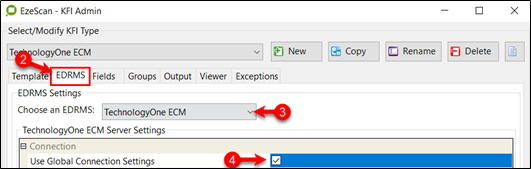
Click on the EDRMS tab of the KFI
-
Select TechnologyOne ECM from drop down list
-
Tick the Use Global Connection Settings box
Uploads
-
Select TechnologyOne ECM from drop down list
-
Tick the Use Global Connection Settings box

Configuring Connection Settings in Jobs, KFI & Uploads
The same process is used as covered in the previous section except it must be done whenever a Job, KFI or Upload needs to connect to ECM.
TIP: The only time this really needs to be done is when setting up new configurations and you want to run test jobs which load processed documents into a Test/Dev Repository. It is therefore recommended to utilise the Global Settings in the Workstation options on your site if using one (Production) Repository.
Setting the XML Document Schema
Step 10 of the Configuring Connection settings section continues here.
Once the Connections settings have been completed the ECM Settings File must be created. This will be in an XML format and will be used to create the links to the various Indexes in ECM.
The XML settings are slightly different depending on the CMIS or DAS connections. The primary difference being the DAS will require an ODBC DSN set-up whereas the CMIS does not. 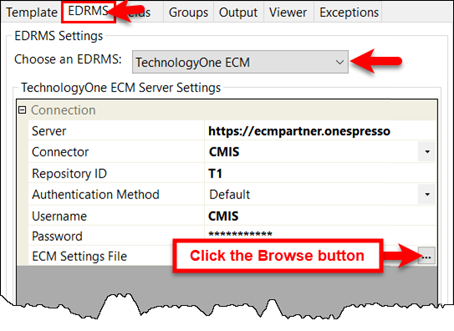
ECM Connect connections - CMIS
Create Search Profiles
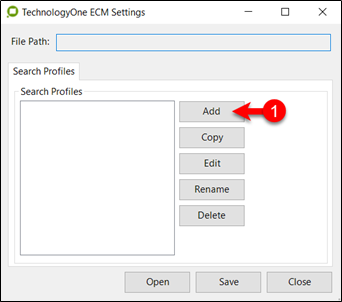
Clicking the Browse button on the ECM Settings File field will launch the screen shown in Figure 7.
-
The first step is to click the Add button to create the first profile
-
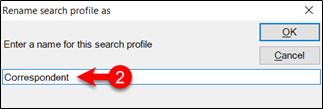
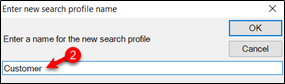
Give the Search Profile a name e.g. Correspondent (for the name/NAR index)
-
Select the newly created search profile (e.g. Correspondent)
-
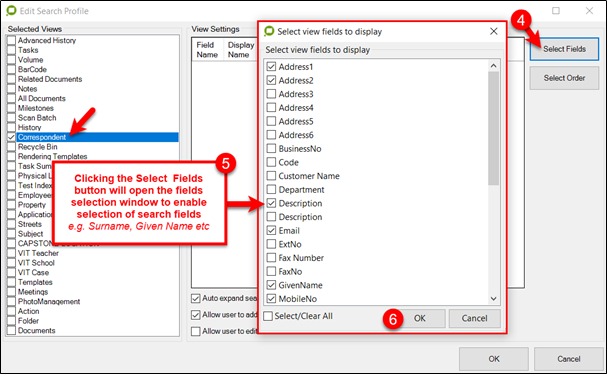
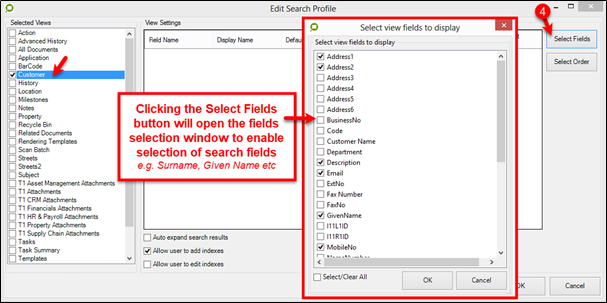
Click the Edit button and the screen below will appear. Find the index name you require e.g. Correspondent and click the Select Fields
-
Select the fields to be used in the search e.g. Surname, Given Name, Email, Description etc
-
Click OK once the required fields have been selected
-
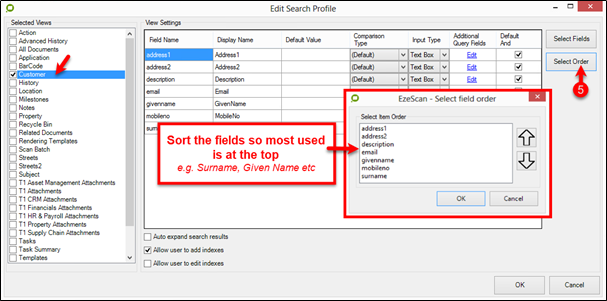
Now choose the field order using the Select Order
-
Use the Up & Down arrows to sort the fields into the required order (as shown in Figure 10)
TIP: Suggest sorting so most used items to top of list e.g. Surname, Given Name etc
-
Click the OK button once the fields have been sorted

-
Click OK again to save the search profile and return to the main search profiles window.
-
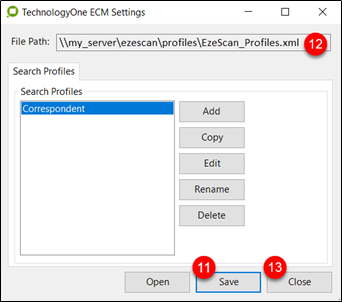
Click the Save button and save the newly creates search profile to a location which will be accessible by all operators using EzeScan to profile the CMIS related documents.
-
This should be a network location which multiple EzeScan clients can use.
-
-
This will create an XML file so give it an appropriate name such as xml.
-
Click Close when complete.
-
Repeat the above steps for additional search profiles such as Property, Applications, Streets, Subject etc
When creating new search profiles and the Save button is clicked; you will need to locate the existing XML file and when you click Save you will be prompted to replace it.
Always select the Yes option to “replace it”.
ECM Connect connections - DAS
This is required for “ECM Connect /DAS clients” connections only.
The DAS ECM Settings Files requires a new ODBC System DSN to be created.
-
To do this open the Run command from the start menu, enter odbcad32 and click OK.

-
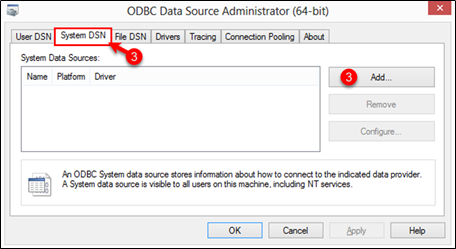
This will then show the ODBC Data Source Administrator
-
Navigate to the ‘System DSN’ tab and click “Add”.
-
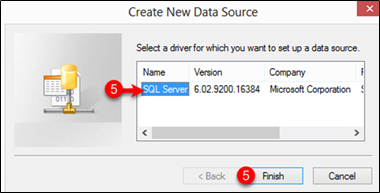
The operator will now be prompted to select a driver for the new data source.
-
Select the SQL Server driver and click Finish
-
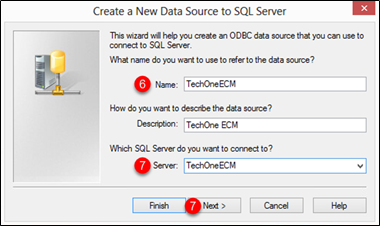
Next the operator will be prompted to Name and Description for the Data Source.
-
Select the SQL Server which the connection is to be created against and click the Next button
-
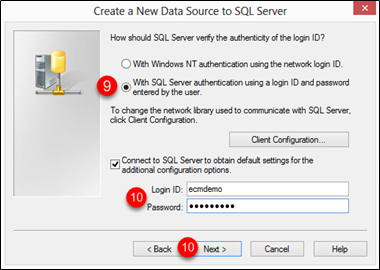
The operator will then be prompted for the verification or login id for the new data source (see Figure 16).
-
Select

-
Populate the boxes with the appropriate Username & Password and click the Next
Configure EzeScan to obtain the schema
This is required for “ECM Connect” connections only.
If using one ECM server for the EzeScan installation the configuration can be set in the EzeScan workstation options.
If not, the configuration can be set in the respective JOB, KFI and UPLOAD EDRMS options.
-
Load EzeScan -> Select Admin -> Workstation Options -> EDRMS
-
Select the TechnologyOne ECM ODBC DSN
-
Complete the Server, Username and Password details
-
Click the Browse … button for the ECM settings Files and the following screen will appear.
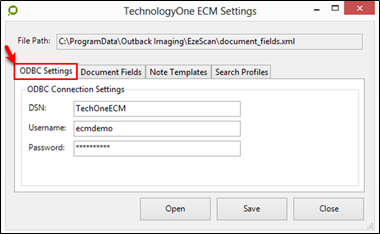
-
Fill out the DSN, Username and Password settings.
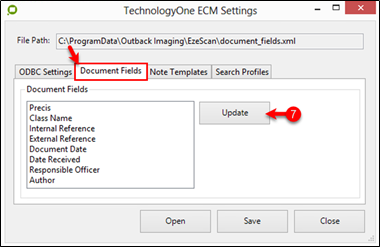
-
The Document Fields tab will have automatically pulled the corresponding values from TechnologyOne ECM, as shown in Figure 18.
-
To update click on the Update button
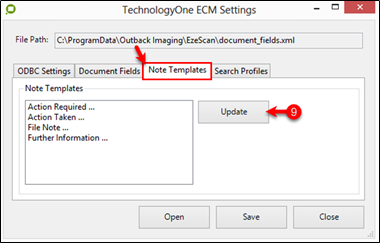
-
The Note Templates tab should have also automatically pulled the corresponding values from TechnologyOne ECM.
-
To update click on the Update button
Creating search profiles
-
Click on the Search Profile tab, to browse across multiple additional fields, and click on the Add button
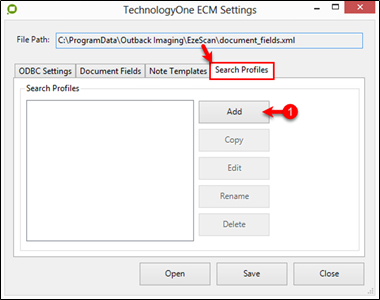
-
Name the new Search Profile and click OK.
-
Select a view from the panel on the right and click ‘Select Fields’
-
Click the Edit button and the screen below will appear. Find the index name you require e.g. Customer and click the Select Fields button
-
The operator may now configure the settings per field. The operator can also choose the field order using the Select Order
TIP: Suggest sorting so most used items to top of list e.g. Surname, Given Name etc
-
Click OK and then click Save
-
Choose a location of where the XML file is to be stored
-
This should be a network location which multiple EzeScan clients can use.
-
-
Click Close and then Save when complete.
Explaining the Search Profiles View Settings fields
|
Field Name |
This is the ECM field Name |
|
Display Name |
This is the how the field will be displayed in the EzeScan search screen |
|
Default Value |
This is if a default value is to be applied (note: the operator can put in KFI field values. E.g. if a previous KFI field value needs to be used in the search the operator could enter <<F1>> in the Default Value box. F1 = Field 1, F2 = Field 2 and so on) |
|
Comparison Type |
This is the operator to be to be used in the search field. The options are default (contains), Begins, Equals, Contains, Not Equals |
|
Input Type |
This is whether the field will have one search box or three. The multi text box will allow the operator to enter multiple entries. For example… A Single input box… Figure 24 A Multi input box… Figure 25 |
|
Query Additional Fields |
This option allows for additional fields to be searched inside the selected field. Click the edit button and choose any additional fields that the operator wishes to be searched upon. |
|
Auto Expand Search Results |
This option will expand the results so all index levels can be seen. Use this is usually attaching a 2nd level or deeper index to the document. |
|
Enable Add Index Button (DAS Only) |
This option will enable an Add button on the search form for if there is no result the add button will display the respective ECM web page to add an index |


Job Settings
-
Using a simple output to TechnologyOne ECM form
-
This can be created with a Job only, commonly used for low volume scanning or “ad hoc” type scanning.
-
This would usually be a separate EzeScan job for either of these…
-
one job to scan and save to TechnologyOne ECM
-
another job to import from TechnologyOne ECM, mark-up/redact/adjust and save to resave to TechnologyOne ECM.
-
-
-
Using the KFI and UPLOAD modules
-
This would be used for specific workflows that utilise EzeScan KFI to assist in minimal data entry, reusing data, forms extraction and setting workflow defaults.
-
-
Using the SERVER Routing Module
-
This uses the SERVER Routing, KFI and UPLOAD module functionality but allows EzeScan to be run as a Windows Service.
-
Different licensable modules may be required for the above configurations.
Output documents using Job Profile Form
To enable TechnologyOne ECM output functionality on a Job:
-
Output tab............................ select Other Destination = TechnologyOne ECM from drop down list
-
Click the Advanced button

-
Tick the Use Global Connection Settings box

-
Click Save when complete.
TIP: Refer to the example of setting up and running a Job to output documents to TechnologyOne ECM using just a Job Form.
Import documents from TechnologyOne ECM for reprocessing
If there is a requirement to import documents from TechnologyOne ECM into EzeScan, (e.g. for mark-up/redaction purposes or to adjust a document) an EzeScan job can be configured to pull the file from TechnologyOne ECM.
TechnologyOne ECM Import functionality on a Job is only available when Output to TechnologyOne ECM is configured, as outlined in the previous section.
To enable Import File functionality on a Job:
-
Click Admin and choose Jobs (F6).
-
Create a new Job or select an existing Job you want to modify.
-
Output tab…
-
select Other Destination = TechnologyOne ECM from drop down list
-
Click the Advanced button
-
Tick the Use Global Connection Settings box
-
-
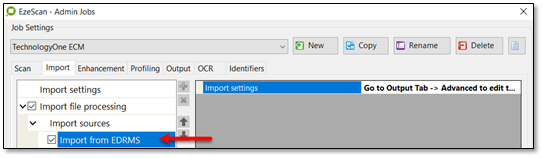
Import tab…
-
Click Save when complete.
-
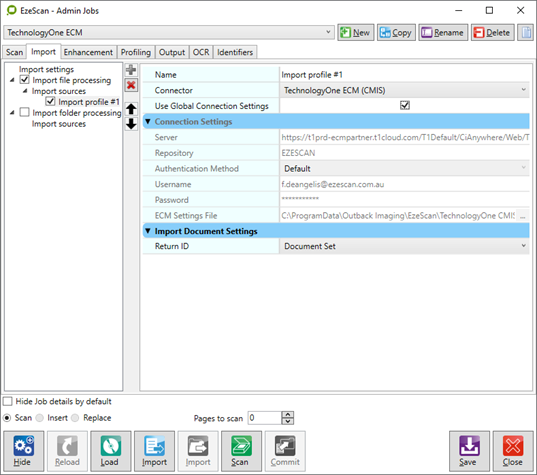
Click the Import tab, enable the “Import pile processing" option and then click on to create an import connector source and select TechnologyOne ECM (CMIS). Tick Use Global Connection Settings.
-
To import a file from the TechnologyOne ECM Server simply select “Import” and EzeScan will connect with the TechnologyOne ECM server and allow you to browse to the file required and then bring it in to allow the user to re-profile it.
TIP: Refer to the example of setting up a Job, KFI and Upload to output documents to TechnologyOne ECM.
KFI Field Settings
The KFI Field Settings allow the operator to browse into TechnologyOne ECM during KFI indexing so the operator can then select folders and object metadata to be applied to the document.
The following functionality requires that the EzeScan workstation be licensed for the EDRMS as well as KFI and UPLOAD modules.
Enabling browse options
The TechnologyOne ECM settings must be configured before a KFI field can use the TechnologyOne ECM browse functionality.
-
Press F7 to display the KFI
-
Select the EDRMS
-
Select TechnologyOne ECM from drop down list
-
Tick the Use Global Connection Settings box or manually fill in the Connection settings.
TIP: Refer to the Configuring Connection Settings section for details on setting up the Global Connection Settings
-
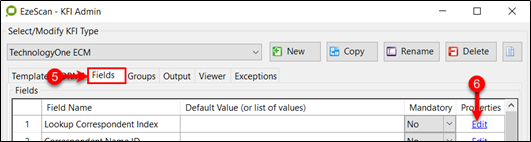
Select the Fields
-
Click the Edit link under Properties for the required field
-
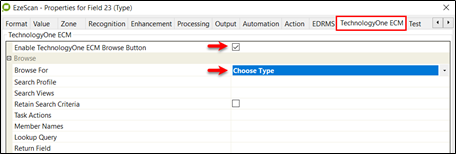
Select the TechnologyOne ECM tab
-
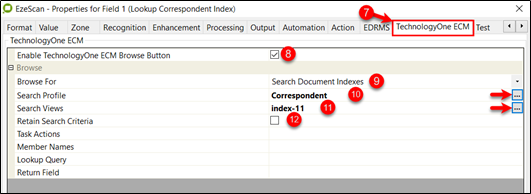
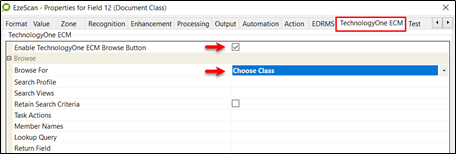
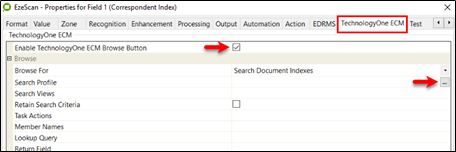
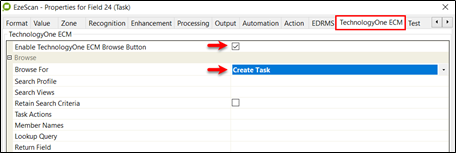
Tick the Enable TechnologyOne ECM Browse … button box
-
Leave the default setting of Search Document Indexes selected
-
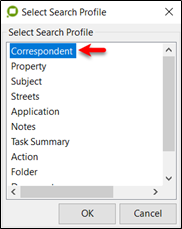
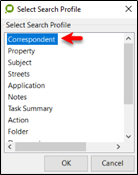
Click in the Search Profile field and then on the Browse … button to bring up the Select Search Profile window (as shown in Figure 34). In this example the Correspondent search profile was selected
-
Click in the Search Views field and then on the Browse … button to bring up the Select Search View window (as shown in Figure 35). In this example the Correspondent index was selected.
-
Ticking the “Retain Search Criteria” box will retain the last search made by the operator. Unticking it will provide a clear search window when the operator begins the search process.
|
|
|

TIP: Refer to the Configuring browse parameters section for more detail on configuring these parameters. Refer to the example of setting up a Job, KFI and Upload to output documents to TechnologyOne ECM.
Configuring browse parameters
Browse for field
The “Browse For” option determines the type of TechnologyOne ECM Browse which is shown when the Browse … button (F3) is pressed during indexing.
|
Option |
Description |
|
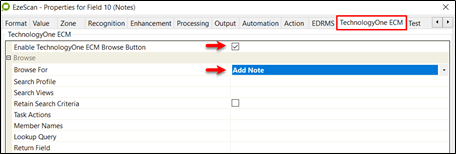
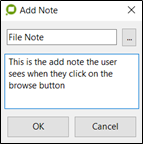
Add Note |
When selected, this option enables the TechnologyOne ECM Browse … button to appear on the EzeScan Viewer KFI indexing panel. This will allow the KFI operator to choose a Note Template to associate to the current document. |
|
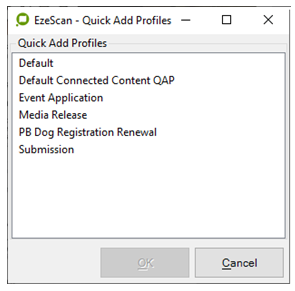
Choose Add Profile |
When selected, this will allow the operator to browse the Quick Add Profiles in the ECM environment. |
|
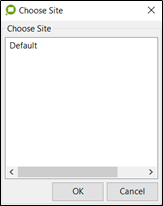
Choose Call Site |
When selected, this option enables the TechnologyOne ECM Browse … button to appear on the EzeScan Viewer KFI indexing panel. This will allow the KFI operator to choose a Site value to associate to the document currently being profiled. The ‘Site’ field is usually renamed by customers so the operator will need to know which upload field to apply this metadata to. |
|
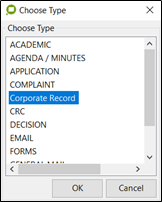
Choose Call Type |
When selected, this option enables the TechnologyOne ECM Browse … button to appear on the EzeScan Viewer KFI indexing panel. This will allow the KFI operator to choose a Document Type value to associate to the document currently being profiled. |
|
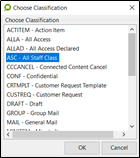
Choose Class |
When selected, this option enables the TechnologyOne ECM Browse … button to appear on the EzeScan Viewer KFI indexing panel. This will allow the KFI operator to choose a classification type to associate to the document currently being profiled. |
|
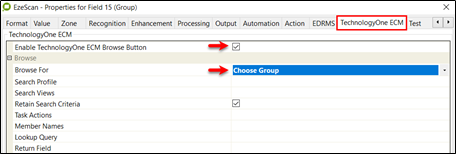
Choose Group |
When selected, this option enables the TechnologyOne ECM Browse … button to appear on the EzeScan Viewer KFI indexing panel. This will allow the KFI operator to choose a User or Group to associate to the document currently being profiled. The operator can use the Member Names setting if they wish to filter names out of the list. Select the Member Names box and click the button and then choose the members that are required. If making changes at a later date the previous names selected will be removed so use this option with care.
|
|
Search Document Indexes (about) |
When selected, this option enables the TechnologyOne ECM Browse … button to appear on the EzeScan Viewer KFI indexing panel. This will allow the KFI operator to choose a view to search on, select and then attach to the document. Depending on the KFI field set-up requirements; the operator can select one of the options shown below… 1. Use a Single Index 2. Use Multiple Indexes 3. Use All available Indexes Refer to the following 3 sections for further details |
|
1 - Search Document Indexes - use a Single Index |
This set-up would normally be used when a specific type of index is required where the information returned from ECM is then used to populate another EzeScan field such as a name or property address.
1. Check the Enable TechOne Browse button 2. Select Search Document Indexes 3. Click in Search Profile field and click the Browse … button to launch the select Profile window (shown at right) 4. Choose required Search Profile from the list 5. In this example the Correspondent Index has been selected. 6. Click OK to finish Example: When the operator profiles a document in EzeScan and they select the Browse … button the Correspondent index search window will appear (as shown in Figure 42) |
|
2 - Search Document Indexes - use Multiple Indexes |
In this example you need to create an index search in the XML lookup file (see page 9 for further details) which will allow selection of multiple indexes.
o Property Index o Application Index o Streets Index
o If additional indexes are required; select the View (e.g. Application), set the search criteria and click on the search button.
o Each index value returned will be separated by a Double Pipe || |
|
3 -Search Document Indexes - use All available Indexes |
This function is exactly the same as the last example except a search profile has been created for every available index which can be returned from ECM |
|
Create Task |
*** Only to be used in the DAS environment; not in CMIS environment.
When selected, this option enables the TechnologyOne ECM Browse … button o appear on the EzeScan Viewer KFI indexing panel.
This will allow the KFI operator to choose a Task to create and associate to the document currently being profiled. The variable options are Type of Task, Users, Deadline, Time period or No Time Limit.
The operator can also filter which tasks to display during KFI profiling. Click the ‘…’ button on Tasks Actions and select the tasks that are required.
The operator can also use the Member Names setting if they wish to filter names out of the list. Select the Member Names box and click the button and then choose the members that are required. When making changes at a later date the previous names selected will be removed so use this option with care.
|


Upload Settings
The UPLOAD module will obtain the KFI output data to pass into TechnologyOne ECM saving the document and respective field data.
The following functionality requires that the EzeScan Workstation be licensed for the EDRMS and KFI and UPLOAD modules.
Configuring connection parameters
-
Open the Upload Form (F8).
-
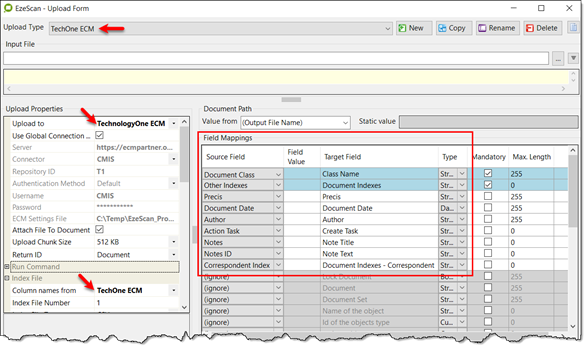
Choose the Upload Type you want to configure.
-
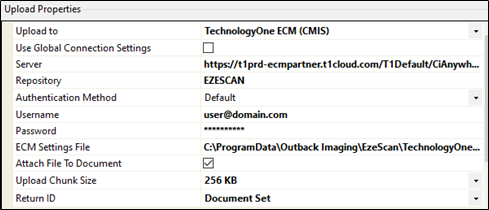
On the left hand side in the Upload Properties pane choose TechnologyOne ECM in the Upload To list.
-
Fill in the details of the TechnologyOne ECM server required for the Upload.
-
If the EDRMS settings have been pre-configured (as per section 0) tick “Use Global Connection Settings”
-
The Return ID setting is whether to display the Document ID or the document Set ID after the document has been saved into ECM. To enable the message, please refer to section 9.7 How to display the TechnologyOne ECM Record Number after saving a document.
-
Use the Column names from setting to set the KFI that will be used with the UPLOAD. This will automatically tell the UPLOAD Type what fields it will be looking for.
Configuring built-in upload fields
The following fields will appear after choosing Upload to TechnologyOne ECM in the Upload Properties pane. These are the default TechnologyOne ECM fields.
Each field can have its input set using the source field cell. They can be mapped from a KFI field or set to a static value.
|
Target Field |
Description |
|
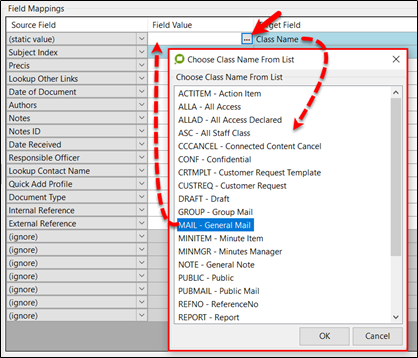
Class Name |
This field sets the level of classification of the uploaded document. It may be set as a Static value as shown below or may be set to a mapped KFI field |
|
Document Indexes |
There are two ways to map the Document indexes.
It depends whether all indexes are captured in the one KFI field or over multiple fields.
The two variations are covered below…
All indexes in the one (single ) KFI field
TIP: Refer to the KFI sections about Multi Indexes and All Indexes for details on setting these KFI functions up Single Indexes set in the separate KFI fields If the indexes have been broken up into multiple KFI entry fields then the operator can add additional Document Index mappings to the Upload
To add extra Document Indexes click the + button, a new field mapping will appear, for example…
Rename the Custom Field 1 to “Document Indexes - Your index name” and apply the respective KFI source field to it, for example…
|
|
Precis |
This field will become the Title/Name of the uploaded document |
|
Document Date |
This field sets the Date of the uploaded document |
|
Author |
This field sets the Author of the uploaded document. |
|
Create Task (DAS Only) |
This field sets the Create Task browse options. The task/s selected from the KFI browse needs to be mapped to this field. |
|
Lock Document (DAS Only) |
This field will set the document to a locked status. Enter a value of either T or True or 1 to activate this setting. |
|
Document |
This field defines the Document ID. Enter a value and EzeScan will create a revision of this document. Noting that a new document number will be created. |
|
Document Set |
This field defines the Document Set ID. Enter a value and EzeScan will create a revision of this document. |
|
Note Title |
This field sets the Note Title of the uploaded document. |
|
Note Text |
This field sets the Note Text of the uploaded document. |
|
Parent Compound Document (DAS Only) |
This field allows the uploaded document to be related to another document. The Document number specified will show a paperclip icon to show that there is a related document. The operator needs to pass through a document ID into this field. |
|
Parent Compound Document Set (DAS Only) |
This field allows the uploaded document to be related to another document set. The Document number specified will show a paperclip icon to show that there is a related document. The operator needs to pass through a document Set ID into this field. |
|
Related Document Sets (CMIS Only) |
This option will accept document id’s (from a KFI Document index browse) and apply a relationship to the newly created upload Document. Note: The relationship type is “Related” |


Configuring custom document fields
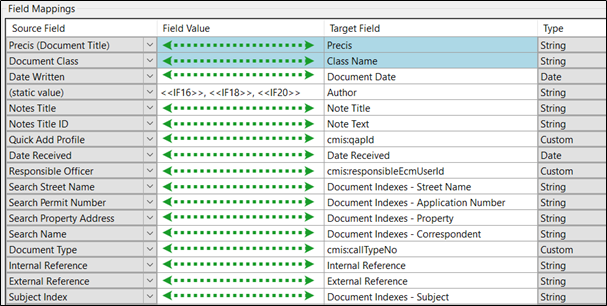
The TechnologyOne ECM connector can obtain all of the document object type custom fields from a TechnologyOne ECM Server. Fields like the Quick Add Profile, Received Date, Internal and External Reference are bought in using this method.
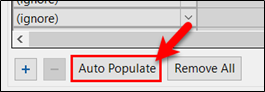
Click the Auto Populate button at the bottom of the screen. This will result in the TechnologyOne ECM connector returning a list of custom fields that relate to the respective Object Type.
TIP: Select the Object Type 1st prior to clicking on the Auto Populate button - set as a (static value) then set it back to the mapped KFI field when appropriate.
It is then a matter of setting the KFI field source values to the ECM Target values of the custom fields.
Make sure that the ECM Settings Files have been setup as instructed in the Setting the XML Document Schema section to obtain the schema data and configure index profiles.
Applying KFI Output Data to Object Field Data
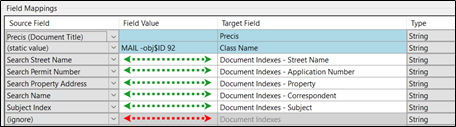
To pass through the KFI output data into the Upload module the operator is required to set the source field data to the target field data.
-
In the Field Mappings Grid the operator can apply the Source Field settings to the Target Field settings to populate the appropriate Target Field with the value picked up from the Corresponding KFI
-
In the example below the TechnologyOne ECM Target Fields View Levels, Author and Document Date are being populated by the KFI Source Field Title.
-
When all the mappings are complete, click Apply.
-
Click OK to save the changes.
SERVER Routing Settings
The Routing module is another way of configuring EzeScan to use the KFI and UPLOAD modules to upload documents to TechnologyOne ECM.
As it can be configured to run as a windows service it is recommended for jobs that do not require operator intervention. E.g. Automated workflows like barcoding of forms with exception handling enabled so they can be processed on an EzeScan (client) PC or passing through indexed files from an EzeScan client and the service will pass through the field data, OCR and upload to TechnologyOne ECM.
The following functionality requires that the EzeScan workstation or Server to be licensed for the SERVER product.
Configuring a route to upload
-
Click Admin and Choose Routing (F9)
-
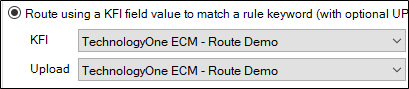
Create a new Route and set the mode to “Route using a KFI Field value to match a rule keyword”
-
In the KFI drop down list, select the KFI that will be used with the Route.
-
In the UPLOAD drop down list select the UPLOAD that will be used with the Route.
-
Click Save then Close.
Please refer to the Routing User Guide from the help menu for more information on Routing.
Running a Job for Saving Using Just a Job Form
To run a job directly into TechnologyOne ECM with the profile form…
-
Confirm that the Other Destination is set to TechnologyOne ECM
-
Confirm that the Advanced Settings have been completed
Please refer the Output documents using TechnologyOne ECM Job Profile Form section on how to set this up.
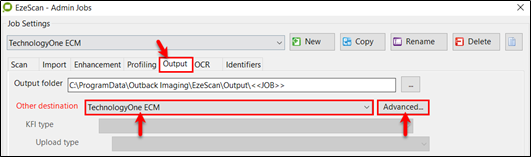
Figure 56 - check all settings have been completed on the Output tab
-
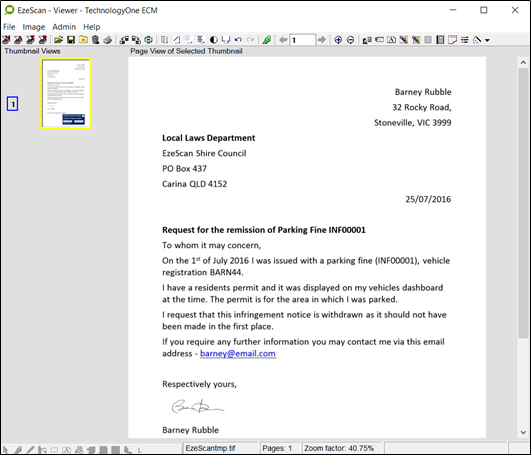
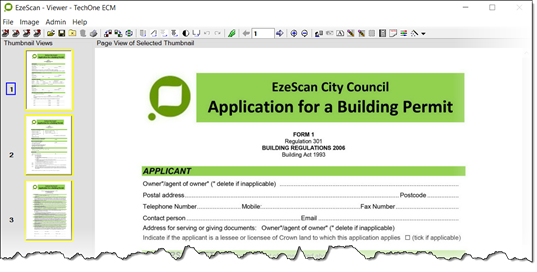
Click the Scan/Import or Job button to load the image into the EzeScan viewer.
-
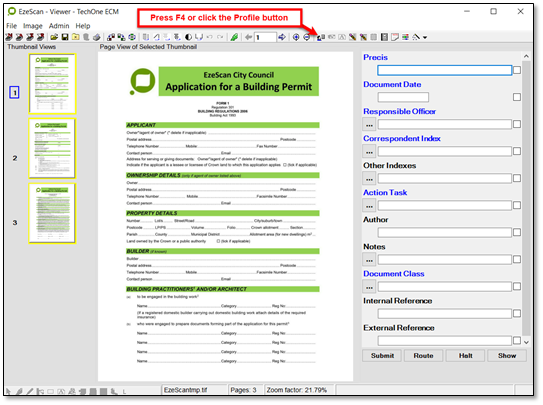
Press the F4 key or click the Profile

-
The Profile to TechnologyOne ECM screen will appear:
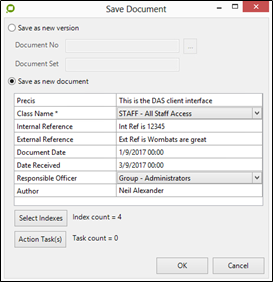
ECM DAS Client:
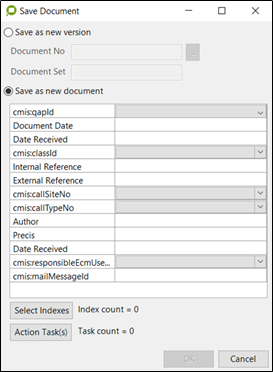
ECM CMIS Client:
-
Fill out the corresponding record details and then click OK. Make sure that you include the appropriate indexes, dates, Precis etc
-
The document will be saved into TechnologyOne ECM and the next document will appear in EzeScan for profiling.
Running a Job Import Documents From TechnologyOne ECM For Reprocessing
To import documents from TechnologyOne ECM for reprocessing…
-
On the Output tab…
-
Confirm that the Other Destination is set to TechnologyOne ECM
-
Confirm that the Advanced Settings have been completed
-
-
On the Import tab…
-
Confirm that the Import from EDRMS has been completed
Please refer to the Output documents using TechnologyOne ECM Job Profile Form section on how to set this up.
-
-
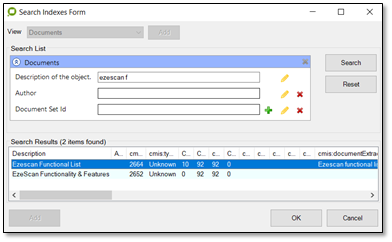
Click the Import or Job button to launch the Search Indexes Form and search for the document to be re-processed
-
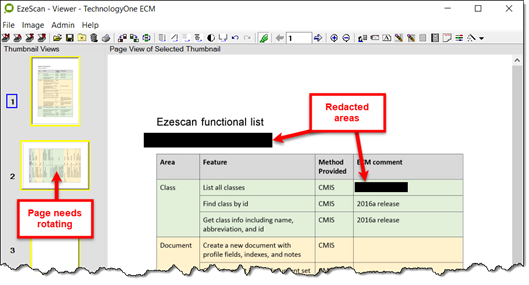
The document will load the image into the EzeScan viewer; for example…
-
Rotate pages which were originally incorrectly processed
-
Redact areas on pages - e.g. credit card numbers
-
-
Once all changes have been made; press the F4 key or click the Profile

-
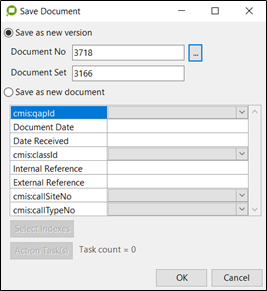
The ECM “Save Document” screen will appear and either…
-
Select “Save as new version” (default) and click the OK button OR
-
Select “Save as new document” and follow the steps covered in previous section and click the OK button
-
|
ECM DAS Client: |
ECM CMIS Client: |
|
|
|


Running a Job for Saving Using KFI and Upload
To run a job to TechnologyOne ECM using the KFI and UPLOAD modules…
-
confirm that the Other Destination is set to KFI
-
and the respective KFI and UPLOAD Types are selected.
Please refer the KFI Field section and Upload Settings section for details on how to set this up.
In the example below the KFI\UPLOAD types have been configured for a:
-
Title (Title of document)
-
Collection (Location of Collection)
Create a Job
-
Undertake the normal steps to create a job with associated KFI and Upload
-
Click OK to create the KFI
-
Click OK to create the Upload
-
If scanning; set the job to use separator pages
-
If importing; set the import path to a location where some sample documents can be found
-
For example - C:\ProgramData\Outback Imaging\EzeScan\Samples
-
Output to a text searchable PDF
-
-
Set the Output to the KFI and Upload (see below)

TIP: Set the job to display the ECM Record Number once it is uploaded.
Edit the KFI
Open the KFI created along with the Job in last section.
EDRMS tab - Global Settings
Select the EDRMS tab and set to use the “Global Settings ”. 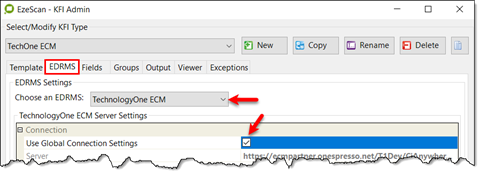
Fields tab - create fields
Select the Fields tab and create the fields; use the example below (mandatory fields in blue)…
TIP: Details for creating the values on the “TechOne ECM tab” are covered in the KFI Field section.
|
Field Name |
Details / Comments |
|
Precis |
Free text field |
|
Document Date |
Date formatted field................................................................................ set to DD/MM/YYYY |
|
Responsible Officer |
TechnologyOne ECM tab - browse for.................................................. select Choose Group · Refer to creating a “Choose Group” option (figure 40) |
|
Correspondent Index |
TechnologyOne ECM tab - browse for........................... select Search Document Indexes TechnologyOne ECM tab - Search Profile.......................................... select Correspondent · Refer to creating a “Correspondent Index Search Profile” (figure 33) |
|
Other Indexes |
TechnologyOne ECM tab - browse for .......................... select Search Document Indexes TechnologyOne ECM tab - Search Profile .......................................................... select Other · Refer to creating an “Other Index Search Profile” (or - All Indexes) (figure 43) |
|
Action Task *** |
NOTE: *** Only to be used in the DAS environment; NOT in CMIS environment TechnologyOne ECM tab - browse for ...................................................... select Create Task · Refer to creating the “Create Task” option (figure 45) |
|
Author |
Free text field |
|
Notes |
TechnologyOne ECM tab - browse for ......................................................... select Add Note · Refer to creating the “Add Note” option (figure 36) |
|
Notes ID |
NOTE: This field creates itself with above field (this is the Note Body Text) |
|
Document Class |
TechnologyOne ECM tab - browse for ................................................... select Choose Class · Refer to creating the “Class” option (figure 39) |
|
Internal Reference |
Free text field |
|
External Reference |
Free text field |

Edit the Upload
Open the Upload created along with the Job in previous section.
-
Set Upload to........................ TechnologyOne ECM
-
Set Column names from........ the KFI created earlier (e.g. TechOne ECM)
-
Map the KFI fields to the ECM (target) fields
-
You may have to create a new target field for the Correspondent
-
Call the target field Document Indexes - Correspondent
-
-
Run the Job to import, profile and upload into ECM
The steps below show how to run the job created in the previous sections into TechnologyOne ECM.
-
scan/import or job button to load the image into the EzeScan viewer.
-
Press F4 or click the Profile button to begin indexing the document. The profiling fields will appear (in this example they are set in List mode to the right of the image)
-
Add the Precis and then hit Enter to move to the next field
-
Add the Document Date and then hit Enter to move to the next field
-
The cursor will now be in the (mandatory) Responsible Officer
-
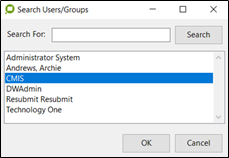
Click the Browse … button OR press F3 to bring up the Search Users/Groups window
-
Search for and select a Responsible Officer (see Figure 73) and click OK
-
Then hit Enter to move to the next field

-
-
The cursor will now be in the (mandatory) Correspondent Index
-
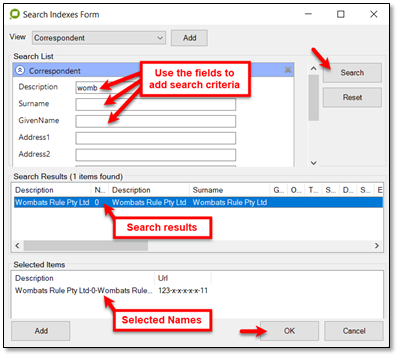
Click the Browse … button OR press F3 to bring up the Search Indexes Form
-
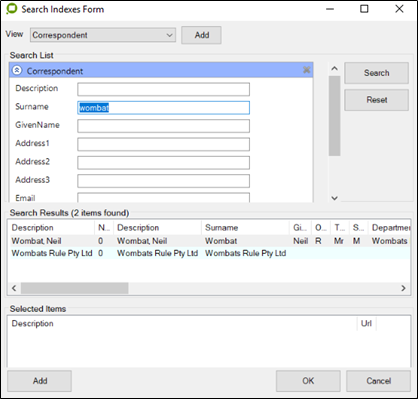
Follow these steps (see Figure 74)…
-
Add search criteria (this is a “contains” search, so you only need part of the name)
-
Click the Search button
-
Results (if any) will appear in the results window
-
Double click on the required name (multiple names may be searched for and selected)
-
The selected names will appear in the bottom window
-
Click OK to return the results to the KFI field
-
-
Then hit Enter to move to the next field
TIP: If a name was incorrectly selected, just go back to the search screen again, select the name in the “selected Items” box and hit the Delete button to remove it.
-
-
The cursor will now be in the (non-mandatory) Other Indexes
-
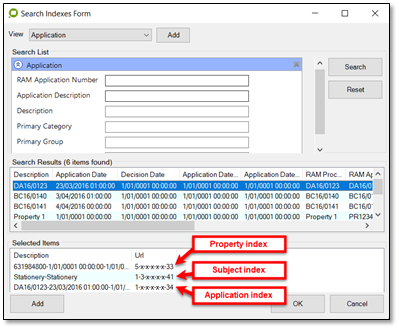
Click the Browse … button OR press F3 to bring up the Search Indexes Form
-
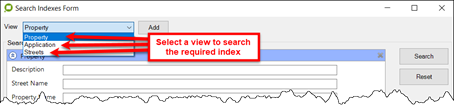
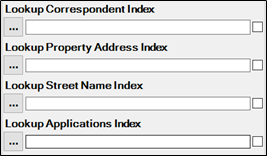
This field provides the ability to select different Index types on the one screen; such as Property, Subject, Application etc. Follow these steps…
-
Select the Index to be added from drop down list (e.g. Property)
-
Add search criteria (this is a “contains” search, so you only need part of the name)
-
Click the Search button
-
Results (if any) will appear in the results window
-
Double click on the required item (multiple items may be searched for and selected)
-
The selected items will appear in the bottom window
-
Select another Index from drop down list (e.g. Subject) & repeat above steps
-
Select another Index from drop down list (e.g. Application) & repeat above steps
-
Continue until all index items have been added (see Figure 75 for end results)
-
Click OK to return the results to the KFI field
-
-
Then hit Enter to move to the next field
-
-
*** Only to be used in the DAS environment; not in CMIS
The cursor will now be in the (non-mandatory) Action Task
-
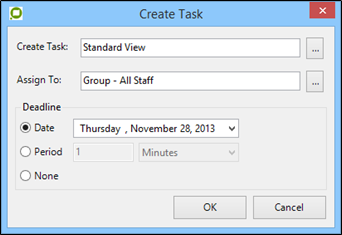
Click the Browse … button OR press F3 to bring up the Create Task Form
-
Click the Browse … button OR press F3 to create the Task (see )
-
Click the Browse … button OR press F3 to Assign the Task
-
Set a Deadline
OR set to None
-
Defaults to today’s date if selected or change to required date
-
Set the Period - e.g. 2 Work Days
-
-
Multiple tasks may be added
-
Click OK to return the results to the KFI field
-
-
Then hit Enter to move to the next field

-
-
The cursor will now be in the (non-mandatory) Author
-
This is a free text field but you have 2 choices to make
-
-
This will allow the KFI operator to choose a view to search on, select and then attach to the document. The operator can select multiple views in the one KFI field.
-
The views available to search on are customer, location, property, streets, subject, user groups, user with file and volume. Once all corresponding views have been selected, press OK.
-
The operator will then be prompted to Choose Class.

-
Once the associated classification has been chosen, press OK.
-
The operator will then be prompted to Create a Task.
-
Create Task will allow the operator to select the Type of task as well as specific users it can be executed for within a certain period, deadline or no time limit.
-
Once the associated task has been created, press OK.
-
When complete, press Enter and the submit button will highlight.
-
Press Enter or click Submit.
-
The document will be saved into TechnologyOne ECM
There is sample TechnologyOne ECM KFI / UPLOAD jobs in the downloads section on the
EzeScan website
(you must have an account to log-on & download)
Running a Job for Saving Using SERVER Routing
The Routing module can be run in two ways:
-
In the EzeScan UI by selecting Admin -> Routing, selecting the respective Route and clicking the Run Routing button. This is good for testing or troubleshooting issues.
-
As a windows service. To do this the EzeScan Server service must be installed and started.
Please refer to the EzeScan Routing user guide on how to install and run the service.
Retrieving Details From the Index Fields (CMIS)
It is fairly straight forward to add 2 more KFI fields under an index field, such as a Correspondent/ Customer which can extract the required detail for use in the Precis/Document Title. In this section we will demonstrate how to set the fields up. The majority of the indexes may be treated in the same manner.
Retrieving a Name from a Correspondent/Customer field
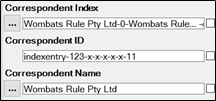
In the example in Figure 74 (refer previous sections) the Correspondent is added and the result should have a long text string which looks like this Wombats Rule Pty Ltd-0-Wombats Rule... -obj$ID 123-x-x-x-x-x-11
We just want the name Wombats Rule Pty Ltd - so you need to do this…
-
Insert 2 new KFI fields underneath the Correspondent Index field…
-
Call 1st field..................... Correspondent ID
-
Call 2nd field.................... Correspondent Name
-
-
Edit the Correspondent ID field…
-
Value tab........................ Extract from Correspondent Index
-
Processing tab................ Click Regex Edit button then copy and paste this regex into the form - "^(.*obj\$ID *)+","indexentry-"
-
Automation tab.............. þ Automatically move to next field
-
-
Edit the Correspondent Name field…
-
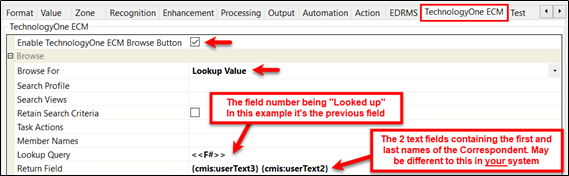
TechOne ECM tab........... set as shown in Figure 79 below
-
The <<F#>> Lookup will actually be the field number being “looked up” e.g. <<F4>>
-
The Return Field should be the 2 text fields for Given Name and Surname values
{cmis:userText3}space{cmis:userText2} -
Refer to page 53 to find out how to locate these types of values from your system
-
-
Processing tab................ Click Regex Edit button then copy and paste this regex into the form - "^ +| +$",""
-
This Regex removes any spaces which may appear at the front of the name. In our example we have returned a business name and it therefore has no 1st
-
spaceWombats Rule Pty Ltd will become Wombats Rule Pty Ltd (no leading space)
-
Whereas Neil Wombat (Given Name & Surname) will remain the same
-
-
-
Automation tab.............. Automatically move to next field ...................................... Automatically show browse form
-
Finding the Field Values From Your System
When creating KFI fields which will run a “Lookup” of a value in your system you will need to know the actual values to use. It is more than likely that your ECM field settings differ from those used here but if you follow these simple steps it is easy to find the correct “Lookup Values” to use.
In this example we will use the Correspondent / Customer index which has been already used in this document.
-
Using a KFI which is browsing ECM. If you do not have one then set-up one with the necessary fields to browse the ECM indexes.
-
Click the Browse … button
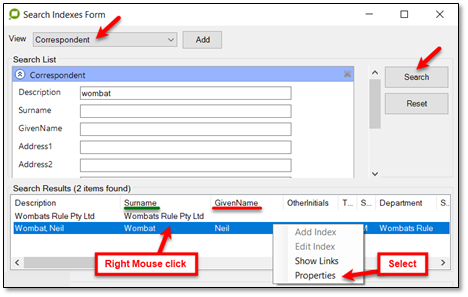
OR press F3 to bring up the Search Indexes
Form (refer figure 80)
-
Search the index (e.g. Correspondent) for a name
-
Right mouse click on the returned name
-
Select the Properties option
-
|
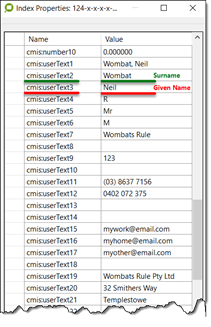
3. The window at right should appear
The same functionality can be used with any index type & field. In the ECM system being used for this document:
|
|
Display Record Number After Saving Record
To enable this setting, please refer to the How to articles.