
KFI
Key From Image
EzeScan has an optional Key From Image (KFI) module built into the product. The KFI module can be licensed as an option at purchase time, or added at a later stage as a module upgrade.
Why is it it called KFI? In the early days of developing EzeScan, when we first added indexing fields to our data capture panel, we only supported the keying in of data by the operator as they looked at the scanned image (hence the name ‘key from image’). Nowadays the data capture panel indexing fields support keying in data, extracting data from the image using recognition engines (like OCR, ICR, MICR, BCR), using SQL database queries, or using integration lookups to access remote system data.
EzeScan KFI is ideally suited to those capture applications that need to process a variety of structured and unstructured forms where both the form image and form data need to be reused with either an EDRMS system, database, or other legacy systems. With KFI you can use the image and the data, or just the image, or just the data. It's your choice..
KFI can be configured as a standalone process. It does not require connection to the EDRMS, database or legacy system at scan time. The output generated by the KFI process (TIF/PDF and TXT/CSV/XML files) is usually imported into the destination system using one of that destination system's import tools.
Alternatively, the EzeScan UPLOAD module can be used to automatically upload the images and data into any of its supported systems.
The following sections take you through building a simple KFI definition using the Admin Tool and then running that KFI definition as a production job.
Are you licensed to run EzeScan KFI?
First you'll need to check whether you are licensed to run the KFI option. Use the EzeScan Admin → Licensing menu option to display the following form:
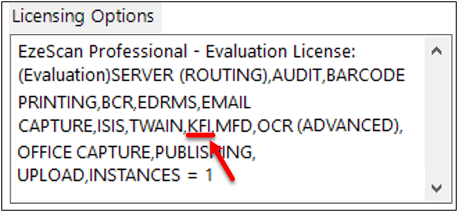
If the Licensing Options say either "EzeScan PRO All (Eval Only)" or contains the word "KFI" then you may run the KFI option.
If your current production license is not licensed for KFI but you would like to evaluate the functionality please contact your reseller or send an email to sales@ezescan.com requesting a 30 day evaluation license with KFI enabled.
Building a KFI definition using the KFI Admin Tool
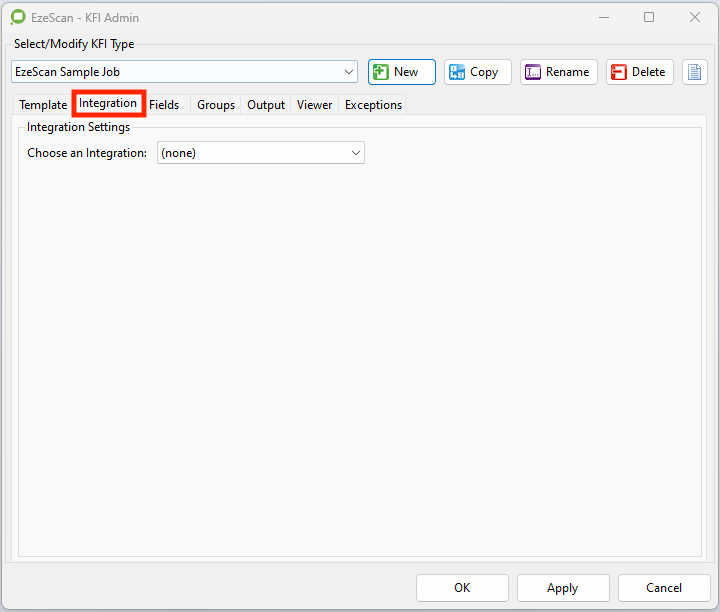
Before you can run KFI you must configure the template (if required) and index fields that will be shown on the operator's KFI job screen. Use the Admin->KFI menu option to display the following form:
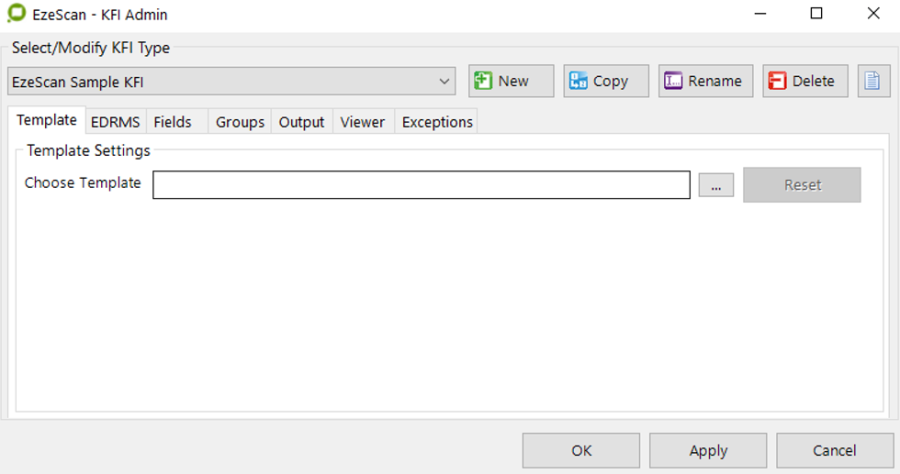
To configure a KFI definition, simply configure the required settings on each of the tabs.
KFI Types
Available KFI Types
Use this list box to select a KFI definition from the available list. The system comes with built in list called 'Default'. This can be altered and then cloned to create as many KFI definitions as you'll need.Simply select the KFI type you want to use and contents of the Templates, EDRMS. Zones, Zone Groups, Output and Viewer tabs will be updated with those KFI type settings.

Creating A KFI Type
Use the New button to create a new KFI type.
![]()
Copying A KFI Type
Select a KFI from the drop down list, and then use the Copy button to copy a KFI Type.
![]()
Renaming a KFI Type
Select a KFI from the drop down list, and then use the Rename button to rename the KFI Type.
![]()
Deleting a KFI Type
Use the Delete button to delete a KFI Type.
![]()
Tabs
Use these tabs to configure all of the settings required for the KFI type. Detailed information on these tabs follows.

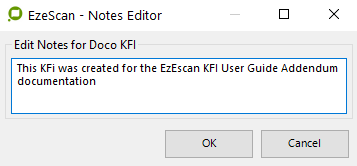
Adding Notes to the KFI
The Notes button provides the ability to add some notes about the KFI so that anyone opening it may be able to understand certain aspects of it. The same functionality can be applied to each KFI field.
Saving Your Changes
Use this button to save any changes made to the currently selected KFI definition.
![]()
Template Tab
A template is required for a structured form. In the define template define tool the operator can specify zones which can then have individual rules applied to extract data from them.
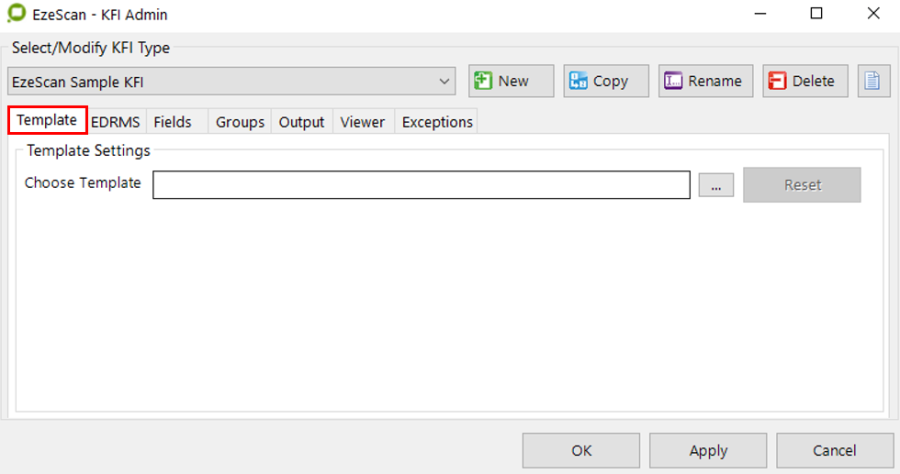
Template Settings

The Choose Template button displays a browse dialog that allows the operator to choose a TIF image that will be used as the template when defining zone locations to be used by this KFI type.
The Operator then browses for the template Image.
Note: It is recommended to use a template image scanned at the same resolution as it will be in production (e.g. 300 dpi), and best to have a template fully filled out so all the zones can be thoroughly tested. Also note there is no need to setup a template if the documents being processed by KFI are totally unstructured (e.g. no values to extract using an OCR engine). The operator can move to the fields tab and setup the fields in there.
After the image has been selected, the file will be copied to the EzeScan templates subdirectory.
The template tab will then display a new frame that allows the operator to configure the template alignment options (e.g. either none, use page margins, use registration points) and also define the template which is a way to create all the fields for the form.
Reset Button
The Reset Template button prompts the operator asking them if they want to clear the template for this KFI type.
Caution is recommended when using this option as it will completely remove all template associated settings from the KFI type (e.g. zone data, and registration settings).
Page Alignment Options
When a template is loaded the operator can define the template zones, alignment and recognition settings.
Page Alignment Settings
Page alignment is used to check the current scanned document against the template that has been defined. This helps when scanned documents contain movement or scaling. EzeScan will attempt to re align the data zones so data extraction is more accurate.
None - This will not apply any checking and just the c-ordinates or the zones configured in template define tool.
Use Page Margins - This will check the top and left margins on the current scanned document against the template margins. If any difference the KFI field zones will move to new co-ordinates.
Use Registration Points - This will use Registration points that have been configured in the Define Template tool. Registration points can look for a barcode, word or shape. The co-ordinates of these points are saved. When the scanned document is loaded into EzeScan the registration points are checked and compared to the template. The respective KFI field zones are then re positioned to where they should be.
Minimum Points Required - When less than the number of registration points (set in box) are located, EzeScan will raise an error and won't register the page. The operator will have to take the necessary action.
Form Recognition Settings
This setting is used with the Forms Recognition Module. When setting up registration points in the Define Template tool, the operator can also specify for it to be an ID point.
Minimum Points Required - This is the number of ID points that are required for the forms recognition module to detect that a document is matched against a template.
This option is a per page setting. For example, page 1 may require three ID points and page two may require four.
Define Template
![]()
The Define Template button allows the operator to define data, registration, group and omit zones.
The Define Template screen is where the operator draws the zones.
The Pencil button is used to draw the zones that require data extraction.
Defining the data zones
In this example it displays that we have 5 data zones. Each data zone becomes a KFI Field.
Note: If the template form can be re-designed, please contact EzeScan to obtain the EzeScan Form Setup Guide. This guide assists operators on how to get your form setup to help EzeScan extract data with higher confidence results.
Defining a Data Zone (Red)
A data field is a field that EzeScan will use to extract data from (i.e. a barcode, handwritten text, printed text or a check box).
Draw the area of the zone and EzeScan will display a new field screen. The field can then be configured to extract the data and perform Format, Processing and Output settings.
Use the Pencil Tool to draw the zone (its blue when drawing it)
A New field screen will appear
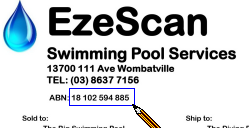
In the Format Tab, give the field a name (e.g. ABN) and set its required data settings.
In this example the ABN is a number, therefore set the type to "Numeric".
Format tab appears - complete required settings for the field
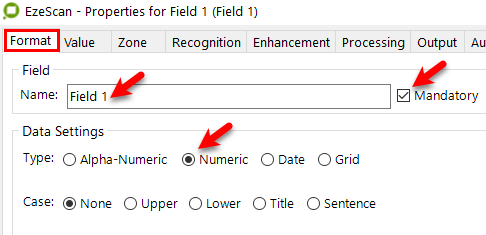
On the Recognition tab set the options to extract data from the zone (e.g. OCR, ICR, OMR, & BCR).
Setting the recognition type (OCR)
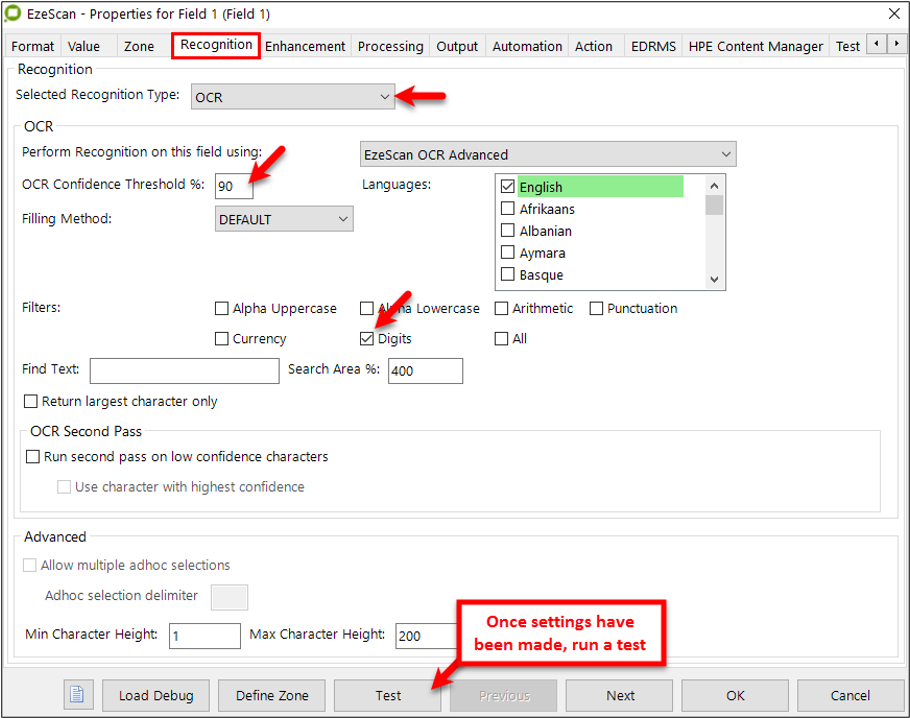
When the settings have been applied the operator can then use the test option to see if the information is correct.
The test indicates a 100% confidence
To remove the spaces in the ABN number; go to the Processing tab and add a space to the "Remove These Characters" field. The result should look like this…

When the operator clicks ok, and go into the Fields Tab, the first field has been completed.
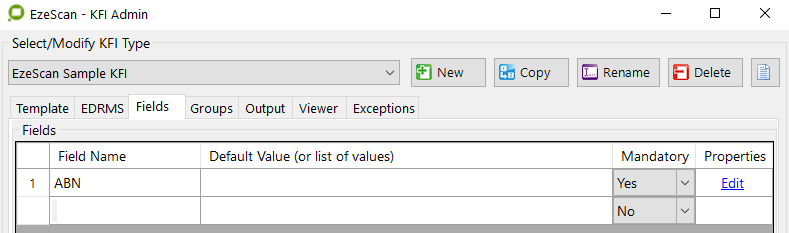
Figure 13 -ABN field is created
Follow the above steps to create your remaining data fields.
Defining a Registration Zone (Pink)
Registration points can be used to overcome zone alignment problems (and/or used as Form ID registration points with the EzeScan IDR module).
Registration Points
Zone Alignment issues may occur when scanning documents which may be printed on different model printers or scanned using different model scanners. If this were to occur the co-ordinates of the data zone may move, using a registration zone EzeScan will look for a pre-defined (static) word, shape or barcode and when found it will calculate the movement and move the data zone so it is correctly lined up.
Form ID Points
Form ID Points are used in conjunction with the EzeScan Forms Recognition feature. Please refer to the EzeScan SERVER Routing User Guide for more information on this feature.
If the operator is required to run a Forms Recognition EzeScan workflow, Form ID points need to be applied on each KFI form template. Then when the job is run EzeScan will check the scanned image against the KFI Form ID points. If a match is found, the image will be moved to the respective import folder for that job.
When setting up form ID points, try to avoid using similar search terms in similar locations across different templates. Failure to use unique ID Points may result in EzeScan matching against the wrong form type.
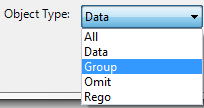
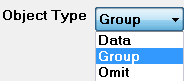
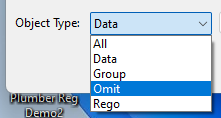
To define a Registration Zone, select Rego from the Object Type drop down menu.
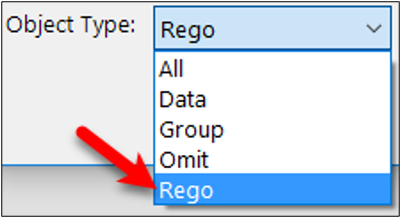
Select the "Rego" option from pulldown list
Use the Pencil tool to define your zone. (In this example we are looking for a word) Hint: It is recommended to use a word that may be bigger, clearer or have space around it. This will make it easier for the EzeScan OCR engine to find it.
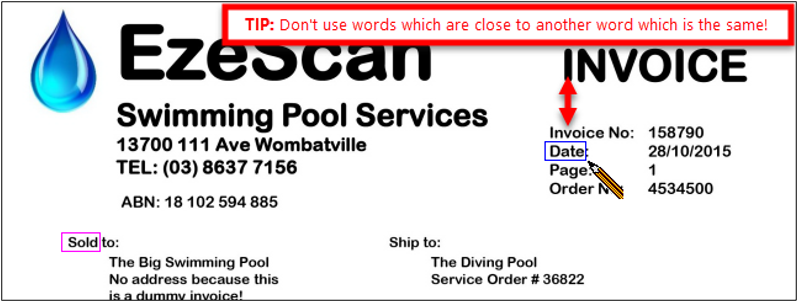
When selecting a rego point do not use words which are close to another “same word”
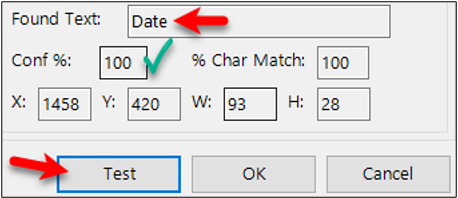
A Registration Point settings screen will appear.
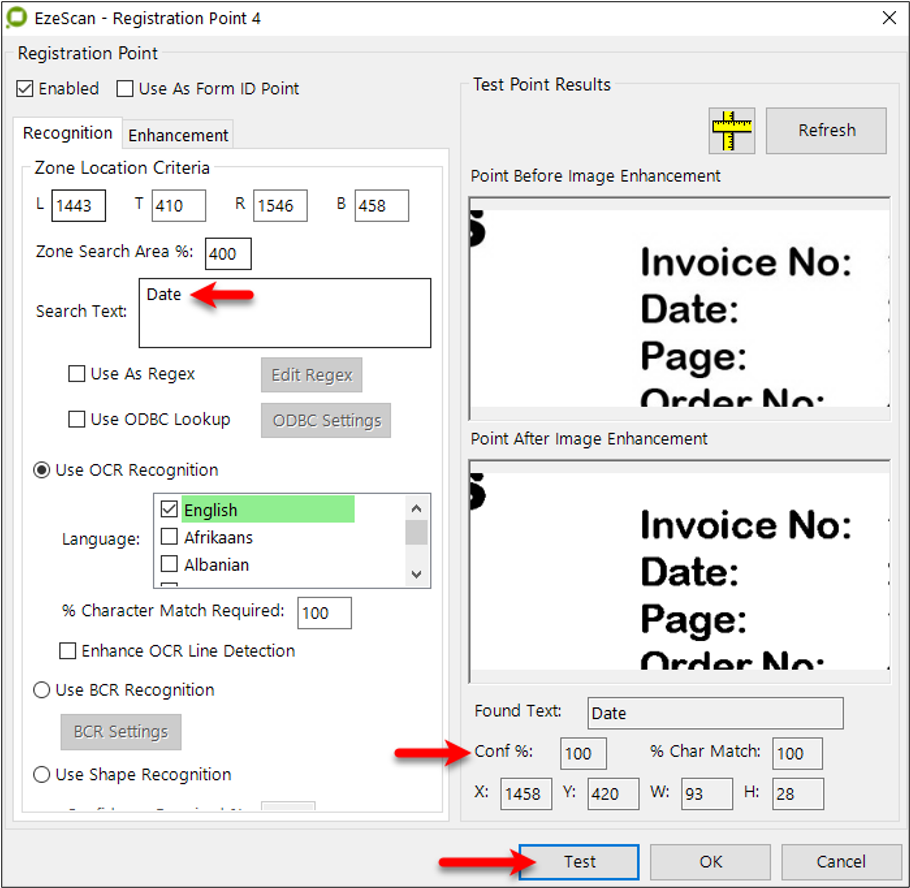
Testing the rego point on the word “Date”
In this screen it must be specified what type of registration point to look for. The options are:
OCR Recognition (look for a printed word) - this is the default
BCR Recognition (look for a barcode)
Shape Recognition look for a shape
Note: In this example we are doing a search by OCR.
Set the Search text of the characters to search for. In this example we are searching for "Date".
A search area, e.g. how much space to search around the zone can be applied.
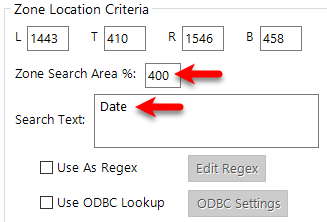
The 'Search Text' may also be used as a Regular Expression during OCR recognition, upon ticking this box, the specified Regex will run during processing and execute a text search.
Enhancements can also be applied to help the OCR engine find the zone. This is done in the Enhancement tab. A good one to use is "Perform Box Line Removal" if there are lines near the subject text.

Click the "Test" button. Confirm that is has found the text and there is at least an 80% confidence.
If the form has a lot of movement it is recommended to have at least four rego points on the page, preferably on each corner of the page.
Click OK when complete.
Testing Registration Points
It is recommend testing more than one document when setting up a form with registration points. This will help the operator see if a registration point is reliable over different documents.
Load a document into EzeScan Job/KFI and press the Profile button (F4).
Select the Image Menu and select "Registration Points".
A screen similar to the below will display.
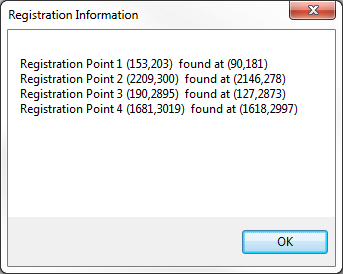
In this example all the registration points are found.
The operator can profile this document and then repeat the same steps above to check the next document. If a registration point/s is failing often it will mean that it would be best to adjust or move the registration point on the template to make it more reliable.
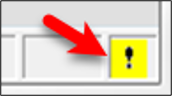
Another way for the operator to check if a registration point has failed is to look for the yellow exclamation symbol that will appear on the bottom right corner of the EzeScan viewer.
Defining a Group Zone (Green)
A Group Zone allows the operator to group data fields.
When the Group Zone is created the operator can then apply a rule to it. e.g. 2 out of the 5 fields must be populated.
A Group is usually set on data fields that are set to do OMR (Optical Mark Recognition)
Groups can be created two ways.
Using the Template Define Tool
Creating them in the Groups Tab
Using the Template Define Tool
To define a Group Zone, select Group from the Object Type drop down menu.
Use the Pencil tool to define your group zone.
The Group Settings screen will appear; like this example.
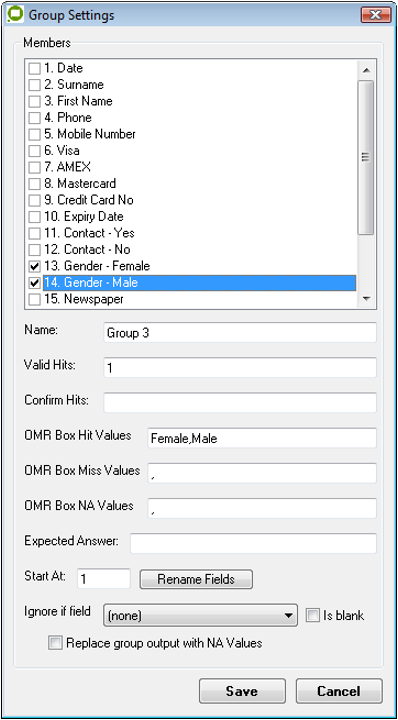
EzeScan will display a tick in the fields that have been defined in the Group.The operator can apply a name for the Group. E.g. "Gender"
Giving a clear name on the group will help with the defining of the KFI output.
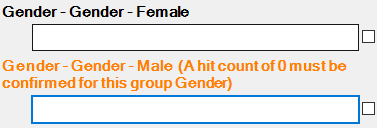
In this example we have two fields in our group…
#13. Gender - Female
#14. Gender - Male
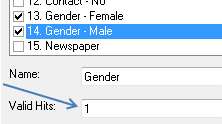
If the operator wants to have a hit on one field then the valid hits must be set to 1.
If the operator wants to display a confirmation on 0 hits for the group then the Confirm Hits needs to be set to 0 (This is the NA value).
The operator can also apply the Hit, Miss and NA values in this screen.
In this example we are allowing 1 Valid Hit for this group.
Click Save when the group settings have been applied.
Group Error During KFI indexing
When EzeScan is running and the job and detects a result outside of the Valid Hit settings it will display an error.
The operator can move to the incorrect field and press the "spacebar" to switch the result from a hit / miss / or NA.
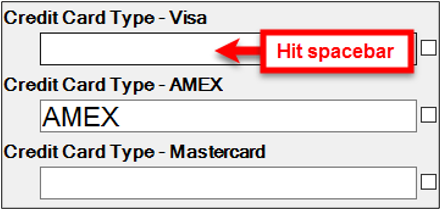
When corrected they can press enter to move onto the next field.
Group Warning During KFI indexing
When EzeScan is running and the job detects a hit for the NA setting (e.g. 0 hits) it will display a confirmation warning.
The operator can use the left and right icons to move to the fields and press the "space bar" to switch the result from a hit / miss / or NA.
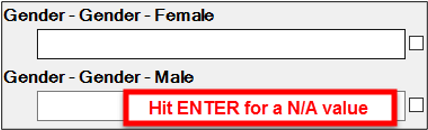
When corrected they can press enter to move onto the next field.
Creating a Group and Data Zones automatically
If a document contains a high amount of OMR data zones it can take the operator a considerable amount of time to define each data zone. EzeScan can automate the setup of both the data and group zones.
To use this option, ensure that no data fields are already setup on the proposed area of the document.
In the template define tool, select group option in the Object Type drop down list.
Use the Pencil tool to select the area of the group.

In this example we have six OMR data zones. The screen below should appear.
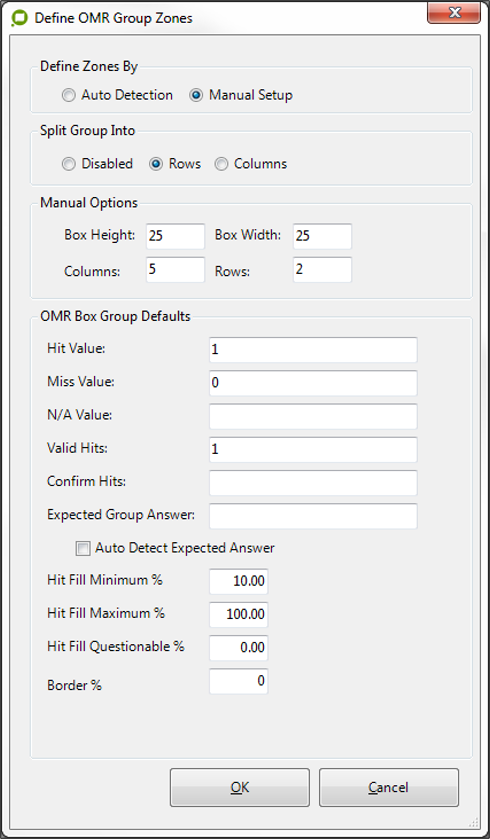
This screen will allow the operator to set the defaults for all of the data zones in the new group.
Choose Auto Detection to make EzeScan find all the data zones, or choose Manual Setup (recommended) which will allow the operator to split the group, set the size of the data zones, and apply how many columns and rows of zones there are. The operator can also set the Hit, Miss, N/A values, the amount of Valid and Confirm hits.
Set the default settings and then click OK.
EzeScan will draw the respective data and groups zones.
(The operator can move the data zones if required)

In this example:
Manual detection was set.
Split Group was set to rows (resulting with the 2 groups)
Box Height and Width were set to 50
Columns set to 3
Rows set to 2
This results with six new data zones and two new group zones.
Defining an OMIT Zone (Light Blue)
An Omit Zone allows the operator to select an area of the template so EzeScan will not process it. This option is good when a line or image may be close to the zone that requires data extraction (e.g. it will not perform data extraction on the area).
Select the OMIT option from the Object Type drop down list.
With the pencil tool ![]() , select the OMIT area.
, select the OMIT area.

This area will be excluded from data extraction.
Define Template Buttons
Button | Action | Description |
|---|---|---|
 | Default Field Settings | Clicking this button gives the operator to set field defaults for all Zones that are defined. |
 | Pointer | Use this button to select, move and delete fields. |
 | Define Object | Click this button to define a new zone.
|
 | Ruler | The Ruler is used to define the size of words and boxes.
|
 | Erase | This button will become active when a zone is selected.
(To highlight multiple zones hold down the shift button and then click on the zones to be selected). |
 | Delete Fields | This option will delete all fields on the current page. |
 | Deskew | This button will deskew the current page.
|
 | Re Order Zones | This button will ask the operator to select zones that are to be re ordered.
|
 | Edit Pages | This button will allow the operator to either Insert, Append or Delete pages from the selected Template. |
 | Rotate Template Image | This button will allow the operator to rotate the image. 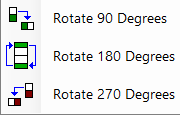
|
 | Zoom In | This button will zoom in on the image. |
 | Zoom Out | This button will zoom out on the image. |
 | Align To Field | This option will allow the operator to align zones based on another zone. To use this option
|
 | Clone Field Settings | This option will allow the operator to clone the field settings based off another field. To use this option
|
 | Resize Selected Fields | This option will allow the operator to resize selected fields on the page. To use this option
|
 | Move Fields | This option will allow the operator to move all the fields an operator defined amount of pixels.
|
 | Adjust OMR Settings | This option will allow the operator to adjust all the OMR settings on the selected template page.
|
 | Adjust Group Settings | This option will allow the operator to adjust all the Group settings on the selected template page.
|
 | Properties | This button will display the properties of the selected zone.
|
 | Test Data and Registration Zones | This button will test all zones for either the current or all pages in the template.
|
 | Duplicate Selected Zone | This button will become enabled when the operator selects a zone. 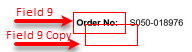
|
 | Page Number | These buttons will allow the operator to move back and forward pages.
|
 | Close | Closes the Define Template screen. |
Integration Tab
If using an EzeScan supported Integration, the KFI operator can browse back to the respective Integration to obtain information. Each Integration will have its own functionality. i.e. an Operator could browse the folder structure or lookup a metadata field like Client ID. This data will eventually be passed into the UPLOAD module which will save the document with the respective information.
Once the Integration is set, each KFI field can each have its own Integration setting applied (i.e. KFI Field 1 can Browse folders, KFI Field 2 can Browse users).
See below to apply the credentials and also refer to section to see what browse features your Integration supports.
Choose an Integration
When an Integration is selected a drop down list will appear below which the operator will be required to fill in the settings.
The Integration options will appear as below (please note some of these Integrations are End of Life and will not be sold to any new customers, see a list here).
Please refer to the respective User Guide available from the Help menu to access all the particular EDRMS KFI Browse documentation. Help → Connector User Guides Menu
* Aconex
Australian Business Register
Blackbaud Payments
Box
Business Craft V2
Civica Authority
Civica Authority Purchases
Docushare Flex
DocuShare
DocuWare (Platform Services)
Dropbox
EzeScan WebApps
Financial Edge NXT
Google Drive
iManage Work
iManage Work (REST API)
Infor Pathway
InfoRouter
IT Vision AltusEcm
Laserfiche
LDAP
LEAP
LexisNexis Affinity
MAGIQ Documents
Merchant Warrior
M-Files
Microsoft OneDrive
MYOB AccountRight
Objective ECM
Objective Nexus
Objective Webtalk +
OpenText Content Manager Service API
OpenText Content Server REST
OpenText Content Server
OpenText eDOCS (Rest API)
OpenText eDOCS DM 5.X
OpenText eDOCS DM 6.X
Paydock
Practice Evolve
Prime Ecosystem
Raiser's Edge
Raiser’s Edge NXT
Send Image to Second Viewer
SharePoint
SharePoint 2013
Sharepoint 2016
Sahrepoint Online
Shexie
TechnologyOne ECM (CMIS)
TechnologyOne ECM (DAS)
TechnologyOne Financials
TechnologyOne Financials Cia Anywhere
Therefore
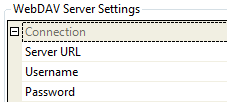
WebDAV
Xero
With WebDAV the root of the server can be specified or anywhere in the WebDAV path. The username and password also need to be set.
When the EDRMS is selected, an additional tab is displayed on the KFI Field form for that particular EDRMS system.
Fields Tab
This is the fields tab. There are two ways fields can be defined.
By typing in the field name below. An Edit button will appear so all settings can be applied to it.
By using the Template Definer. If using a structured form, the template definer can be used where the operator can define the area of a data zone and then EzeScan will prompt with the new field. The operator can then apply the settings for the field.
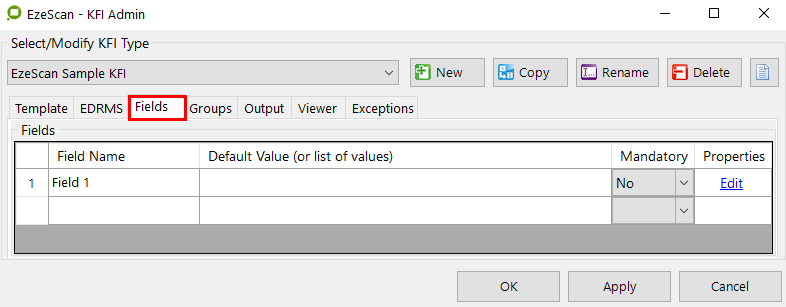
The Fields tab
Field Display Name

Enter the name that the data entry operator will see as the field name.
Simply type your own value (e.g. Invoice No, Employee No, Department etc).
To insert, duplicate, move, reset or delete an existing field use the field menu options. The field menu can be displayed by right clicking with the mouse in the field number column of the field details grid as shown below.
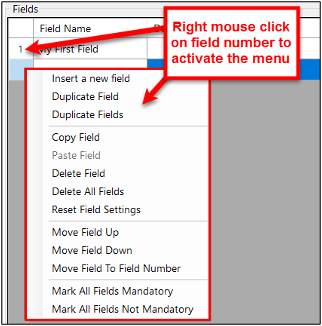
Right Mouse click to see field options
Field and System Placeholders
Each KFI field will have its own specific placeholder value; for example…
Field 1 will also be known as <<F1>>
Field 2 will also be known as <<F2>> and so on.
There are also System placeholders. These are placeholders such as…
Current…
date
time
windows login name
output file name, etc.
All the system placeholders are documented in the System Placeholders section of the EzeScan PRO User Guide
System placeholders are defined as <<S1>>, <<S2>>, etc
Placeholder values can be referenced in other KFI fields and SQL lookups.
Default Values (or List Values)

This is where you can enter a default value to be used in the actual data entry field. If the operator is constantly keying in the same default value into the field, you can get EzeScan to do it for them by default.
Or if you want to use a pull down list, simply enter the values separated by semi colons into the list. They'll appear to the KFI job operator in a pull down list (e.g. For an index named Department, the list might be Housing; Public Works; Health; Premiers). Or alternatively use the list management tools on the KFI Rules form to build and manage lists.
Mandatory

No = the field is not mandatory. The KFI operator may leave the field blank.
Yes = the field is mandatory, and data must be either entered or selected from a pull down list.
Mandatory field names are highlighted in blue on the KFI data entry form.
Fields Edit Button

The Fields Edit button launches the KFI Fields form. It looks like this...
The screen which appears after selecting “Edit Field”
There are 12 tabs on the KFI Rules Form…Format
Value
Zone
Recognition (BCR/MICR/DISC, OCR/ICR/OMR)
Enhancement
Processing
Output
Automation
Action
EDRMS (if selected)
Test
Exception
The options available on each tab allow the fields rule configuration to be customised.
Please refer to The Fields Edit Button Explained section for more detailed information on using these rules options.
Groups Tab
The Groups tab looks like this:
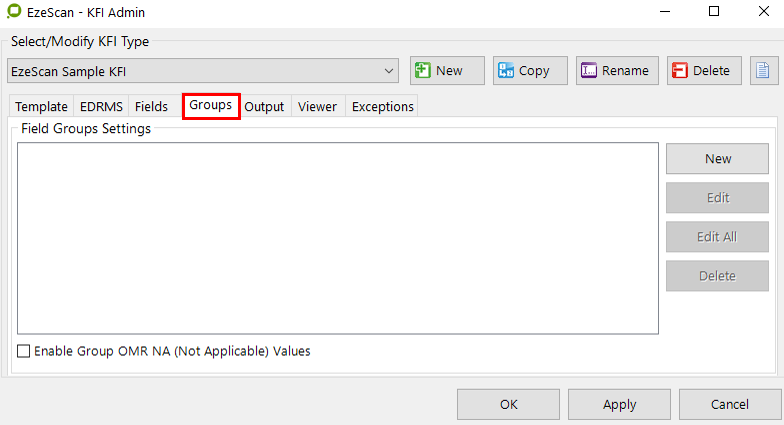
The Groups tab allows the operator to create a group, Edit an existing field group, Edit all field groups or Delete a field group.
A zone group is usually setup to handle multi choice answers on forms or questionnaires. It normally limits an answer to only one multi choice answer.
For example you could setup a group zone called 'Title' which groups 4 OMR zones together (e.g.4 tick boxes - Mr, Mrs, Miss, Other). The group zone would be set to have a valid hit value of 1.
During processing if none of the tick boxes are ticked, or if 2 or more are ticked then the verification operator will be alerted to the fact that the form has not been complete properly by the end user.
Creating a Group
To create a new group click the "New" button.
The Group Settings screen will appear, like below…
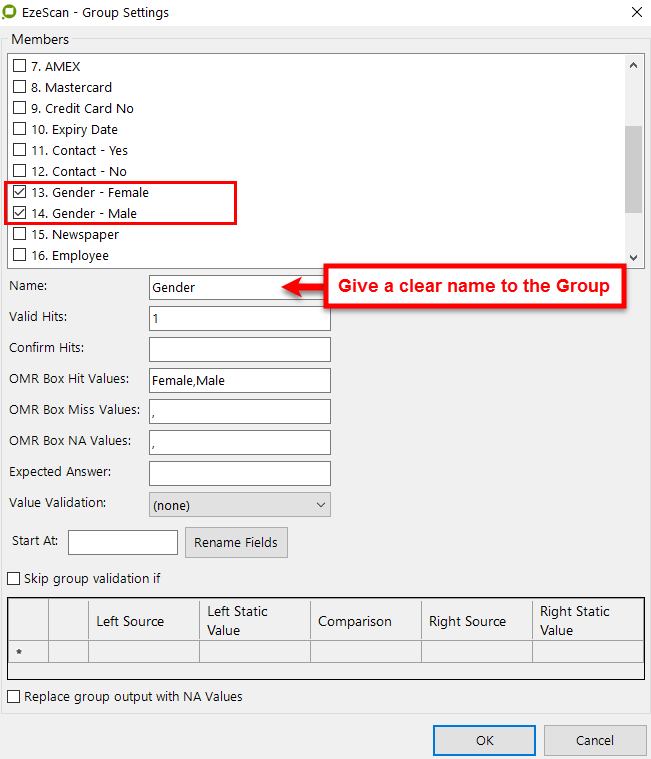
The screen you see when creating/editing a group
EzeScan will display a tick in the fields that have been defined in the Group.
The operator can apply a name for the Group. E.g. "Gender"
Giving a clear name on the group will help with the defining of the KFI output.
In this example we have two fields in our group.
Field #13 - Gender - Female
Field #14 - Gender - Male
If the operator wants to have a hit on one field then the valid hits must be set to 1.
In this example we are allowing 1 valid Hit for this group.
If the operator wants to display a confirmation on 0 hits for the group then the Confirm Hits needs to be set to 0. (This is the NA value)
The operator can also apply the Hit, Miss and NA values in this screen.
Click Save when the group settings have been applied.
Group Error during KFI indexing
When EzeScan is running and the job and detects a result outside of the Valid Hit settings it will display an error.

The operator can use the left and right icons to move to the fields and press the "space bar" to switch the result from a hit / miss / or NA.When corrected they can press enter to move onto the next field.
Group Confirmation during KFI indexing
When EzeScan is running and the job detects a hit for the NA setting (e.g. 0 hits) it will display a confirmation warning.

The operator can use the left and right icons to move to the fields and press the "space bar" to switch the result from a hit / miss / or NA.
When corrected they can press enter to move onto the next field.
Output Tab
This is the KFI Output tab. The operator can perform tasks such as define the syntax of the index files e.g. csv, txt, xml, and how header, data and footer information is to be formatted.
There are also options to have X number of index files, have an index file per document, per batch or a custom index file name and append entries into it.
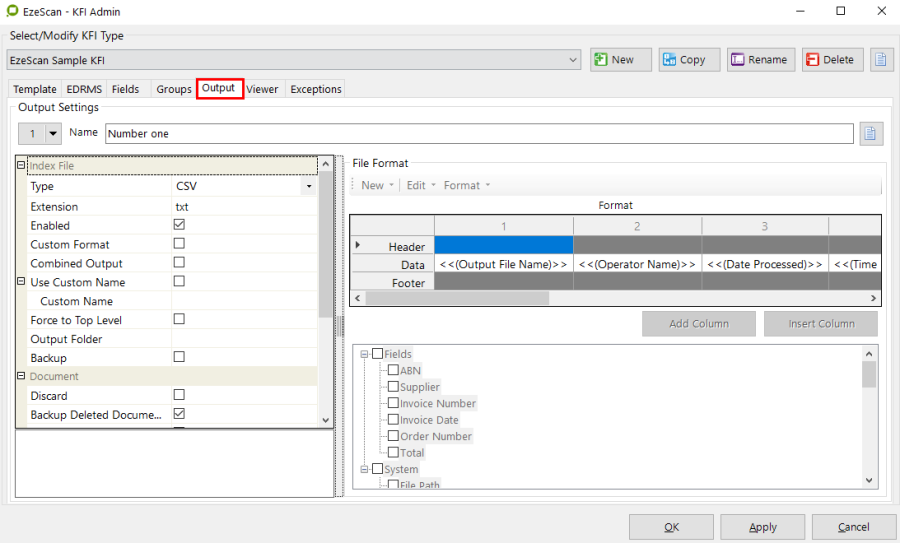
The Output tab
Output Settings
The operator can choose to have as many index files as they would like. By default the first one is called 1. (default csv). This can be renamed in the Name setting.

Click the add button to add and name more index files.
When an index file is added the "Index File" table below can then be modified with its settings for the current Index File.
Output Index File
The first entry the operator must choose is the syntax of the index file.
Type of Output settings on the left
Can be set to CSV or XML
Selecting either option changes the options available to the user
File Format on the right. Selecting:
CSV format will display the available fields for the export (highlighted in red)
XML format will change the display to show available fields for the export (highlighted in green)
The tables below provide information relating to the index file components.
Further explanation on certain aspects of these components are covered in more detail on the following pages.
Index File Options
Index File Options | What does it do |
|---|---|
Type | There are two types of output index files available to select:
|
Encoding | When outputting to CSV the following text encodings can be selected:
|
Extension | The file extension in use.
|
Enabled | On by default
|
Output Condition | Conditionally output/skip the index file. |
Custom Format | Off by default
|
| Default option is a comma , (this is not available when the type selected is XML - only CSV) |
| On by default (this is not available when the type selected is XML - only CSV) |
| Default option is a comma , (This is not available when the type selected is XML - only CSV) |
| Off by default (Not available when the type selected is XML - only CSV) |
Combined Output | Off by default
|
Use Custom Name | Off by default
|
Custom Name | This feature works with the "Use Custom Name" option is ticked
|
Force to Top Level | Off by default
|
Output Folder | Blank by Default
|
Backup | Off by default |
Document Options
Document Options | What does it do |
|---|---|
Discard | Off by default
|
Backup Deleted Documents | On by default |
Output Single & Multipage | Off by default
|
Filename field delimiter | Default is set to "Underscore" _ |
Other Settings | What does it do? |
|---|---|
Default Combined Index Filename | Combined index files will be named using this method if no custom name is provided. |
| Default Setting. Will use the name of the KFI. |
| This option allows the operator to specify a static index filename or a system of field variable. I.e. if the index filename needs to be the date of the scan the operator could use <<S3>> or it the index file name needs to be a KFI field value the operator could use <<F?>> (? Is the field number) |
| This will display the Incrementing Batch Suffix value (<<S13>>).
|
| When selected this forces the output indexes to be written to a file that matches the import file name; for example…
|
Suppress Messages | On by default
|
Replace System Date/Time with File Date/Time | Off by default |
Run Validation First | Off by default
|
Upload | Default = Blank
|
Secondary KFI | Default = Blank
(This setting can only be used when saving a file twice using a Job. It does not work with Routing). |
Output indexes using the default CSV format
Selecting this option will force EzeScan to generate the KFI index field values in the default CSV format.
This allows the operator to configure EzeScan to generate 1 default CSV output file.
This comprises the 5 system generated fields (Output File Name, Operator Name, Date Processed, Time Processed, Pages Processed) followed by any user defined field values (e.g. Account Number).
This is a sample output from the default CSV format…
"Image_17.tif","User","20071114","105402","1"
The default extension for CSV files is .txt
Output indexes using a custom CSV format
When selected this option will force EzeScan to generate the KFI index field values in the user defined custom format.
This allows the operator to configure EzeScan to generate up to 2 custom output files.
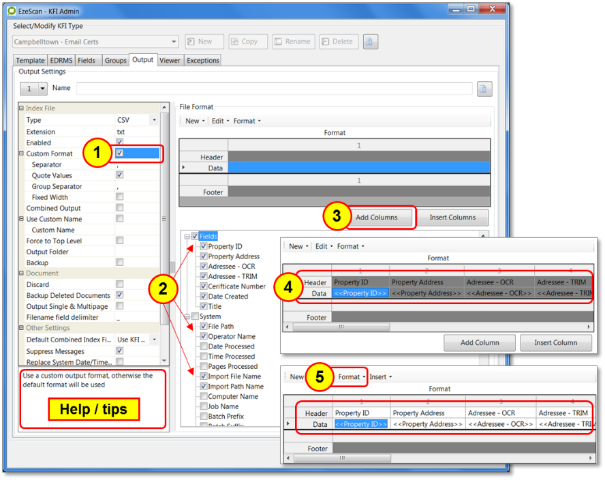
To create a custom output file:
Tick Custom Format box
Select the fields to be included in the export file (tick boxes)
Click on Add Columns button
The selected fields will appear in the Format section
Depending on the required output select the Format option and…
Select Output Header option to include the header details in the export
Select Output Data option to include the header details in the export
The above options must be selected to enable the output file to contain the required values.
Making Changes to the CSV Output file
The table below covers the options available when formatting a custom output file.
You must have checked the Custom Format box to make any changes
Option (Right mouse click and…)
Option | What does it do? |
New → Create from an existing CSV file | Allows the user to pick an existing CSV file which may be of use when matching a particular requirement of the system the data will be uploaded into. |
New → Create from the KFI | Will include ALL of the Field and System values which are in the KFI |
New → Clear All | Takes the settings back to where you began |
Edit → Copy → Header | Will copy all the data in the Header Row to the clipboard. |
Edit → Copy → Data | Will copy all the data in the Data Row to the clipboard. |
Edit → Copy → Footer | Will copy all the data in the Footer Row to the clipboard. |
Edit → Copy → All | Will copy all three Header, Data and Footer Rows to the clipboard. |
Edit → Paste → Header | Will paste the data from the clipboard into the header row. |
Edit → Paste → Data | Will paste the data from the clipboard into the Data row. |
Edit → Paste → Footer | Will paste the data from the clipboard into the Footer row. |
Edit → Paste → All | This will paste the data from the clipboard into the Header, Data and Footer rows. |
Format → Output Header | Needs to be selected if required in output file, will be white if active, and grey if not active. |
Format → Output Data | Needs to be selected if required in output file, will be white if active, and grey if not active. |
Format → Output Footer | Needs to be selected if required in output file, will be white if active, grey if not active.t file |
Format → Align Header Columns with Data | Will align the header columns in line with the data columns. It makes the values a lot easier to marry up. |
Format → Align Footer Columns with Data | Will align the footer columns in line with the data columns. It makes the values a lot easier to marry up. |
Format → Show Columns | Will show the row data as columns, i.e. if the row data has been manually entered with the separator using this option will make it more clear as they value will appear as columns; for example…

 |
Insert → Fields … | Allows the user to select additional KFI fields for inclusion in the export file.
|
Insert → System … | Allows the user to select additional fields for inclusion in the export file. |
Add Column Button | Will add a column to the end of the index table |
Insert Column Button | Will inset a column before the currently selected column in the index table |
Add Column | Right mouse click on a column number and select Add Column to add a blank column |
Insert Column | Right mouse click on a column number and select Insert Column to add a blank column |
Merge Columns | Merging columns will create an output file which only has a delimiter based on the selected separator value (e.g. ',' or '|' or '\t' etc) To do this…
 |
Delete Columns | Allows selected columns to be deleted. Right mouse click on column number to delete. |
Exclude Remaining Cells | Right mouse click on a cell and select this option to remove all columns to the right. TIP: Repeat for the Data row as well as Header. |
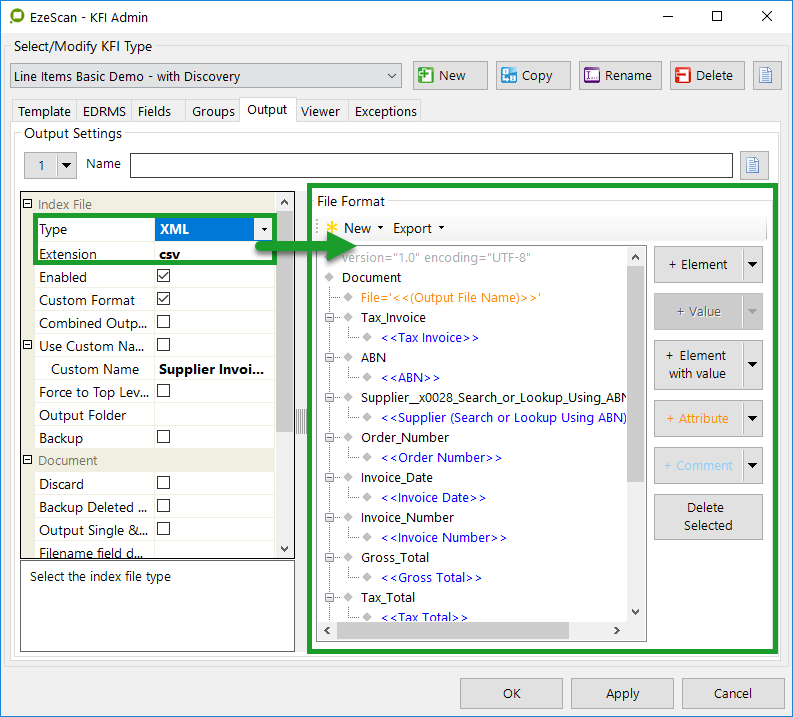
Output indexes using a Default XML format
This option should not be ticked when using the EzeScan UPLOAD module, as it expects the indexes to be in CSV format.
If the import tool you are using to import the KFI images and indexes into another system supports XML, then tick this option to force KFI to output its index file in XML format.
This allows the operator to configure EzeScan to generate 1 default XML output file.
By default EzeScan includes all KFI system fields and user defined fields in the XML output data; as shown in the example below:
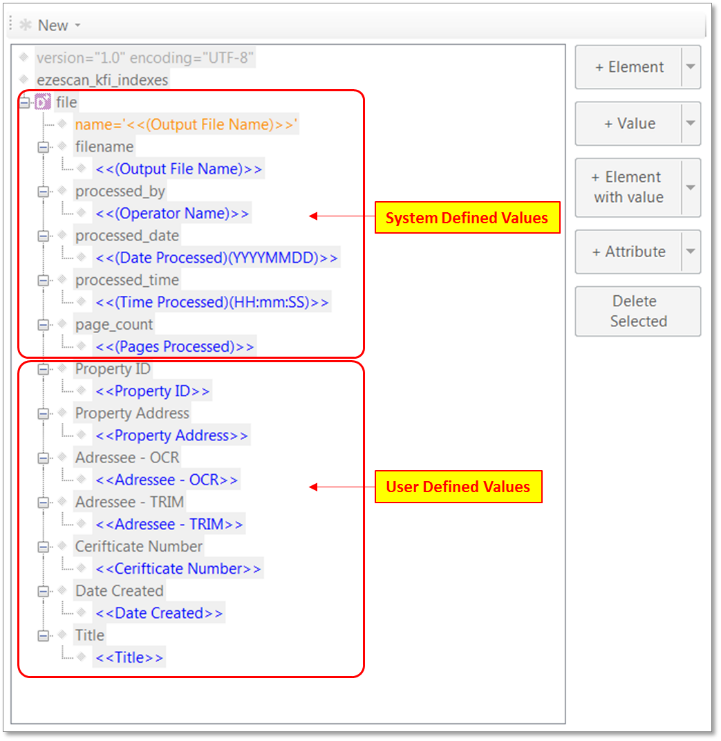
Example of the XML export config
Output indexes using a Custom XML format
This option should not be ticked when using the EzeScan UPLOAD module, as it expects the indexes to be in CSV format.
If the system requires the XML to be customised then the operator will need to tick the "Custom Format" checkbox.

This allows the operator to configure EzeScan to generate up to 2 customised XML output files.
The operator can build each output file using any of the system generated fields (i.e. output image filename, operator login ID, processed date, processed time, number of pages in the image) or user defined fields (e.g. Account Number).
It does not support the use of a custom header or custom footer, nor the entering of any other user defined text in the custom data.
A customised XML Output file may be created using any of the means below:
The operator must have an understanding of how XML files are created before attempting to build their own file.
Create from an existing XML file
This will allow to build from the syntax from an existing XML file. For example another application that may require it's XML to be in a specific syntax. A sample could be obtained and then this setting can be used to bring in the syntax. The operator will then need to modify the syntax to include the KFI field or system variables to be required.

Create from the KFI
Will bring in all of the KFI fields (just like the default) but will allow the manipulation of the content. Fields may be moved around, deleted or edited.
Create New
Starts with a blank page and the operator adds the values they require using the buttons on right side of the window.
Create for EWA from the KFI
This will create the XML syntax directly to support the EzeScan WebApps product. Please refer to the EzeScan WebApps user guide for configuring the existing fields to show the data in it.
Clear All
Removes all values from the window.
Viewer Tab
The Viewer tab looks like this:

Viewer Settings
Label Font Size
The font size of the label above each field (blue = mandatory)

Edit Line Font Size
This option will change the font size in the KFI input panel during KFI processing.

Display group names
Will "pre-pend" the name of the first group the field belongs to (if any) to the field description displayed during processing
Maintain viewed page
This option will keep the viewer on the selected page during KFI processing. If a field is configured with specific zones then this option will not be applicable.
Released in version 4.3.104 and any KFI's created prior to this release will have the box unchecked and will need to be ticked to make usable.
Highlight questionable values
If capturing a document using OCR/OMR/Discovery etc will highlight the portion of text which the capture has deemed as questionable in Yellow
Show hidden fields after scan or import
When ticked this option forces hidden KFI zones to be redisplayed during KFI processing immediately after scanning or importing has occurred.
Clear reuse fields on
Don't' Clear will not clear out fields set to Reuse between scan batches
On Batch Start will clear out batches upon a new scan batch.
On Job Start will clear the re-use values when the job is restarted.
Default Viewer Image Position
This list box includes the following options:
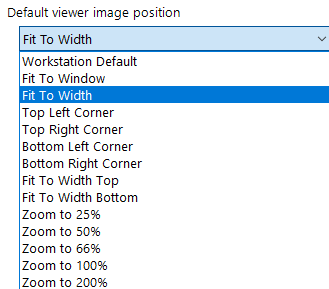
Choosing the image size to display in the viewer window
In some cases you may not be defining zones for a KFI template, but you still may wish to position the viewer to a certain area on a scanned image.
Zones locations when present, will always override this settings.
Indexing Method
Wizard - Displays each KFI field one at a time at the bottom of the form.
List (default) - Displays all the KFI fields at once. The location of the fields can be configured to be on the left or right side.
Display Summary Frame on Submit
Works with the "wizard" option. Tick to display a screen of all the KFI fields after the last field has been processed. This will give the operator the chance to double check all fields in one screen.
Location
Works with the "list" option and will display the KFI fields to the right (default) or left of the preview window.
Disable button options

The administrator can disable the Print, Email, Delete and Route buttons.
The respective disabled buttons will not appear when the user is in KFI mode. e.g. the image below shows the Print, Email and Delete buttons disabled.
Ticking this box | Disables this button |
Disable Print |  |
Disable Email |  |
Disable Delete |  |
Disable Route
|  |
Disable Showing Hidden Fields |  |
Hide Add Zone Button |  |
Hide Perform Recognition Button |  |
Skip Markup When Routing
| |
Ignore Submit Until Last Field
|  |
Apply Field Flow Automation
This will set all of the KFI fields to automatically process each field.
It sets all fields to move to next field and set the last field to automatically submit the document.
This option works with the automatically move to the next field and automatically submit document options in the automation tab.Please refer to the Field - Automation tab section on page for more information.
Remove Field Flow Automation
This will unset all of the KFI fields to automatically process and submit.
This option works with the automatically move to the next field and automatically submit document options in the automation tab. Please refer to section 11.10 for more information.
Exceptions Tab
The Exceptions tab allows for a KFI type to move the current document into the import folder of another job for verification processing. Typically exceptions would be enabled on a job running with automation. When a field / confidence error occurs, EzeScan will then move the document to the import folder of the exception job so an operator can run it in a manual / verification mode. The verification Job / KFI is usually a copy of the automated Job / KFI with all of the KFI fields automation switched off.
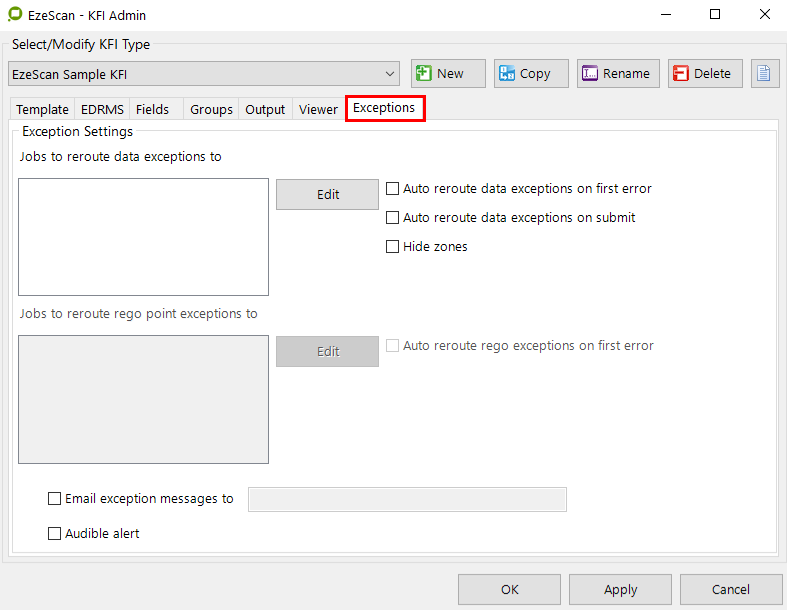
The Exceptions tab
Exception Settings
Job type to reroute data exceptions to
During KFI processing the operator might need to route the current document to a different processing job. If this field is blank, during KFI processing pressing the KFI Route button will display a list of available jobs that the document can be routed to. Otherwise if this field contains another valid job type name, when the route button is pressed the job will automatically be selected from the list. The operator will then click the Route button to route the job to the respective import folder.
Auto reroute data exceptions on first error
When this option is ticked and the Job type To Reroute Data Exceptions To value has been set to a valid job type then during KFI processing EzeScan will automatically reroute the document to this job type as soon any data processing error occurs.
The operator does not have to press the KFI Route button.
Auto reroute data exceptions on submit
When this option is ticked and the Job type To Reroute Data Exceptions To value has been set to a valid job type then during KFI processing EzeScan will automatically reroute the document to this job type on the submit button.
The operator does not have to press the KFI Route button.
Hide Zones
Use this option to hide the blue zones for the KFI Fields when profiling.
This option is only available for "Auto reroute data exceptions on submit"
Hiding the zones will save a small amount of processing time.
Job type to reroute rego point exceptions to:
During KFI processing the operator might need to route the current document to a different processing job. If this field is blank, during KFI processing pressing the KFI Route button will display a list of available jobs that the document can be routed to. Otherwise if this field contains another valid job type name, when the route button is pressed the job will automatically be selected from the list. The operator will then click the Route button to route the job to the respective import folder.
Auto reroute rego exceptions on first error
When this option is ticked and the Job type to Reroute Data Exceptions to value has been set to a valid job type then during KFI processing EzeScan will automatically reroute the document to this job type as soon any data processing error occurs.
The operator does not have to press the KFI Route button.
Email Exceptions messages to:
When this option is ticked an email will be sent to the specified email address so the operator can be notified of a KFI exception. Below is a sample message.
KFI Simple KFI: exception routed to C:\Program Files\Outback Imaging\EzeScan 4.3\Input\Exceptions\20081029_154337_John.tif
Audible Alert
This option will give a beep when a KFI exception occurs. This option is recommended to be run for jobs in automation mode.
The following KFI exceptions will give a beep if…
an ICR or OCR confidence level is not met.
there is a group OMR error.
there is an OMR confirm message.
there is an OMR questionable result
there is an ODBC validation failure.
The Fields Edit Button Explained
Field Screen buttons
At the bottom of each KFI field there are set of buttons.
 | 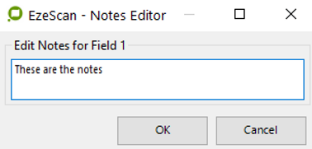 The Notes button provides the ability to add some notes about the KFI field so that anyone opening it may be able to understand certain aspects of it. You may add notes to each field as required. The button applies to the whole KFI, not just the selected field. The same functionality can be applied to each KFI field (more details on page ) |
 | The Define Zone button allows you to browse another image beside the template image in order to test settings on a field which has had Recognition set-up on it. |
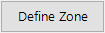 | The Define Zone button will allows you to define the area pixel coordinates on an image template where the field has had Recognition set-up on it. |
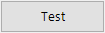 | The Test button will allows you to test the defined area pixel coordinates on an image template where the field has had Recognition set-up on it. |
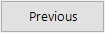 | The Previous button will move to the previous field when clicked(i.e. <<F2>> to <<F1>>) |
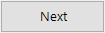 | The Next button will move to the next field when clicked(i.e. <<F1>> to <<F2>>) |
 | Clicking the OK button will save and close the KFI fields window, returning to the main KFI screen. |
 | Clicking the Cancel button will not save and close the KFI fields window, returning to the main KFI screen. Clicking Cancel will exit without saving any changes made. |
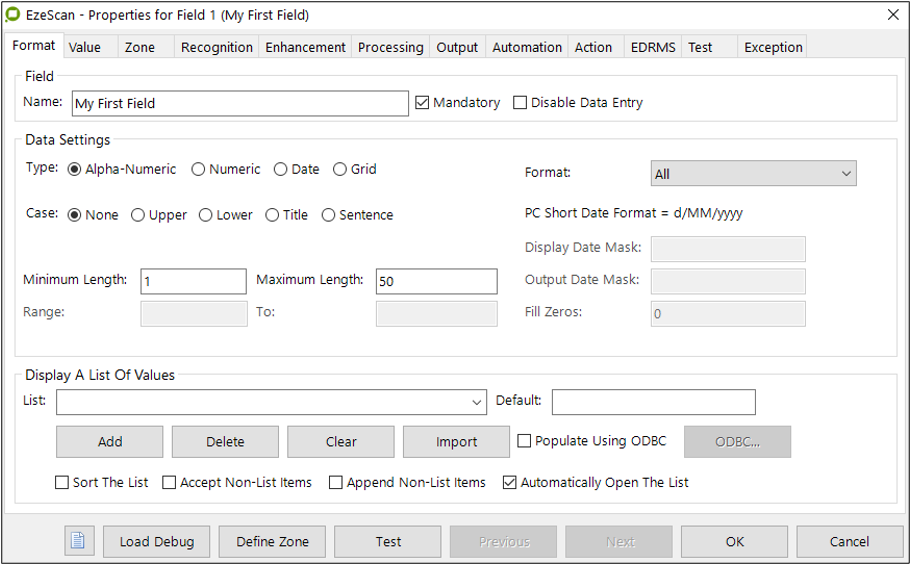
Format Tab
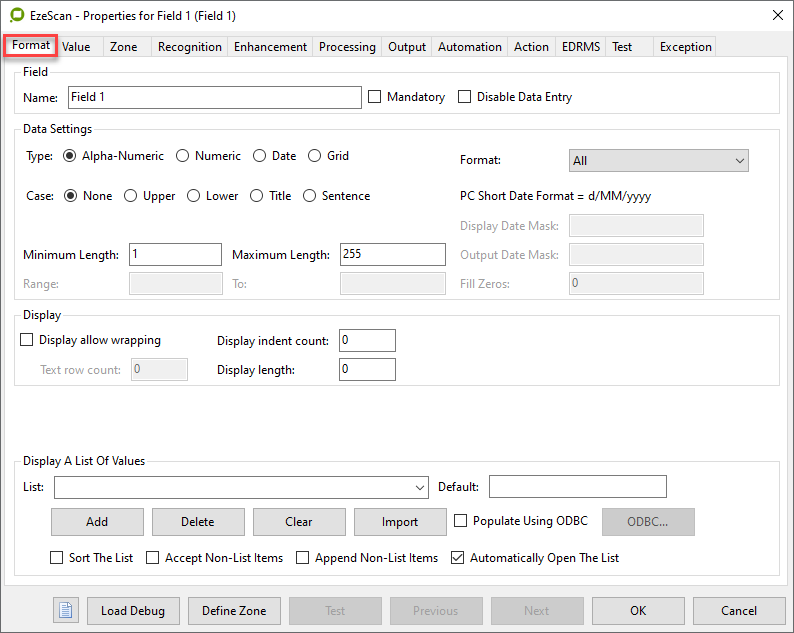
Field tab options
Field section
Name | This is the name of the Field. The Operator will see this when profiling. |
Mandatory | Off by default |
Disable Data Entry | Off by default |
Data Settings section
Defining the zone type and input data format type
The way that the form works will change depending on whether the operator selects the field as alphanumeric, numeric or date.

Figure 37 - options to select for the type & case for the zone (default settings shown)
Alpha-Numeric | Default setting For alphanumeric fields choose from any of the following alphanumeric data entry formats:
|
Numeric | For numeric fields choose from any of the following numeric data entry formats:
|
Date | For date fields choose from any of the 39 date data entry formats including: DDMMYY MMDDYY YYMMDD YYDDMM DD-MM-YY MM-DD-YY YY-MM-DD YY-DD-MM DD/MM/YY MM/DD/YY YY/MM/DD YY/DD/MM DDMMYYYY MMDDYYYY YYYYMMDD YYYYDDMM DD-MM-YYYY MM-DD-YYYY YYYY-MM-DD YYYY-DD-MM DD/MM/YYYY MM/DD/YYYY YYYY/MM/DD YYYY/DD/MM DD.MM.YY DD.MM.YYYY MM.DD.YY MM.DD.YYYY DDMMMYY DDMMMYYYY DD MM YYYY DD MMM YY DD DDD DDDD MM MMM MMMM VARIABLE * * VARIABLE - This will allow the operator to specify any date format but when EzeScan outputs this value it will be converted to DDMMYYYY. This option is recommended if scanning documents that contain different date formats. TIP: If using the Variable option, ensure you set the “maximum length” to match the largest date mask being used (e.g. DD/MM/YYYY requires 10) |
Grid | When selected, this will activate the Line Items Module for reading individual items from the grid of an Invoice. A Grid Settings tab will appear to allow the operator to configure the respective settings. |
Display Date Mask | This will display the formatted date in the KFI field in to the operator. This could be used for jobs like supplier invoices that would contain different date syntax’s.  |
Display Date Mask | If the date syntax is required to be in a specified format for outputting the data, it can be defined in here. This would usually be required for data that may be imported by a 3rd party system that requires the date to be in a specific format.  |
Case | Default setting is set to None The Case option forces the KFI input field characters to either none, upper, lower, title or sentence case format.  It is applied to field data that is typed into the field, or generated from a zone using a BCR, ICR/OCR, OCR or OMR recognition engine. For example - Title Case will display outback imaging as Outback Imaging |
Length (Minimum and Maximum) | 
|
Range | The range fields are only active when using a numeric zone type. Simply set values for the lower and upper range. Field input values must be within the nominated range specified.  i.e. in the example above the value must be 5 or greater and 8 or less. |
Display section
Display allow wrapping | Tick the box to allow the field to be wrapped onto multiple lines in the viewer TIP: This very useful for fields such as Title; Workflow etc Default is off (unticked ) |
Text row count | Specify the number of text rows to display
Default is 0 |
Display indent count | Specify the number of indents from the left to apply when displaying this field in list layout mode Default is 0 |
Display Length | Specify the length of the field. Whilst the field max setting is still used this setting can allow the crop the display length. The operator can scroll across the value if it is longer than the display length. |
Display a List of Values section
Rather than keying a value, the operator may simply select it from a list of values that have been configured for the zone.
Lists may be created by using the list add button to input new list values 1 at a time. Simply key a value into the list box, and then press the Add button |  |
Lists values may be removed 1 at a time by using the list Delete button |  |
All the list values can be cleared by using the list Clear button |  |
A list can also be imported from a CSV formatted .txt file using the list Import button. |  |
A sample import syntax would be:
Option1
Option2
A list can also be imported from an external ODBC compliant database by using the “populate using ODBC” button.
Please refer to the Creating a List using and ODBC SQL query section for details.
List Sorting Options
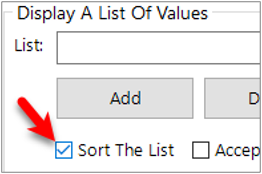
Sort the List | Lists will appear sorted when the box is ticked or unsorted box is not ticked. The Default is not ticked |  |
Accept non list items | If the value (that is typed in by the operator) is not in the list the option, EzeScan will allow the operator the option to accept it when the box is ticked. Default is not ticked. |  |
Append non list items | Lists can be fixed lists if box is not ticked or user update-able when the box is ticked. Default is not ticked . |  |
Automatically open the list | If the list is going to contain multiple values, having this option ticked will automatically expand the list results for the operator. Default is ticked. |  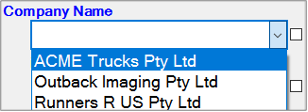 |
Default Menu Value
This option allows you to have one of the menu options to be enabled as a default.
The operator can either specify the field number (i.e. for Field 1 #1) or put in the field value in this text box.
Populate Using OBDC
A list can also be imported from an external ODBC compliant database by using the "populate using ODBC" button.

This allows the operator to return a value, list or display a search table back to an ODBC data source. Tick the box and click on ODBC button and the following form displays…

The ODBC Settings screen
Connection Details
DSN | This is the ODBC DSN that is configured to point to the respective database. Click the ODBC Admin button to display the ODBC Data sources |
User ID | This is the ODBC login for the respective ODBC data source |
Password | This is the ODBC password for the respective ODBC data source |
Use a Lookup | This option allows the operator to manage a database out of EzeScan. Note: each database/s is stored as .txt file in the EzeScan\Lookups folder |
Creating a Lookup Set
Tick the Use a Lookup, click on the Edit Lookups button and the editor screen below appears...
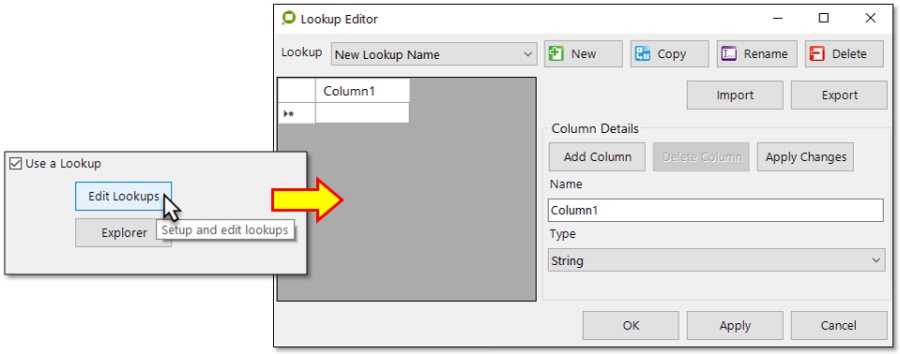
Creating a new Lookup set
Lookup Name | The operator can use the New, Copy, Rename and Delete buttons to create different lookups. |
Import / Export | The operator can import other text file database/s or export a text file database/s. Tip: The EzeScan Export Tool can export a lookup with a KFI. |
Column Details | This is where the operator can define the database columns. |
Add Column | Click Add Column button to add a new column. You must have the cursor sitting in the data column and the new column will be appended to the right hand side of the columns. |
Delete Column | Click Delete Column button to remove a column. You must have the cursor sitting in the data column which is being removed. |
Apply Changes | Save the changes made to a column. |
Name | Enter the column name in the box and always click on Apply Changes button before adding another column. If you add another column before hitting the Apply Changes button the new column will be inserted before the column you just named. |
Type | The column format to be applied. e.g. String, Date time, Decimal, Double and Integer. |
Column Data | 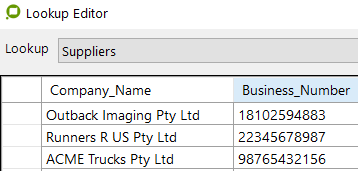 When the column structure is completed the operator can then apply the data into the database. e.g. This example shows a database "Suppliers" with two columns "Company_Name" and "Business_Number"… |
When all the information is applied the operator can then click OK and then tick the "Use a Lookup" button.
We will use the above example to create a "List" of Supplier Company Names for the operator to select from. Refer to the Creating a List using and ODBC SQL query section for details.
Connector Options
A list or data generated using ODBC can be configured as either:
Disabled | No settings will be applied |
Build List Now Once Only | EzeScan will import the values now and the list remains static. |
Build List At Each KFI Startup | EzeScan will import the list each time KFI is used. |
Build List Each Time New Document Is Processed | EzeScan will import the list every time a document is processed. |
Return value based on a placeholder value <<F?>> | EzeScan will return a value from a previous KFI field. Note: Please refer to your database administrator for the database table and SQL statement commands. |
Return image based on a placeholder value <<F?>> | EzeScan will return an image from the current KFI field value. The image has to be either in the database as a BLOB or referenced in the database as a file path. i.e. A database could have a table similar to below.  OR..  In the example above the operator will be submitting the PO number as the KFI Field. Then the following statement would be run to return the image.
CODE
Tip: The Field and System Placeholders section describes the function of an F# placeholder value. |
Creating a List using an ODBC SQL query
Using the example of a "Suppliers Lookup Set" outlined on page ; we will create an SQL based lookup of the suppliers list to provide the operator with a list to select from profiling a document.
In the example below we are looking to extract the Company Name from the Suppliers Lookup Set.
Click edit on the Company Name field and on the Format tab, tick the Populate Using ODBC box then click on the ODBC button.

Tick the Use a Lookup box
Select the Build List At Each KFI Startup option
Enter your SQL statement e.g. Select Company_Name from Suppliers
The details in the statement must match the Column headings in the Suppliers Lookup Set.
Click to Test button and if the SQL script is correct it should display the list of Company Names as well as provide "Query Succeeded" at bottom of the screen
If this fails then there is probably something wrong in your SQL statement
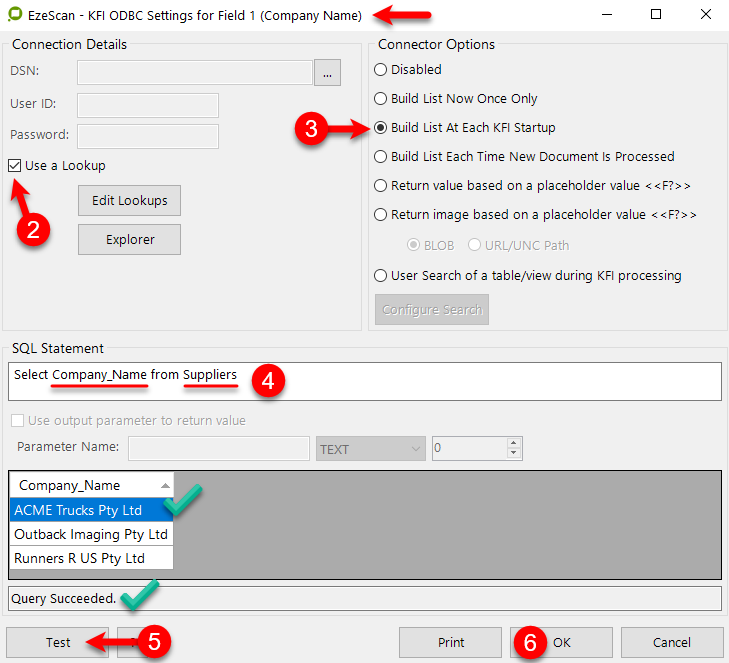
SQL query set to build a list of Company Names from the Supplier Lookup Set
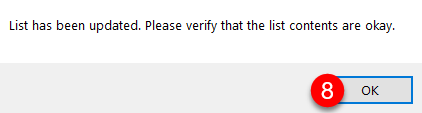
Click OK to complete the set-up
The following message should appear. Select Yes.
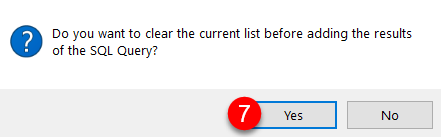
The following screen should appear. Select OK to complete the process.
If you click on the List on the Format tab the list should now appear.

Tip: Simply update the Suppliers Lookup Set when new Company Names need to be added.
The operator will then see the list of suppliers when they are profiling a document…
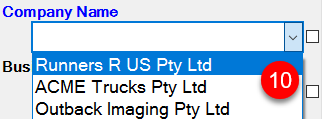
If the list needs to be sorted alphabetically then click on the "Sort List" option on the fields Format tab.
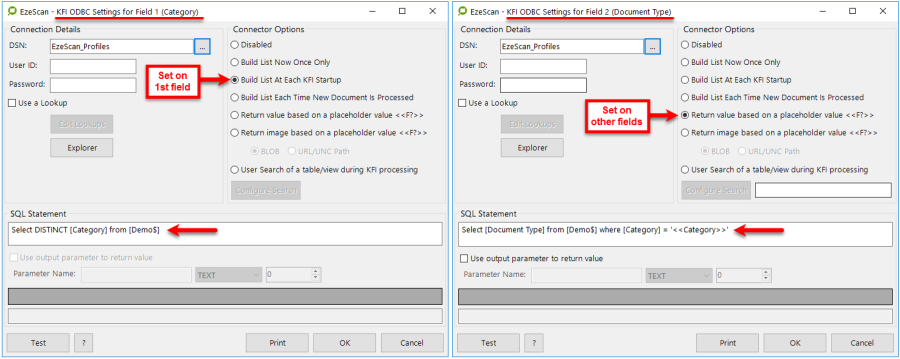
Creating an SQL Statement to Extract Details from the Lookup Set
An SQL statement may be created to extract data out of the Lookup set based on another field's value.
In this example we will find the Company's Business Number using their name which was located by the operator (using the example in the previous section).
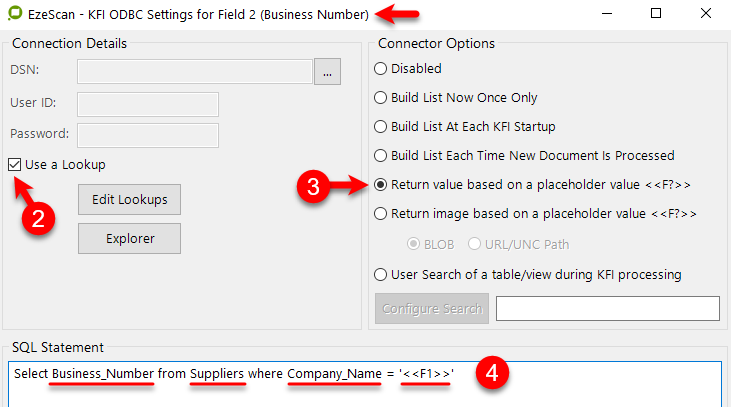
Click edit on the Business Number field and on the Format tab, tick the Populate Using ODBC box then click on the ODBC button.
Tick the Use a Lookup box
Select the Return value based on a placeholder value <<F?>> option
Enter your SQL statement
e.g. Select Business_Number from Suppliers where Company_Name = '<<F1>>'The details in the statement must match the Column headings in the Suppliers Lookup Set.
Tip: When using an SQL query to find details based on a previous field always select the "Return values based on a placeholder value <<F?>>" as shown above.
Click OK to complete the set-up.
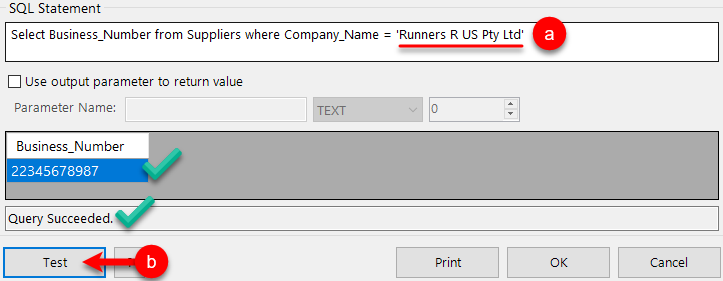
Follow these steps to test the SQL is correct…
Edit the SQL script and replace the <<F1>> with a supplier's name from the list
Select Business_Number from Suppliers where Company_Name = 'Runners R US Pty Ltd'Click on the Test button and the result should display
If this fails then there is probably something wrong in your SQL statement
TIP: Don't forget to change the supplier name used to test back to <<F1>>!!!!!!
Use Search of a Table/View during KFI Processing
This is recommended for very large databases or to allow the operator to search the database.
Tip: This helps the operator as they can search the database from EzeScan instead of having to switch into the native application
Note: A database connection needs to be establised via an ODBC DSN connection. Please discuss this with your database adminstrator as it is sometimes best to have a "view" created to use. EzeScan requires "read only" access.
When selecting the configure search you simply type in the name of the table or view in the "Table or View Name Box"; for example…

Figure 44 - add the Table / View Name into field before clicking on the Configure Search button.
When the table or view name is entered, click the Configure Search button.
The following screen appears…
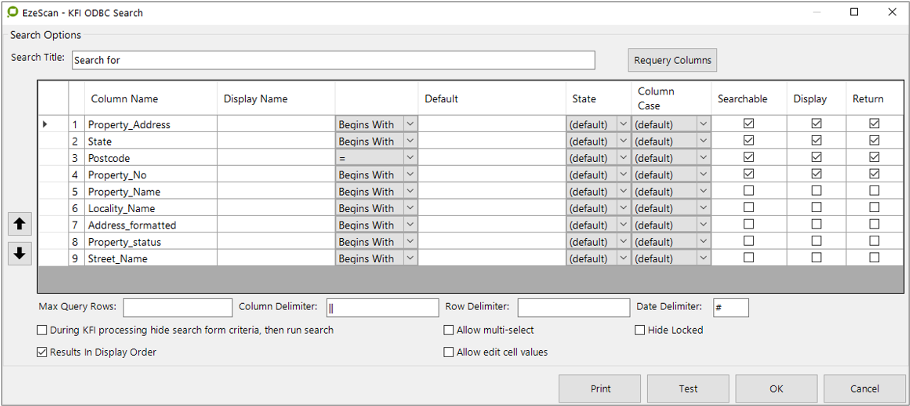
Figure 45 - ODBC search screen for looking up the associated database table/view
The following table outlines the options available in the ODBC search screen:
Search Title | Add some meaningful text here so the operator knows what they are looking for when running the search (Search for is default) e.g. Search for Property Address |
Requery Columns | Figure 45 above shows all available database fields which may be used. |
Column Name | Display the database column names - cannot be changed |
Display Name | Allows the administrator to create their own column names which will appear in the operators search screen. If blank then the Column Name will display. |
Search type | Allows the use of standard search criteria… Begins with (default), Like, Contains, =, <, <=, >, >=, <> |
Default | Permits the use of a default value which would be used when the search is run |
State |
Tip: The user can modify the search/criteria value when "(default)" or "retain" is used. |
Column Case | Permits the use of the text case to be applied when searching… (default), Ignore (Upper), Ignore (Lower), Entry to Upper, Entry to Lower |
Searchable | Will allow the operator to search on this field when the box is ticked |
Display | Will display the search results when the box is ticked |
Return | Will return the values from the search results when the box is ticked |
Max Query Rows | Will only return the number of rows selected. Warning: Setting this to a small number may cause issues with a limited number of values returned - you may not see all results. Only use when necessary |
Column Delimiter | Will place the delimiter between each value. Set to 2 pipes () by default. |
Row Delimiter | Will place the selected delimiter between each row - e.g. ~ |
Date Delimiter | Will place the delimiter between each date value. Set to hash (#) by default. |
During KFI processing hide search criteria, then run search | The search panel is hidden, preventing the user from seeing/modifying the search criteria and the search is automatically executed - but only during actual KFI processing - the search panel is shown and the search must be manually run if launched when editing the KFI config |
Changing the Display order | Allows the sorting of the rows. |
Results in Display order | When ticked will output the results in the same order as displayed on screen |
Allow Multi-select | When ticked will allow the operator to search for multiple values (e.g. 2 names) |
Allow edit cell values | Allow editing of cells in the search results. |
Hide Locked | Hides search criteria rows for entries marked as locked |
When you open the KFI ODBC search screen the three columns at right allow you to choose which data fields can be searched, displayed and returned when the operator processes the KFI profiling field…
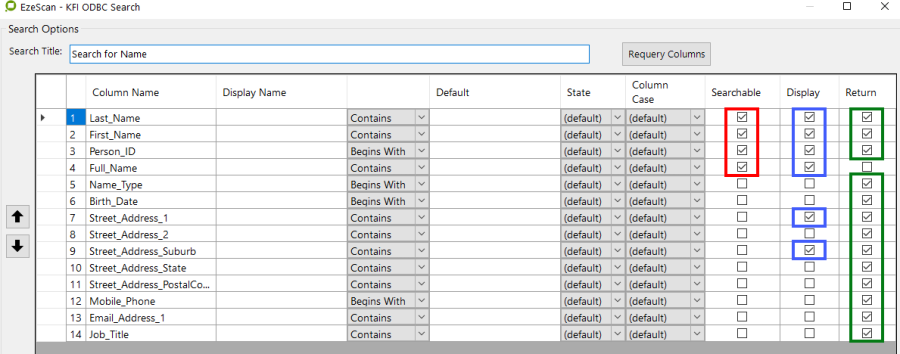
Setting the search, display and return field data
In the example shown above the operator has made their selections:
Red box shows which database fields will be available to search on
Blue box shows which fields are to be displayed in the search result
Green box shows which field data to be returned into the KFI indexing panel.
For example: when the operator clicks on the browse button (F3) the search screen below will appear...

Search screen appears for operator to search for a name
The result will display all of the results set in the "Return" column (as shown in Figure 46 above).

Creating an ODBC Connection to an EzeScan Profiling Spreadsheet
One of the benefits EzeScan can provide is to utilise a spreadsheet (refer to the section on page of the appendices for further details).
Note: To create an ODBC set-up you will need to have "Local Admin" access to the PC.
Follow these steps to facilitate the creation of an EzeScan Profiling spreadsheet.
Create a spreadsheet and save it to a "file share" location.
Save the spreadsheet with a meaningful name; e.g. EzeSca_Profiles.xlsx
Tip: Anyone using EzeScan to profile documents must have access to this location
Create an ODBC System DSN for the spreadsheet using the Microsoft Excel Driver and call it EzeScan_Profiles
Note: It must be a System DSN You will also need "Local Admin" access to the PC to administer it! Use the Microsoft Excel Driver (*.xls, *.xlsx, *.xlsm, *.xlsb)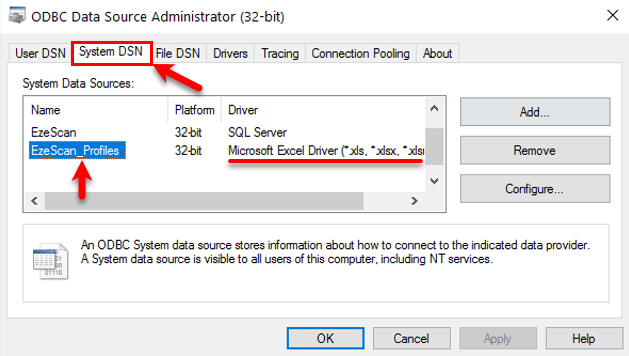
Ensure that it is a "System DSN" and that you use the correct driver
Then set-up the required fields with their spreadsheet SQL Statements.
Display a Browse Form
Use an LDAP Lookup Form
Setting up LDAP
EDRMS tab
To turn on the LDAP (Lightweight Directory Access Protocol) functionality you must first set it up on the field's EDRMS tab using the Alternative EDRMS option.
This then add a new tab to the field tabs called LDAP.

In the figure above it details:
Host | The hostname of the LDAP server. |
Base DN | This is where in the LDAP search is to begin. In an Active Directory environment it is recommended to run the "ldifde -f c:\ldapout.txt" command. |
Authentication Type | Default is Secure |
Username | Enter the username used to log onto the LDAP server. Tip: Leave the field blank to login using the current windows domain logon. |
Password | Enter the password used to log onto the LDAP server. Tip: Leave the field blank to login using the current windows domain logon. |
LDAP tab
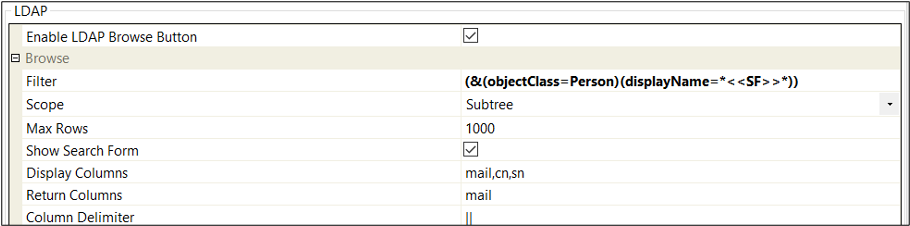
Tick the Enable LDAP Browse Button and then make the necessary changes as required. The settings in the below image are the "defaults".
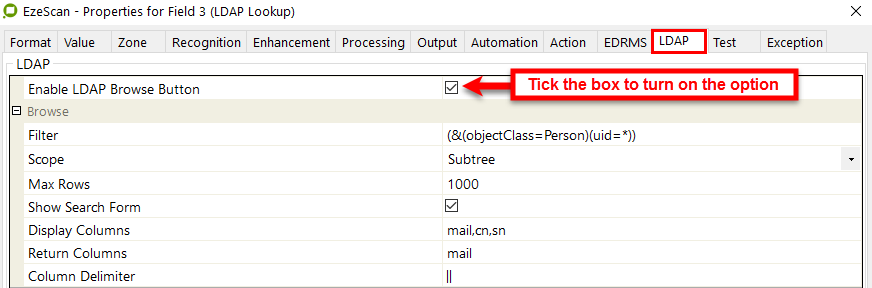
the LDAP browse settings screen (LDAP tab)
Filter | This is the specify what to search for.
Tip: Use the (&(objectClass=Person)(uid=<<SF>>)) setting as it will return users matching the "Search For" |
Scope | There are three scopes available:
Tip: Leave the setting set to subtree |
Max Rows | The number of results to be returned in a search (default = 1000) |
Show Search Form |
|
Display Columns | These are the fields to be returned in the search.Select from the following (separated by a comma - no spaces):
Tip: Leave the default setting of mail,cn,sn |
Return Columns | The field to be return into the EzeScan KFI panel. i.e. if you require the email address to be the field then the return columns value would be mail |
Column Delimiter | If more than one column is required to be returned then a custom delimiter can be used, i.e. a comma, pipe, etc (default = | |) |
Note: LDAP can have many attributes for user objects. Either reference your active directory output file or contact your LDAP administrator for further assistance.
When profiling the operator can either click browse button or press F3 and the LDAP Lookup form will appear.
When the operator clicks the Search button a list of results will be returned on the options that have been set in the KFI Admin Tab.
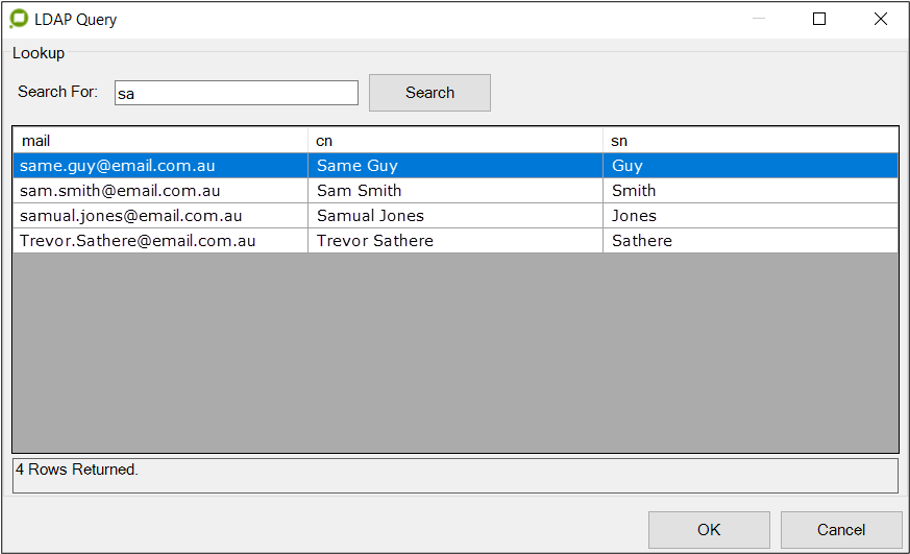
searching for a name containing “sa” using the settings shown below

An example of settings on the EDRMS tab (grey values are dummy)
An example of settings on the LDAP tab
Tip: For troubleshooting or assistance with setting up it is recommended to use the http://www.openldap.org/ community software to assist.
Value Tab
The value tab can be used to extract multiple KFI field and / or system placeholder values into the one field, it can be used to extract specific characters and barcode values from the job level detection.
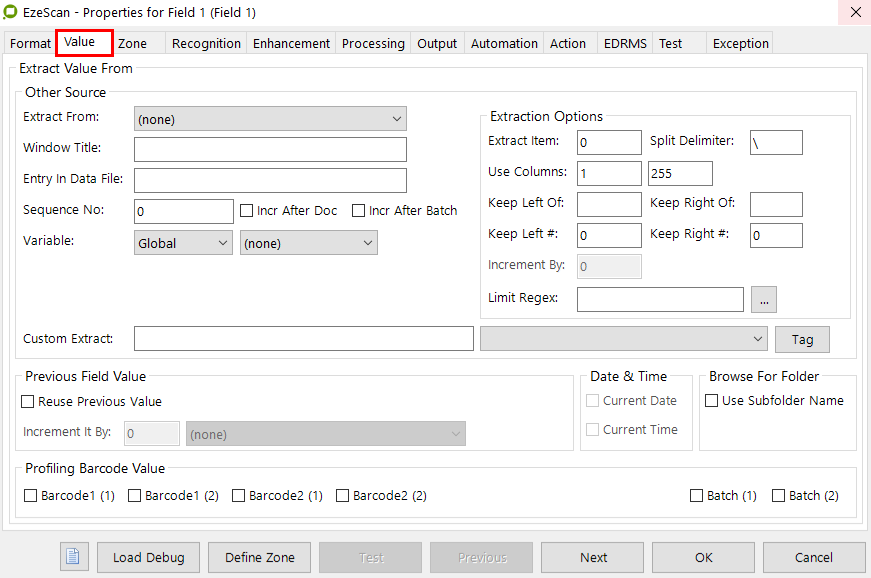
The field’s Value tab
Extract Value From
Other Source section
Extract From
This option allows the acquisition of a field value from a prior field value that has already been populated or a system value (e.g. Job Name) for use in the current field.
Use the pull down list to select the value from which you want to copy the value from.
The image below shows the items which may be selected.
Note: Only fields above the current field will be available to select. i.e. The field to copy from must be before the current field.
The available System Values are explained in the table below.
Pages in Batch | The total number of pages in the viewer (including separator pages) |
Incrementing Document Identifier For Day | This is the daily document counter.
|
Pages in Document | This is the page count of the current document in EzeScan. |
Base Filename + Next Number | This is the current value of the Jobs base file name and next number values.
|
Next Number | This is the current value of the job next number value.
|
Base Filename | This is the current value of the job base filename value.
|
Prompted Index Filename | If the KFI is set to prompt for an index filename, this option can extract this value into a KFI field.
|
Operator Email Address | Obtains email address of logged in LDAP user |
Previous Profiled Record ID | Obtains previous TRIM or DocuShare previous document / record ID |
Unique Doc ID | Used with Batch Doc ID.
|
Batch Doc ID | Obtained from the Barcode Batch Value set in the Admin Form.
|
Batch Prefix + Suffix | Obtained if "Generate Batch & Document Identifiers are enabled in the Options / Jobs tab. |
Batch Suffix Only | Obtained if "Generate Document Identifiers are enabled in the Options / Jobs tab. |
Batch Prefix Only | Obtained if "Generate Batch Identifiers are enabled in the Options / Jobs tab. |
Job Name | Obtained from the Admin Job Name |
Operator Name | Obtained from the logged in User |
Computer Name | Hostname of the PC |
Use Window Title | Extracts a title from another open windows Application |
This option is designed for strings delimited by either a / or a .
| |
Use filepath | This will bring back different values of the file path.
|
Use relative filepath | This will bring back the lowest level subfolder
|
Use filename - ext | This will display the filename with the file type extension. |
None | None is the default value for this field (i.e. nothing will be extracted) |
Window Title
This option allows the operator to define a partial window application title that EzeScan should search for. If found the topmost windows window title is copied into the zone value.

Entry in Data File
This is the column or path to be read from an existing index file. The index file is imported with the image with the Import Folder Mode option at the EzeScan Job level.

For example, if using a simple XML file and an image file you could enter \\ConsID which would extract the ConsID value of 123456 from the below Image: 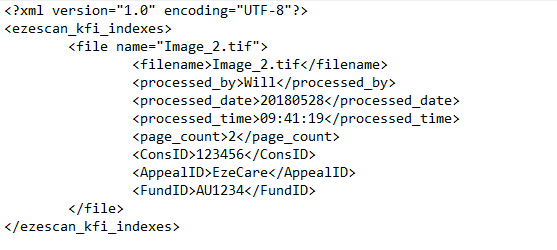 This works because this is a simple XML file and ConsID is the only value with this ID meaning we do not have to specify its location only its name. However if a complex XML file and an image is imported the operator could input the XML path to the value.  |
For example an XST file works with the below syntax:
CODE
The operator would need to put "//entry_1/MetaDataValue" in the field.  When profiling the value "EzeScan" will be returned for this field. |
Sequence No.
This can be a number set as a default for a KFI field.
There are two options available:

Inc after doc: This will increase the sequence number after each document has been processed.
Inc after batch: This will increase the sequence number after each batch has been processed.
Global/Batch Variable

Global Variable
This option is used to read a value from the Global Variable list for use across multiple KFI types. There is 50 global variable values that can be assigned.
For example an operator may have multiple Job/KFI's or a job/KFI that calls a 2nd KFI type.
For example in both KFI's there is a KFI field called "Box Number"
When the operator runs Job A they will put in a value for Box Number. The operator can save the Global
Variable value as an output value, (refer to the "Use Output Value section" on page ) or here in the value tab.
If saved as an output value the Box Number field value is cleared on the 2nd and following documents in the batch. If set in the value tab the value will re appear on the 2nd and following documents in the batch.
Note: When EzeScan is closed the Variable values are cleared.
Batch Variable
This option is used to read a value from the Batch Variable list, except unlike Global variables they are only available for the current KFI, and are reset at the beginning of each new batch.
Custom Extract

This option allows the operator to extract from previous KFI field values and will display them in the current KFI field. For example if Fields 1 and 2 need to be displayed in Field 3, the operator could input "<<F1>><<F2>>" (in Field 3) then when the job is run Field 3 will display the results of Field 1 & 2 in the KFI indexing panel.  |
If the operator requires a mathematical equation, this also can be done. If Fields 1 and 2 need to be added then the operator could input "=<<Field 1>>+<<Field 2>>" (in Field 3) then when the job is run Field 3 will display the total of Field 1 and Field 2 in the KFI indexing panel. Below is an example of adding Field 1 and Field 2.  |
If the operator would like to extract PDF properties the following values can be used.
 |
If the operator would like to pull in a previous field SQL column result the following can be used Where <<F1>> is the field name that is doing the ODBC lookup.  Supplier_Name is a field being looked in up Field 1 |
Tag (EXIF Image Tags)

This option will display a form to allow an operator to select EXIF Image Tags.
The selected tags will be returned into the custom extract option for use in the KFI field.
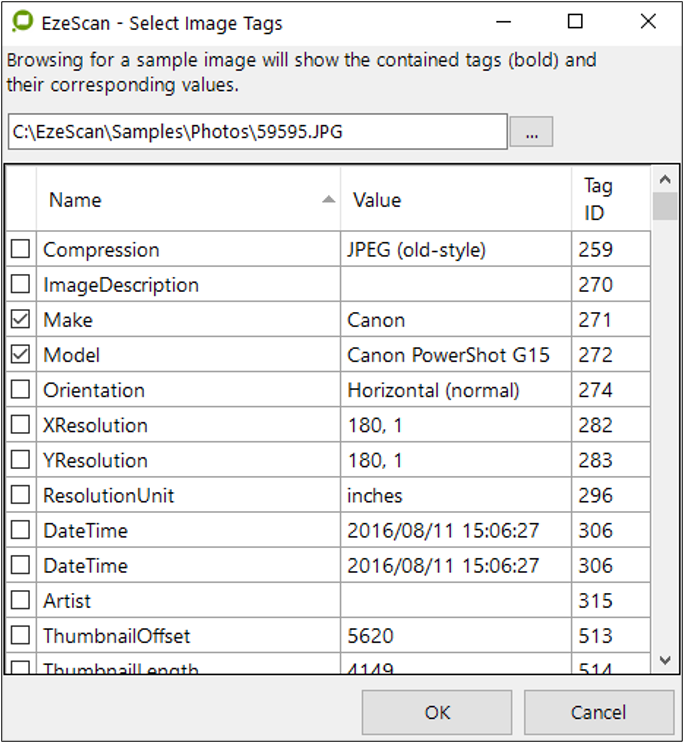
To set this up, click the browse button … and browse to a sample image to be used for the respective job. It will display all the available tags.
Click the check box for the respective tags that are required to be extracted.
Click OK when complete. The selected tag options will appear in the custom extract.

Tip: Using the DateTime or DateTimeOriginal value can be used to retrieve the date and time a photograph was taken.
Extraction Options section
Extract Item, Split Delimiter

This option allows the operator to split the current zone value and extract a particular item based on the item number and split delimiter specified.
For example if we have a value which is 1234-5678-9012 
|
This option can also be used to extract a field value from a document pathname. The following special values can be used when the incoming string is a fully qualified file pathname, and the split delimiter is set to a "\" character:
|
Another example would be extracting a value out of another field which contains the output from a database search (as outlined in the Use Search of a Table/View during KFI Processing section).
The database extract will place a delimiter between each value. This is set to 2 pipes (||) by default.
An example of a returned value is shown below:
Smith||Betty||9011||Person||||2 Blue Street||||BEDROCK||VIC||2442||||||
Where the query returns a NULL value the pipes will appear together - e.g. ||||
Extract Item values are entered as shown in the table…
1 | 2 | 3 | 4 | 5 | 6 | 7 | 8 | 9 | 10 | 11 | 12 |
Smith|| | Betty|| | 9011|| | Person|| | || | 2 Blue Street|| | || | BEDROCK|| | VIC|| | 2442|| | || | || |
We would set our split delimiter to 2 Pipes ||…
If we have Extract Item set to…
1 our value would be "Smith"
2 our value would be "Betty"
5 our value would be "blank" - no value in field
6 our value would be "2 Blue Street"|
Use Columns
This option can be used to further extract the current zone value by extracting only those columns specified.
e.g. if a value is "EzeScan" and the operator wanted to return columns 4 | 7 then "Scan" would be returned; being the 4th to 7th characters.
Keep Left Of, Keep Right Of
The Keep Left and Keep Right fields can be used to help trim the copied value down to a smaller sized string.
For example let's assume that the prior zone contains "1. Tools" but this field only wants the value "Tools".
All we need to do is simply specify a Keep Right string = "1. " for this zone.
Then when the value "1. Tools" is copied from the prior zone, everything to the right of "1. " in the value "1. Tools" will be retained, and hence the value "Tools" will be placed in this field.
Keep Left #, Keep Right #
The Keep Left and Keep Right # allows the value to be copied from left to right. i.e. let's say the KFI value that is extracted is "123456789"

Note: Both Keep Left and Keep Right value cannot be enabled at the same time in one KFI Field.
If Keep Left is set to 4 then the KFI value will be "1234"
The left 4 values are kept
If Keep Left is set to 0 and Keep Right is set to 4 the value will be "6789"
The right 4 values are kept
If Keep Left is set to -4 and Keep Right is set to 0 it will perform the reverse
e.g. keep the left over values. In this instance it will be "56789"
If Keep Left is set to 0 and Keep Right is set to -4 it will perform the reverse
e.g. keep the left over values. In this instance it will be "12345"
Limit Regex
The Limit Regex option uses a regular expression to match and return specific data from the extracted data. Enter a regular expression to match the data you want returned. For example…

\b\d{9}\b would match and return a 9 digit number from the input text as shown at right
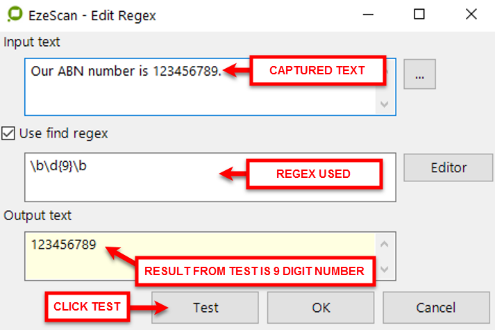
(?<={PREFIX})(.*)(?={SUFFIX}) would return a value that had
{PREFIX} before it and {SUFFIX} after it as shown at right
In this style {PREFIX} and {SUFFIX} are not inclusive meaning we need to match them, but they are not included in the result.
?<= is a positive look behind.
?= is a positive look ahead.
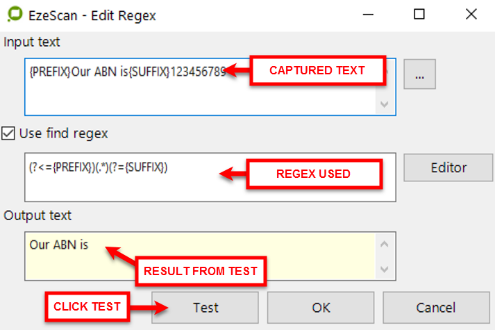
Previous Field Value section
Reuse Previous Value
This option allows a field value to be carried forward from the current document being processed to the next document about to be processed.

Reuse Previous Value - Increment it by:
When used with Numeric Zones the Increment "n" allows the zone value to be automatically incremented by n as it is passed from document to document.
When using a previous KFI field it will append to the value. This will work with numeric and alpha numeric values.
i.e. For numeric, if scanning invoices each invoice has a total.
The operator could have a field called "Running Total"
This KFI field would be set to reuse the previous field of "Total" Every time an invoice is scanned the current total will be appended to the running total.
For Alphanumeric, each value will be appended with a space.
i.e. "value1 value2 value3"
Current Date |  When using a date Field, the Field must be firstly set to " Date" in the format tab. Then in value tab tick "Current Date". The date will be shown in the date format (e.g. DD/MM/YYYY) selected for the zone |
Current Time |  When using a time Field, the Field must firstly set to "Numeric" in the Format tab and the Format type must be set to 99:99 Then in the value tab tick "Current Time". The date will be shown in the format HH:MM selected for the zone |
Browse for Folder
This option allows the operator to browse the windows folder structure. The operator can then select a folder and upon clicking ok the folder name will be returned into the KFI panel.
Profiling Barcode Value section
When using batch scanning with barcoded documents, the value of the admin job document separator barcode can be used as the field value.This also eliminates the need to redetect the barcode again in a KFI field.

Zone Tab
The zone tab is used to define a specific area of the document for viewing or data extraction by using one of the engines in the Recognition tab. The zone will usually have a fixed set of co-ordinates but also can be a dynamic location which is used with the Activate Add Zone Pen feature in the Automation tab.
Zone Location section

Fixed Co-ordinates
Tick this option when you are going to predefine the zone co-ordinates where the zone is located on the documents being processed. This is normally done when processing structured/form like documents.
Dynamic Location
Tick this option to allow the operator to draw then zone whilst profiling.
Zoom in on Dynamic Zone
Tick this option to let EzeScan zoom in on the dynamic zone that the operator has selected.
Do not display the blue zone rectangle
When using a fixed zone this option will not display the blue border around the zone.
Defining A Fixed Co-ordinate Zone
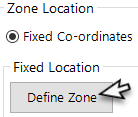
On its own; choosing the Use Fixed Co-ordinates option does not actually create the zone co-ordinates. The Define Zone button does this. Use the Define Zone button to launch the Define Zones form.
Before a Zone can be defined the Template must be implemented.Refer to the Template Tab section on page for details.
The Define Zones form appears as follows:Use the right/left arrow buttons to move to the page in the document where you want to define the zone.Click on the pencil button and then use your left mouse button to draw the zone where you want it on the Image.Once the zone is created use the select button to select the zone, and then drag/resize it as required OR use the right mouse button to delete the zone.Once the zone is positioned properly press the Close button to return to the Zone Tab. You'll notice that this form now displays the page number and zone co-ordinates of the zone you have just defined.EzeScan will now use these L, T, R and B co-ordinates to position the viewer to that area of each form as the KFI operator processes the job.

Override Zone Page
This option (default = 0) allows the operator to select a different page on the scanned image compared to the template. For example, if an invoice has multiple pages the amount will always be on the last page. Setting the Amount KFI Field to -1 (like in the example at right) will set this zone to be on last page of the selected document.

Search To Page Number
This option is enabled when the "Selected Recognition Type" on the Recognition tab is set to Discovery (module licence required).
For example if the zone is set to page 1 and the discovery result is not found, the operator can set to the Search To Page Number e.g. 2 and EzeScan will perform the discovery search up to page 2 to look for a result.
If the operator requires EzeScan to search through the rest of the pages in the current document, then set this to -1.
If the override Zone Page is set to 3 and the Search To Page Number set to 1 it will perform a reverse search. E.g. Search page 3 then page 2 then page 1.
Override the Zone Position by maintaining

Its position relative to the corner
This option is only used when you are scanning documents that are a mixture of A4 portrait and A4 landscape.
The documents have an indexing sticker applied to the bottom right corner of the document.
Because the pages vary between portrait and landscape orientation the zone location is going to move, but it will still be the same relative to the page corner.
Its position relative to the zone
This option will calculate the current zone co-ordinates based from a previous zone co-ordinates.
The operator can also apply the zone to move only horizontally or vertically or both.
Zone Output section
Blackout Zone On first output file
After the zone has been processed, EzeScan will fill the zone (redact) in black.
Blackout Zone On second output file
After the zone has been processed, EzeScan will fill the zone (redact) in black. For example…

Output Zone as Separate Image
When ticked, this option will allow KFI to create a separate image file of the zone.
This file will be placed into the same directory as the image file.
Skip If Image Size In Bytes Is Less Than
If the zone image size is less than the specified size then EzeScan will not output the separate zone image.
Set this to 0 to ignore.
Output Type
Zone images may be saved in BMP, GIF, JPG, JPG2,PDF (image only or text searchable), PNG or TIF format.
Output Path
Zone images can be saved to an alternative output directory.
File Name
By default the separate image file will be named as filename_ZXX.YYY where…
filename = the image filename
XX = the zone number
YYY = the file format selected from the list below.
The operator also has options to name the file the current field value or use a custom name by choosing the placeholder values from the drop down to list to right.
Edit Image In Secondary Viewer
This option will allow the operator to display the document in another viewer for editing. The document can have the brightness adjusted, crop and crop border applied.The operator can then press the save button to apply the changes.
Expand Zone Image Area To Whole Page
This will override the zone area and use the whole page to be displayed in the secondary viewer.
Secondary Viewer Caption
The operator can enter a custom caption which will appear on the top left of the screen.
By default it displays "EzeScan - Secondary Image Viewer"
Zone Border Offset
This will display the zone into the secondary viewer either zoomed in or out.
Setting to a minus value (e.g. -10) will zoom out by 10 pixels.
Setting to a positive value (e.g. 10) will zoom in by 10 pixels.
Setting to 0 will ignore the option and display the zone as per the co-ordinates specified.
Recognition Tab
This tab enables the operator to perform recognition on an image.The options below detail how to configure and extract the data from the respective engine.

Perform Barcode Recognition - BCR
BCR will send the zone image to the Bar Code Recognition engine.
We recommend scanning barcoded images at a minimum of 300 dpi.Poor quality images may result in a higher level of barcode recognition failure.
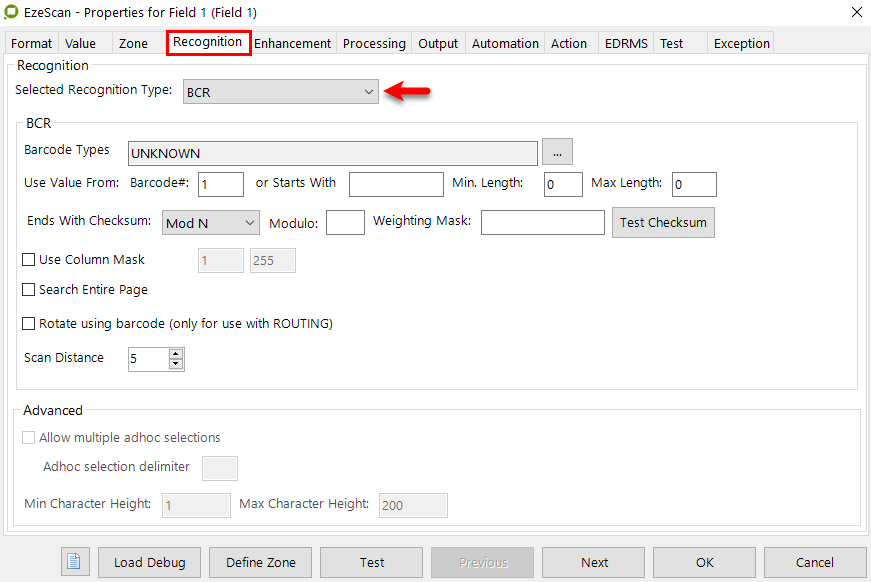
BCR options
Barcode Type | Select one of the supported barcode types from the list. | |
ADD 2 | ADD 5 | |
AUSTRALIAN POST 4 STATE | AUSTRALIAN POST 4 STATE CUSTOM ALPHA | AUSTRALIAN POST 4 STATE CUSTOM DIGITS |
BCD MATRIX | CODABAR 2 | CODE 128 |
CODE 32 | CODE 39 | CODE 39 EXTENDED |
CODE 93 | DATALOGIC 2 OF 5 | DATAMATRIX |
EAN 13 | EAN 8 | IATA 2 OF 5 |
INDUSTRY 2 OF 5 | INTERLEAVED 2 OF 5 | ONE CODE |
PATCH CODE | PDF417 | POSTNET |
QR | ROYAL MAIL 4 STATE | UCC128/EAN128 |
UPCA | UPCE |
If unsure then use the unknown option; or to find out the barcode type…- import a template image with the barcode on it, (refer to the Template Settings section on page )- Select "Search Entire Page" and then click the test button.It will return the Barcode Type in the Test Tab.|
Use Value From Barcode #

EzeScan can read up to 30 separate barcodes within one zone. If there a multiple barcodes in the zone specify the barcode number (starting from top to bottom numbered from 1 to 30) you want to read. If the operator does not want to specify a barcode number the "Starts with" option can be used. i.e. if the barcode starts with "000" EzeScan can find that barcode. A minimum and maximum length can also be set for the barcode value.
Ends with checksum
If using a barcode that contains a checksum character as its last character, EzeScan can check that the value is correct. The operator will need to enter the modulo number and the weighting mask used to create the barcode. If the modulo result calculated by EzeScan does not match the checksum value indicated by the last character in the barcode, EzeScan will ignore the barcode.
Please refer to the Checksums Explained section on page for further details|
Use Column Mask
Use this option to extract a value from within the barcode value.
The value extracted will start at the starting column and end at the ending column.Search entire page
Use this option to force the barcode search engine to look anywhere on the page for the barcode, thereby overriding the zone location specified by the operator.
Rotate Using Barcode (only for use with ROUTING)
Use this option only when using KFI within ROUTING.
This option will force the ROUTING engine to rotate the document to match the orientation of the barcode.Scan Distance
Default set to 5. Reducing this value can help in finding barcodes which are short relative to their height. Values 1 through to 10 may be used.
Perform Magnetic Ink Character Recognition - MICR
The MICR module is a separate module that can be licensed on top of the KFI module.Please contact your EzeScan Sales representative for details.
When ticked, this will send the zone image to Magnetic Ink Character Recognition engine.
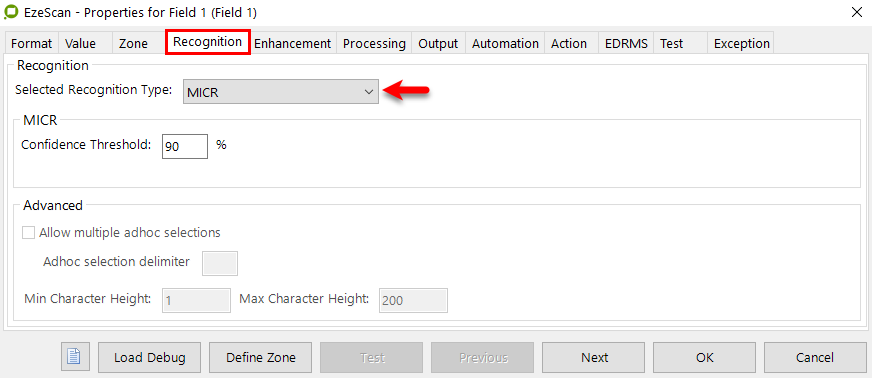
We recommend scanning MICR images at a minimum of 300 dpi. Poor quality images may result in a higher level of recognition failure.
MICR Options
Confidence Threshold % | Default = 90% |
Advanced | Used by other options - is "greyed out" and not used by this option. |
Perform Discovery Recognition
The DISCOVERY module is a separate module that can be licensed on top of the KFI module.Please contact your EzeScan Sales representative for details.
The DISCOVERY module is used to search for data by defined expressions or keywords.This module is primarily designed for supplier invoices but can be used for other documents that have structured values on different parts of the page.For example, a supplier invoice may usually contain the following fields. Invoice number, purchase order number, date and amount.With the above examples they would also appear in certain areas of the page. The issue is that different organisations will always have these fields in different areas so a precise zone cannot be set. The Discovery module can look for a result in four ways:
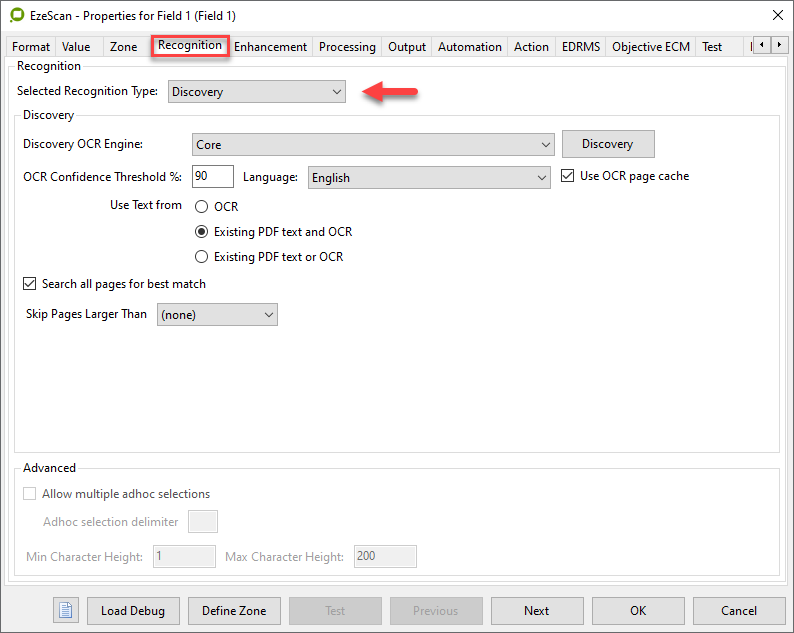
Expression Search - This would use a regular expression. It is designed for structured values e.g. a Date or Business Number. e.g. For Date it could be "DDMMYY, DD/MM/YY, DD/MM/YYYY, MMDDYY, DD-MM-YY, etc.
Keyword Search - e.g. For Invoice Number it could be a string of terms such as "invoice number, invoice no, invoice #,invoice:,Inv #, etc
Item Search – This can help with currency amounts. A tax rate can be applied and it can look at values on the document to compare if a gross, net or tax amount.
Position Search - This will search from the top or bottom of the image looking for the specific word type, e.g. a currency or date format word.
The discovery search options can be configured to search in any specific order. These are
configured as profiles and explained below.
Please contact your EzeScan support representative for assistance with expression searches.
OCR Engines
The drop down list will display the available OCR engines that can be used.
Core (recommended)
Alternative (this engine requires the ICR module license)
OCR confidence threshold
This is the OCR % confidence level to use when using discovery fields with automation. If the OCR confidence is met the field can automatically process and move to the next field.
Please refer to the option Automatically move to the next field after successfully processing this field on page for further details
If the confidence is not met EzeScan will not display a result to the operator.
Language
This option is to set the OCR engine to OCR different text languages.
Use OCR page cache
When enabled, this will force EzeScan to perform a full OCR on the page (if no cache exists). However if the cache does exist, EzeScan will extract the OCR word results for the current fields Zone from the cache. The page cache option will increase the operator indexing ability as it does not need to spend time to do OCR on each KFI discovery field.
If the Use OCR page cache option is disabled on a discovery field, EzeScan will perform a new OCR on the field zone.
The cache option is supported with the "Core" engine only.
USE TEXT FROM
OCR
This option will run OCR over the document no matter if a digitally born PDF or not.
Existing PDF text and OCR
This option will extract the PDF text (if the PDF is digitally born) and OCR. It will compare the results for use.
Existing PDF text or OCR
This option will skip performing OCR on the page (if the PDF is digitally born) and use the text layer. If no text layer is found then OCR will be used. SEARCH ALL PAGES FOR BEST MATCHThis will make EzeScan goes through all pages of the document to find a match. SKIP PAGES LARGER THANThis will allow EzeScan to skip the OCR for over the set page size. For example it may be a large plan or photo where the OCR is not required to run. Clicking on the Discovery button will display the form below…
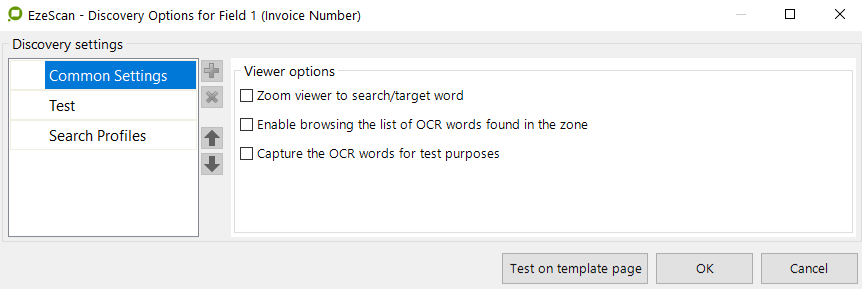
Common Settings
The viewer options may be selected
Zoom viewer to search/target word (off by default )
If selected , it will zoom to the targeted text area in the KFI preview window
Enable browsing the list of OCR words found in the zone (off by default )
If selected , it will display a list of OCR words found in the zone
Capture the OCR words for test Purposes
If selected , allows the captured OCR words to be used when running the testing function
Search Profiles
When the button is clicked a new search profile will be created, as shown below. Multiple search profiles may be created and Discovery will run through each one starting at the 1st profile in the list. The profiles may also be given a specific name. In the following tabs the operator can use different methods to find a specific value, such as…

Condition (set whether to run or not based of previous field data)
Search zone size (which part of the page to search - full; top ½, bottom ½etc)
Pre-Processing
Search settings
Skip content
Pre-validation
Validate words by (e.g. currency, date, custom etc)
Condition Tab
This option will allow the operator to configure the profile to run on a condition. For example if <<F1>> is X then run. By default a profile will always run unless a condition is http://set.It is possible to set a condition on the page OCR text or can set using the operators below based on a KFI field value.
Search Zone Size tab
This option will allow the operator to set a fixed zone, dynamically expand to a specific portion of the page or set a custom search area.
Fixed
The fixed options are:
Fixed If using a fixed area the operator will be required to define the zone in the define template tool.They would click the Define Zone button on the properties of the KFI field, select the Pencil icon and draw the required area over the image.Then Click Close to return back to the KFI field properties....
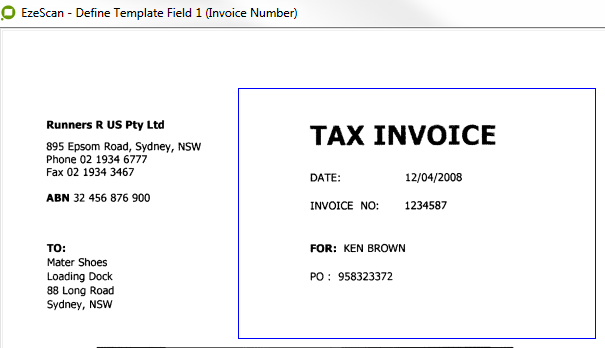
Fixed Relative to CornerThe fixed relative to corner option will dynamically move the zone to the closest corner of the scanned document.
Expand
Selecting an expand option means that the operator is not required to define a zone. The expand options will dynamically use the area on the scanned document. This option is recommended is using different paper sizes as it will always capture the same area, e.g. the top half of the page.The expand options are:
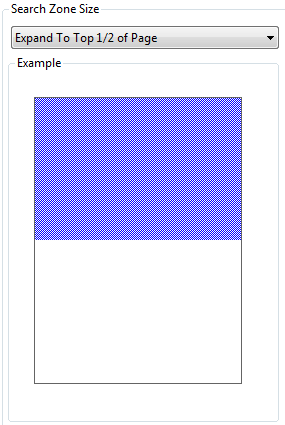
Expand to Whole Page
Expand to Top 1/3 of Page
Expand to Middle 1/3 of Page
Expand to Bottom 1/3 of Page
Expand to Top 1/2 of Page
Expand to Middle 1/2 of Page
Expand to Bottom 1/2 of Page
Expand to Top Left 1/4 of Page
Expand to Top Right 1/4 of Page
Expand to Bottom Left 1/4 of Page
Expand to Bottom Right 1/4 of Page
Expand to Custom Area
When an expand option is set, EzeScan will show an example of the selected area. e.g. this is "Expand to Top 1/2 of Page"
If the operator selects "Expand To Custom Area" it will enable the Search Zone Height and Width options.For example if the Operator wanted to search on the bottom 20% and the bottom right 40% they would input 80% in the Top option as this would only go 20% up and they would input 60% in the left option as this would only go 40% right. Below is the resulting area.
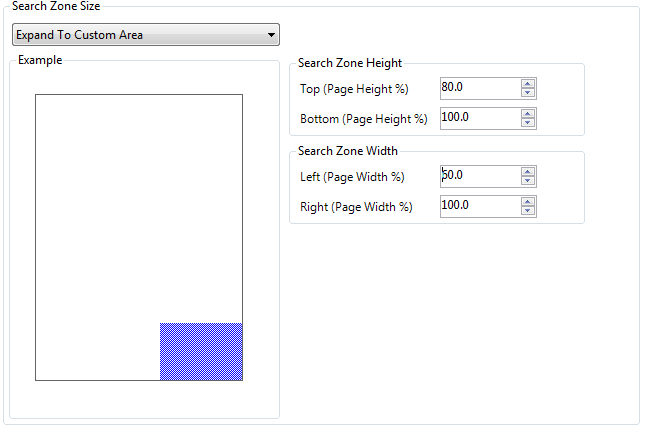
Pre-processing tab
This can be used to clean up the OCR'd data prior to processing; for example changing INV to Invoice
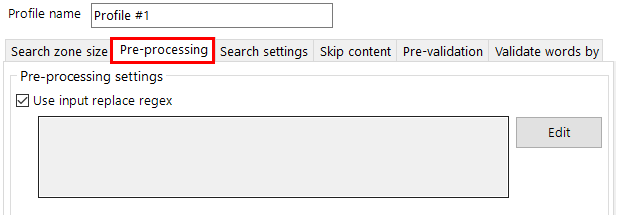
Refer to the Regular Expressions section on page for further details about using regexes.
Search Settings tab
Search using the "Content Simple" option
This option is typically used to bring back results from an ODBC source and then used to attempt a match on the document. Typically results will be delimited with a space but it can also support pulling from previous KFI fields and the "split search strings using these characters" can be utilised to break a value into multiple. E.g. Invoice_12345 can be split to "Invoice" and "12345" Populate Strings Using ODBCThis will allow the use of looking up the search values from a database.e.g. search for all open order numbers where supplier number is ='<<F1>>'This will then return all the results into the simple string search box http://below.In the example below a SQL select statement is querying for all open orders for the supplier value in the KFI Field 1 value. (e.g. KFI Field 1 is Supplier Name) The results will then dynamically update at runtime.
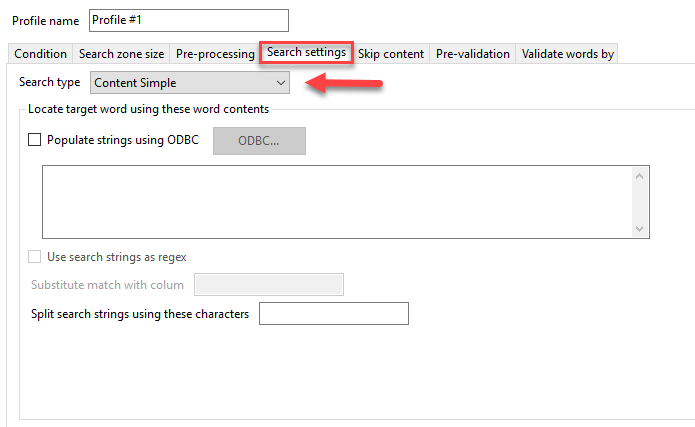
Search using the "Content Advanced" option
The Advanced string search utilizes regular expressions (Also known as a Regex). A Regular expression is a flexible mean of defining a particular word, character or pattern of characters.
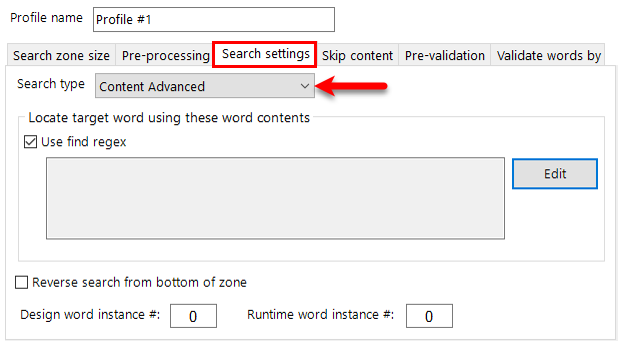
Refer to the Regular Expressions section on page for further details about using regexes.
to find the word "car" as its own word the Regex would be "\bcar\b"
to find a 3 digit number as its own value the Regex would be "\b\d{3}\b"
to find a value that contains at three to nine digits the Regex would be "\b\d{3,9}\b"
The operator would place this Regex value in the Find Regex box like the example shown at right
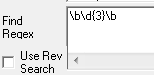
There are books and information available on the internet with regards to Regular Expressions, please refer to them for assistance in creating your required Regex.
An example of a "Content Advanced" search is shown below:
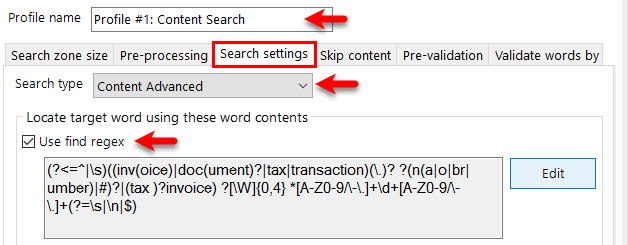
Search using the "Search Terms" option
In this box the operator defines the search terms for the discovery zone. For example if it is an invoice, many suppliers may define the invoice number differently. Therefore the operator needs to type in these different terms. e.g. Invoice, Invoice No, Inv no; Invoice # Clicking on the Edit button will display a form which may be used to add new word terms. Click on the + button to add and - button to remove the values.You can change the order of words in the list using the arrows.The search terms are not case sensitive.
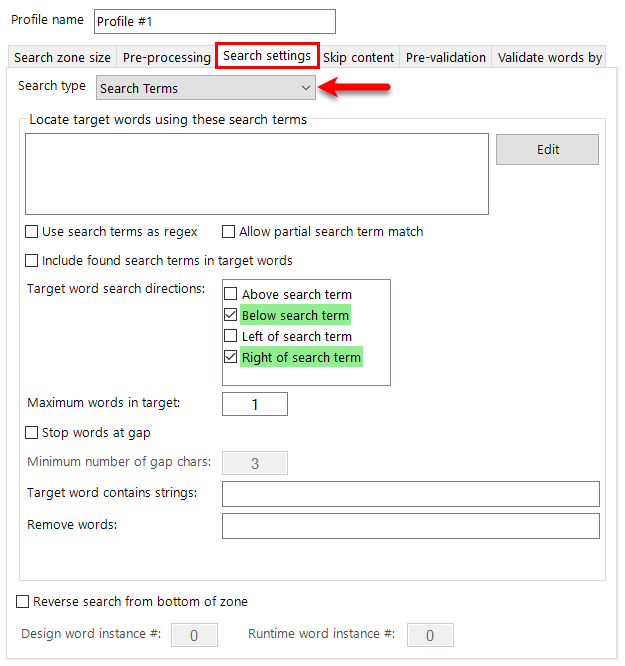
You can also manually add/change text. Just ensure that each term must be separated by a comma with no spaces.
There are various options which may be applied:
Use search terms as regex | Ticking this box will launch the "Regex" box when the Edit button is clicked |
Allow Partial search term match | If a partial search term has been found EzeScan will process it as the word |
Include found search terms in target words | This will include the search term in the result. e.g. if the word "Invoice" was the search term, the result would be "Invoice 1234" |
Target word search directions | This will set where EzeScan will search for the target words. 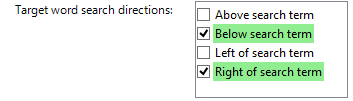
|
Maximum words in target | This is the number of words to display from the search term. |
Stop words at gap | If the search result is in a format where there are spaces i.e. xxx xxx xxx EzeScan will process these as single words. |
Minimum number of gap chars | Is activated when the Stop words at gap box is ticked
|
Target word contains strings | The operator can specify strings that would need to be in the search result. e.g. for a Currency field use $ or for a date field use / |
Remove words | This will remove words that are found in the result. |
Reverse search from bottom of zone | When ticked will start the search (in reverse) from the bottom of the OCR results upwards |

Search using the "Invoice Items" option
This option will allow searching for the selected invoice total type values based upon the tax rate percentage provided.EzeScan looks at all numerical values in the zone and then performs equations to determine which currency value is the Net, Tax or Gross total.
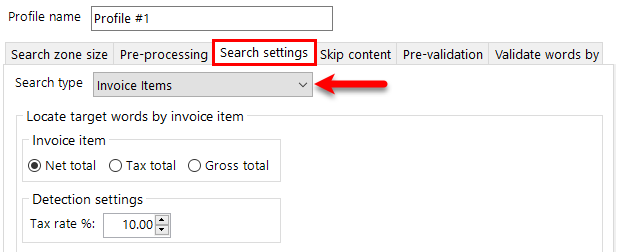
Net Total | The total amount of the Invoice excluding GST |
Tax Total | The total amount of GST. Set the GST rate that applies |
Gross Total | The total amount of the invoice Including GST |
Tax Rate % | This is the variable amount of tax charged. This value will assist in determining which currency value is the total. |
When using this search method, if one of the three total values are not on the invoice then results may not be returned.
Search using the "Word Position" option
This option will allow searching for target words using specific settings.
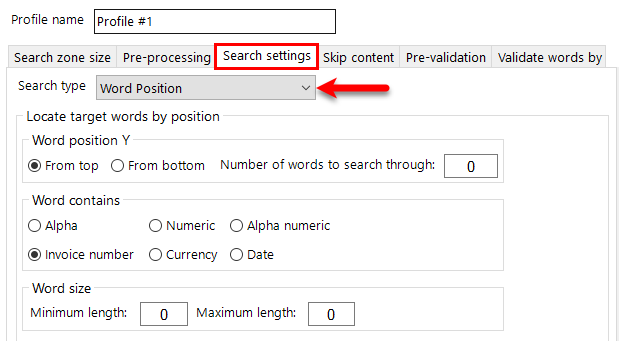
Word position Y |
|
Word contains |
|
Word size | Sets the minimum and maximum number of characters to be captured
|
Skip content Tab
The "Skip content" function provides the options to exclude text in the captured area to be excluded from the results, or "skipped".One profile could be set to skip content using a "find/limit" regex like below; which is being used to skip words such as customer, order, contract etc

Refer to the Regular Expressions section on page for further details about using regexes.
A second profile could be set to skip content using a string like below
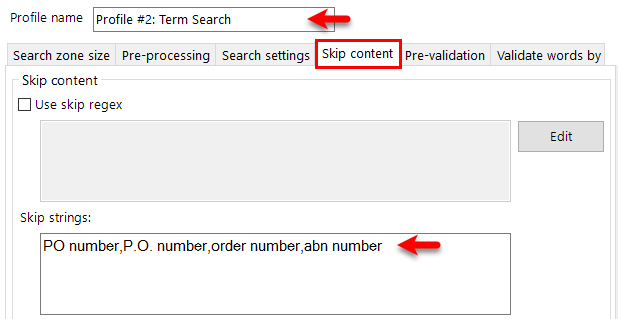
Pre-validation Tab
These settings allow to manipulate the value after it has been found. e.g. Remove specific words and also options to append and prepend data. Example Find / Replace regex to "pre-validate" text strings for processing by Discovery.For example: Example of appending the current date to a value (Supports <<S>> and <<F>> placeholders).
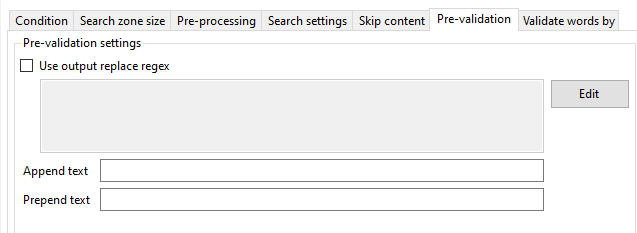
Validate words By Tab
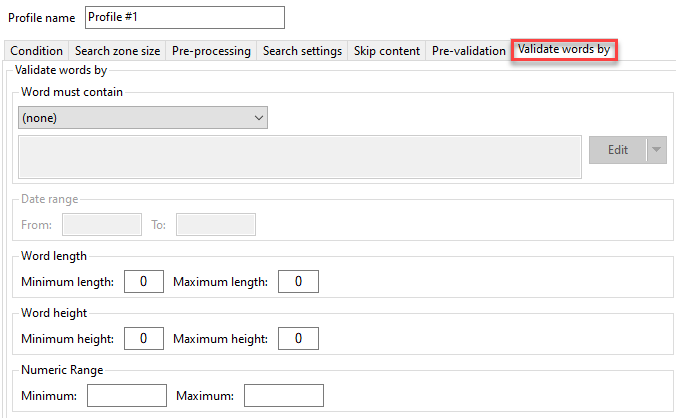
Word Must Contain:
Ignore | EzeScan will process the field and not apply any filters |
Alpha | Alpha words will be returned. e.g. ABC |
Numeric | Numeric words will be returned. e.g. 123 |
Currency | Currency type words will be returned. e.g. 123.00 |
Alpha Numeric | Alpha Numeric words will be returned e.g. ABC123 |
Date | Date format words will be returned. e.g. 20/02/2008, 20-02-2008 |
Business Registration Number | This option performs a modulo check to ensure the number meets the respective standard. The following are supported
|
Custom | Allows for a regex to be entered for a custom value |
Date Range | When 'Word Must Contain' is set to 'Date' this option will allow the Input of a standard date range (e.g. From: 01/01/2012 To: 31/12/2012) or a preceding type code (D=Day, M=Month, Y=Year) used to calculate the expected date based on the current date. |
Word Min Length | This is the minimum length of characters that the search result will allow |
Word Max Length | This is the maximum length of characters that the search result will allow |
Word Min Height | This is the minimum height (in pixels) of the character to be found |
Word Max Height | This is the maximum height (in pixels) of the character to be found |
Other Options
Zoom Viewer To Search/Target Word | When profiling the viewer will zoom in to the search result |
Enable browsing the list of OCR words found in the zone |  When profiling this will allow the user to click the browse button or F3 button to display the list of search results found in the zone |
Capture The OCR Words For Test Purposes | This will create a file called "Discovery_OCR_Result.txt" in the EzeScan Cache folder. It can then be later used with the Regex edit option in the "Find Word(s) by Content" tab to test with different regular expressions |
Reverse search from bottom of zone | This option will start searching for results from the bottom of the OCR list |
Design word instance # | If your regex contains multiple words this is the word number to return |
Runtime word instance # | This feature works with the design word Instance. |
Allow word instance to span pages | This will make EzeScan search through all pages (of the current document) before choosing a design/runtime word result. |
Filter Results Tab
This option is used for when finding date field values. A discovery profile may find more than one date in the defined zone and the operator may want to filter out dates. The operator can choose:

None: will use the first result
Newest Date Only
Oldest Date Only
Perform Optical Character Recognition - OCR
Selecting this recognition type will allow OCR recognition to be performed on the KFI field.OCR settings can be adjusted to improve confidence levels therefore higher OCR results.The OCR can be configured as a fixed zone or a dynamic zone which uses the Zone Pen to allow the operator to select an area on the document to OCR. There are three different OCR engines available in the pulldown field:
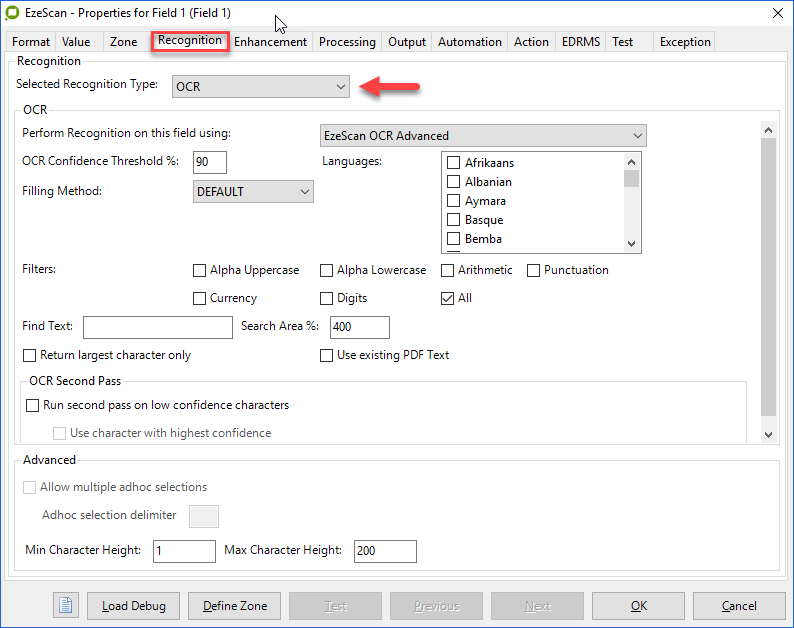
EzeScan OCR | This is the standard OCR engine in EzeScan |
EzeScan OCR Advanced | This is a newer OCR engine. It is faster and has better OCR results. |
OmniPage Pro 16 & 17 Office Edition | OmniPage Pro 16 & 17 is not supplied with EzeScan. It needs to be purchased separately. |
OCR Options
OCR Confidence Threshold % | If the operator is automatically moving through fields then for it to successfully move to the next field it must meet the confidence level.
|
Filling Method | This will set the OCR Engine on what typeface characters to search for.
|
Filters | Choosing the character processing filters sets the OCR recognition engine to only process characters which meet the selected options.

|
Find Text | This option allows the operator to specify the text that the zone should contain. |
Return largest character only | This option will return the largest character from the OCR result list. |
Language | This option is to set the OCR engine to OCR different text languages.
|
Use existing PDF Text | This option will skip performing OCR on the page for if the source page is from a PDF with a text layer. For example a PDF that has been digitally created, e.g. from Word > PDF. |
OCR Second Pass | Run second pass on low confidence characters
|
Advanced | Allow multiple adhoc selections
|
Min Character Height | Default = 1 |
Max Character Height | Default = 200 |
Perform Intelligent Character Recognition/Optical Character Recognition - ICR/OCR
Selecting this recognition type provides additional functionality to the recognition process by allowing the recognition to be set to:
Intelligent Character Recognition (ICR) for handwritten text
Optical Character Recognition (OCR) for typed text
Both ICR and OCR
If using OCR in this section the EzeScan ICR option must be http://purchased.It is recommend to use the OCR option which is detailed in the Perform Optical Character Recognition - OCR section on page .
When the ICR/OCR option is selected, this will send the zone image to the configured ICR engine.
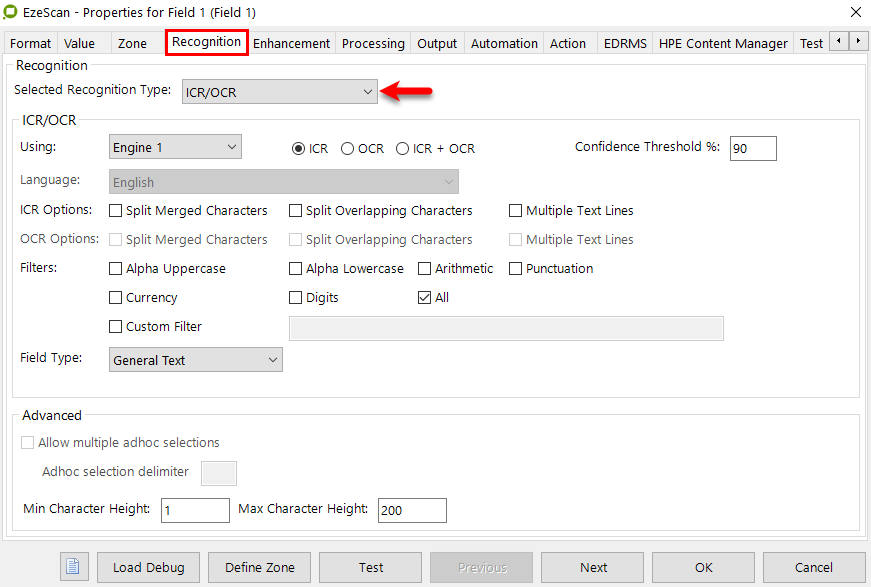
We recommend scanning handwritten images at a minimum of 300 dpi, preferably 300 dpi. Poor quality images may result in lower levels of ICR/OCR accuracy.
ICR/OCR Options
Using Engine 1 |  Has options to use ICR, OCR, or both ICR+OCR Choose whether the zone is OCR (typed print) or ICR (handprint) |
Using Engine 2 |  Has ICR option only |
Confidence Threshold | Sets the ICR/OCR recognition engine confidence threshold. |
Language (engine 1 for OCR only) | This option will set the OCR engine to a specific language. |
ICR Options | Available when the ICR option is selected 
|
OCR Options | Available when the OCR option is selected 
|
ICR & OCR Options | Both of the above settings are available when the OCR + ICR option is selected 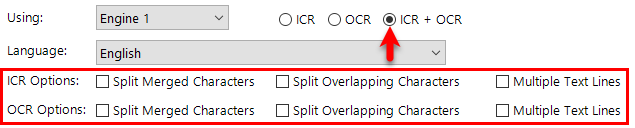
|
Filters | Choosing the character processing filters sets the ICR/OCR recognition engine to only process characters which meet the selected options.
|
Field Type | 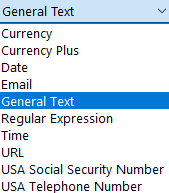 Default = General Text These options assist the engine to look for particular types of values |
Advanced | Used by other options - is "greyed out" and not used by this option. |
Min Character Height | Default = 1 |
Max Character Height | Default = 200 |
Perform Optical Mark Recognition - OMR
Optical mark recognition (also called optical mark reading and OMR) is the process of capturing hand-marked data from document forms such as surveys and tests.
The example below is a menu form.
Each day is a "Group" and each group has 15 OMR fields.
the ticked/checked box will return a 1 (hit)
the blank boxes will return a 0 (miss).
Selecting this recognition type will send the zone image to the OMR Recognition engine.
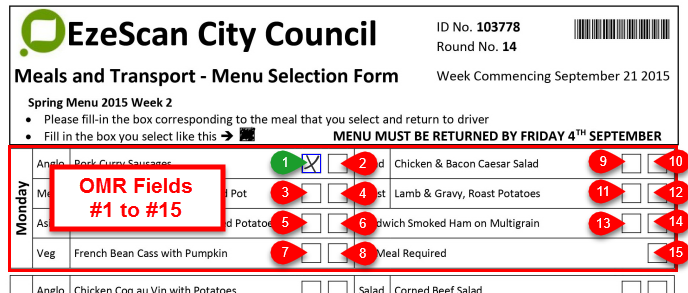
We recommend scanning OMR images at a minimum of 200 dpi, preferably 300 dpi.Poor quality images may result in lower levels of OMR accuracy. OMR Zone settings can be applied at a field level or a page level.
If the form contains many OMR zones it is advisable to set OMR settings in the template define tool.
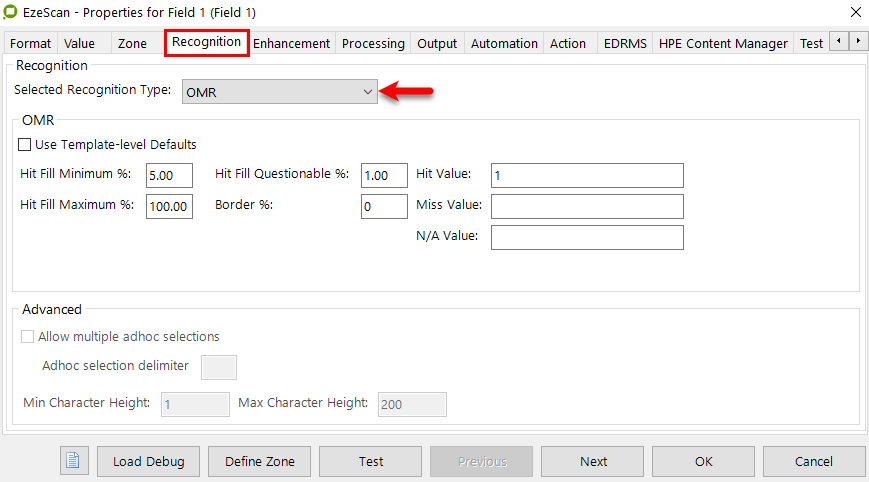
OMR Options
Use Template-level Defaults | If the "Use Template-level Defaults" box is ticked the default OMR values will be used. |
Hit Fill Minimum % | This is the minimum percentage of black fill that is considered to represent a hit in this zone. |
Hit Fill Maximum % | This is the maximum percentage of black fill that is considered to represent a hit in this zone. |
Hit fill Questionable % | The questionable percentage is a tolerance factor that is used to decide how accurately the zone fill has been calculated.
|
Border % | If the OMR zone has a black box a border should be applied. i.e. a zone without a hit may have a 10% fill without a mark.
|
Hit Value | This is the value the operator wants to output as the hit value. |
Miss Value | This is the value the operator wants to output as the miss value. |
N/A Value | Enter the output value that will be used when the zone is not applicable. 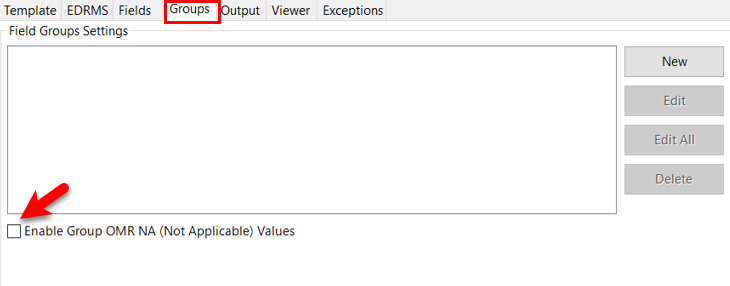
|
Advanced | Used by other options - is "greyed out" and not used by this option. |
Enhancement Tab
The field enhancement options may be used to clean-up or enhance the zone image before that zone is sent to a recognition engine.The order the enhancements are to run can also be set with the arrows on the right hand side of the form. The 'Reset Order' button can also be used to reset form to default settings.
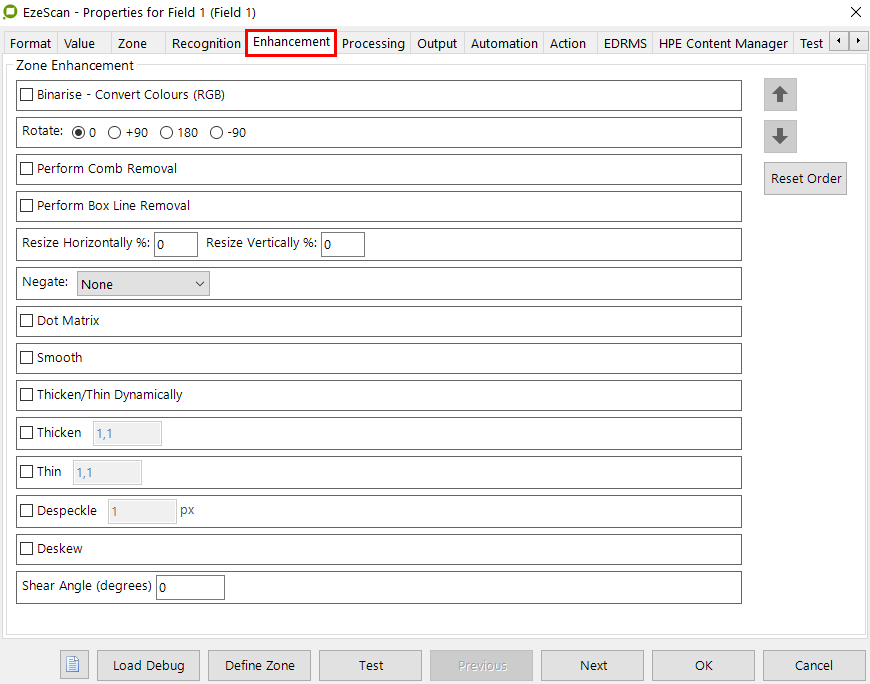
All of the Zone enhancement options are "off" by default.The following table covers what the options are expected to do if they are turned "on".
Enhancement tab options
The options work as follows:
Binarise - Convert Colours (R,G,B) | This option is to help an EzeScan engine get better accuracy on certain images that may contain certain colours. This option is off (unticked ) by default and will leave an image as is. e.g. if the image is colour it will extract in colour Ticking the option will allow the operator to change RGB values. 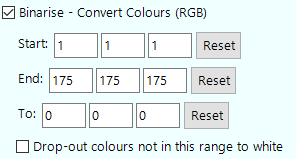
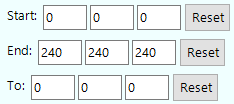
|
Rotate |  Will rotate the zone by the slected angle. Default is 0 i.e. the zone is not rotated |
Perform Comb Removal | This option should only be used when the ICR zone actually contains character combs below the zone data. The operator can specify the… 

|
Perform Box Line Removal | Used in conjunction with OCR or ICR recognition technology, to remove the black box either around individual characters or a whole word. The operator can adjust the following to discern the best results: Min Horizontal Line Length 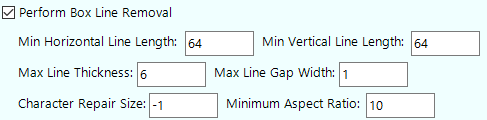

|
Resize Horizontally |  Will resize the zone X% in the horizontal direction only. Useful when you want to shrink or stretch the zone horizontally before it is sent to the recognition engine. Default is 0% |
Resize Vertically |  Will resize the zone Y% in the vertical direction only. Useful when you want to shrink or stretch the zone vertically before it is sent to the recognition engine. Default is 0% |
Negate | Will negate the zone contents. 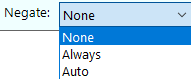
|
Dot Matrix |  Will enhance Dot Matrix characters |
Smooth |  Will smooth any text found in the zone |
Thicken/Thin Dynamically | Will thin and thicken the zone. It works in conjunction with the ICR engine. It will perform three tasks 
|
Thicken | Thicken uses dilation to thicken the areas around black pixels. 
|
Thin | Thin uses erosion to thin the areas around black pixels. 
|
Despeckle |  Will remove isolated pixels that are up to N pixels in size. Default is 1 px |
Deskew | Will deskew the zone. It straightens the image. |
Shear Angle (in Degrees) |  Will shear the zone by a degree percentage. This can then assist the OCR engine to correctly extract a character or word Default is 0 degrees |
Processing Tab
The processing tab will run tasks during KFI indexing on the respective field. If the operator was to set to remove a character or replace a value with another they will be shown to the operator.
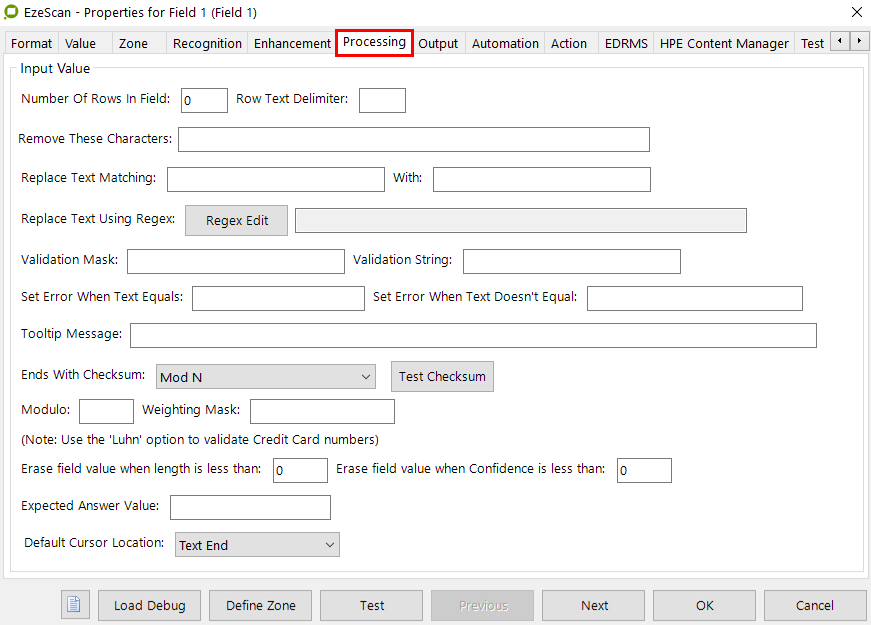
Processing tab options
The options work as follows:
Number of Rows in the Field | When performing an OCR on a multi row zone, only n rows from the zone may be required. |
Row Text Delimiter | Will put in a delimiter when there is a new row in the OCR result.i.e. If a zone has two rows of data, a delimiter will be put in at the end of the first row. |
Remove These Characters | Allows the operator to remove unwanted characters from the zone input data.
|
Replace Text Matching | Allows the operator to replace one string in the input data with another string.
|
Replace Text Using Regex | Used to clean up captured text to meet the process's requirements
|
Validation Mask | Allows the operator to apply a validation mask to the input data. For example:
|
Validation String | This option can be used if a specific string value is required during the KFI field being processed. For example:
|
Set Error When Text Equals | Use this option when the operator wants to move an image to an exception job automatically when it matches the value entered. For example…
|
Set Error When Text Doesn't Equal | Use this option when the operator wants to move an image to an exception job automatically when it does not match the value entered. For example…
|
Tooltip Message |  The operator can specify a message to be displayed in a KFI field. The message is displayed in brackets like shown at right has Use DDMMYYYY applied in the tooltip message field The tooltip message can also be a previous SQL lookup result. e.g. <<F1@value>> - Where F1 is the Field Number and value is the column being looked up in the ODBC search |
Ends With Checksum | Will check the checksum character (last character)
|
Test Checksum | Allows the testing of the checksum being applied.
|
Modulo | In computing, the modulo operation finds the remainder after division of one number by another (sometimes called modulus).3F Source - Wikipedia
|
Weighting Mask | Enter the checksum Modulo weighting mask (e.g. 13131313) |
Erase field value when < length | Will erase the value if the length of characters is less than what is in this box. |
Erase field value when < Confidence | Will erase the value if the confidence performed by the recognition engine is less than what is in this box. For example…
|
Expected answer value | This option will allow the operator to enter the expected answer value from the examination marking sheet. |
Default Cursor Location | This option allows the operator to select the default cursor location upon viewing the field. For example…
|
Output Tab
This tab allows the operator to do specific tasks with the KFI field on output.
For example when the document is submitted the output tasks are run.
The operator does not see the output tasks in the KFI indexing panel.
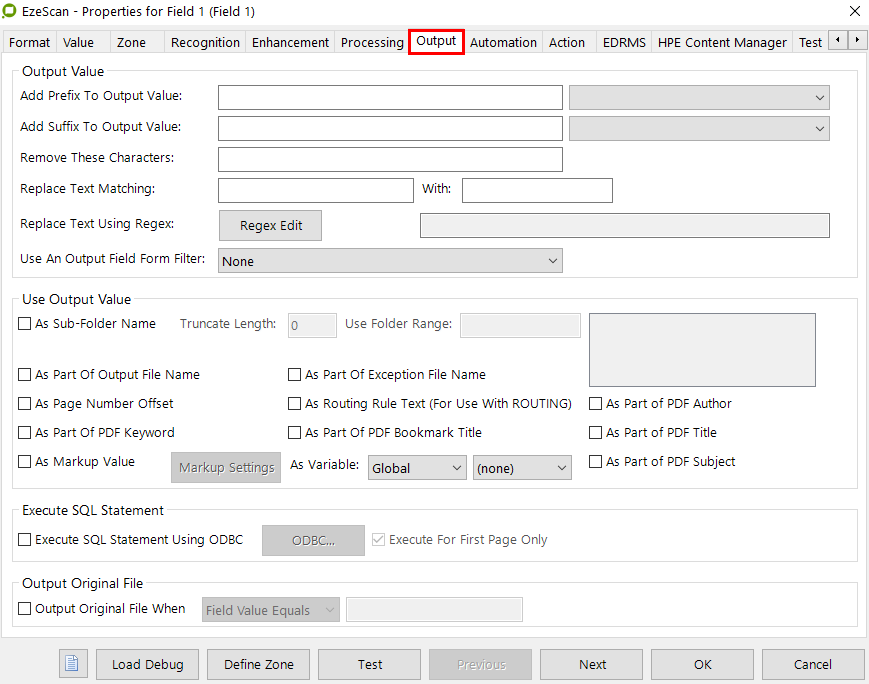
Output tab options
Output Value section
Add Prefix / Suffix To Output Value | These two options allows the operator to add… 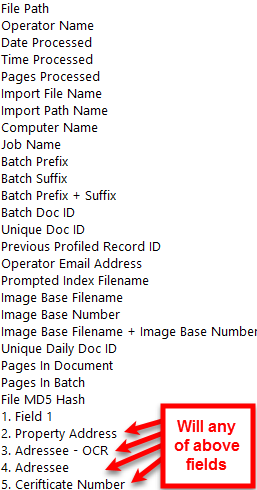 
|
Remove These Characters | This option enables the operator to remove unwanted characters from the zone output data. |
Replace text matching | This option enables the operator to replace one string in the output data with another string. For example replace the word QLD with the word Queensland. |
Replace Text Using Regex | This option allows the operator have multiple text entries to be replaced with other words.
|
Use An Output Field Form Filter | This only contains 2 options…
|
Use Output Value section
Use Output Value as sub folder name | The KFI will normally place its output files directly into the job types default output directory.
|
As Part of output file name | Tick this option to use the zone value as part of the output filename. |
As page number offset | This option is used to force the zone value to be used as a page counter offset. Used with the audit stamps feature, it creates page numbering that starts at any page offset |
As part of PDF keyword | When used in conjunction with PDF output files, this option will write the zone value into the PDF keyword field |
As part of exception file name | If the job is an exception, this field will be used as the name of the file |
As routing rule text |
|
As part of PDF bookmark title | When used in conjunction with PDF output files, this option will create a Bookmark in the PDF file |
As part of PDF Author | When used in conjunction with PDF output files, this option will write the zone value into the PDF Author field |
As part of PDF Title | When used in conjunction with PDF output files, this option will write the zone value into the PDF Title field |
As part of PDF Subject | When used in conjunction with PDF output files, this option will write the zone value into the PDF Subject field |
As Markup value | This option will apply the KFI field value as a mark-up on the document
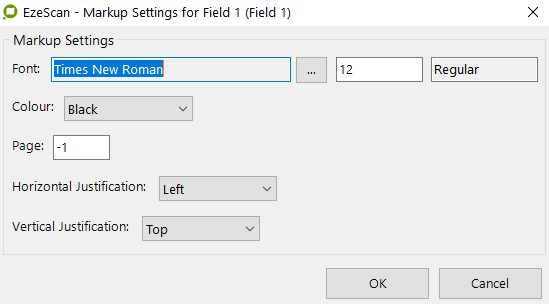
|
As Global / Batch Variable | Global Variable (Default) 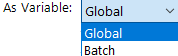
|
Execute SQL Statement section
Execute SQL Statement Using ODBC | This option is designed to run an SQL Insert statement on the output.
|
Output Original File section
Output Original File When | This setting works with the Job Output settings |
Grid Settings Tab
The grid settings are used for EzeScan to extract line item dissections from a document, typically an invoice type of document. The Grid settings tab appears when the Grid option is selected on the Format tab as shown below…
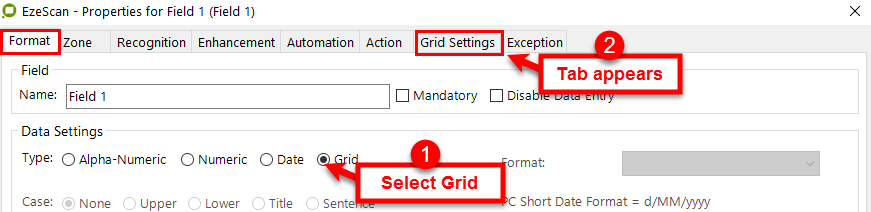
These settings are used by the "EzeScan Line Items" module.Please refer to EzeScan Line Items User Guide for further details
EDRMS Tab
It is recommended that you set up your Primary EDRMS connection on the main KFI Admin window as covered in the KFI Admin > EDRMS tab section on page .In the example below it was set to HPE Content Manager.If the Primary EDRMS connection has been pre-set you can then create an alternative connection to one of the other EzeScan Plugins which are available, as shown below.You may be uploading to another EDRMs such as SharePoint or using a connection to a Property System such as Infor Pathway to extract information for the relevant field (e.g. Property Address). Please refer to the Connector User Guides available from the EzeScan Help menu to access the respective documentation.

Not all connectors have user guides. If the one you wish to use is not listed at right then please contact yor EzeScan supplier or the EzeScan Support desk for assistance.
Primary EDRMS Tab
Please refer to the Connector User Guides available from the EzeScan Help menu to access the respective documentation (details on previous page) and steps to set-up the Primary EDRMS tab.
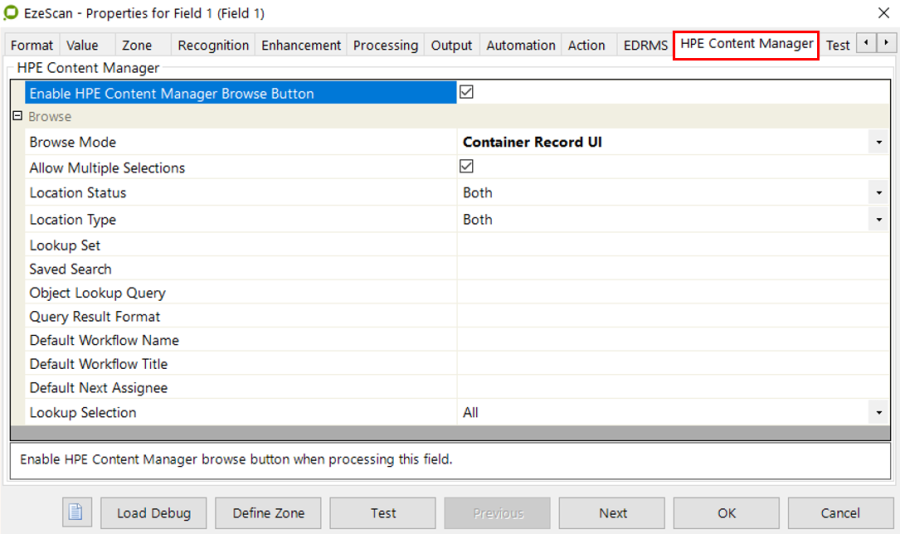
Alternative EDRMS Tab
If an alternative EDRMS has been selected (e.g. SharePoint 2013) then the EDRMS tab will change from Primary to Secondary EDRMS.Configure the field requirements using the information contained in the respective Connector User Guides available from the EzeScan Help menu (details on previous page).
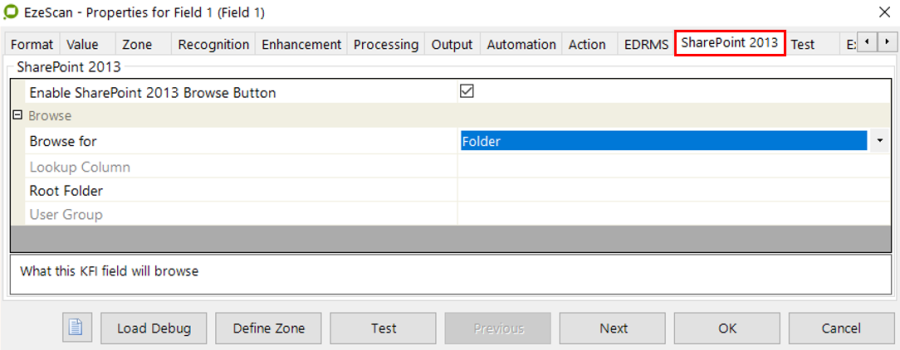
Test Tab
When a template is defined, a zone has been defined and a zone recognition engine (BCR, ICR/OCR, OCR or OMR) has been defined, the Test tab test button will be enabled.When the test button is pressed, the form displays the:
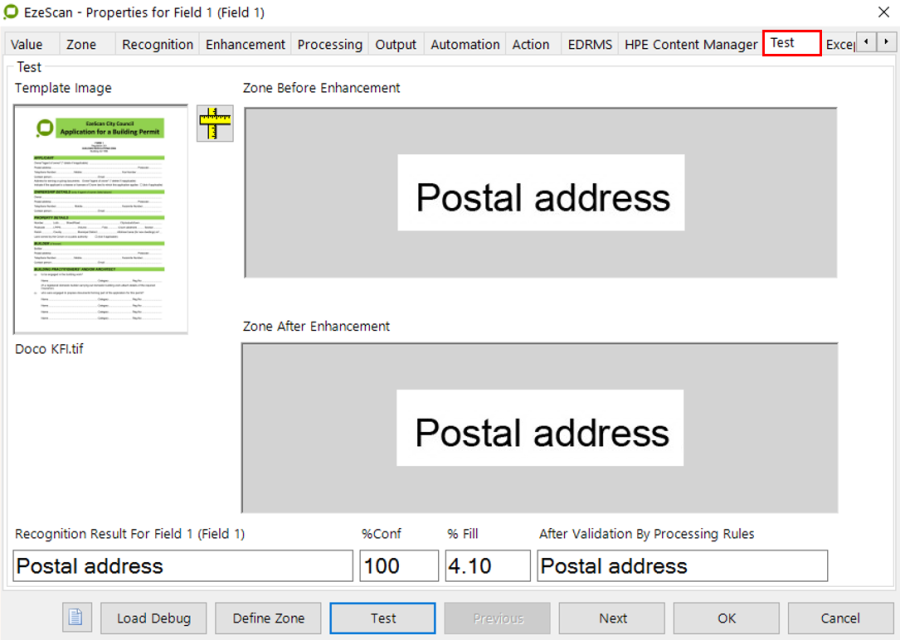
KFI / Debug image
Zone image after enhancement, before recognition
Zone image output data after recognition
Recognition result for the field
recognition confidence %
Zone black fill %
Field output data after processing rules have been applied.
The next and previous buttons can be used to quickly move to the next or previous zones.
Exceptions Tab
This tab will allow the operator to define custom folder paths in which to route KFI field exceptions to.This means that if a certain field does not meet the required confidence criteria of validation specification, it will be routed to the selected folder for further exception processing.
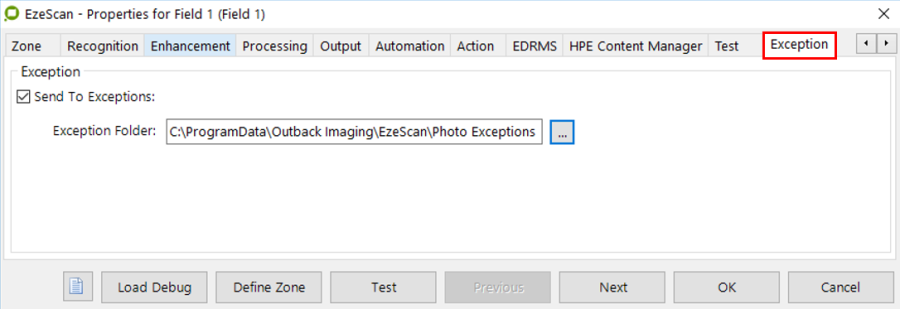
Exceptions are kept in the TIF format when moved to the exceptions folder and Sub-Versioning is used to prevent overwriting existing exceptions.
Appendices
Creating a simple KFI definition
Create the KFI
Let's follow the simple steps required to create a simple KFI definition to process HR records.
Launch the KFI screen (select Admin > KFI or press F7) and click on the button

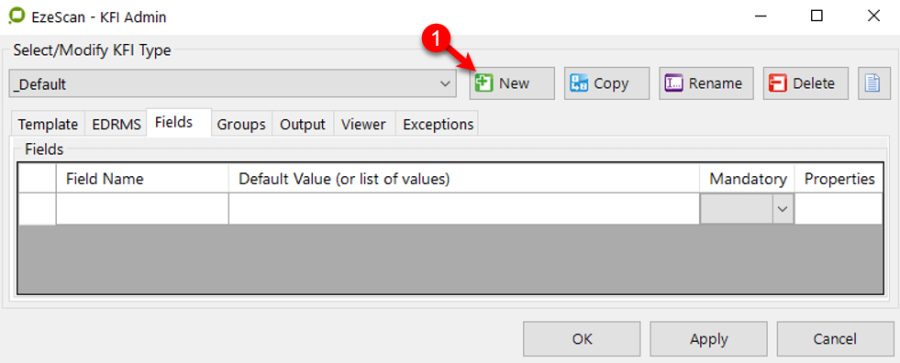
When the screen below appears; enter HR Records
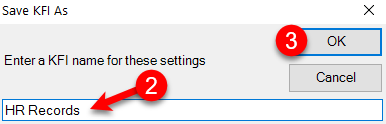
Click OK
You are now working on the newly created HR Records KFI.
Creating the 1st KFI field
The 1st field will capture the Employee Number. Undertake these steps on the field's Format tab…
Click on the Fields Tab
Type "Employee Number" into the 1st Field Name text box.
Then press the edit button and the KFI Rules form will display as shown in Figure 107.
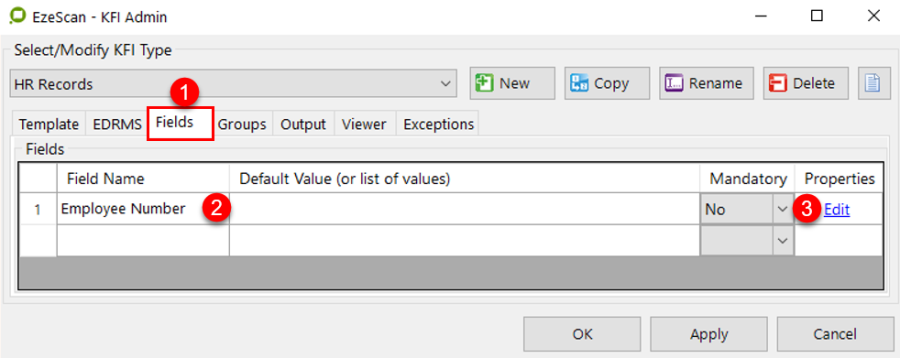
The Employee Number is an integer - set the Data Type to Numeric
Set the Format to 999
Set the Minimum Length to 1
Set the Maximum Length to 5
Set the Range from 1 to 10000
The field will error if the number is greater than 10,000
Press the OK button which will return you to the main KFI screen (shown in Figure 106)
Press the Apply button to save the KFI settings.
Creating the 2nd KFI field
The 2nd field will capture the Employee's name. Undertake these steps on the field's Format tab…
Click on the Fields Tab
Type "Employee Name" into the 2nd Field Name text box.
Then press the Edit button and the KFI Rules form will display as shown in Figure 109.
Employee Name contains alpha characters - set the Data Type to Alpha-Numeric
Set the Format to A-Z,Punc
Set the Minimum Length to 0
Set the Maximum Length to 35
Press the OK button which will return you to the main KFI screen (shown in Figure 108)
Press the Apply button to save the KFI settings.
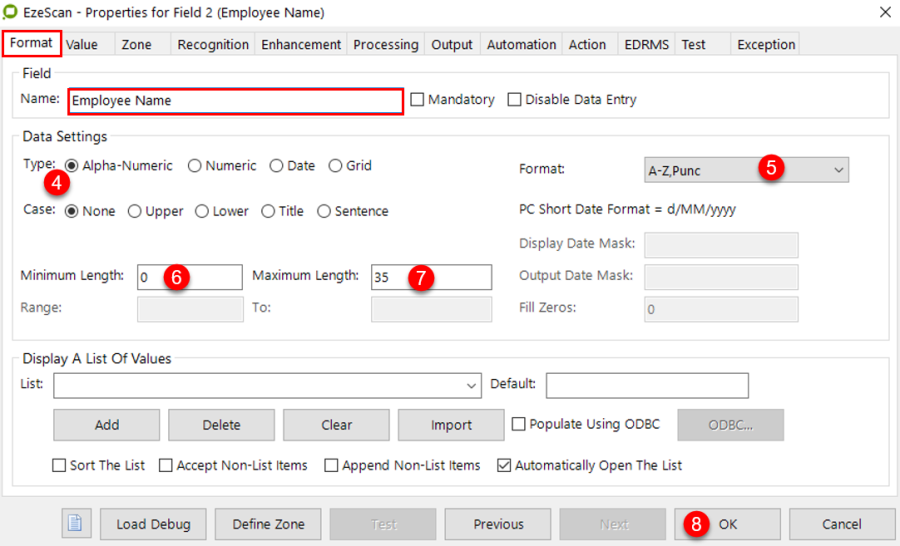
Creating the 3rd KFI field
The 3rd field will capture the Department name. Undertake these steps on the field's Format tab…
Click on the Fields Tab
Type "Department" into the 3rd Field Name text box.
Type the semi colon ( separated list of departments (Accounts;Engineering;HR) into the Default Value field
Then press the Edit button and the KFI Rules form will display as shown in Figure 111.
😉
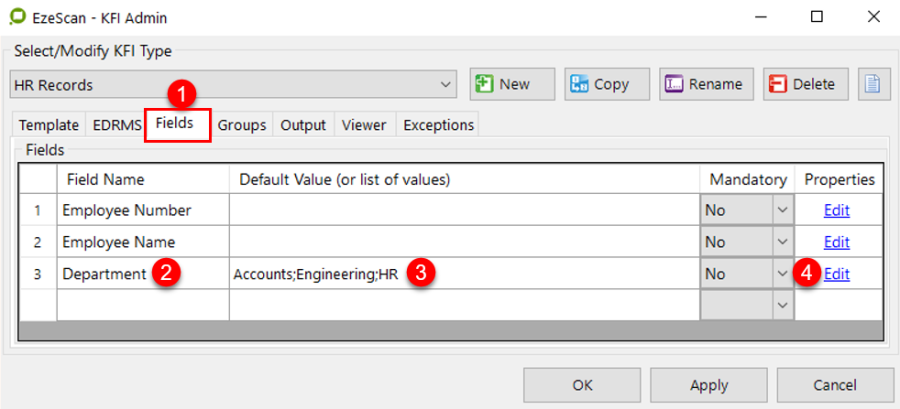
Department contains alpha characters - set the Data Type to Alpha-Numeric
Set the format to All
Set the Minimum Length to 1
Set the Maximum Length to 50
Press the OK button which will return you to the main KFI screen (shown in Figure 110)
Press the Apply button to save the KFI settings.
In this example the department name is not actually displayed on the form. The KFI operator will simply select it from the list of departments displayed in the list box.
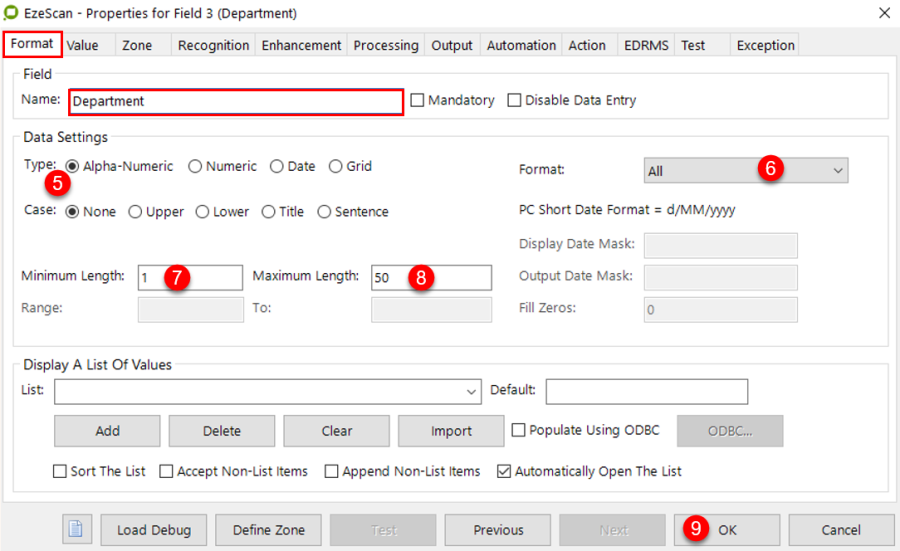
Creating the 4th KFI field
The 4th field will capture the Record Type. Undertake these steps on the field's Format tab…
Click on the Fields Tab
Type "Record Type" into the 4th Field Name text box.
Type the semi colon ( separated list of record types (10;20;30;40;50;60;70;80;90) into the Default Value field
Then press the Edit button and the KFI Rules form will display as shown in Figure 113.
😉

Record Type contains numbers - set the Data Type to Numeric
Set the format to 999
Set the Minimum Length to 1
Set the Maximum Length to 3
Press the OK button which will return you to the main KFI screen (shown in Figure 112)
Press the Apply button to save the KFI settings.
In this example the Record Type Code name is not actually displayed on the form, so we don't define the zone area. The KFI operator will simply select it from the list of codes displayed in the list box.
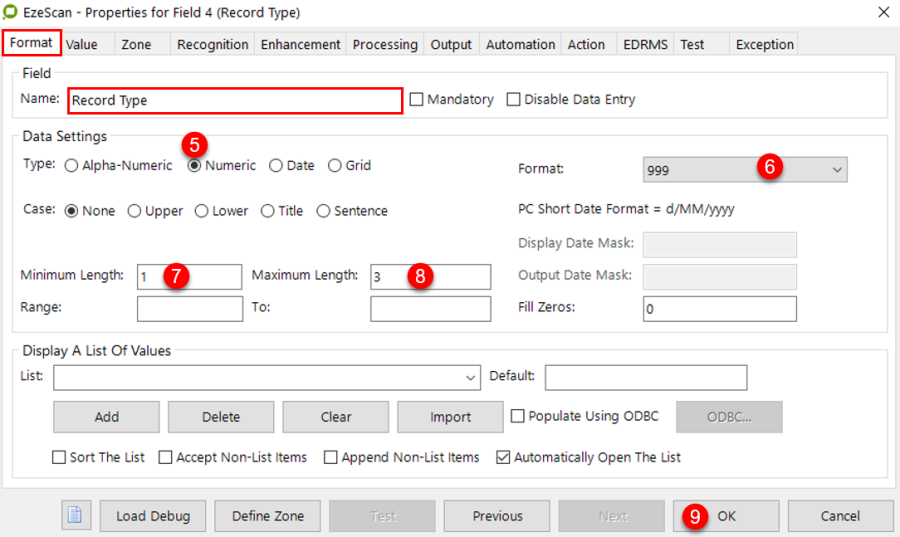
Creating the 5th KFI field
The 5th field will capture the File Date. Undertake these steps on the field's Format tab…
Click on the Fields Tab
Type "File Date" into the 5th Field Name text box.
Then press the Edit button and the KFI Rules form will display as shown in Figure 115.
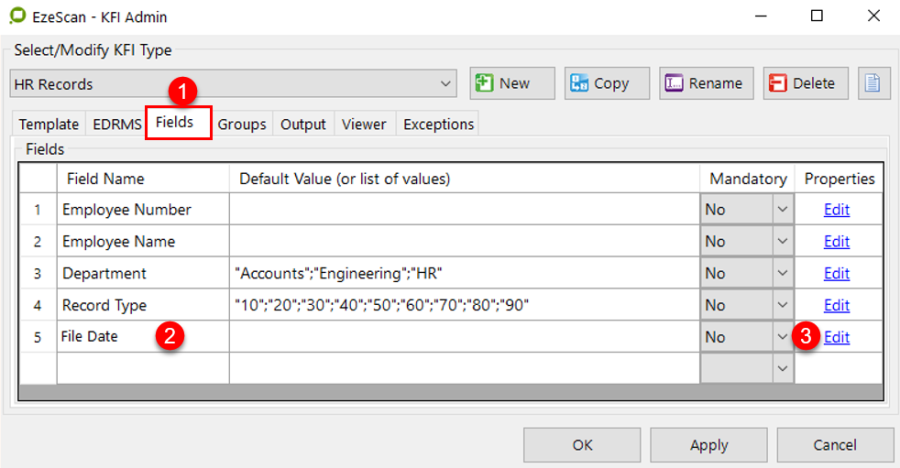
File Date contains date characters - set the Data Type to Date
Set the format to Variable. Setting the date format to variable will allow the operator to key the date in their preferred format (e.g. dd-mm-yy; d/m/yyyy etc) EzeScan will manage to final format.
Set the Minimum Length to 8
Set the Maximum Length to 10
Set both the Display Date Mask and Output Date Mask to DD/MM/YYYY
On the Automation tab tick the Auto complete date field
Press the OK button which will return you to the main KFI screen (shown in Figure 114)
Press the Apply button to save the KFI settings.
In this example the date is not actually keyed from the form, so we don't define the zone area.
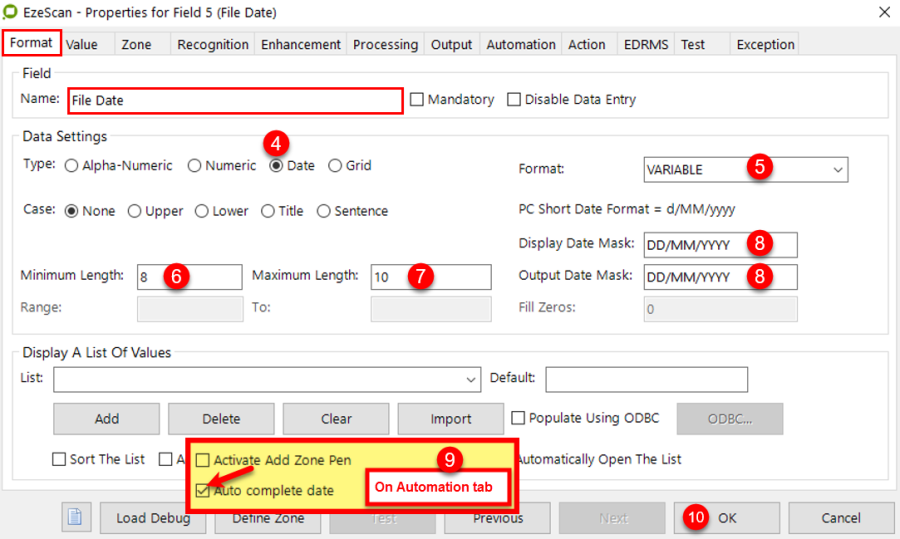
Creating the 6th KFI field
The 6th field will capture the Comment. Undertake these steps on the field's Format tab…
Click on the Fields Tab
Type "Comment" into the 6th Field Name text box.
Then press the Edit button and the KFI Rules form will display as shown in Figure 117.
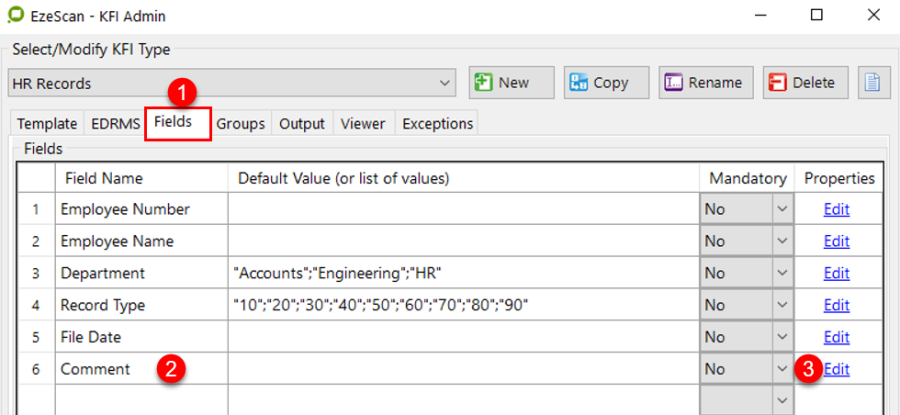
Record Type contains alpha characters - set the Data Type to Alpha-Numeric
Set the format to All.
Set the Minimum Length to 1
Set the Maximum Length to 244
Press the OK button which will return you to the main KFI screen (shown in Figure 116)
Press the Apply button to save the KFI settings.
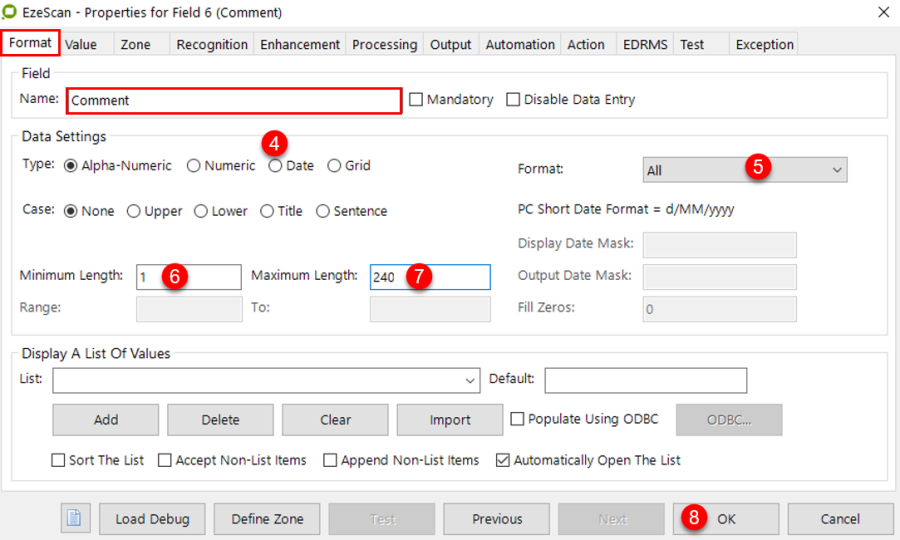
Set the Mandatory fields
For the Mandatory section, set Fields 1,3,4,5,6 to yes as shown in Figure 118.Press the Apply button to save the KFI settings.Press the OK button.You will now be returned to the main viewer window as shown in Figure 119.You are now ready to configure one of your scanning job types for use with this KFI type.
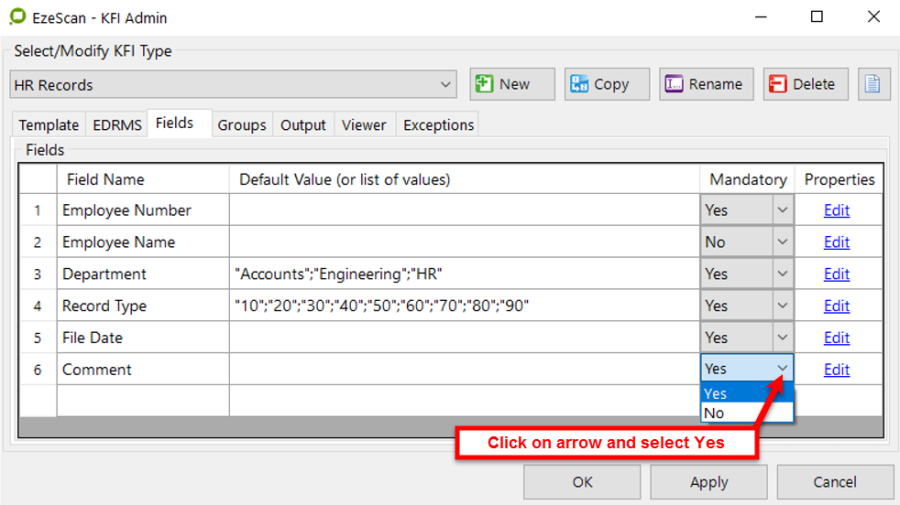
Create and Configure a Job Type to use the new KFI
Let's follow the simple steps required to create a simple Job definition to process HR records.
In this example we have created the KFI first and will now create the job.This may also be done in reverse where the Job is created first.
Creating the Job
Launch the Job screen (select Admin > Job or press F6) and click on the button
When the screen below appears; enter HR Records
Click OK
When prompted to also create a KFI, select No
You are now working on the newly created HR Records Job.
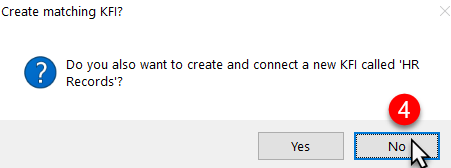
Setting up the Job
This example will use the default settings for a Job, except for a change on the Output tab.Please follow the steps covered in the EzeScan "User Guide" if you need to understand about setting up a Job; available under the Help menu…
Changing the Job's Output tab
Select the Output Tab
In the Other destination drop down list select KFI
In the KFI type drop down list select HR Records
Select File type = PDF
Set the options to
Text Searchable
PDF/A
Click on Save to save these changes to the job type.
Click on Close to return to the EzeScan Viewer.
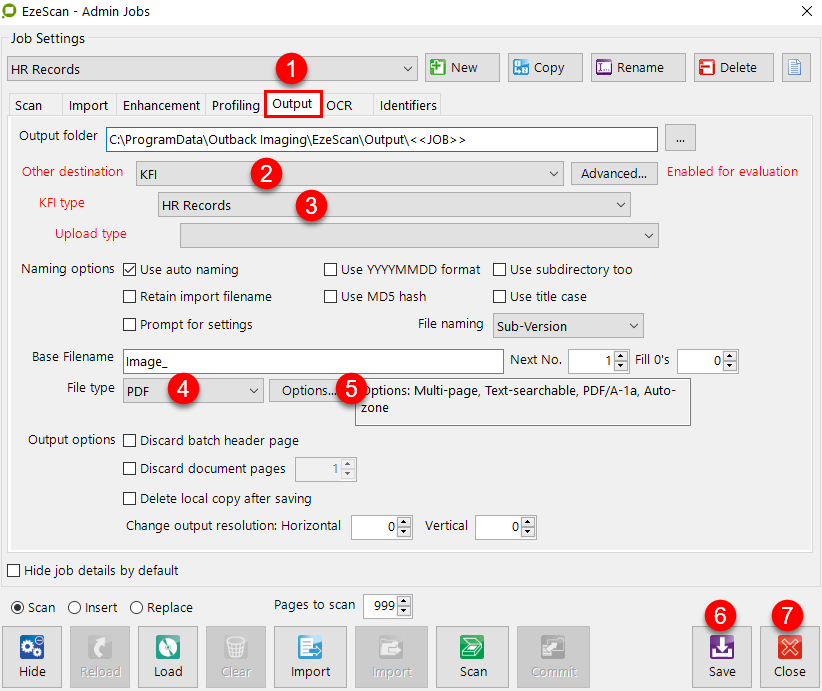
You are now ready to run the job.
Running the new Job and associated KFI
Capturing the document to be processed
In EzeScan press F6 to launch the Operator Action form and select the HR Records job type that you have configured for use with KFI.Then either press the Scan button or File Import button to acquire a batch of documents for KFI processing.
If going to use a scanner, make sure the twain scanner driver is installed and then click the Select Scanner button to choose your scanner.
In this worked example we'll use the File Import button to load in a file called Separator_sample.tif
Click on the Import File button.
Navigate to C:\ProgramData\Outback Imaging\EzeScan\Samples" and open the file called Separator_sample.tif as shown in Figure 124.
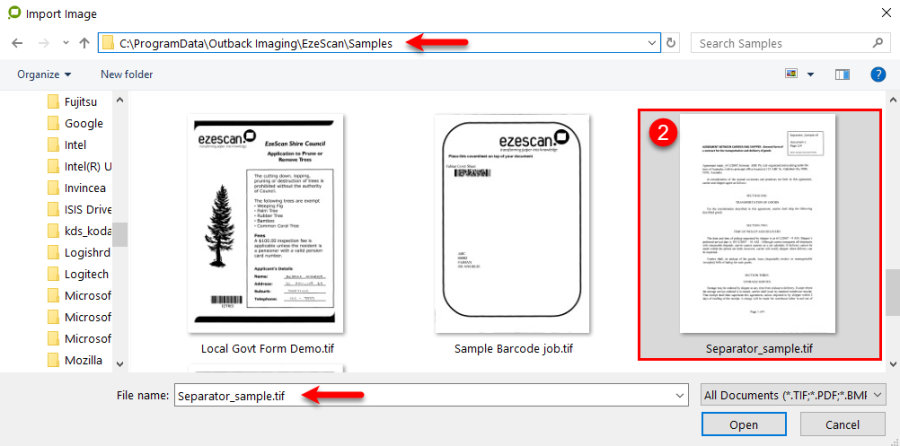
The selected file will load into the "document viewer" screen as shown below.
Press the F4 button to begin the profile process.
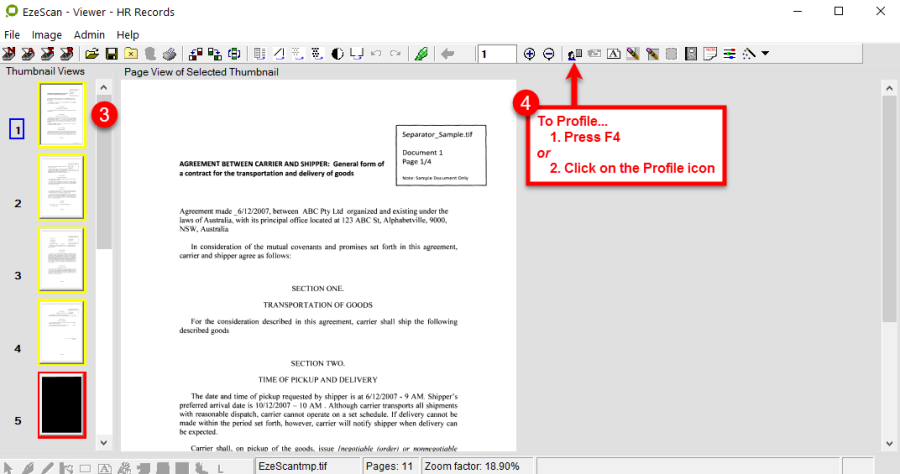
Profiling the 1st captured document
In Figure 126 below there are 4 pages in the 1st document to be processed (surrounded by yellow borders).The next document is separated by the "black paper" separator (thumbnail image # 5)
When the KFI form is loaded the focus is set at the first index field (in this case "Employee Number").In this example the operator completed the following:
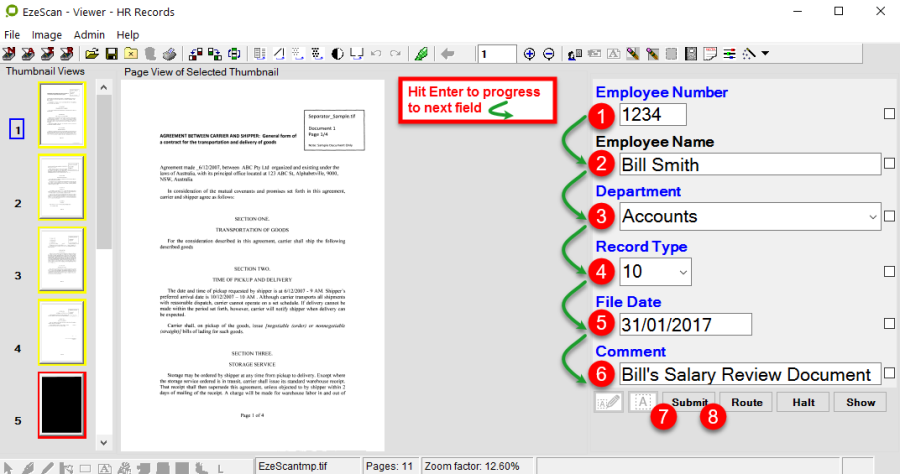
Keyed in 1234 as the employee number and hits the enter key
Keyed in Bill Smith as the employee name and hits the enter key
Chosen the Accounts department from the pull down list and hits the enter key
Chosen 10 from the Record Type Code pull down list and hits the enter key
Entered today's date or hits the space bar to automatically use today's and hits the enter key
Keyed in a comment - Bill's Salary Review Document and hits the enter key
As the Comment field is the last field; the focus is now on the Submit button
The KFI operator presses the enter key again (or clicks on the Submit button) and the document is written out to the default output directory set in the Job's Output location along with the index field data.
Profiling the 2nd captured document
EzeScan removes the 1st document from the viewer, and positions the viewer at the start of the 2nd document. Notice that the index fields need to be re-keyed for this 2nd document.
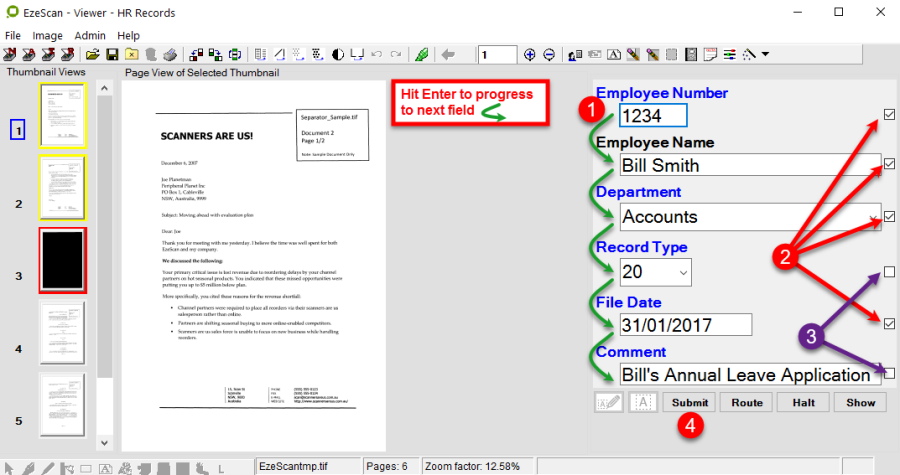
This time when the KFI operator enters or selects the index field data
They then select particular ReUse checkbox options for fields which will also be the same on following documents
Employee Name; Employee Number; Department and File Date
Two fields do not have their reuse boxes ticked as they will vary for subsequent documents to be processed
Record Type and Comment
The KFI operator presses the enter key again (or clicks on the Submit button) and the document is written out to the default output directory set in the Job's Output location along with the index field data.
Profiling the 3rd captured document
EzeScan removes the 2nd document from the viewer, and positions the viewer at the start of the 3rd document.
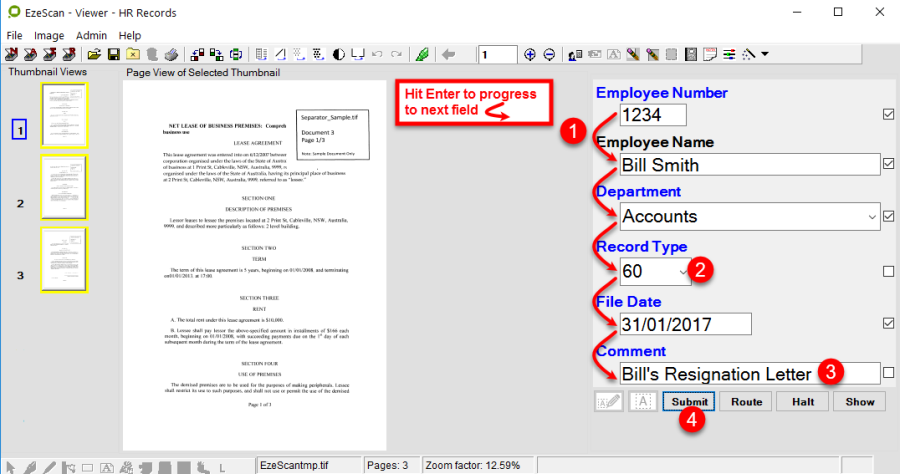
Notice that the reuse boxes are still ticked and the 1st field has already defaulted its value set in the previous document
Press enter to move through the fields
Each field will populate due to the reuse boxes being ticked
The next value to enter is the Record Type field
Select its value from the list = 60 and hit enter through to the Comments Field
Add a comment and press enter
The KFI operator presses the enter key again (or clicks on the Submit button) and the document is written out to the default output directory set in the Job's Output location along with the index field data.
EzeScan removes the 3rd document from the viewer.
There are no more documents to process in this batch.
In this worked example we saw how a batch of images (with separator pages) was processed.
Some Tips
It is also possible to process batches without separator pages using the EzeScan Fixed Page Count option, or Barcode Separator option.
This information is available in the EzeScan Pro User Guide.
You can also automate the fields so that the ones with the reuse boxes ticked will skip through to the next field without the reuse box ticked (e.g. the Record Type field)
Refer to the "Automatically move to the next field after successfully processing this field" section on page (in the Automation tab section)
Output Images and Data
KFI produces 1 image file (pdf/tif) per profiled document and one KFI index for each document.
The index files may be written into a separate output file for each document (this example),
OR
Appended into one KFI output file name. This setting can be changed in the KFI Output Tab as described in the "Combined Output" field on page of the Output File section.
All output images and data created by the KFI processing run are stored in the job's output directory.
Simply use the EzeScan File-> Open menu option to browse for and open either PDF or TXT output files.
The image files in our example are PDF as this was set in the Jobs Output tab, as shown on page .
In the example, EzeScan generated the following KFI indexes from processing the 1st batch document.The export text files contain the following data…
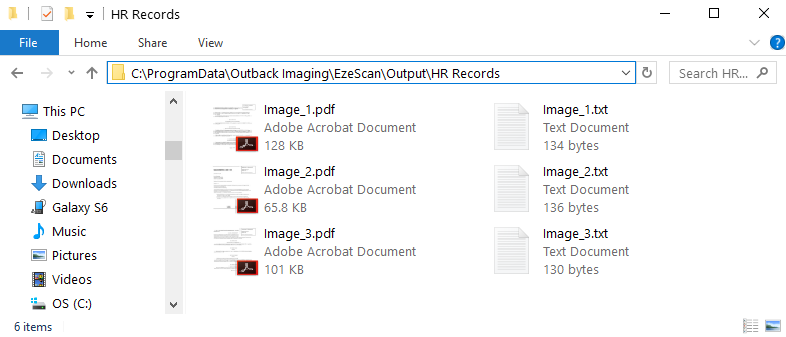
The image file name
The operators log-in ID
The date file was created (YYYYMMDD)
The time the document was created (HHMMSS)
Number of pages captured in file
Value from field # 1 - Employee Number
Value from field # 2 - Employee Name
Value from field # 3 - Department
Value from field # 4 - Record Type
Value from field # 5 - File Type
Value from field # 6 - Comment
Transferring output images and files to other systems
What can you do with these files?
Simply use the import tool supplied with your EDRMS system to import the image plus its indexes into the EDRMS system. Or if you only want the data, then simply import that data directly into your applications database.
OR
Use the EzeScan UPLOAD module to load the KFI generated images and indexes directly to one of its supported UPLOAD locations. Please refer to the EzeScan UPLOAD Guide for more information.
The advantage of using KFI is that the data type rules, format rules, length rules and range rules help to ensure that only the appropriate index data is made available for loading into your host systems.
Checksums Explained
To be able to calculate a checksum, you need to set a value for the modulo and a value for the weighting mask.
The modulo value can be between 1 and 36.
If your modulo is 10 then the data portion can contains digits 0-9.
If your Modulo is 36 then your data can contain digits 0-9 , and letters A-Z.
The weighting mask should be the same length as the data portion you are creating the checksum digit for.
The checksum digit is a single digit value only.
Let's assume your Modulo is 10 and the weighting mask is 1313
That means that your data field should contain 4 digits + 1 checksum digit
How do we calculate the checksum digit value?
Well if the data field contains 1111 we simply multiply each digit by its weighting mask value, add the values together and divide by the modulo value, and the remainder is the checksum digit
For 1111
Summed value after applying weighting mask = (1x1) + (1x3) +(1x1) + (1x3) = 8
Summed Value divide by modulo = 10/8 =0 remainder 2
The checksum value would be 2
So our field + checksum value should be 1111+2
Try setting the modulo = 10, weighting mask to 1313.
Press the Test Checksum button.
Enter the value 1111+2. Press Okay
The input value passes checksum validation
Now let's see what happens when a checksum fails.
Press the Test Checksum button.
We'll put in a data + bad checksum value.

Enter the value 1111+3. Press Okay
The input value fails checksum validation
It fails because the checksum calculated by EzeScan would have been 2 but the value in the string was 3. So the field data or checksum digit are corrupted
Setting up and activating the EzeScan dictionary
There is a dictionary option for EzeScan but it is only available via the KFI fields. You should only use the function where the operator may be adding "free form text" such as Notes and Title fields.
Before proceeding please ensure that you undertake a full config back up…Admin > Settings Backup > Export > Backup entire configuration
Close down the button screen
Select Admin
Select KFI
Select the required KFI - in this example it's the "Process docs to TRIM - Using Spreadsheet - Multi page" KFI
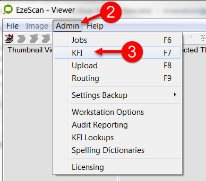
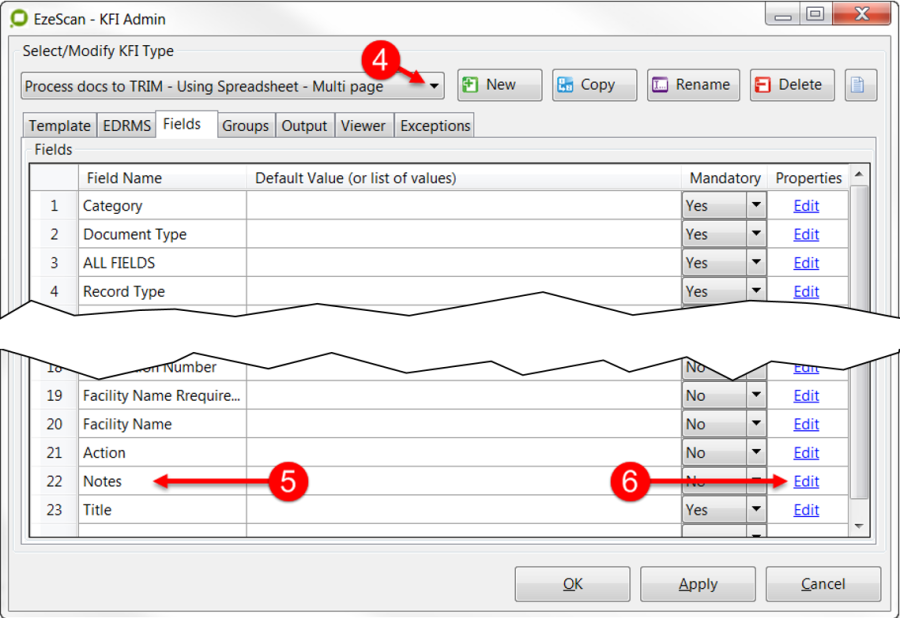
Locate the field you want the dictionary to be run against (e.g. Notes)
Click on edit
Select the Automation tab
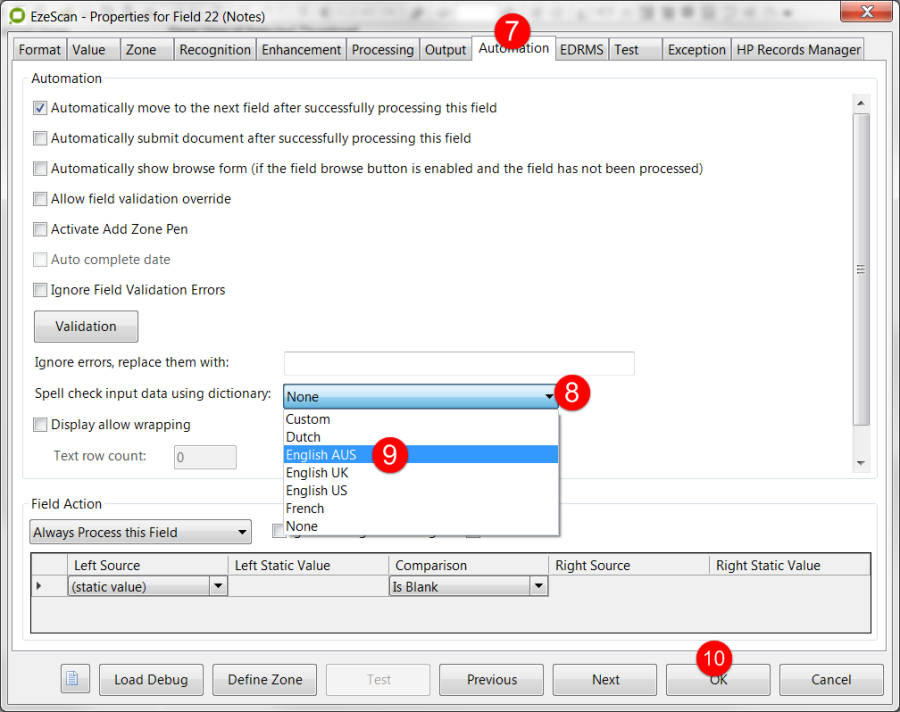
Click on the list
Select English AUS
Click OK button
Repeat for any other fields (e.g. Title)
Once finished click the Apply button
Repeat for any other KFI's
Do a backup of the config again and deploy to the other PC
Using the dictionary while profiling a document
When an operator misspells a word they will be prompted to fix itThe screen below will appear. You must select one of the options so that you can continue.

Adding bulk text to the dictionary
There may be the occasion where a list of words (e.g. a Council's list of Street names, Suburbs etc) may need to be added to the dictionary. The dictionary must be exported first, added to and then imported back into EzeScan. Follow the steps below:

Close the button screen and select Admin
Select Spelling Dictionaries
Select the English UK dictionary
NOTE - both the AUS and UK dictionaries use the UK dictionary
Click on the Export button
Open and edit the dictionary file
You may want to open the file with something like MS Excel so that you may sort it when you have completed your additions. You may find that MS Word cannot handle the number of words and you cannot sort in Notepad
Append the words you wish to have added to the dictionary
Sort the words into alphabetical order
Save and close the file
Import it back into EzeScan using the steps set-out above except this time select Import option instead of Export.