
The following information details the connectivity and functionality offered by the EzeScan integration with the DocuWare EDRMS solution. It details the available options and how to configure an EzeScan job into DocuWare.
For information on DocuWare please refer to the DocuWare website - https://start.docuware.com/
For information on EzeScan please refer to the EzeScan website - https://ezescan.com.au
The minimum requirements for DocuWare integration with EzeScan are:
DocuWare server versions 6.5 - the Platform Services component must be installed on the DocuWare server.
Support of the GAPI interface has been discontinued.
Developed for Ezescan Release: 4.3
 Configuring Connection Settings
When configuring a Job, KFI or Upload to use the DocuWare connector the connection settings panel must be filled in. If only using a single Server, it is recommended that the DocuWare connection settings are configured globally.
-
Click the Admin menu, choose Workstation Options.
-
Click the EDRMS tab and choose the DocuWare option from the drop down list that appears.
-
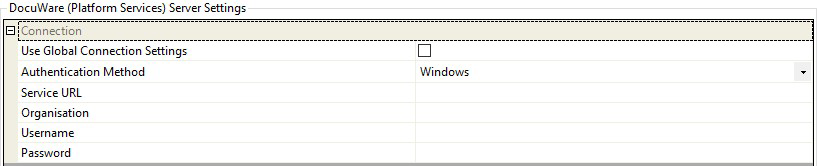
Enter the following information:
Field
|
Description
|
|---|---|
|
Authentication Method |
Specify the Authentication Method to use when connecting to the DocuWare Server. Use the WindowsAuthentication to connect using the windows credentials. |
|
Service URL |
Specify the URL of the service (i.e. http://dwserver/DocuWare/Platform ). |
|
Organisation |
Specify the name of the organisation licensed to the DocuWare Server. |
|
Username |
Specify the username to access the DocuWare Server. Leave this parameter blank if using the WindowsAuthentication option. |
|
Password |
Specify the password associated with the username. Leave this parameter blank if using the WindowsAuthentication option. |

KFI Field Settings
The KFI Field Settings allow the operator to browse into DocuWare during KFI indexing so the operator choose values from File Cabinet Select Lists to be applied to the document.
The following functionality requires that the EzeScan workstation be licensed for the EDRMS as well as KFI and UPLOAD modules.
Enabling browse options
The DocuWare settings must be configured before a KFI field can use the DocuWare browse functionality.
-
Press F7 to display the KFI form.
-
Click the EDRMS tab.
-
If using the global connection settings from the Workstation Options, tick the Use Global Connection Settings box; otherwise fill in the Connection settings.
-
Click the Fields tab.
-
To enable a field to access DocuWare you need to:
-
Click the edit link under Properties for the field.
-
Click the DocuWare tab.
-
Tick the Enable DocuWare Browse Button box.
-
The browse parameters will become active.

-
Click OK.
-
Configuring browse parameters
Browse Mode
This option determines the type of DocuWare Browser that is shown when the Browse button (F3) is pressed during indexing.
Choose from one of the following five options:
Option
|
Description
|
|---|---|
|
Show Field Select List |
Enables the operator to browse the Select List of a File Cabinet Field. |
|
Show Field Selective Select List |
Enables the operator to browse the recent select list of a File Cabinet Field. |
File Cabinet
Specify the File Cabinet to be used for the Field selection lookup. To browse a list click into the value cell and then click on the … button that appears.
File Cabinet Dialog
Specify the File Cabinet dialog to use for the display the Field selection lookup. To browse a list click into the value cell and then click on the … button that appears.
File Cabinet Field
Specify the File Cabinet field to be used for displaying the Select List. To browse a list click into the value cell and then click on the … button that appears.
Upload Settings
The UPLOAD module will obtain the KFI output data to pass into DocuWare saving the document into the respective File Cabinet and applying metadata information.
The following functionality requires that the EzeScan Workstation be licensed for the EDRMS and KFI and UPLOAD modules.
Configuring connection parameters
-
Open the Upload Form (F8).
-
Choose the Upload Type you want to configure.
-
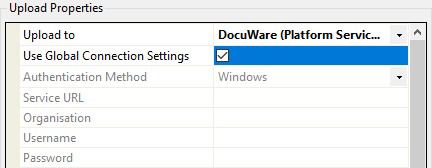
On the left hand side in the Upload Properties pane choose DocuWare in the Upload To list.
-
If using the global connection settings from the Workstation Options. Tick the Use Global Connection Settings option; otherwise fill in the Connection settings.
Configuring built-in upload fields
The following fields will appear after choosing Upload To DocuWare option in the Upload Properties pane. These are the default DocuWare fields.
Each field can have its input set using the Source Field cell, noting that the FileCabinet field can’t be set to ignore. 
Target Field
|
Description
|
|---|---|
|
File Cabinet |
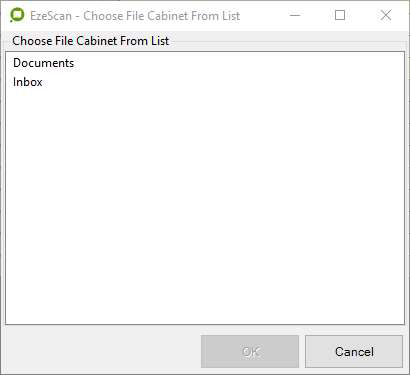
This is the DocuWare File Cabinet that the documents will be saved into. To browse for the File Cabinets set the Source Field to static and a ... button will appear for the Field Value.
Click this and select your respective File Cabinet. |
|
Auto Populate (button) |
Once the File Cabinet is specified, click the Auto Populate buttonOnce the File Cabinet is specified, click the Auto Populate button. This will return all the available fields for the selected cabinet. The operator can then set the source fields from the KFI output
This will also return all system fields. If the status field is set to “New” this will trigger the workflow (applied on the cabinet level) when a new document is uploaded.
|
|
Custom Fields |
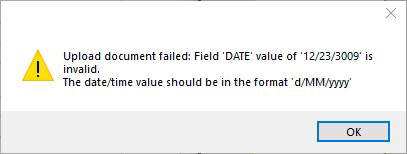
The DocuWare Upload connector currently supports the field types –Date, Number, and Text. When processing these custom field types, excluding type Text, the connector will use the current workstations Region and Language settings (in Control Panel) to validate the data. If the data cannot be validated the Upload will fail and an error message will appear. |


Configuring custom file cabinet fields
After selecting the File Cabinet that the uploaded document will be assigned to (FileCabinet Field), click the Auto Populate button at the bottom of the screen.
This will result in the DocuWare connector returning a list of custom fields that relate to that
FileCabinet.
It is then a matter of setting the source values of those fields to the target values of the custom fields.
The Auto Populate button appears under the Field Mappings grid. 
Applying KFI output data to target field data
To pass through the KFI output data into the Upload module the operator is required to set the source field data to the target field data.
-
In the Upload type, set the Column names from option to the name of the KFI job Type.

-
In the Field Mappings Grid the operator can apply the Source Field settings to the Target Field settings.
-
When all the mappings are complete, click Apply.
-
Click OK to save the changes.