
The following information details the connectivity and functionality offered by the EzeScan integration with Civica Authority6.
For information on Civica Authority please refer to the Civica website - https://www.civica.com/en-au/
For information on EzeScan please refer to the EzeScan website - https://ezescan.com.au
For details on the minimum requirements for Authority6 integration with EzeScan, please see below:
The Authority Desktop MSI version 6.3 or higher must be installed on the EzeScan workstation. EzeScan requires the AuthDRIX component of this MSI to display Authority forms and perform lookup functionality.
Developed for Ezescan Release: 4.3

KFI Field Settings
The KFI Field Settings allow the operator to display Authority non-browser based enquiry forms and perform basic lookup functionality.
The following functionality requires that the EzeScan workstation be licensed for the EDRMS and KFI modules.
Enabling browse options
The Authority6 connector must be selected before a KFI field can use its browse functionality. Traditionally the KFI will also be browsing to HPE Content Manager (so the operator can select containers, actions etc) so an EzeScan KFI can be configured to have fields configure to browse HPE Content Manager and also Authority. To enable a Authority browse field do the following:
-
Press F7 to display the KFI form.
-
Select the Fields Tab and click edit on a field that is required to browse Authority.
-
Select the EDRMS tab and select the Alternative EDRMS to “Authority6”.
-
An Authority6 tab will appear.
-
Tick the Enable Authority6 Browse Button box. The browse parameters will become active.
-
Click OK.
In EzeScan licensing the BOX connector will show in the UPLOAD options,
Configuring browse parameters
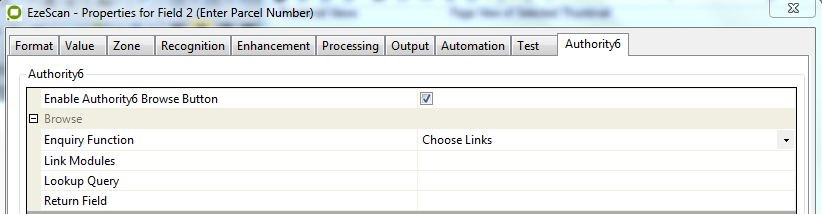
Enquiry function
This option determines the Authority6 enquiry function that is performed when the Browse button 
Choose from one of the following options:
|
Option |
Description |
|---|---|
|
Choose Links |
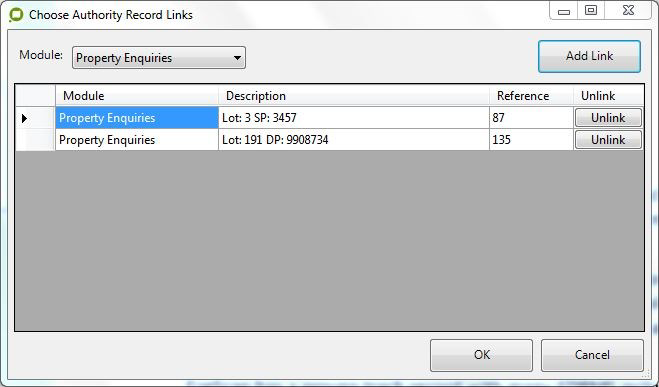
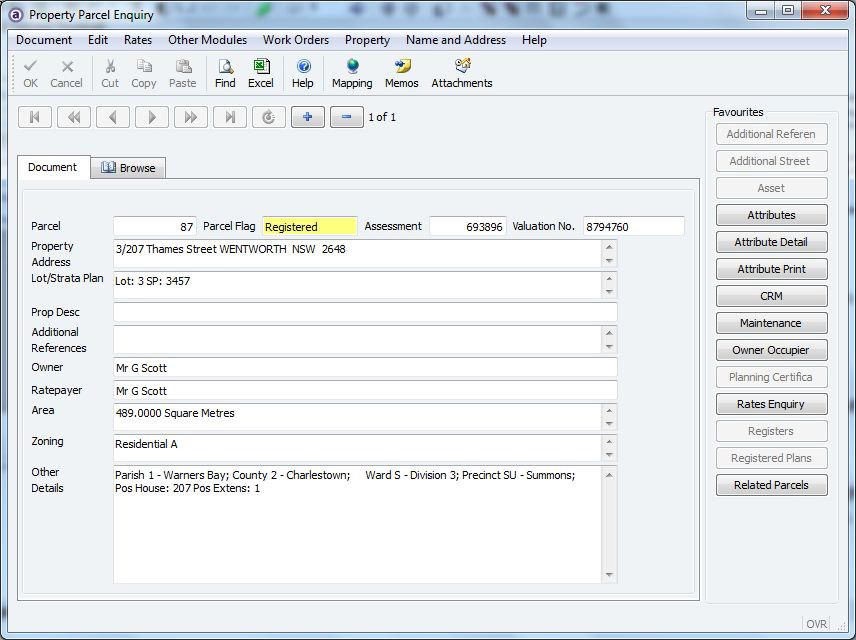
Enables the operator to choose one or more links using the modules configured in the ‘Link Modules’ option. The following is a screenshot of the Choose Links form that is shown during KFI indexing. To choose a link the operator must select the appropriate module from the Module drop down and the click on the Add Link button. The following is a screenshot of the Property Enquiries form (PRENQ). It is possible for the operator to remove any the previous selected links by clicking on the associated Unlink button. Please Note: To prevent users from tampering this field value after closing the Choose Links form it is recommended that the Format tab > Disable Data Entry option be enabled. Failure to do this may result in invalid data being passed into the EDMS. |
|
Choose NAR Link for HPE Content Manager |
This enables a lookup into the Name and Address Register and is designed to browse from Authority to integrate with HPE Content Manager. E.g. the browse will return the Civica Nar Number which is then used for search for the respective TRIM location, if the TRIM location does not exist, EzeScan UPLOAD will create the location. The Link Modules do not need to be configured as this is already set to browse the Name and Address Register. |
|
Lookup Value |
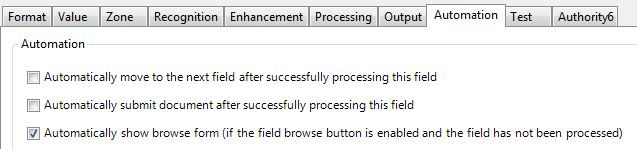
Enables EzeScan to lookup an entity in Authority and return a specific column value into the field. To ensure this field will perform the lookup without the user pressing F3 enable the Automation tab > Automatically show browse form option. To prevent users from tampering this field value after closing the Choose Links form it is recommended that the Format tab > Disable Data Entry option be enabled. Failure to do this may result in invalid data being passed into the EDMS. |
|
Link Modules |
Use this option to specify the modules that the operator can select in the Choose Links form. To edit this option simply click into the value cell and then click on the ‘…’ button that appears. The following is a screenshot of the Configure Modules form that is shown. In this form you must fill in all of the cells for each row otherwise the Choose Links form may not function as expected. The following is a brief description of the modules settings. If you are using HPE Content Manager as the EDRMS please refer to your TRIM_Configuration location notes for a detailed listing.
Below is an example of the data to be extracted for the Property Enquiry Register module in the TRIM_Configuration. <Module modulecode="PR"> <DisplayName>Property Enquiry</DisplayName> <MenuAlias>PRENQ</MenuAlias> <ModuleCode>PR</ModuleCode> <DescriptionFormat>[address]</DescriptionFormat> <PrimaryKey>pcl_num</PrimaryKey> If planning to browse into the Name and Address Register with HPE Content Manager integration, please create a separate KFI field and use the option Choose NAR Link for HPE Content Manager
TIP: More information is available in the Authority Link Modules examples table below.
|
|
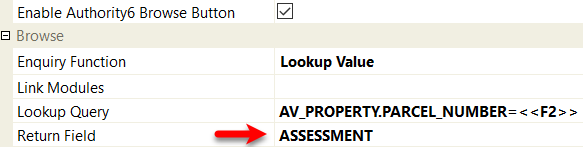
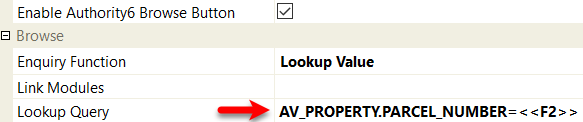
Lookup Query |
Use this to specify the query to perform when using the enquiry function Lookup Value. This must be entered using the following format…
<VIEW NAME>.<KEY FIELD>=<KEY VALUE>
For example the following can be used to locate a property with the parcel number 87…
AV_PROPERTY.PARCEL_NUMBER=87
To pass in a previous KFI Field value as the key value when performing this lookup use the fields associated placeholder. For example the following will use the value of field 2…
Return Field
Use this to specify the view field to return when using the Lookup Value enquiry function. For example the view field ASSESSMENT can be used in conjunction with the below Lookup Query to return the assessment number of the found property.
|


Upload Settings
The UPLOAD module will obtain the KFI output data to pass into HPE Content Manager saving the document into the respective folder and applying metadata information. Please refer HPE Content Manager User Guide for detailed information on how to configure an UPLOAD. The details below will explain how to pass the Authority lookup data into the HPE Content Manager fields so the operator can view the links when the document is saved in HPE Content Manager.
The following functionality requires that the EzeScan Workstation be licensed for the EDRMS and KFI and UPLOAD modules.
Configuring data mappings
In the HPE Content Manager Field Mappings there will be three fields (for the respective record type called) AuthorityUNIDs, Description and if using the NAR integration AuthorLoc. These fields need to be populated from the respective KFI fields which are populated from the Authority lookup during KFI processing.
In the example below the KFI field which performs the lookup is called Authority Link. This will return the details from the register. e.g. the Property Address, NAR, etc.
The KFI field Authority Links ID will return the UNID/S from the KFI browse (this is a hidden field during KFI profiling). This value needs to be passed into the AuthorityUNIDs field.
If using the HPE Content Manager NAR integration, the Authority link also needs to be passed into the AuthorLoc field. (This is the HPE Content Manager default Author field).
e.g. Mapping to HP RM fields 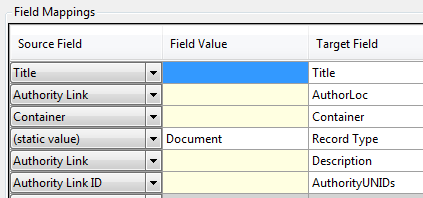
If using the Name and Address Register and other Module lookups, the operator will end up with two Link result and two Link ID result KFI field values. These Links and Links ID KFI field values will need to be merged into one field each. The KFI Custom Extract option can do this. Please refer to the KFI user guide on how to use this functionality.
TIP: There is a sample Civica job available in the Sample Jobs section on the EzeScan website. This job has both Register and NAR lookup integration enabled.
This is an example of a saved HPE Content Manager record. 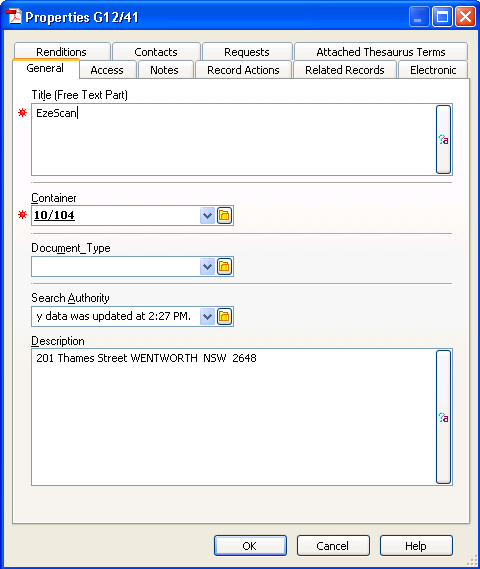
-
The Description field is populated with the Description/s
-
The Search Authority field is populated with the UNID/s
Troubleshooting
EzeScan hangs after clicking Add Link in the Choose Links form
The enquiry form you are trying to use may not be supported via the Authority6 API. This typically results in either an error, or the calling process to hang. At the time of publication it was known that various 4GL forms, and all web generated forms such as those used by CRM, were not supported. Please refer this issue to Civica using the contact details shown below.
Email: support@authority.civica.com.au
Website: Authority Altitude for Local Government | Civica
EzeScan displays an Error when performing Lookup Value enquiry function
This is typically the result of an invalid parameter in the Lookup Query and Return Field options. Please ensure that these options are formatted correctly and that the specified table name/view name and column fields are valid.
Authority Link Modules Examples
WARNING: These are generic examples of Authority links and may differ between sites.
Link to
|
Program Alias
|
Code
|
Data Field
|
Description
|
|---|---|---|---|---|
|
Accounts Payable |
APENQ |
AP |
MDU_ACC |
[fmt_nm2] |
|
Accounts Receivable |
ARENQ |
AR |
DEB_NUM |
[fmt_nm2] |
|
Amendments |
AMENENQ |
DD |
FMT_ACC |
[var_txt] [address] - [wrk_dsc] |
|
Animals #1 |
ANENQ |
AN |
ANI_NUM |
[ani_name] |
|
Animals #2 |
ANENQ |
AN |
ANI_NUM |
[ani_name] - [br1_dsc] [br2_dsc] [co1_dsc] - [ani_add] |
|
Animals #3 |
ANENQ |
AN |
ANI_NUM |
[br1_dsc] [co1_dsc] - [ani_add] |
|
Assets |
ASENQ |
AS |
AST_NUM |
Number [ast_num] - [ast_dsc] |
|
Building Applications |
BLDENQ |
DD |
FMT_ACC |
[doc_dsc] [var_txt] - [address] [title] |
|
Council Owned Properties |
COPENQ |
DD |
FMT_ACC |
[var_txt] [address] - [wrk_dsc] |
|
Crossover |
CENQ |
DD |
FMT_ACC |
[var_txt] [address] - [wrk_dsc] |
|
Development Applications #1 |
DEVENQ |
DD |
FMT_ACC |
[doc_dsc] [var_txt] - [address] [title] |
|
Development Applications #2 |
DDENQ |
DD |
FMT_ACC |
[address] - [var_txt] - [title] |
|
Development Applications #3 |
DDENQ |
DD |
FMT_ACC |
[var_txt] - [pcl_unt][unit_alp][hou_num][hou_alp] [str_nme] [str_typ], [sbr_nme] |
|
Display of Items on Footpaths |
DIOFPENQ |
DD |
FMT_ACC |
[var_txt] [address] - [wrk_dsc] |
|
Engineering Permit |
EPENQ |
DD |
FMT_ACC |
[var_txt] [address] - [wrk_dsc] |
|
Food Premises |
FPENQ |
DD |
FMT_ACC |
[var_txt] [address] - [wrk_dsc] |
|
Health |
HEENQ |
DD |
FMT_ACC |
[var_txt] [address] - [wrk_dsc] |
|
Infringements #1 |
INENQ |
IN |
INF_NUM |
[inf_nme] - [ofc_nme] - [inf_dte] |
|
Infringements #2 |
INENQ |
IN |
INF_NUM |
IN[inf_num] - [inf_nme] - [fmt_nm1] - [ofc_nme] - [inf_dte] |
|
Legal Agreements |
LEGENQ |
DD |
FMT_ACC |
[var_txt] [address] - [wrk_dsc] |
|
Lodging House |
LHSENQ |
DD |
FMT_ACC |
[var_txt] [address] - [wrk_dsc] |
|
Mortuaries |
MORTENQ |
DD |
FMT_ACC |
[var_txt] [address] - [wrk_dsc] |
|
Offensive Trades |
OFFTENQ |
DD |
FMT_ACC |
[var_txt] [address] - [wrk_dsc] |
|
Orders and Requisitions |
ORENQ |
DD |
FMT_ACC |
[var_txt] [address] - [wrk_dsc] |
|
Outdoor Eating Area |
OEAENQ |
DD |
FMT_ACC |
[var_txt] [address] - [wrk_dsc] |
|
Owner Occupiers Roll |
OOCCENQ |
DD |
FMT_ACC |
[var_txt] [address] - [wrk_dsc] |
|
Planning Applications |
PSENQ |
DD |
FMT_ACC |
[doc_dsc] [var_txt] - [address] [title] |
|
Property Enquiry #1 |
PRENQ |
PR |
PCL_NUM |
[address] |
|
Property Enquiry #2 |
PRENQ |
PR |
PCL_NUM |
[address] |
|
Property Enquiry #3 |
PRENQ |
PD |
PCL_NUM |
[address],[ass_num] |
|
Public Building |
PBLDENQ |
DD |
FMT_ACC |
[var_txt] [address] - [wrk_dsc] |
|
Public Swimming Pools |
PSPENQ |
DD |
FMT_ACC |
[var_txt] [address] - [wrk_dsc] |
|
Rates Assessment |
RTENQ |
RT |
ASS_NUM |
RT[ass_num] ( [lab_add] ) |
|
Residential & Visitors Permits |
RVPENQ |
DD |
FMT_ACC |
[var_txt] [address] - [wrk_dsc] |
|
Skin Penetration |
SKPENQ |
DD |
FMT_ACC |
[var_txt] [address] - [wrk_dsc] |
|
Smallgoods |
SMGDENQ |
DD |
FMT_ACC |
[var_txt] [address] - [wrk_dsc] |
|
Subdivisions |
SUBENQ |
DD |
FMT_ACC |
[var_txt] [address] - [wrk_dsc] |
|
Swimming Pools |
SWENQ |
DD |
FMT_ACC |
[var_txt] [address] - [wrk_dsc] |
|
Waste Management |
WMENQ |
DD |
FMT_ACC |
[var_txt] [address] - [wrk_dsc] |
|
Works Bonds |
WBENQ |
DD |
FMT_ACC |
[var_txt] [address] - [wrk_dsc] |