
Authority Lookup Tables - additional details
Linking the Authority Tables to an EzeScan Client
When creating a new KFI to use the Profiler table created in the Authority Tables Lookups you use SQL statements to bring the details back.
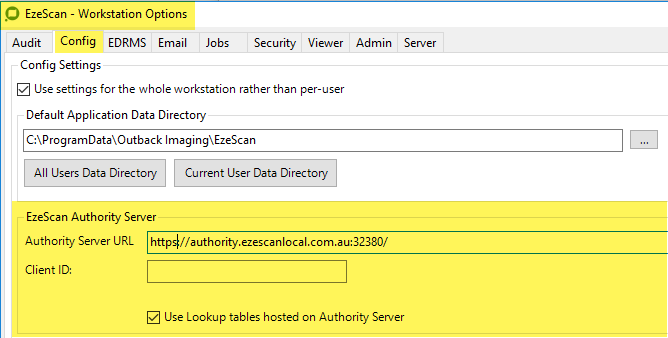
To get this functionality working you must have the Workstation Options set to point at the Authority Server. SO on the EzeScan clients…
-
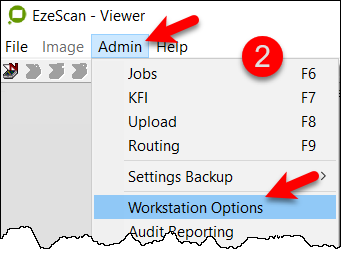
Close the button screen (bottom RH corner of window
-
Select Admin > Workstation Options
-
Select the Config tab
-
Add the Authority Server URL
-
Click the Test button
-
Tick the Use Lookup tables hosted on Authority Server box
-
Click Save to complete the process
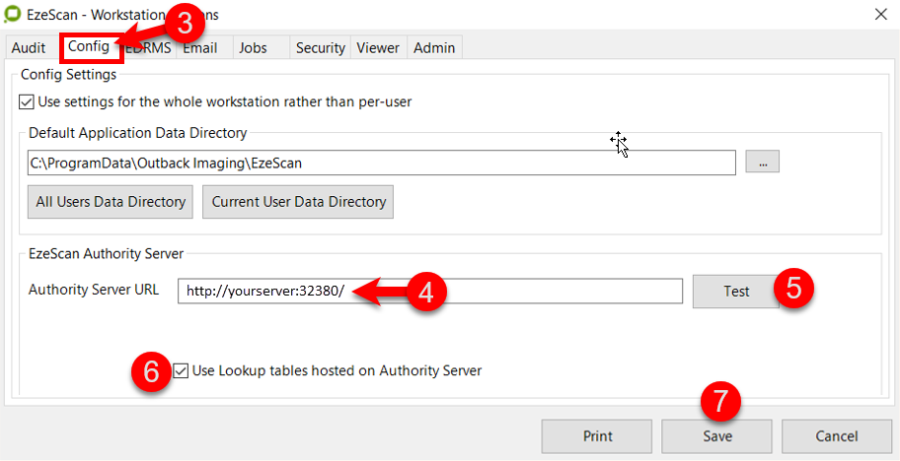
Figure 55 - setting up the Authority Tables link on the EzeScan client PC
-
Backup EzeScan once the set-up is completed and roll it out to the other PC's using EzeScan OR update the configs on the Authority Server
Using the table values in a KFI on an EzeScan Client
Once that the EzeScan client is configured to use the Authority Server Lookup tables (as per previous section above) the KFI can utilise the tables via SQL statements.
-
Create a field and select edit
-
Go to the Format tab, tick the Populate Using ODBC box and click the ODBC button
-
Tick the Use a Lookup box and select the Connector options
-
Add the SQL statement including the table name, for example: Select DISTINCT [Category] from [Profiler_General] Order by [Category]
-
This is covered in full detail in the EzeScan KFI User Guide.
Updating Authority Lookups in the EzeScan Client
The easiest way to edit existing values or add new rows to the table is via the EzeScan Client.
-
This process will update the master table on the Authority Server so it should only be maintained by the staff who are authorised to do so. Please refer to the EzeScan KFI User Guide for details on how to apply security passwords.
-
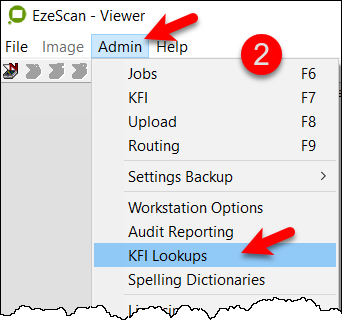
Close the button screen (bottom RH corner of window
-
Select Admin > KFI Lookups
-
Select the table which requires editing
-
Make your changes
-
Click Apply Changes button
-
Click Apply button
-
Click OK button
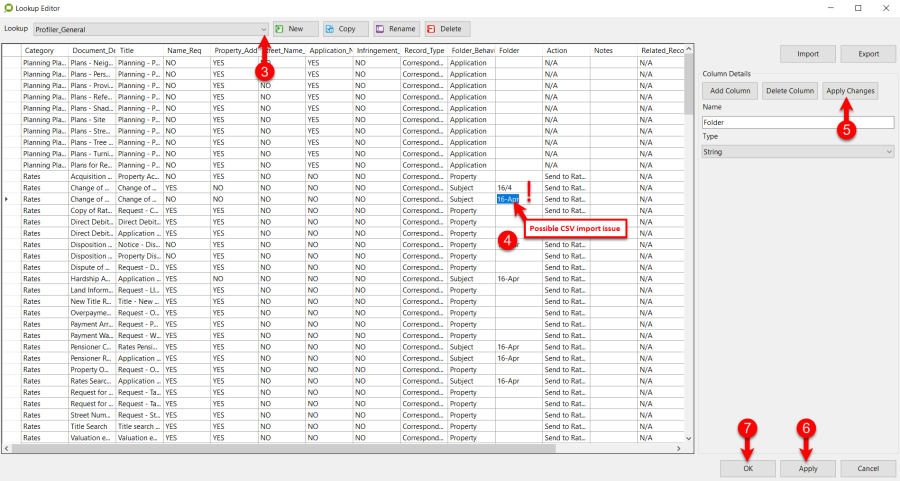
Figure 56 - editing a lookup table in the EzeScan Client
SOME IMPORTANT NOTES
-
You cannot delete columnsdo this in the Authority Server
-
You cannot create columnsdo this in the Authority Server
-
You can create new rows in the table
-
It may be possible that data converted by the imported CSV file may be converted into a date format. This is a CSV issue and can only be fixed in the Lookup set (shown in Figure 56 above)
-
-
An example would be a folder/container number e.g. 16/4 was converted to 16-Apr and needs to be changed back (shown in Figure 56 above)
-
-
If there are multiple edits and/or additions it may pay to export the Authority Lookup table from the Authority Server (to a CSV) and make the edits in a spreadsheet (a lot easier) then replace the table. Refer to the How do I do a bulk update of a table on page for details.
How do I do a bulk update of a table?
Export the Table to a CSV
-
Open the Authority Server in your browser and go to the Tables tab
-
Select the table to be exported
-
Click the Export as CSV option
-
The CSV should be exported to you nominated windows for or the Downloads folder on your PC
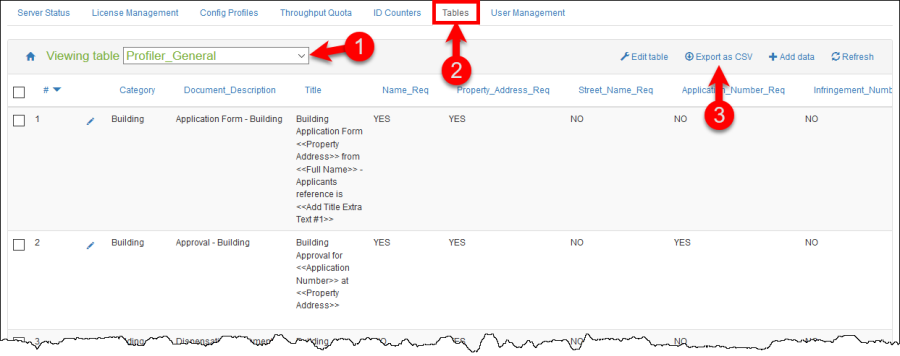
Figure 57 - Exporting a table to CSV
-
Locate the CSV file and make your additions and/or changes
-
Save the file ready for re-importing
-
SOME IMPORTANT NOTES
-
Do not change the column names. If you do you will then need to change any KFI SQL statements which use those column names; otherwise the KFI will fail!
-
It may be possible that data converted by the imported CSV file may be converted into a date format. This is a CSV issue and can be prevented by importing the CSV file into Excel as Text data, see here for the process, otherwise an affected item can be resolved in the Lookup set itself (shown in Figure 56 above)
-
An example would be a folder/container number e.g. 16/4 was converted to 16-Apr and needs to be changed back (shown in Figure 56 above)
-
Re-importing the modified CSV file
You must "drop" the existing table in the Authority Server prior to re-importing the CSV file.
-
Copy the Table name
-
Tick the box
-
Select Delete Selected
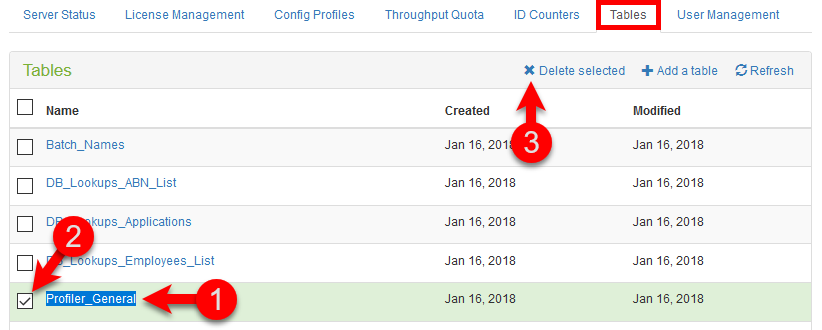
Figure 58 - Deleting (dropping) a table
-
Confirm the deletion
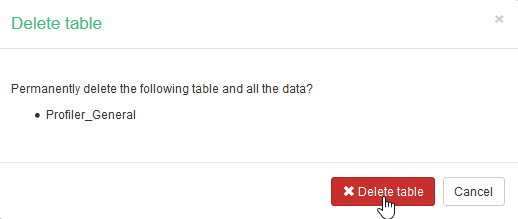
Figure 59 - confirm table deletion
-
Then perform an import using the steps covered in the Creating a new Authority Lookup Table - using the "Automatic" method section on page ; ensuring you use exactly the same table name as the previous one.
Configuring the EzeScan client to use an ID counter
Workstation options - Config tab
-
Close the button screen (bottom RH corner of window)
-
Select Admin > Workstation Options
-
Select the Config tab
-
Add the Authority Server URL
-
Click the Test button
-
Click Save to complete the process

Figure 60 - setting up the Authority Tables link on the EzeScan client PC
-
Backup EzeScan once the set-up is completed and roll it out to the other PC's using EzeScan OR update the configs on the Authority Server
Configuring an EzeScan Client for Batch / Document ID counters
-
You must have created the Batch ID and Document ID Counters on the Authority Server prior to undertaking this task.
Set up in an EzeScan Job
A job which utilises the batching process needs these options set…
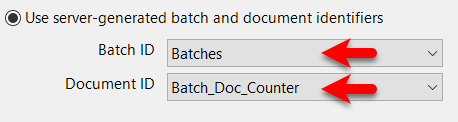
If using Batch IDs (without Document ID option)
|
Tab |
Do this |
|
Output |
|
|
Identifiers |
|

If using Document IDs (together with Batch ID option)
|
Tab |
Do this |
|
Output |
|
|
Identifiers |
|

-
The job output tab should be set to output a TIF file and also to the nominated KFI (details below) and to a network drive which then be accessible by the operators who will be processing the batches.
-
The output folder could be set to the Authority Server, keeping all EzeScan items together
Set up in an EzeScan KFI
The KFI example below has been set-up to create new batches in a nominated network folder. It also has been set to create document names using the Document ID functionality shown above.
|
Field |
Tab |
Do this |
|---|---|---|
|
Batch Number |
Value |
|
|
|
Automation |
|
|
Document Number |
Value |
|
|
|
Automation |
|
|
|
Output |
|
|
Batch Name |
Format |
|
|
|
Value |
|
|
|
Output |
|
|
|
Automation |
|

The processed documents in the above example KFI will look something like this…
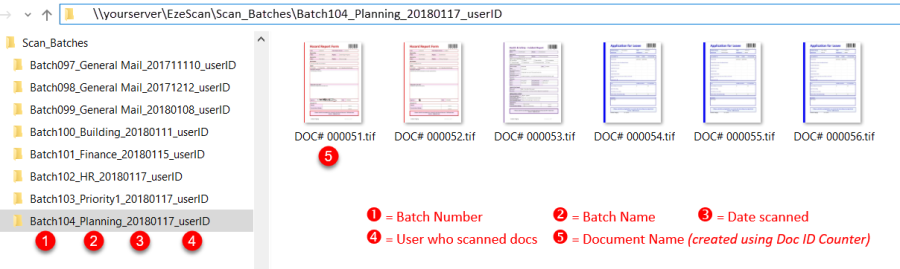
Figure 66 - example of what output would look like using the above config
Workstation options - Jobs tab
-
Setting the Generate Batch Identifiers & Generate Document Indentifiers at the workstation level may cause confusion as every document which is processed will increment the number. This may cause confusion as it may appear that documents have been missed (gaps between numbers) because every document processed will take the next batch/document identifier even it is not being placed into a batch.
-
Leave the Workstation options settings unticked and make the settings in the scan jobs which require batch and document numbering set to utilise the ID numbers set in Authority Server.
-
Close the button screen (bottom RH corner of window)
-
Select Admin > Workstation Options
-
Select the Jobs tab
-
If batch counters are required - tick the Generate Batch Identifiers box
-
Select the required Server ID Counter from the list
-
If doc counters are required - tick the Generate Document Identifiers box
-
Select the required Server ID Counter from the list
-
Click the Save button

Set the Workstation options to utilise Authority Server Batch and Document IDs
Authority Web Services and HTTPS Configuration
EzeScan Authority as of version 4.3.133.1091 and EzeScan itself as of version 4.3.139 supports the use of HTTPS encryption for the Authority Website, meaning communications between EzeScan and Authority would be encrypted as would the Authority website.
For functional HTTPS operations the following will be required.
-
Appropriate EzeScan and EzeScan Autority versions (see above).
-
A fully qualified DNS name for the Authority website URL.
-
A valid website pfx format certificate naming the Authority website DNS reference.
The fully qualified DNS name is a requirement as it will used as name validation on the website certificate.
The DNS name itself would be of the format of name.domain.type.etc, for example authority.ezescan.net or authority.ezescan.com.au
For certificate usage, a fully qualified name is required as certificate issuers no longer issue website certificates for non-doted URLS e.g. https://authority would be invalid for website certificate usage, however https://authority.ezescan.net would be considered a valid DNS name.
Web browsers similarly have specific requirements for a HTTPS site and for a website certificate to function, a fully qualified name is part of the requirement.
The EzeScan Authority web services can function with a variety of certificates.
-
A Certificate issued by a Public Certificate Authority.
e.g. GoDaddy, IdenTrust, Comodo, Entrust etc.
-
Internal Certificate Authority issued. An organisation's own CA is able to issue certificates to themselves.
-
A Self-Signed certificate generated by EzeScan Authority itself.
The most ideal would be a public authority issued certificate, followed by a certificate issued by an internal authority and lastly a self-signed certificate.
Advantages and disadvantages for types of certificates
Each different type of certificate will have different functionality requirements.
For example self-signed and internal CA issued certificates are not in general automatically considered as valid by the HTTPS subsystem unless a chain of trust is specifically configured.
-
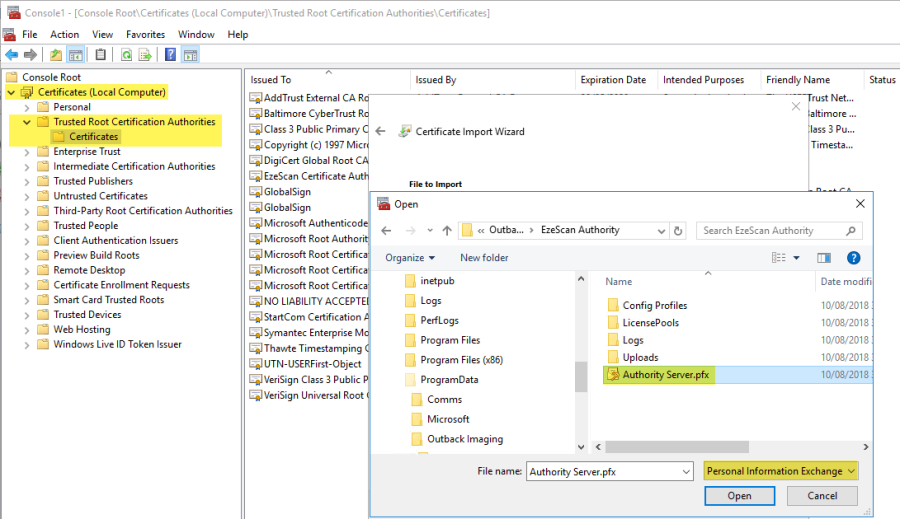
For a self-signed certificate this will mean installing the certificate into the Windows "Trusted Root Certification Authorities" repository.
-
For an internal CA issued certificate the CA public root certificate will need to be installed into the local computer Windows "Trusted Root Certification Authorities" repository.
-
For a public issued certificate the chain of trust is typically already in place as Windows will have the issuers public root CA certificate already installed in the Windows "Trusted Root Certification Authorities" repository.
-
A public issued certificate generally has a cost and expiry of one or two years, meaning there will be a regular maintenance interval where the certificate is renewed/replaced every year or so.
-
An internal CA certificate can be issued for no cost and can have longer expiry time periods (5 years for example) and will require the internal CA root certificate to be rolled out to the Windows "Trusted Root Certification Authorities" repository. There is also the overhead of managing and maintaining the internal Certificate Authority.
-
A self-signed certificate is a certificate created by the application itself.
The certificate would contain both the private and public key and to obtain a chain of trust the certificate would need to be installed into the local computer Windows "Trusted Root Certification Authorities" repository.
This would apply for every machine where the EzeScan client software is installed and for every machine where the EzeScan Authority web service is going to be accessed via a web browser.
-
Note the FireFox web browser will no longer trust self-signed certificates even if a chain of trust is in place, although it is possible to allow FireFox to create an exception.
Creating a Self-Signed Certificate
Open an administrative command shell and type the following command as a single line.
"C:\Program Files (x86)\Outback Imaging\EzeScan Authority\AuthorityServer.exe" generatessl --subjectname "CN={FQDN}" --subjectalternativenames "{FQDN}" --password "{Password}" --expiry "{ExpiryDate}"
For example:
"C:\Program Files (x86)\Outback Imaging\EzeScan Authority\AuthorityServer.exe" generatessl --subjectname "CN=authority.example.local" --subjectalternativenames "authority.example.local" --password "pass1234" --expiry "2030-12-31"
Additional subject alternative names can be appended if using multiple network addresses to access Authority Server.
For example:
"C:\Program Files (x86)\Outback Imaging\EzeScan Authority\AuthorityServer.exe" generatessl --subjectname "CN=authority.example.local" --subjectalternativenames "authority.example.local" "authority.example.net" --password "pass1234" --expiry "2030-12-31"
The certificate will be created in the path of…
C:\ProgramData\Outback Imaging\EzeScan Authority\Authority Server.pfx

And will be set in the Authority.cfg file as per the below example file entries.
SslCertificateName=Authority Server.pfx
SslCertificatePassword=EACVnJ+J8ntMXbydVFYYfGDD8gDJX3H9Kn0FmiX9R9iw/pKQGr0=
A restart of the Ezescan Authority Windows Service will be required to initialise the use of HTTPS.
Once created the self-signed certificate will need to be added to the Windows local computer "Trusted Root Certification Authorities" repository using the Microsoft Certificate Management MMC (Microsoft Management Console).
When added to the local computer "Trusted Root Certification Authorities", a Chain of Trust will be in place and the EzeScan Authority Website will open on the local machine without certificate errors (FireFox excluded, see previous page).
-
The self-signed certificate will need to be added to the local computer "Trusted Root Certification Authorities" on all workstations/servers where EzeScan is in use.
Adding a Certificate to the EzeScan Authority Web Service
Follow the steps below to install and configure an SSL certificate for the EzeScan Authority service.
In the Authority Service ProgramData directory create a folder named Certificate.
For example:
C:\ProgramData\Outback Imaging\EzeScan Authority\Certificate
Place the PFX certificate into this newly created folder.
Open an administrative command shell and type the following command:
"C:\Program Files (x86)\Outback Imaging\EzeScan Authority\AuthorityServer.exe" setsslcert --certificatename "MyCertificate.pfx" --password "MyPassword"
Substitute "MyCertificate.pfx" with the name of your certificate file, and “MyPassword” with the passphrase for the respective certificate.
The above command will install the certificate and configure the Authority.cfg file with the required entries for running as HTTPS
Swapping between HTTPS and HTTP
To swap back to HTTP comment the two certificate lines in the Authority.cfg and restart the EzeScan Authority Windows Service.
Comment indicators are the # symbol.
#SslCertificateName=Authority Server.pfx
#SslCertificatePassword=EACVnJ+J8ntMXbydVFYYfGDD8gDJX3H9Kn0FmiX9R9iw/pKQGr0=
 EzeScan Configuration
Set EzeScan to reference the new Authority HTTPS URL
Admin/Workstation Options/Config/
Authority Server URL
Further Information
Contact EzeScan support at support@ezescan.com.au or 1300 393 722
Resetting a user password by command line
Typically, this would be required if the admin password was forgotten or lost.
The following command can be run to update a user password from the EzeScan Authority folder.
C:\Program Files\Outback Imaging\EzeScan Authority>authorityserver setuserpassword --username "admin" --password "newpasswordhere"
The command should return the following
INFO: 2021-08-09 10:34:13.2831, Getting user manager
INFO: 2021-08-09 10:34:13.2831, Updating password for user 'admin'
INFO: 2021-08-09 10:34:13.3020, Update password succeeded
The operator will then be able to login to the web client with the new password.