138. Sharing a TWAIN Scanner using a RemoteScan Server and Clients
It is sometimes cost prohibitive to put scanners on every employee's desk in the Records Department or the Finance Department. Some customers find it beneficial to share scanners between 2-3 employees seated in the same work area.
For customers used to using TWAIN drivers with their scanners, Quest Software sells a scanner-sharing application called RemoteScan.
RemoteScan Server allows multiple client PC's to share a single scanner via its RemoteScan(TM) TWAIN driver. RemoteScan client/server information and pricing is available from https://www.quest.com/remotescan
EzeScan v4.3.71 has been tested with RemoteScan v9.748. Higher versions of EzeScan and higher versions of RemoteScan should still be compatible.
📘 How to instal and test the RemoteScan software
Decide which PC is going to run as your RemoteScan Server PC. This is the PC that is going to be connected to your scanner. It needs to be powered on at all times when client PCs want to use the scanner.
Connect the USB cable between the scanner and the RemoteScan Server PC.
Connect the scanner power cable.
Install the TWAIN driver for the scanner onto the RemoteScan Server PC (e.g... we used a Kodak I2900 driver available from the Kodak Alaris download website).
Turn on the scanner. Test that the scanner works okay on the Remote Server PC using the scanner application that came with the scanner.
Install the RemoteScan Server component onto the RemoteScan Server PC. This adds a new RemoteScan Server v9.748 icon to the windows hidden icon menu.
Right-click on the RemoteScan Server icon in the Hidden Windows Icons menu. The following menu is displayed.

Use the 'Choose a TWAIN Scanner' option to select the TWAIN driver for the scanner you have installed.
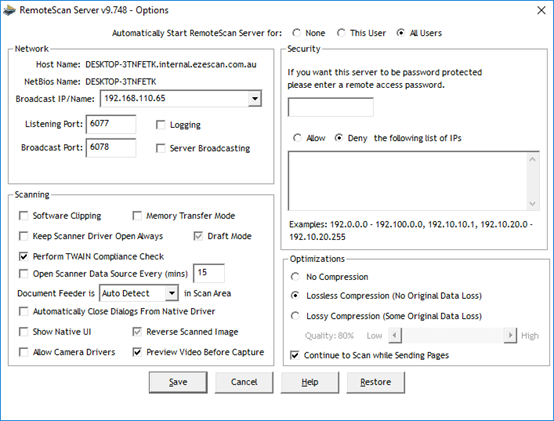
Press F2 and right click Options to display the RemoteScan Server options.
Note: Pressing F2 enables you to change some admin settings that are normally disabled if you haven't pressed F2.
If you intend to run the RemoteScan Client on the RemoteScan Server PC you must tick on the 'Server Broadcasting Option'
If you are scanning lots of colour documents you might like to consider using 'Lossy Compression' instead of lossless compression. This will speed up the scanning process.
You might also like to turn on the 'Continue to Scan while Sending Pages' option. This will speed up the scanning process.
Use the RemoteScan Installer to install the client software onto each PC that is going to be sharing the scanner that's installed on the RemoteScan Server PC. This installs the RemoteScan (TM) TWAIN driver to each PC.
Note: There is no need to physically install the actual Scanner Vendor scanner drivers on each client PC.Install the EzeScan Desktop application onto each client’s PC.
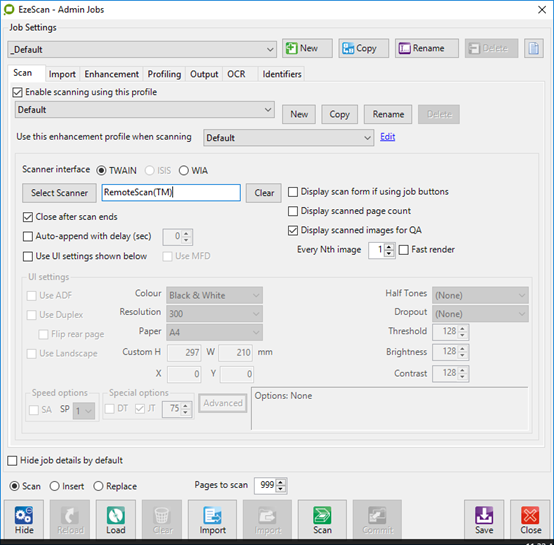
Configure a new scanning Job in EzeScan and set it to use the RemoteScan (TM) TWAIN driver.

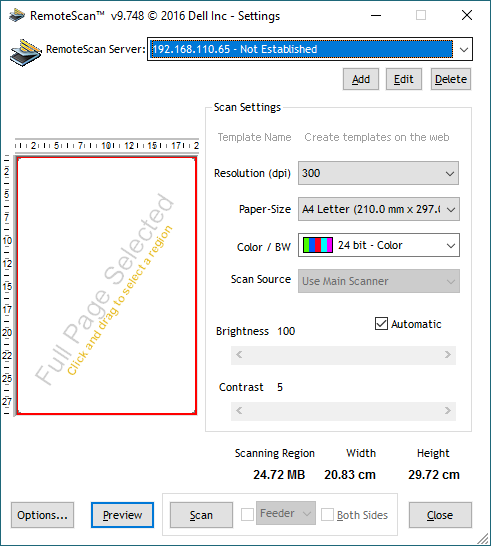
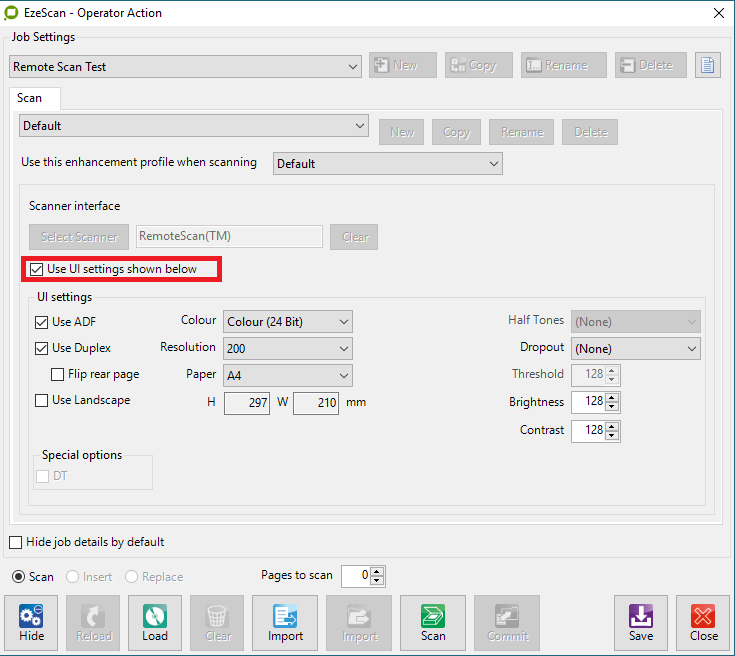
Test that the scanner works okay by using the RemoteScan TWAIN UI. To do this un-tick the job 'Use UI Settings shown below' option.

Press Scan. You should be able to drive the scanner properly through this UI shown below.
Choose the required settings. Press scan, inspect the scanned pages and make sure that the RemoteScan TWAIN UI settings are properly controlling the shared scanner image properties (e.g.. resolution DPI, colour type, paper size, brightness, contrast).Once you have proved the scanner works okay using the RemoteScan(TM) TWAIN UI, then change the EzeScan Job settings to tick the 'Use UI settings shown below'.

Set the required TWAIN scanner settings within the EzeScan TWAIN UI panel. Press scan, inspect the scanned pages and make sure that the EzeScan TWAIN UI settings are properly controlling the shared scanner image properties (e.g.. resolution DPI, colour type, paper size, brightness, contrast).Once you've got it all working don't forget to register the RemoteScan Server registration key on the Remote Scan Server PC.
We performed a test to compare the scanning speed of a locally connected Fujitsu fi-6670 to the scanning speed of a RemoteScan Server-connected Fujitsu fi-6670 Scanner. Scanning was performed with 67 sheets of magazine paper in duplex, colour, A4 at 300dp, Portrait mode.
EzeScan reported the RemoteScan Server connected scanner as 75.85 ipm.
EzeScan reported the locally connected scanner speed as 74.85 ipm.
The RemoteScan Server speed was slightly faster. We were somewhat surprised by these results but several iterations of the tests gave the same results. It looks like the Remote Scan Server has been optimised to buffer scanned images and pass them quickly from the server to the client.
We found a small issue on Kodak Scanners when using their TWAIN drivers with RemoteScan. We noticed that we could not adjust the brightness or contrast settings on the scanner (the problem did not exist when we were using Fujitsu Scanners with their PaperStream IP TWAIN drivers). We contacted RemoteScan tech support and they responded very quickly to our call. The fix for the Kodak TWAIN driver problem was to make sure that we ticked the RemoteScan Server option 'Show Native UI'.
Once this was ticked, the next time we scanned the Kodak Scanner TWAIN UI driver dialog was displayed during Scanning. We were able to scan and adjust the brightness/contrast settings okay.
Once this has been done once you can then go back in and untick the RemoteScan server option 'Show Native UI'.
After doing this you will then still be able to adjust the scanner brightness/contrast setting normally using either the RemoteScan TWAIN UI or the EzeScan TWAIN UI brightness/contrast controls.
There is another issue to watch out for when using RemoteScan. If the scanner vendor driver displays error messages (paper jam, misfeed) on-screen during its processing the RemoteScan Server PC will display those messages, not the client PC. If the error message is sitting waiting for the user to hit OK or Cancel then RemoteScan Server will appear busy to the client PC's until that message box is responded to. In extreme circumstances, the RemoteScan Server process may need to be killed off and restarted via the Windows Start Menu Remote Scan Server option.
