
This guide provides information on the EzeScan connectivity with the SharePoint EDRMS solution.
The SharePoint versions supported are SharePoint Online (Office 365), 2016, 2013, 2010 and 2007.
It details the available options and how to configure an EzeScan job into SharePoint.
Developed for Ezescan Release: 4.3 & 5.0
System Requirements
-
Microsoft SharePoint Online (Office 365), 2016, 2013, 2010, 2007 with document library support.
-
Microsoft SharePoint Online (Office 365) and 2016 requires the SharePoint Server 2016 Client Components SDK to be installed. It is available for download here…
https://www.microsoft.com/en-us/download/details.aspx?id=51679
-
Please install for the respective client operating system. e.g. the x64 for a 64bit PC.
-
-
Microsoft SharePoint 2013 requires the SharePoint Server 2013 Client Components SDK to be installed. It is available for download here…
http://www.microsoft.com/en-us/download/details.aspx?id=35585
-
Please install for the respective client operating system. e.g. the x64 for a 64bit PC.
-
-
Microsoft SharePoint 2010 requires the SharePoint Foundation 2010 Client Object Model Redistribute to be installed. It is available for download here…
http://www.microsoft.com/download/en/details.aspx?id=21786
Configuring Connection Settings
When configuring a Job, KFI or UPLOAD to use the SharePoint connector the connection settings panel must be filled in. If only using a single repository, it is recommended that the SharePoint connection settings are configured globally. Then in each KFI and upload the operator can tick “Use Global Connection Settings” option, this will then obtain these settings.
To do this:
-
Click the Admin menu, choose Workstation Options.
-
Click the EDRMS tab and choose the one of the SharePoint options from the drop-down list that appears.
-
If using SharePoint 2016 or Online -> Select SharePoint 2016
-
If using SharePoint 2013 -> Select SharePoint 2013
-
If using SharePoint 2010 or 2007 -> Select SharePoint
-
-
Enter the following information:
|
Field |
Description |
|
SharePoint Site URL |
Specify the URL of the SharePoint site to connect to. |
|
Username |
Specify the login name if using the default SharePoint authentication method, otherwise where using the other methods leave blank. |
|
Password |
Specify the login password if using the default SharePoint authentication method, otherwise leave blank. |
|
Domain |
Specify the domain of the server; if local, leave blank. |
|
Authentication Method |
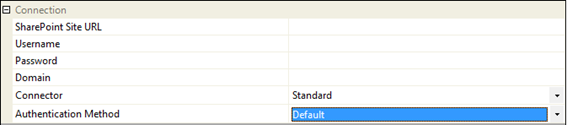
Default - Login with the specified username and password or leave blank to use the current Windows account. SharePoint Online Credentials - Login to SharePoint Online using an email address and password as credentials. This options requires the SharePoint server be configured to allow LegacyAuthProtocolsEnabled. SharePoint Online Credentials (Legacy) - Same as SharePoint Online Credentials but for servers that disallow LegacyAuthProtocolsEnabled. It is recommended that OAuth be used instead. Claims Based - Login is completed through web browser dialog prompt. This option requires user input and thus cannot be used in EzeScan Server. It is recommended that OAuth be used instead. OAuth - Authorise user using OAuth 2.0 protocol. Use the OAuth Sign-in browse button to perform the initial login and approve the connector for access to the site (requires SharePoint Administrator login). The below scopes are required for approving the connection.
Note: The last three scopes are the only ones that require admin consent. |
|
OAuth Sign-in |
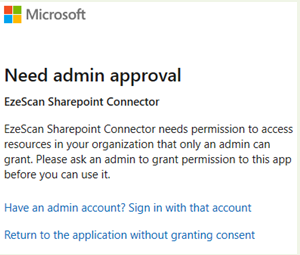
If using OAuth authentication make sure the authentication method is set to OAuth. Click on the … button in this setting and follow the forms to authenticate. The operator will be asked for admin approval to Approve the connector. You will require the SharePoint Administrator to login to this form to approve this. After approval you will be directed to a page http://localhost:5000/ which will display a page cannot be found. Close this can confirm there is a token screen showing that it is signed in. |

Job Settings
There are two ways the EzeScan SharePoint connector can integrate with SharePoint.
-
Using a simple output to SharePoint form. This can be created with a Job only, commonly used for low volume scanning or ad hoc type scanning.
Using the KFI and UPLOAD modules. These are detailed further in sections 8 and 6. This would be used for specific workflows that utilise EzeScan KFI to assist in minimal data entry, reusing data, forms extraction and setting workflow defaults.
The EzeScan to SharePoint Profile Form functionality requires that the EzeScan Workstation be licensed with the EDRMS module.
Output documents using SharePoint Profile Form
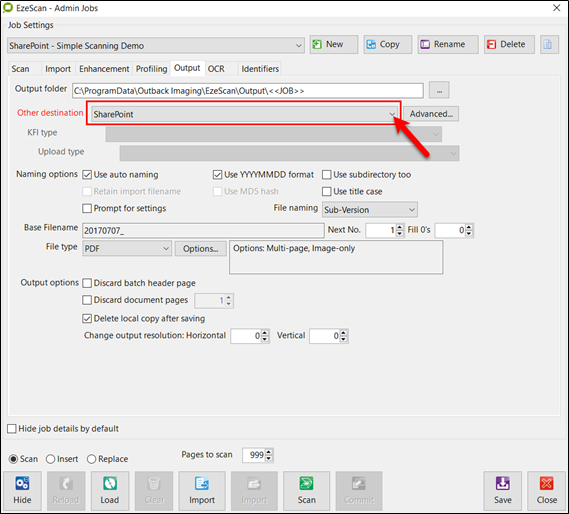
To enable SharePoint output functionality on a Job:
-
Click Admin and choose Jobs (F6).
-
Click the Output tab and from the Other Destination dropdown choose the SharePoint option for the respective environment.

-
Click the Advanced
-
Complete the connection settings or tick “Use Global Connection Settings” (if configured).
-
Scroll down to the Output settings section.

-
Scroll down to the Import settings section.

-
Fill in the following details to change the defaults of the Profile Form that is shown when users profile (F4) documents using this Job:
Field
Description
Show Document Profile Form
Select whether or not to show the document profile form. If ‘No’, the Document Title must be named automatically and Destination Folder URL specified.
Document Title
This will retain the filename generated in the naming options on the output tab. Choose whether or not to keep the file extension.
Destination Folder URL
Type in or browse for the default folder URL to display when the Profile Form comes up.
-
After modifying these settings click the Save button, otherwise the changes will be lost.
-
The Job is now configured to save scanned documents into SharePoint.
Import documents using SharePoint browser
If there is a requirement to import documents from SharePoint into EzeScan, (e.g. for markup/redaction purposes) an EzeScan job can be configured to do this.
This would usually be a separate EzeScan job - one job to scan and save to SharePoint, then another to import from SharePoint, markup/redact and save to SharePoint.
SharePoint Import functionality on a Job is only available when Output to SharePoint is configured.
To enable Import File functionality on a Job:
-
Click Admin and choose Jobs (F6).
-
Select the Job you want to modify.
-
Click the Import tab, enable the Enable Import File Processing option and then enable the Import File from EDRMS option by ticking the box.

-
To change the import default settings, click the Output
-
Click the Advanced
-
Scroll to the Import section of the SharePoint Server settings.

-
Change the Source Folder URL, type in, or browse for, the folder URL to display when the Job’s Import File button is clicked. When the job is run EzeScan will default to the selected folder.
-
After modifying these settings click the Save button, otherwise the changes will be lost.
KFI Field Settings
The KFI Field Settings allow the operator to browse into SharePoint during KFI indexing so the operator can then select folders and object types to be applied to the document.
The following functionality requires that the EzeScan workstation be licensed for the EDRMS as well as KFI and UPLOAD modules.
Enabling browse options
The SharePoint settings must be configured before a KFI field can use the SharePoint browse functionality.
-
Press F7 to display the KFI form.
-
Click the EDRMS
-
If using the global connection settings from the Workstation Options, tick the “Use Global Connection Settings” box; otherwise fill in the Connection
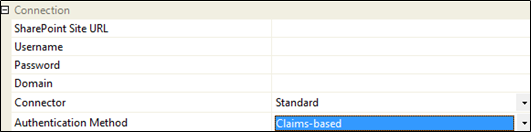
‘Claims-based’ Authentication is to be used in conjunction with Sharepoint 365.
-
Click the Fields
-
To enable a field to access SharePoint you need to:
-
-
Click the edit link under Properties for the field.
-
Click the SharePoint
-
Tick the Enable SharePoint Browse Button
-
The browse parameters will become active.

-
Click OK
-
Configuring browse parameters
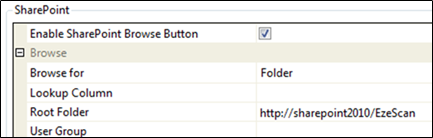
Browse Mode
This option determines the type of SharePoint Browser that is shown when the Browse button (F3) is pressed during indexing.
Choose from one of the following options:
|
Option |
Description |
|
Folder |
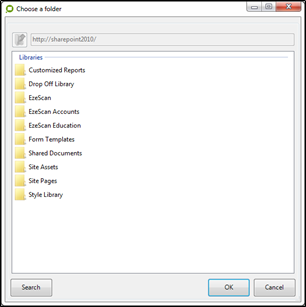
Enables the operator to browse the folder structure of the SharePoint site chosen in the KFI’s connection settings. The operator can also use the Search button to search for a folder instead of having to browse the folder structure. When the operator has selected the folder, the full URL of the selected item is returned as the value.
If the operator requires for the folder browse to start at a specific folder, the Root Folder setting can be used to allow this. E.g. The Browse for is set to folder and the Root Folder is configured to start at a specific folder. |
|
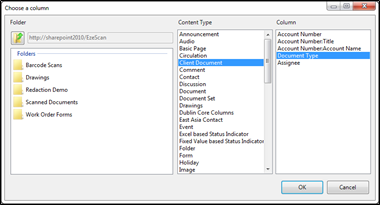
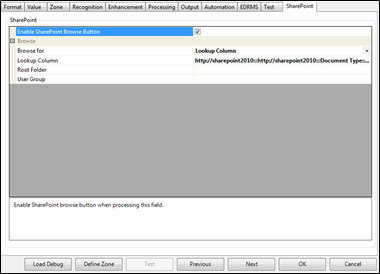
Lookup Column |
Enables the operator to select a column from the connected SharePoint site’s Lookup lists. Navigate through the Content Type(s) and select a column. When the OK button is clicked by the operator, the selected URL is returned as the value. During profiling, when the KFI browse button is clicked by the operator, the respective items are displayed. The operator can then select the item from the list (and with the correct upload mapping) it will be applied to the saved document respective column value. |
|
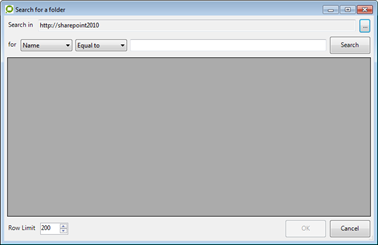
Search |
This will display to the operator a search form. It allows for the operator to search for a folder in the selected document library. The operator can select where to search in and a Name or Title of the Folder |
|
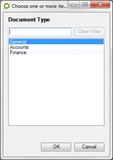
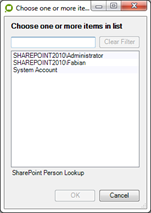
Person |
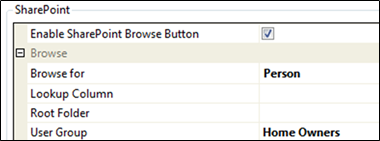
This will display to the operator all the available users in the SharePoint Site. During profiling, when the KFI browse button is clicked by the operator all users will be displayed in a list. The operator can then select the Person item from the list (and with the correct upload mapping) it will be applied to the saved document respective column value. If the operator requires selecting people in a group instead of the whole SharePoint site, the User Group setting can be used to set which group.
e.g. This will display only the people in the selected group. |
|
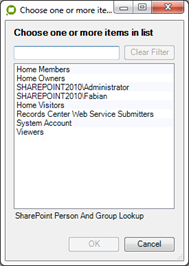
Person or Group |
This will display to the operator all the available People and Groups in the SharePoint Site. During profiling, when the KFI browse button is clicked by the operator all users and Groups will be displayed in a list.
e.g. |
|
Workflow Templates |
This allows the user to browse and select workflows during KFI processing. A Root Folder URL must be specified for the Document Library where the document will be uploaded. |
Upload Settings
The UPLOAD module will obtain the KFI output data to pass into SharePoint saving the document into the respective folder and applying metadata information.
The following functionality requires that the EzeScan Workstation be licensed for the EDRMS and KFI and UPLOAD modules.
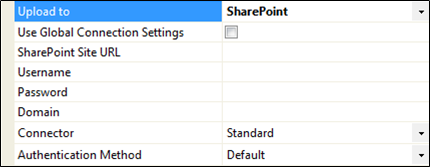
Configuring connection parameters
-
Open the Upload Form (F8).
-
Choose the Upload Type you want to configure.
-
On the left side in the Upload Properties pane choose the SharePoint option for the respective environment.
-
If using the global connection settings from the Workstation Options, tick the “Use Global Connection Settings” otherwise fill in the Connection settings.
-
Configuring built-in upload fields
The following fields will appear after choosing Upload to SharePoint option in the Upload Properties pane. These are the default SharePoint fields.
Each field can have its input set using the Source Field cell, noting that the Parent Folder/Document can’t be set to ignore. 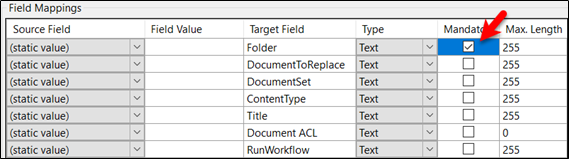
|
Target Field |
Description |
|
Folder |
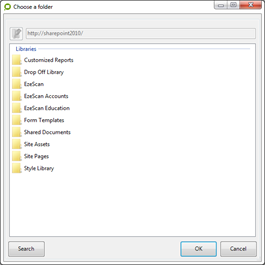
This field is the SharePoint Document Library folder path. The full path of the folder will need to be supplied. e.g. http://SharePoint/Docs/Documents/Scans If the UPLOAD Type is going to upload documents to one SharePoint folder, the operator can set this to a static value. When setting the Source Field to Static a browse button will appear. When Selected, EzeScan will display a SharePoint Document Library browse screen. The operator will then browse to the respective folder, when done click the Choose Folder button and the path will be returned into the field value. |
|
Title |
This field will become the Title of the uploaded document. |
|
Document To Replace |
If the operator would like EzeScan to completely overwrite the document and metadata, set this field to pass through the title value derived from the source KFI field. If EzeScan sees a document of the same name in the folder it will replace the document and metadata. |
|
Document ACL |
The field should be populated with member/role pairs (For example, Viewers||Read||Home Owners||Contribute).
Note: Permissions can only be applied for Groups and Users belonging to the site the document is being uploaded to. This is only implemented for the Advanced connector, if you try to apply an ACL using the Standard connector the upload will fail. |
|
ContentType |
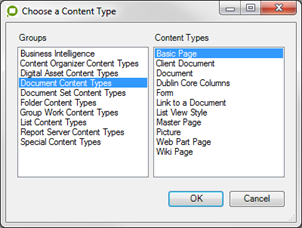
This field is to set the ContentType that is going to be applied to the scanned document. Once the document type is applied the operator can use the Auto Populate button to obtain all the custom columns that the ContentType uses. Set the Source Field to static value. Click the browse button (…) and EzeScan will then display a screen to select a content type. Click on Document Content Types from the Groups column, and then click the respective ContentType. When the operator clicks the OK button, the selected ContentType will be returned into the field value.
NOTE: For this option to work, the Folder mapping must be set to a static value. This is is required so EzeScan can obtain the content types available for the selected folder. |
|
Document Set |
This field can be used to create a document set within the upload folder in SharePoint. You simply pass the name of the document set into the field, if it doesn't exist it will be created, if it does exist EzeScan will re-use it. When the document is uploaded it will be placed inside the document set. Note the system defined 'Document Set' content type must be specified in the upload Content Type field, or a content type that inherits from it. |
|
Document Set Content Type |
This field can be used if EzeScan is creating a Document Set. It needs to be used in conjunction with the Document Set field mapping. If the Document Set to be created is different to the content type then the Document Set Content type needs to be specified in this field. |
|
Run Workflow |
To start a workflow when uploading a document specify the workflow template name in the RunWorkflow upload field, or the value returned from the KFI workflow browse field. Alternatively you can statically browse the RunWorkflow field for one or more workflow names.
NOTE: This may not work for all workflows due to limitations in the SDK. Customers strictly must test this functionality before it is to be used in a production environment. This functionality can only be used on workflows that have been configured for manual starting and that do not require input. |
|
Workflow[1]:Name |
The name of the SharePoint workflow to start |
|
Workflow[1]:Type |
The association type (List or Content Type) |
|
Workflow[1]:Version |
The workflow version (2010 or 2013) |
|
Workflow[1]:Initiation Parameter[1]:Name |
The name of the first parameter |
|
Workflow[1]:Initiation Parameter[1]:Value |
The value of the first parameter
NOTE: To populate 2 initiation parameters on the workflow you manually add the following fields:
To start a second workflow, manually add the same fields above with the workflow key to [2] (Parameter fields are optional). For example:
|


Configuring custom ContentType fields
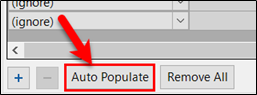
The SharePoint connector can obtain all custom columns from a SharePoint ContentType. The ContentType and Folder mappings must be set to valid values for EzeScan to be able to obtain the custom fields of the content type.
Click the Auto Populate button at the bottom of the screen. This will result in the SharePoint connector returning a list of custom fields that relate to the respective ContentType.
It is then a matter of setting the source values of those fields to the target values of the custom fields.
The Auto Populate button appears under the Field Mappings grid.
Applying KFI Output Data to Target Field Data
To pass through the KFI output data into the Upload module the operator is required to set the source field data to the target field data.
-
In the Upload type, set the Column names from option to the name of the KFI job Type.

-
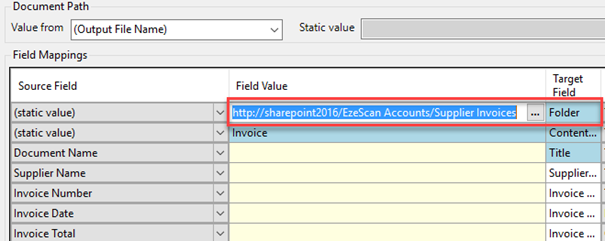
In the Field Mappings Grid the operator can apply the Source Field settings to the Target Field settings. In the example below the SharePoint Target Field Document Name is being populated by the KFI Source Field Title.

-
When all the mappings are complete, click Apply.
-
Click OK to save the changes.
Creating Sub-folders in the Upload
EzeScan is able to create subfolders in EzeScan by searching for the folder name and creating it if doesn’t exist. If the folder already exists, the document will be uploaded to the found folder.
-
In the Upload dialog, locate the target field ‘folder’.
-
Select the root folder which the sub-folders will be created under.
-
Once the folder has been selected, navigate to the end of the value string, and add a forward slash {‘/} to the string.
-
Following the forward slash, you have the option of either adding a static or dynamic value for the folder creation.
-
To add a dynamic value, use the upload placeholder values from the ‘Source Field’ drop-down values. The placeholder values look like ‘<<IF1>>’. Substitute the number value with the drop-down number.

-
You can even create sub-subfolders, by adding extra values at the end of the string.
An example could be:
http://sharepoint2016/EzeScan Accounts/Supplier Invoices/<<IF6>>/<<S3(MMM-YYYY)>>
This will create a subfolder for the supplier name and a sub-subfolder with current month and
year. E.g. “Mar-2020”.
When uploading data into Date and Time type fields in SharePoint the date value must be formatted correctly as MM-dd-yyyy
Running a Job for Saving Using KFI and Upload
-
To run a job to SharePoint with the profile form, confirm that the Other Destination is set to SharePoint. Please refer to section 4.1 on page 7 for how to set this up.
-
Click the scan/import or job button to load the image into the EzeScan viewer.
-
Press the F4 key or click the Profile button

-
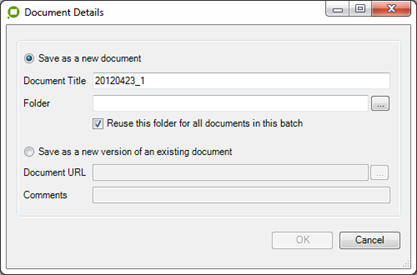
In the Document Details window the operator has the option to save the image as a new document which they can then Name the document and choose the folder to save the document in.
-
Alternatively, the operator can choose an existing document from SharePoint and create a new version of the existing document. Browse for an existing document which will bring back the document’s URL. Comments field can also be applied.
-
Click OK and the document will be saved into SharePoint.
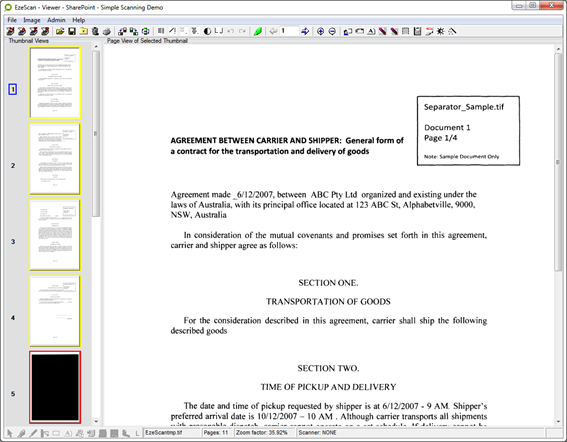
There is a sample SharePoint profile form job in the downloads section on the EzeScan web site (SharePoint – Simple Scaning Demo).
Running a Job for Saving Using KFI and Upload
To run a job to SharePoint using the KFI and UPLOAD modules, confirm that the Other Destination is set to KFI and the respective KFI and UPLOAD Types are selected. Please refer to section 5 on page 9 and section 6 on page 14 for details on how to set this up.
In the example below the KFI\UPLOAD types have been configured for a:
-
Title (Name of document)
-
Folder (Folder in the repository)
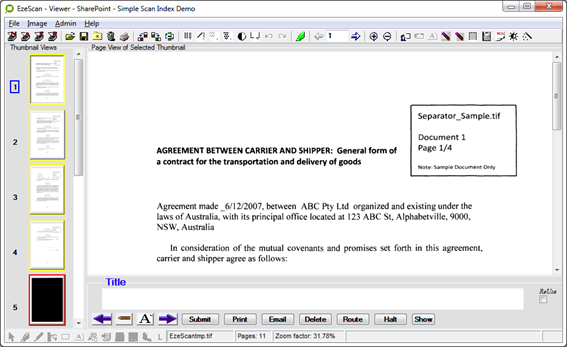
The image below shows a job using the KFI and upload modules. 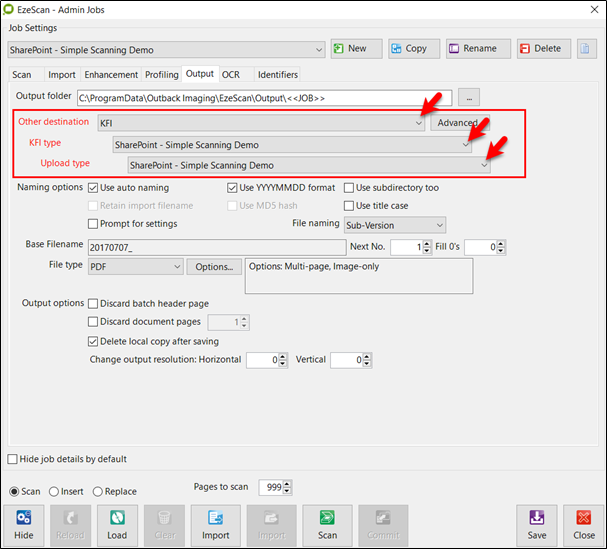
To run a job to SharePoint using the KFI and UPLOAD modules:
-
Click the scan/import or job button to load the image into the EzeScan viewer.
-
Press the F4 key or click the Profile button

-
The operator can enter the Title.
-
When complete the operator can press Enter or click the

-
After the operator has completed the Title field, the next field will appear.
-
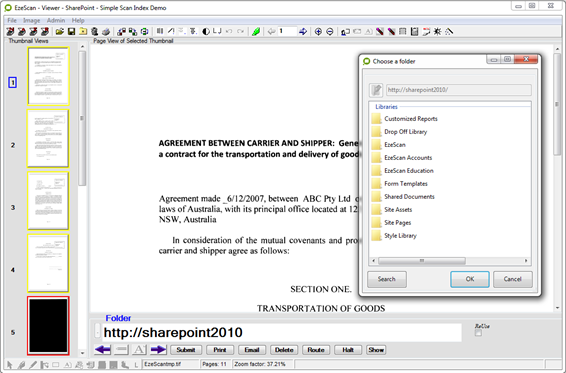
The operator will be prompted to select a folder.
-
When complete, press Enter and the submit button will highlight.
-
Press Enter or click

-
The document will be saved into the respective SharePoint folder and metadata applied.
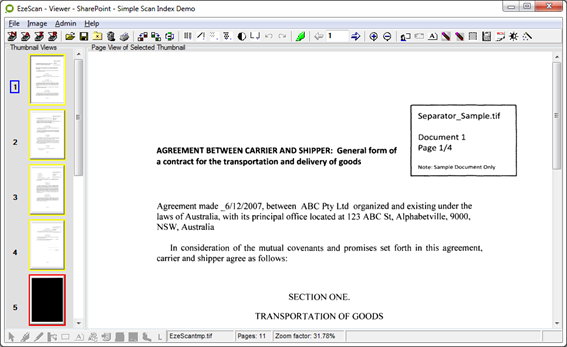
There is sample SharePoint KFI / UPLOAD jobs in the downloads section on the EzeScan web site (SharePoint – Simple Scan Index Demo).
Appendix
Display SharePoint URL after saving document
EzeScan can display a prompt to the operator after a document is saved into SharePoint. This prompt will display the URL of the saved document.
The image below is an example of this message. 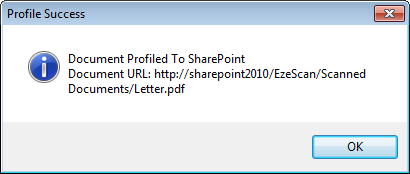
To enable this setting:
-
Click the Admin menu and choose Jobs.
-
Select your Job from the dropdown list.
-
Click the Output
-
Click the Options
-
Click the Messages
-
Tick Display EDRMS Record Number Message.
-
Click OK.
-
Click
-
Click Close.
Fixing the can’t find the Client Workflow Services dll when starting workflows
If the upload fails reporting that it cannot find the Microsoft.SharePoint.Client.WorkflowServices.dll please do the following.
-
Copy this file 'C:\Program Files\Common Files\microsoft shared\Web Server Extensions\15\ISAPI\Microsoft.SharePoint.Client.WorkflowServices.dll'
To
-
'C:\Program Files (x86)\Outback Imaging\EzeScan\Core\SharePoint 2013\
Populating Managed metadata/TaxonomyFields
EzeScan is able to work with taxonomy fields within SharePoint.
If you’re using a content type which has a managed metadata column, EzeScan is able to browse for a value in the KFI and then populate this field as metadata in the upload.
An example of a managed metadata term set in SharePoint: 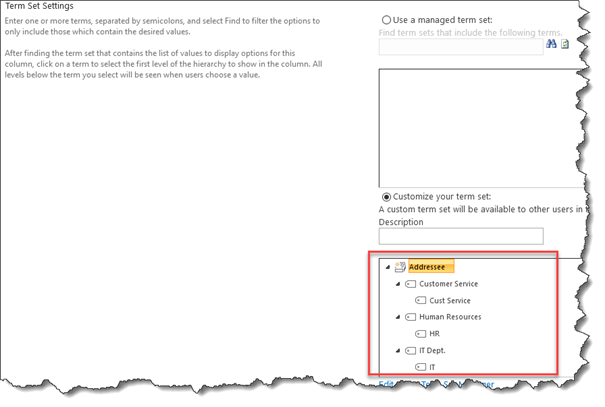
In the KFI, create a field set to browse for a ‘lookup column’. 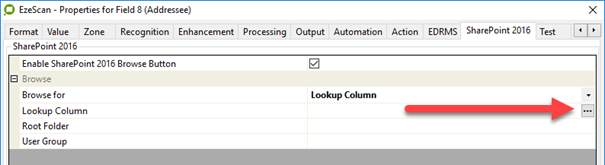
Select the content type with the managed metadata column, and select the column. 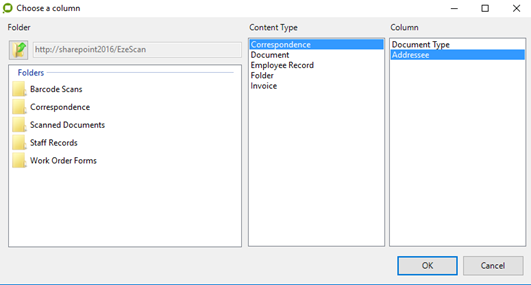
The column value should now be populated and an extra field for the ID of the value will be created in the KFI. 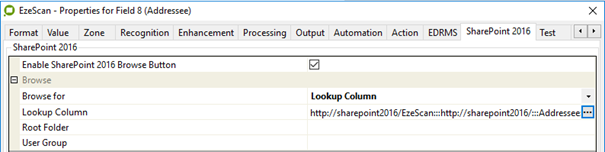
Go to the upload dialog. Use the newly created ID field as the source value to map to the taxonomy field. 
Running the job:
Profile the document and process the index fields. When you get to the taxonomy field, a dialog will appear to search and select a term. 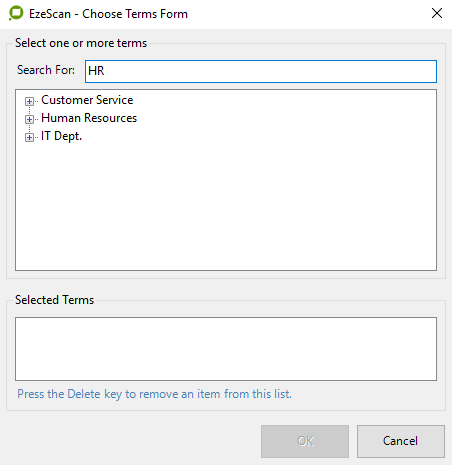
Choose a term to continue, and this term will populate in the index field.
Submit the document, and a valid search term will be applied in the column in SharePoint.