
System Requirements
OpenText eDOCS DM REST API Server verions 16.2 to 24.3.
Configuring the Connection Settings
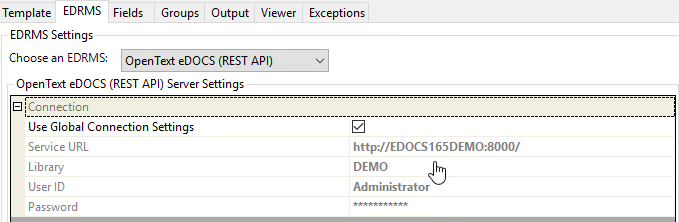
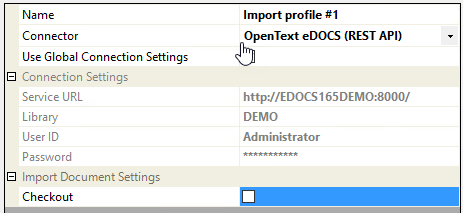
When configuring a Job, KFI or Upload to use the eDOCS connector the connection settings panel must be filled in. If only using a single eDOCS Library, it is recommended that the eDOCS connection settings are configured as a global setting in the EzeScan Workstation Options form. Doing this means that these settings won’t need to be re applied when configuring a job, kfi or upload, the operator can tick the use global connection settings option.
-
Click the Admin menu, choose Workstation Options.
-
Click the EDRMS tab and choose the OpenText eDOCS (REST API) option from the Choose an EDRMS drop down list.
-
Enter the following information:
|
Field |
Description |
|
Service URL |
Specify the URL to the API service e.g. http://edocs:8000/ Refer to eDOCS REST API Server configuration for port number. |
|
Library |
Specify the name of the eDOCS Library, or leave this blank to use the primary library. |
|
User ID |
The User ID to access the library |
|
Password |
The password for the respective User ID |
EzeScan workflow options
There are three ways the EzeScan eDOCS connector can integrate with eDOCS.
Saving documents to eDOCS using the Jobs interface.
This uses the KFI and UPLOAD modules. These modules are detailed further in sections 5 and 5.3. This would be used for specific workflows that utilise EzeScan KFI to assist in minimal data entry, reusing data, forms extraction and setting workflow defaults.
Importing documents from eDOCS using the Jobs interface.
This will allow an operator to browse into eDOCS from EzeScan and import a document for processing.
Saving documents to eDOCS using the Routing interface/service.
The Server Routing module is another way of configuring EzeScan to use the KFI and UPLOAD modules to upload documents to eDOCS. As it can be configured to run as a windows service it is recommended for automated workflows like barcoding, forms or processing documents that do not require operator intervention. Exceptions can be configured and they would be handled using the EzeScan job interface.
EzeScan module eDOCS settings
The below details the JOB/KFI/UPLOAD settings in EzeScan that are available with eDocs.
Once the operator has an understanding of the settings please refer to section 6 Configuring EzeScan workflow settings to make them work in a workflow.
Jobs
The Job settings allow the operator to search or browse for a document in eDOCS to import into EzeScan for processing. The setting to import a document from eDOCS is in the import tab under import sources.

KFI
The KFI Field Settings allow the operator to browse into eDOCS during KFI indexing so the operator can then select folders and object values to be applied to the document.
KFI Connection Parameters
The eDOCS settings must be configured before a KFI field can use the eDOCS browse functionality.
-
Press F7 to display the KFI form.
-
Click the EDRMS tab.
-
Choose OpenText eDOCS (REST API)
-
If using the global connection settings from the Workstation Options, tick the Use Global Connection Settings box; otherwise fill in the Connection settings.
KFI Field Settings
-
Click the Fields tab.
-
To enable a field to access eDOCS you need to:
Click the edit link under Properties for the field.
Click the OpenText eDOCS (REST API) tab.
Tick the Enable eDOCS Browse Button box.
The browse parameters will become active.

KFI Field Browse Settings
This option determines the type of eDOCS Browse that is shown when the browse button (F3) is pressed during indexing.
Choose from one of the following five options:
|
Option |
Description |
|
Browse for Folder or Document |
This will allow the operator to browse for a folder or document. A form like the below will appear. 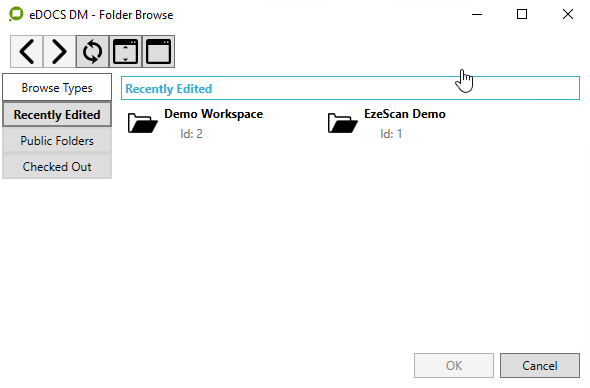
Display Documents Select the Yes option to display documents for when this form is displayed. |
|
Browse for Column Value |
This setting will be used for browsing lookup items such as Document Type and Author. Profile Form Name To select from a list of available Profile Forms, click into the value cell and then click on the … button that appears. Column Name To select from a list of available Columns, click into the value cell and then click on the … button that appears.
|
UPLOAD
The UPLOAD module will obtain the KFI output data to pass into eDOCS saving the document into the respective library and apply the field values.
UPLOAD Connection Parameters
-
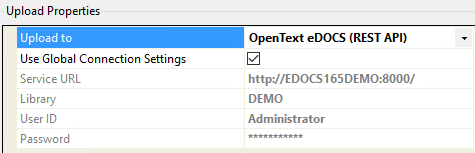
Open the Upload Form (F8).
-
Choose the Upload Type OpenText eDOCS (REST API).
-
On the left hand side in the Upload Properties pane choose OpenText eDOCS (REST API) in the Upload To list.
-
If using the global connection settings from the Workstation Options, tick the Use Global Connection Settings box; otherwise fill in the Connection settings.
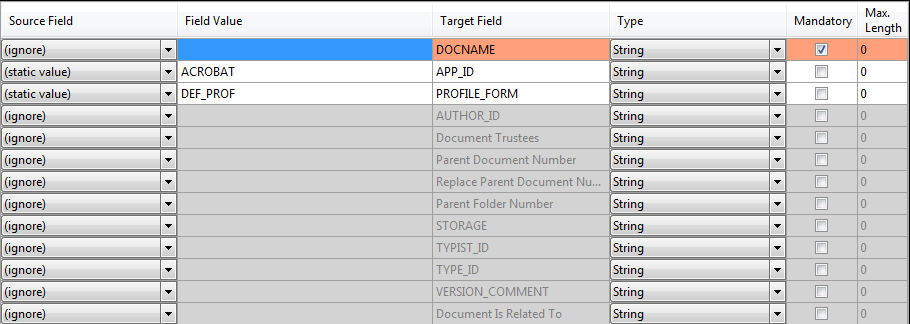
UPLOAD Built-in Upload Fields
The following fields will appear after choosing Upload To OpenText eDOCS (REST API) option in the Upload Properties pane. These are the default eDOCS fields.
Each field can have its input set using the Source Field cell, noting that the Parent Folder/Document can’t be set to ignore.
|
Target Field |
Description |
|
DOCNAME |
Use this field to specify the name of the upload document. |
|
APP_ID |
Use this field to specify the Application ID to use when saving the upload document. Noting that this application must support the file format of the upload document. Before browsing this value the PROFILE_FORM setting must be applied. 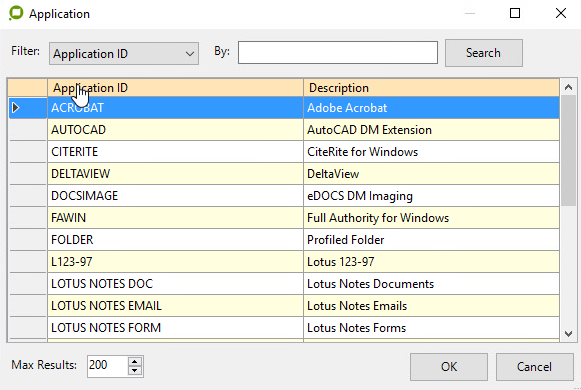
|
|
PROFILE_FORM |
Use this field to specify the name of the Profile Form to be assigned to the upload document.
To select from a list of available Profile Forms, set the source field to (static value) and then click on the … button that appears. 
|
|
|
Use this field to set the Author of the upload document. To browse a list of available eDOCS users, set the source field to (static value) and then click on the … button that appears. 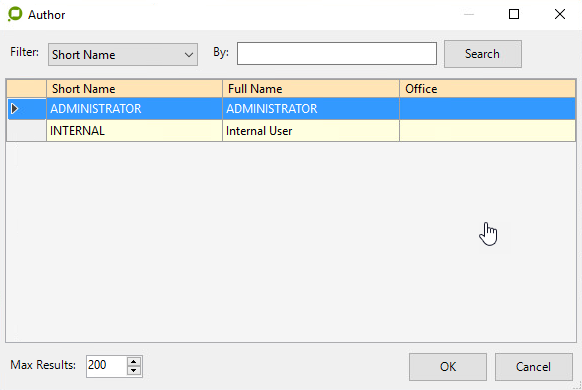
|
|
Document Trustees |
Use this field to specify a custom document Security. Sample syntax
<USERID>||<FLAG(P=Person|G=Group)>||<RIGHTS(255=Full)>
e.g. ADMINISTRATOR||P||255 For multiple ADMINISTRATOR||P||255|||DOCS_USERS||G||63
Otherwise the default profile form security settings can also be applied. To do this set this option source field to “static value” and enter INHERIT_FROM_DEFAULTS. The values applied in the profile form DEFAULT_RIGHTS column will be applied to the scanned document. |
|
|
This is the eDOCS Document Number, When used EzeScan will update the Document in eDOCS with the upload document as a new version.
|
|
|
This is the eDOCS Folder Number, when used EzeScan will save the upload document as a new file into the Folder. To browse the eDOCS Library for a Folder, set the source field to (static value) and then click on the … button that appears. 
Select a folder and click OK.
|
|
STORAGE |
Use this field to specify the Storage to use when the upload document is saved to eDOCS. 
|
|
TYPIST_ID |
Use this field to specify the Typist ID to assign to the upload document when it is saved to eDOCS. To select from a list of available types, set the source field to (static value) and then click on the … button that appears. 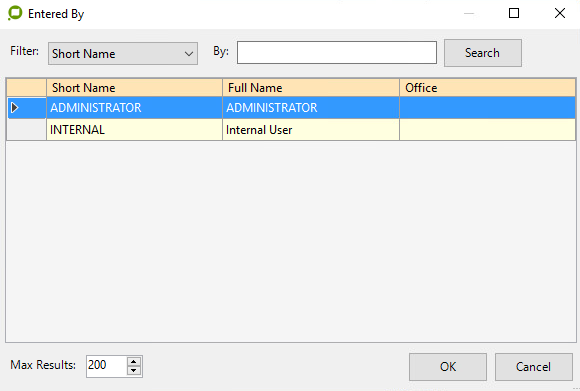
|
|
TYPE_ID |
Use this to set the Type ID of the upload document. This is typically set to a static value in the upload. E.g. DEFAULT or FOLDER. To select from a list of available types, set the source field to (static value) and then click on the … button that appears. 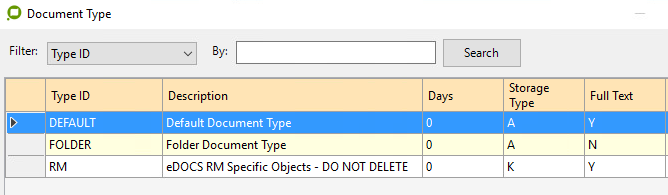
|
|
VERSION_COMMENT |
This is the comment field on the Version History of a document. This field would be used with the “Parent Document Number” field. |
|
Document is Related To |
Use this field to relate a document from upload, simply pass the document number into the field, for multiple values use ||| as the delimiter. |
Configuring the eDOCS Profile Form custom fields
After selecting the Profile Form to assign to the uploaded document (Profile Form Field), click the Auto Populate button at the bottom of the screen.
This will result in the eDOCS connector returning a list of custom fields (Columns) that relate to that Profile Form.
It is then a matter of setting the source values of those fields to the target values of the custom fields.
The Auto Populate button appears under the Field Mappings grid.
Applying KFI Output Data to the Target Field Data
To pass through the KFI output data into the Upload module the operator is required to set the source field data to the target field data.
In the Upload type, set the Column names from option to the name of the KFI job Type.
In the Field Mappings Grid the operator can apply the Source Field settings to the Target Field settings.
In the example below the eDOCS Target Field DOCNAME is being populated by the KFI Source Field Title.
-
When all the mappings are complete, click Apply.
-
Click OK to save the changes.
Configuring EzeScan workflow settings
The below will detail how to configure and run EzeScan workflows using the three methods mentioned in section 4 EzeScan workflow
Configuring a job to save documents to eDOCS
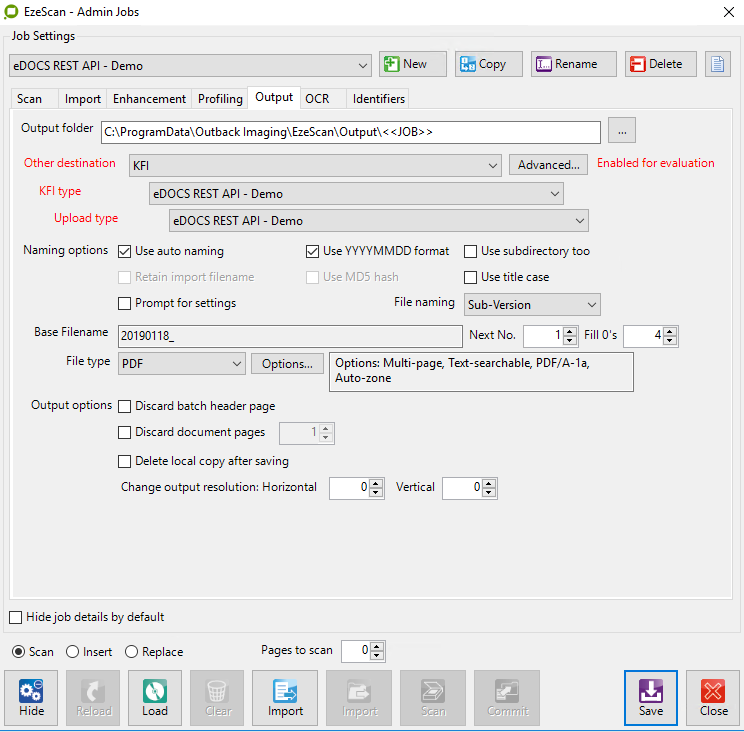
To run a job to eDOCS using the KFI and UPLOAD modules, confirm that the Other Destination is set to KFI and the respective KFI and UPLOAD Types are selected. Please refer to section 5 on page 8 and section 5.3 on page 11 for details on how to set this up.
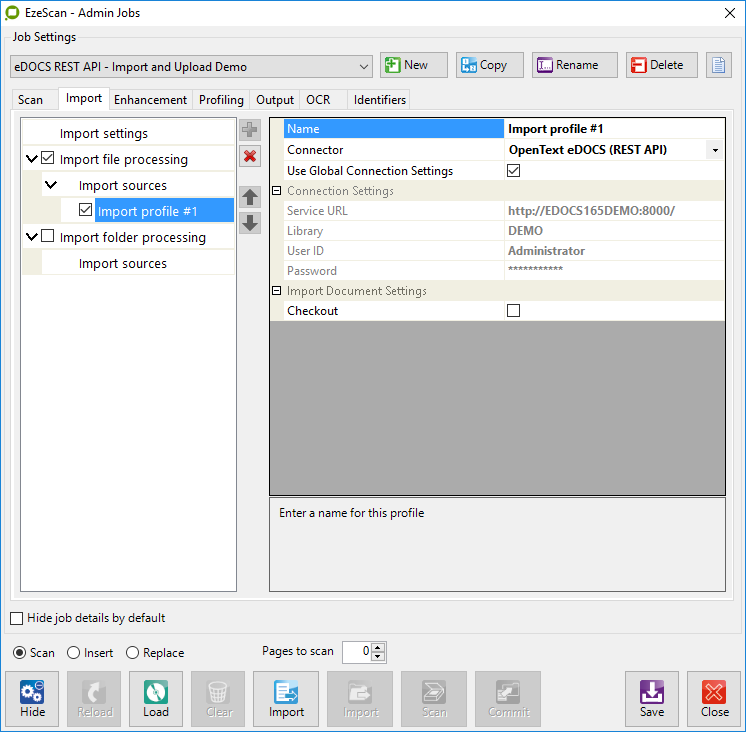
In the example below the KFI\UPLOAD types have been configured for a:
Document Name
Author (Author in the DM Library)
Document Type (Document Type in the DM Library)
Folder (Folder in the DM Library)
The image below shows a job using the KFI and upload modules.
To run a job to eDOCS using the KFI and UPLOAD modules
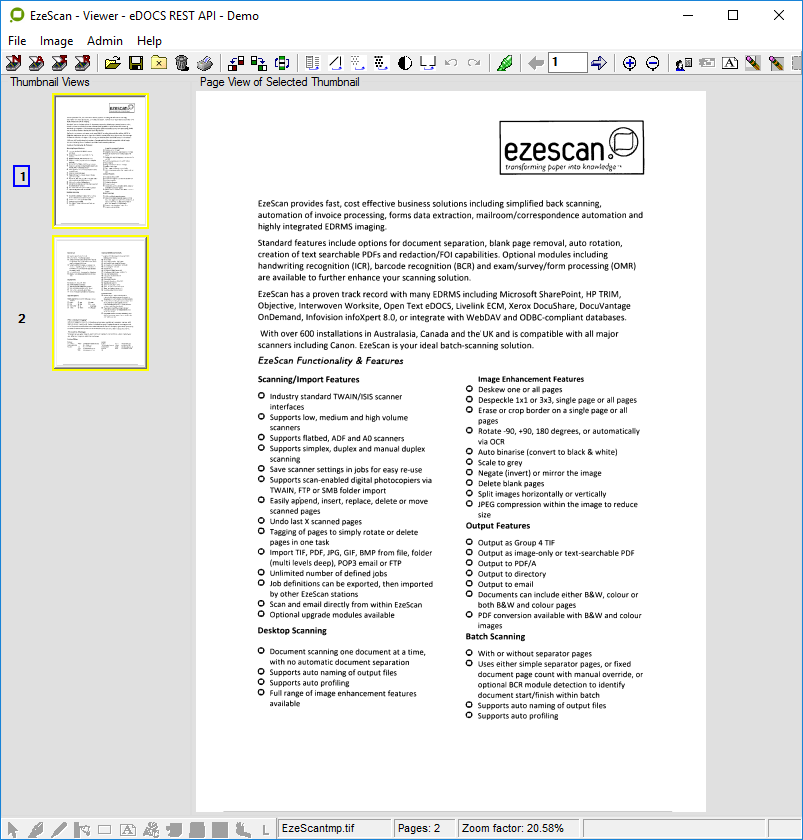
Click the scan/import or job button to load the image into the EzeScan viewer.
Press the F4 key or click the Profile button to index the document. The KFI screen will appear below the page view. In this example the operator will enter a Document Name, browse for an Author, browse for a Document Type, and browse for a Folder.
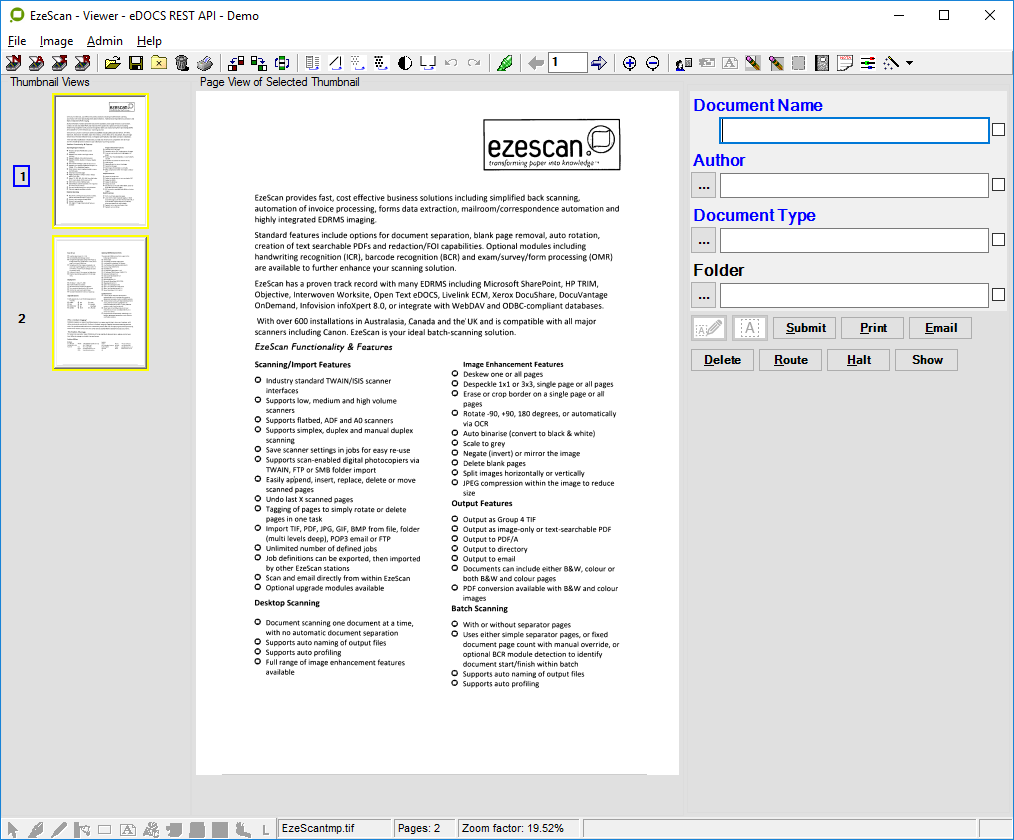
-
The operator can enter the Document Name.
-
When complete the operator can press Enter to move to the next field.
The operator will be prompted to select an Author.
The operator can press F3 or the […] button to browse the options for the author.
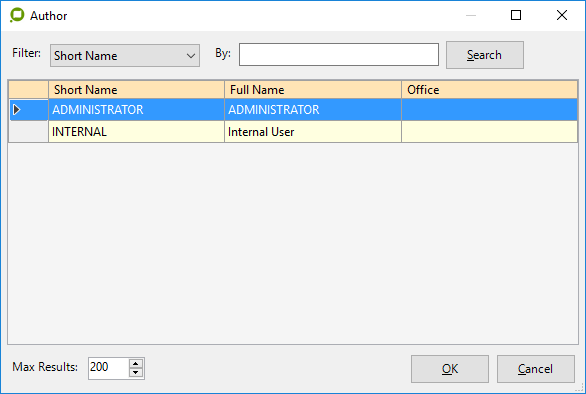
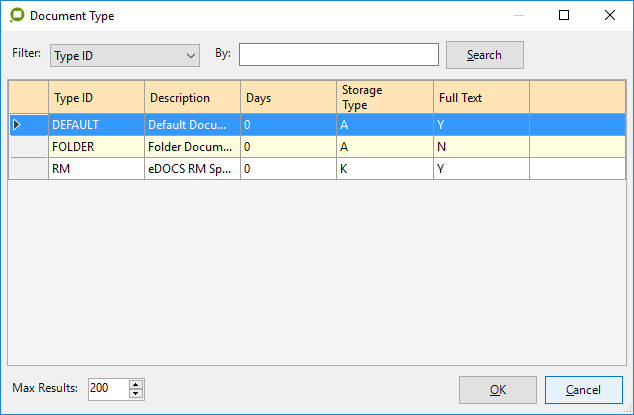
When complete the operator can press Enter to move to the next field. The operator will be prompted to select the Document Type. The operator can press F3 or the […] button to browse the options for the document type.
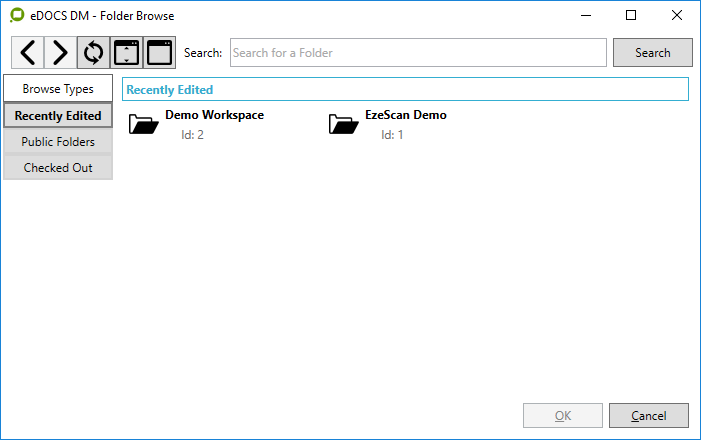
When complete the operator can press Enter to move to the next field. The operator will be prompted to select the Folder. The operator can press F3 or the […] button to browse the options for the folder.
-
When complete, press Enter and the submit button will highlight.
-
Press Enter or click

-
The document will be saved into the respective eDOCS folder and metadata applied.
Configuring a job to import from eDOCS
To run a job to import from eDOCS confirm the import source has been configured in the job import tab.
To enable Import File functionality on a Job:
-
Click Admin and choose Jobs (F6).
-
Select the Job you want to modify.
-
Go to the import tab -> Import file processing -> Import Sources and click the

to add an import source and select “OpenText eDOCS (REST API)”
Select “Use Global Connection Settings” (this will import the settings configured from section 3 Configuring the Connection Settings otherwise if another environment enter in the respective settings.
Click the save button to save the settings.
To run a job to import from eDOCS
Click the import or job button and the following screen will appear. The operator will be able to search by document name or number or browse the browse options recently edited, public folders, or checked out.
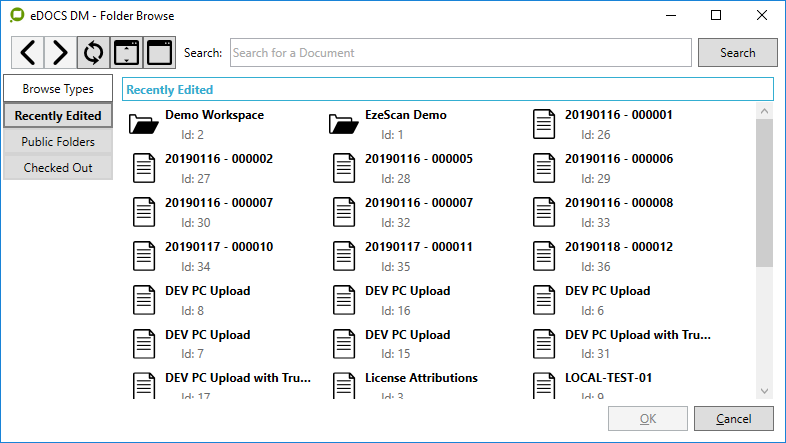
Select a document and click OK.
The document will appear in the viewer.
Configuring a Route to upload to eDOCS
1. Click Admin and Choose Routing (F9)
2. Create a new Route and set the mode to “Route using a KFI Field value to match a rule keyword”
3. In the KFI drop down list, select the KFI that will be used with the Route.
4. In the UPLOAD drop down list, select the UPLOAD that will be used with the Route.
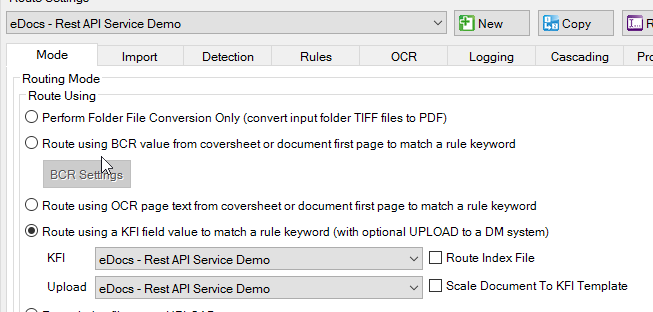
8. Click Save then Close
The Routing module can be run in two ways.
In the EzeScan UI
Select Admin -> Routing, select the respective Route and click the Run Routing button.
This is good for testing or troubleshooting issues.
2) As a windows service.
To do this the EzeScan Server windows service must be installed and started.
Please note: To obtain more information about EzeScan SERVER Routing please refer to the Routing user guide from the help menu.
Appendix
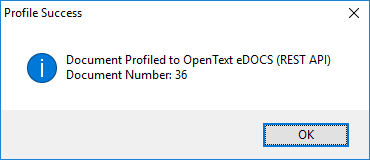
How to display the eDOCS document id after saving a document.
EzeScan can display a prompt to the operator after a document is saved into eDOCS. This prompt will display the record number of the saved document.
The image below is an example of this message.
To enable this setting:
-
Click the Admin menu and choose Jobs.
-
Select your Job from the dropdown list.
-
Click the Output tab.
-
Click the Options button.
-
Click the Messages tab.
-
Tick Display EDRMS Record Number Message.
-
Click OK.
-
Click Save.
-
Click Close.