
This guide provides information on the EzeScan connectivity with the OpenText Content Suite ECM solution. It details the available options on how to configure an EzeScan job into OpentText Content Suite.
 System Requirements
The table below lists the pre-requisites for the version of Content Suite you will be connecting to.
|
|
9.7.X |
10.0 |
10.5 |
16.X |
20.X |
21.X |
22.X |
24.X |
|
OpenText LAPI Package (no longer supported) |
- |
|
|
|
|
|
|
|
|
Livelink Enterprise Services |
|
X |
|
|
|
|
|
|
|
Content Web Services |
|
|
X |
X |
X |
X |
X |
X |
|
OpenText Directory Services (optional) |
|
|
X |
X |
X |
X |
X |
X |
Configuring Connection Settings
When configuring a Job, KFI or Upload to use the Content Suite ECM plugin the connection settings panel must be filled in. If only connecting to the one server, it is recommended that the Content Suite connection settings are configured globally.
-
Click the Admin menu, choose Workstation Options.
-
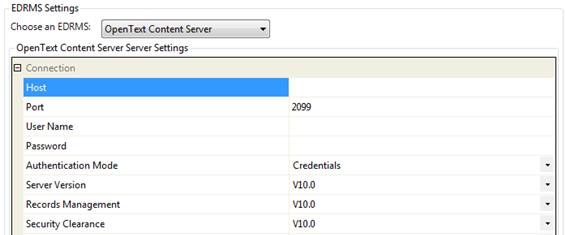
Click the EDRMS tab and choose the Content Suite ECM option from the drop down list that appears.
-
Enter the following information:
|
Field |
Description |
|
Server Address |
Specify the name or IP address of the Content Suite. Note: If connecting to Content Suite 10 this should be the URL of the IIS website. For example http://ezescan-server/ |
|
User Name |
Specify the login name to use when authenticating with the Content Suite. Leave this blank to prompt users for their login credentials. |
|
Password |
Specify the login password to use when authenticating with the Content Suite. Leave this and the user name blank to prompt users for their login credentials. |
|
Impersonate User |
The username to impersonate when connecting to Content Suite. Use input field placeholders (i.e. <<IF6>>) in Upload to pass in the value at runtime. |
|
Authentication Mode |
Specify the authentication mode to use when connecting to the Content Suite. Options are –
Credentials: Login with username and password using Content Suite’s built-in authentication.
Windows Authentication: Login with the current Windows network credentials using Content Suite’s built-in authentication.
OpenText Directory Services: Login with username and password using OTDS web service. Supported for server versions 10.5 and higher. |
|
OTDS Service Url |
The OpenText Directory Services host and port i.e. http://localhost:8080/ or sevice URL http://localhost:8080/otdws/services/Authentication |
|
Server Version |
Select the version of the Content Suite you are connecting to. Version 10.5 can also be used with Content Suite 16.0 and higher. |
|
Records Management |
If wanting to use the records management functionality in Content, set this to the version of the RecordsManagement module you have installed on the Content Suite. Otherwise set to Disabled. |
|
Security Clearance |
If wanting to use the security clearance functionality in Content Suite set this to the version of the SecurityClearance module you have installed on the Content Suite. Otherwise set to Disabled. |
|
Authentication Endpoint Suffix |
This setting will need to be configured when using Java web services or not using the defaults i.e. /cws/Authentication |
|
OpenText Directory Services Endpoint Suffix |
This setting will need to be configured when using Java web services or not using the defaults i.e. /otdsws/services/Authentication |
|
Content Service Endpoint Suffix |
This setting will need to be configured when using Java web services or not using the defaults i.e. /cws/ContentService |
|
Document Management Endpoint Suffix |
This setting will need to be configured when using Java web services or not using the defaults i.e. /cws/DocumentManagement |
|
Member Service Endpoint Suffix |
This setting will need to be configured when using Java web services or not using the defaults i.e. /cws/MemberService |
|
Workflow Service Endpoint Suffix |
This setting will need to be configured when using Java web services or not using the defaults i.e. /cws/WorkflowService |
|
Records Management Endpoint Suffix |
This setting will need to be configured when using Java web services or not using the defaults i.e. /cs-services-rmrecordsmanagement/RMRecordsManagement |
|
Security Management Endpoint Suffix |
This setting will need to be configured when using Java web services or not using the defaults i.e. /cs-services-rmsecmanagement/RMSecManagement |
Job Settings
There are two ways the EzeScan Content Suite ECM connector can integrate with Content Suite.
-
Using a simple output to Content Suite profile form. This can be created with a Job only, commonly used for low volume scanning or ad hoc type scanning.
-
Using the KFI and UPLOAD modules (see further down in this guide). This would be used for specific workflows that utilise EzeScan KFI to assist in minimal data entry, reusing data, forms extraction and setting workflow defaults.
The EzeScan to Content Suite Profile Form functionality requires that the EzeScan Workstation be licensed with the EDRMS module.
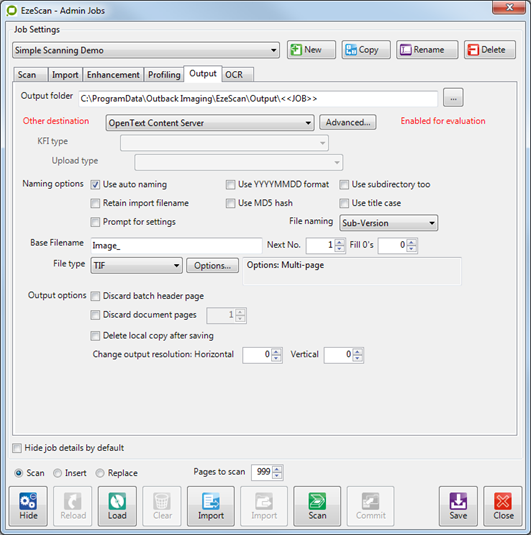
Output documents using Content Suite Profile Form
To enable SharePoint output functionality on a Job:
-
Click Admin and choose Jobs (F6).
-
Click the Output tab and then choose the Content Suite ECM option from the Other Destination
-
Click the Advanced button.

-
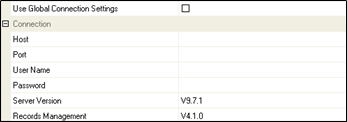
If using the global connection settings from the Workstation Options, tick the Use Global Connection Settings option, otherwise complete in the Connection settings.
-
Scroll down to the Output settings section.

-
Fill in the following details to change the defaults of the Profile Form that is shown when users profile (F4) documents using this Job:
Field
Description
Default Folder
Use this to specify the default folder to select when the profile form is shown. To browse for this folder click into the value cell and the click the […] button. Leave this option blank to force the user to select a folder.
-
After modifying these settings click the Save button, otherwise the changes will be lost.
-
The Job is now configured to save scanned documents into Content Suite.
Import documents using SharePoint browser
If there is a requirement to import documents from Content Suite into EzeScan, (e.g. for markup/redaction purposes) an EzeScan job can be configured to do this.
This would usually be a separate EzeScan job - one job to scan and save to Content Suite, then another to import from Content Suite, markup/redact and save to Content Suite.
Content Suite Import functionality on a Job is only available when Output to Content Suite is configured.
To enable Import File functionality on a Job:
-
Click Admin and choose Jobs (F6).
-
Select the Job you want to modify.
-
Click the Import tab, enable the Enable Import File Processing option and then enable the Import File from EDRMS option by ticking the box.

-
After modifying these settings click the Save button, otherwise the changes will be lost.
KFI Field Settings
The KFI Field Settings allow the operator to browse into Content Suite during KFI indexing so the operator can then select folders and object types to be applied to the document.
The following functionality requires that the EzeScan workstation be licensed for the EDRMS as well as KFI and UPLOAD modules.
Enabling browse options
The SharePoint settings must be configured before a KFI field can use the SharePoint browse functionality.
-
Press F7 to display the KFI form.
-
Click the EDRMS
-
If using the global connection settings from the Workstation Options, tick the “Use Global Connection Settings” box; otherwise fill in the Connection settings.
‘Claims-based’ Authentication is to be used in conjunction with Sharepoint 365.
-
Click the Fields
-
To enable a field to access SharePoint you need to:
-
-
Click the edit link under Properties for the field.
-
Click the Content Suite ECM
-
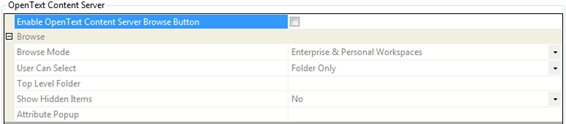
Tick the Enable Content Suite ECM Browse Button
-
The browse parameters will become active.
-
Click OK
-
Configuring browse parameters
Browse Mode
This option determines the type of Content Suite Browser that is shown when the Browse button (F3) is pressed during indexing.
Choose from one of the following five options:
|
Option |
Description |
|
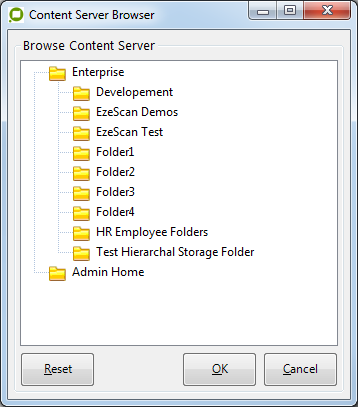
Enterprise & Personal Workspace |
Enables the operator to browse the folder structure of both the Enterprise and Personal workspace volumes. When the OK button is clicked by the operator, the name of the selected item is returned as the value, and the Id is returned as the hidden value. |
|
Enterprise Workspace |
Enables the operator to browse the folder structure of the Enterprise workspace volume. |
|
Personal Workspace |
Enables the operator to browse the folder structure of the Personal workspace volume. |
|
Specified Folder |
Enables the operator to browse the folder structure of the folder specified in the Top Level Folder parameter. |
|
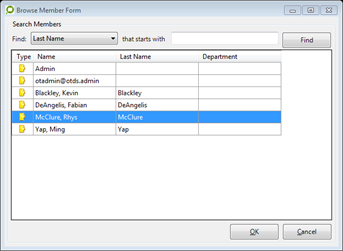
Livelink Members |
Enables the operator to search for Users by their First Name, Last Name, Log-in, and E-mail; and Groups by their Name. When the OK button is clicked by the operator, the selected Member’s name is returned as the value, and the Id is returned as the hidden value. |
|
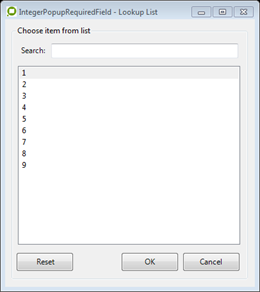
Category Attribute Popup |
Enables the operator to select from the list of values for popup attributes of type Date, Integer, and String. Note this requires that the attribute properties be selected in the Attribute Popup parameter. When the OK button is clicked by the operator, the selected item is returned as the value. |
|
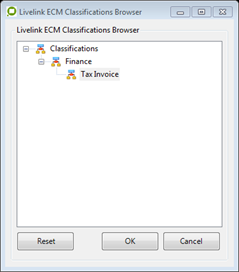
Classification Workspace |
Enables the operator to browse the Classifications workspace. Note: This can only be used if the RecordsManagement connection setting has been enabled. When the operator clicks the OK button, the selected Classification’s name is returned as the value, and the Id as the hidden value. |
|
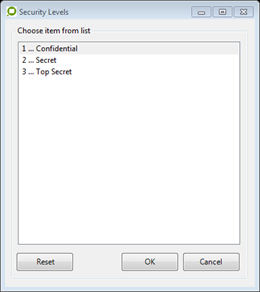
Security Levels |
Enables the operator to select from their list of allowable Security Levels. Note: This can only be used if the SecurityClearance connection setting has been enabled. When the operator clicks the OK button, the selected Security Level is returned as the value. |
|
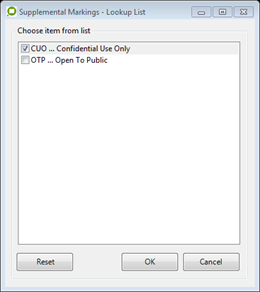
Supplemental Markings |
Enables the operator to select from their list of allowable Supplemental Markings. Note this can only be used if the SecurityClearance connection setting has been enabled. When the operator clicks the OK button, the selected Supplemental Markings are returned as the comma delimited value. |

User Can Select
This option determines the type objects the operator can select when browsing in the Enterprise and Personal workspace volumes.
Top Level Folder
This option determines the top level folder to display when using the Browse Mode Specified Folder. To choose a folder click into the value cell and then press the […] button that appears.
For example: 
Attribute Popup
This option determines the Attribute whose values will be shown when using the Browse Mode Category Attribute Popup. The value of this parameter should be in the format {CategoryID}::{Version}::{AttributeName} or use the following if the Attribute resides in an Attribute Set {CategoryId}::{Version}::{SetName}::{RowIndex}::{AttributeName}.
For example: 
Upload Settings
The UPLOAD module will obtain the KFI output data to pass into Content Suite saving the document into the respective folder and applying metadata information.
The following functionality requires that the EzeScan Workstation be licensed for the EDRMS and KFI and UPLOAD modules.
Configuring connection parameters
-
Open the Upload Form (F8).
-
Choose the Upload Type you want to configure.
-
On the left hand side in the Upload Properties pane choose Content Suite ECM in the Upload To
-
If using the global connection settings from the Workstation Options. Tick the Use Global Connection Settings option; otherwise fill in the Connection settings.
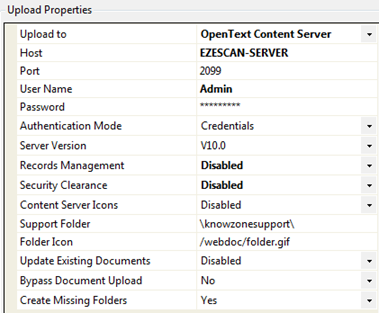
Configuring upload parameters
The following parameters are listed directly underneath the connection parameters. 
|
Parameter Name |
Description |
|
Bypass Document Upload |
Set this option to Yes to not upload the document. This option is intended for chaining together Uploads for creating sub folders. |
|
Create Missing Folders |
Set this option to No to prevent upload from creating missing sub folders. |
Configuring ubuilt-in upload fields
The following fields will appear after choosing Upload To Content Suite ECM option in the Upload Properties pane. These are the default Content Suite fields.
Each field can have its input set using the Source Field cell, noting that the Parent Folder/Document can’t be set to ignore. 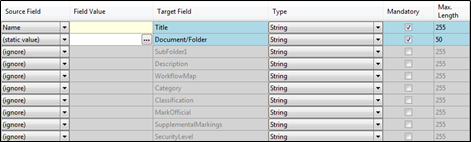
|
Target Field |
Description |
|
Title |
Use this field to name the document when it is uploaded to the Content Suite. To use the original file name set this field to ignore and un-tick the Mandatory option. |
|
Document/Folder |
Use this field to specify where the document will be created in the Server. If the specified item is an existing document then the uploaded document will be created as a new version of it. To browse for the required folder or document set the Source Field to Static Value, and then click in the Field Value cell and click the [...] button that appears. |
|
SubFolder1 |
Use this field to specify the name of the Sub Folder where the document should be created in the Content Suite. If the Sub Folder does not exist than EzeScan will create it. If a second or more subfolders are required to be created, click on the When creating sub folders it is also possible to set Category Attributes, a Classification, and MarkOfficial. For more information refer to section 6.6 of this user guide. |
|
CompoundDocument1 |
If a compound document is required to be created click the
If the Compound Document being created is under a sub folder the mapping number must always be higher than the last subfolder. E.g. If SubFolder2 is the last folder then the Compound Document mapping must be CompoundDocument3
e.g. SubFolder1=Information Management SubFolder2=Invoices CompoundDocument3=ACME Corp CompoundDocument4=November 2012 |
|
Description |
Use this field to set the description/comment on the upload document. |
|
Nickname |
Use this field to set the Nick name of the document. |
|
WorkflowMap |
Use this field to set the WorkflowMap that should be used to start a workflow instance after uploading the document. To browse for a WorkflowMap set the Source Field to Static Value, and then click in the Field Value cell and click the [...] button that appears. |
|
|
|
|
Category |
Use this field to set the Category that should be used to retrieve a list of custom fields when the Auto Populate button is clicked. For more information refer to paragraph 6.4 Error! Reference source not found. of this user guide. |
|
Classification |
Use this to set the Classification(s) to be assigned to the uploaded document. Note this functionality requires the RecordsManagement connection setting be enabled. To browse for a Classification set the Source Field to Static Value, and then click in the Field Value cell and click the [...] button that appears.
Note more than one Classification can be assigned to the uploaded document, if supported by the Content Suite, by placing a comma delimiter in between each of the Classification Ids. For example, |
|
Record Date |
If assigning a Classification to the document, use this field to set the Record Date. Note: This functionality requires the RecordsManagement connection setting be enabled. |
|
MarkOfficial |
Set this option to Y to mark the uploaded document as Official. Note: This functionality requires the RecordsManagement connection setting be enabled. |
|
RMStatus |
Use this field to set the upload document Status field in the Record Details tab, or leave blank to use the selected RM Classification’s default value. Note: This functionality requires the RecordsManagement connection setting be enabled. |
|
RMStatusDate |
Use this field to set the upload document Status Date field in the Record Details tab, or leave blank to use today's date. Note: This functionality requires the RecordsManagement connection setting be enabled. |
|
SupplementalMarkings |
Use this to set the Supplemental Markings on the uploaded document.
Note: This functionality requires the SecurityClearance connection setting be enabled. To select from a list of allowable Supplemental Markings set the Source Field to Static Value, and then click in the Field Value cell and click the [...] button that appears.
Note: More than one Supplemental Marking can be assigned to the uploaded document by placing a comma delimiter in between each of the codes. For example: |
|
SecurityLevel |
Use this to set the Security Level on the uploaded document.
Note: This functionality requires the SecurityClearance connection setting be enabled. To select from a list of allowable Security Levels set the Source Field to Static Value, and then click in the Field Value cell and click the [...] button that appears. |


Configuring custom fields
After selecting a Category to assign to the uploaded document (Category Field), click the Auto Populate button at the bottom of the screen.
This will result in the Content Suite connector returning a list of custom fields (Attributes) that relate to that Category.
It is then a matter of setting the source values of those fields to the target values of the custom fields.
The Auto Populate button appears under the Field Mappings grid.

Applying KFI Output Data to Target Field Data
To pass through the KFI output data into the Upload module the operator is required to set the source field data to the target field data.
-
In the Upload type, set the Column names from option to the name of the KFI job Type.

-
In the Field Mappings Grid the operator can apply the Source Field settings to the Target Field settings. In the example below the Content Target Field Title is being populated by the KFI Source Field Name.

-
When all the mappings are complete, click Apply.
-
Click OK to save the changes.
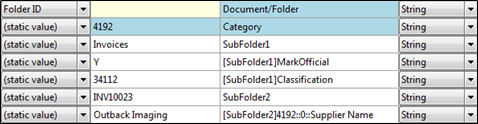
Configuring sub-folder field
When uploading to the Content Suite it is possible to have EzeScan traverse the folder structure to find a Sub Folder for the document to be saved in. This can consist of one or more levels deep of sub folders where the Document/Folder field determines the parent folder of the structure to traverse.
If a sub folder can’t be located, the folder is created automatically using the searched sub folder name.
-
Click the

button at the bottom of the upload form.
-
Click into the newly created field’s Target Field cell and type in SubFolder## (where ## is the depth of the sub folder below the parent folder).
-
In the Source Field cell select (static) and then enter the name of the desired sub folder into the Field Value cell.

-
To add Category Attributes to the sub folder refer to section Error! Reference source not found. After configuring the custom fields simply prefix the Target Field values with the format [SubFolder##], this identifies to EzeScan which sub folder these custom fields belong to.

-
To assign a Classification to the sub folder add another custom field and name it using the format [SubFolder##]Classification, noting that field value should be the Id of the classification to assign.
-
To apply MarkOfficial to the sub folder add another custom field and name it using the format [SubFolder##]MarkOfficial noting that the field value should be set to Y.
-
Repeat steps 1 through 6 for all desired depth of sub folders. See the following images for an example of 2 sub folder levels.
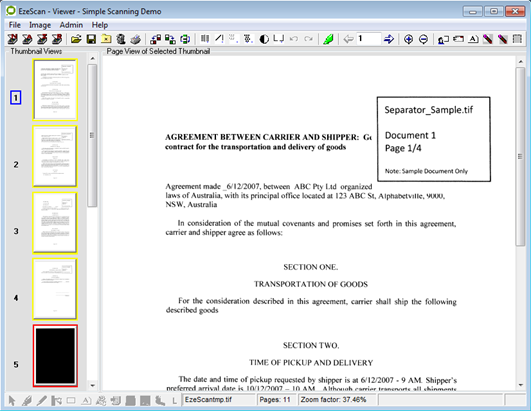
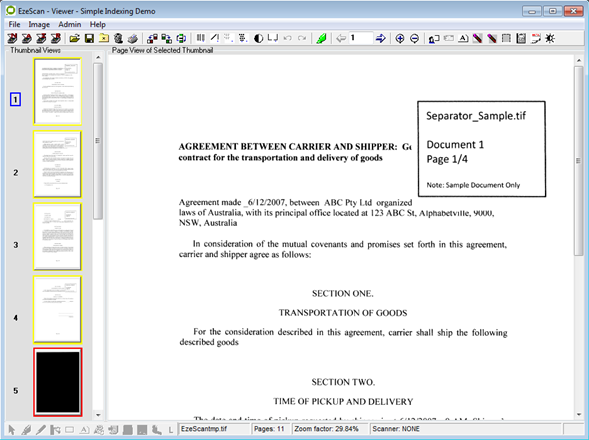
Running a Job for Saving Using the Profile Form
-
To run a job to Content Suite with the profile form, confirm that the Other Destination is set to Content Suite ECM.
-
Click the scan/import or job button to load the image into the EzeScan viewer.
-
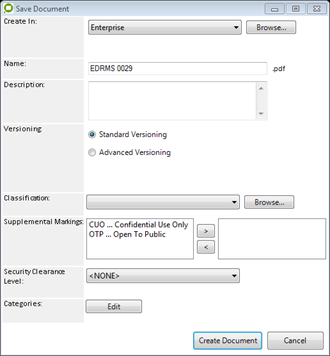
Press the F4 key or click the Profile button to index the document.
-
Click OK and the document will be saved into Content Suite.
There is a sample Content Suite profile form job in the downloads section on the EzeScan web site.
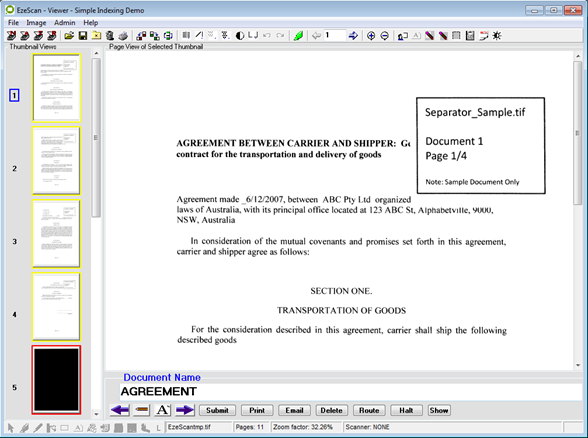
Running a Job for Saving Using KFI and Upload
To run a job to Content Suite using the KFI and UPLOAD modules, confirm that the Other Destination is set to KFI and the respective KFI and UPLOAD Types are selected. Please refer to section 5 on page 10 and section 6 on page 15 for details on how to set this up.
In the example below the KFI\UPLOAD types have been configured for a:
-
Document Name (Name of document)
-
Folder (Folder in Enterprise workspace)
-
Date of Document (Attribute in the Catalogue)
The image below shows a job using the KFI and upload modules. 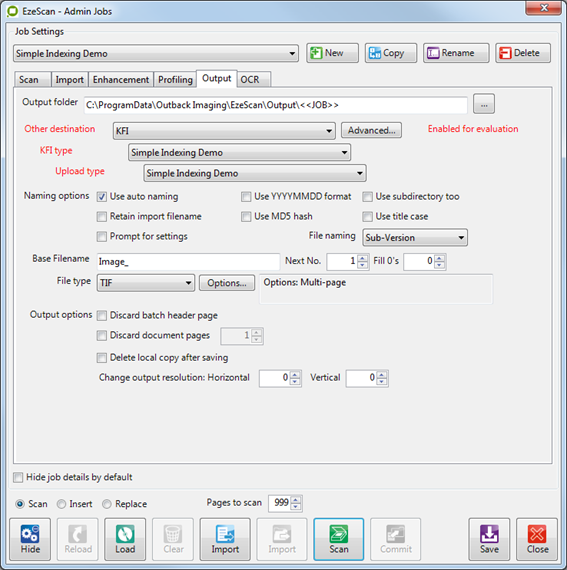
To run a job to Content Suite using the KFI and UPLOAD modules:
-
Click the scan/import or job button to load the image into the EzeScan viewer.
-
Press the F4 key or click the Profile button to index the document. The KFI screen will appear below the page view.
-
The operator can enter the Document Name.
-
When complete the operator can press Enter or click the

-
After the operator has completed the Document Name field, the next field will appear.
-
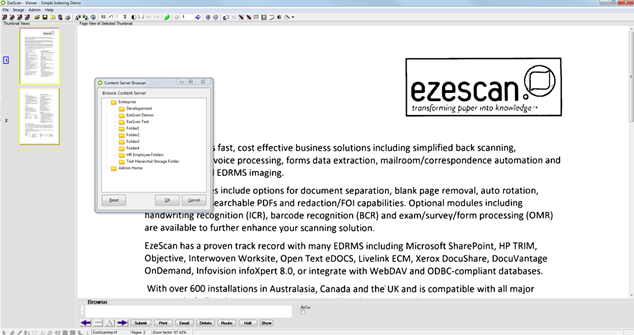
The operator will be prompted to select a folder.
-
When complete the operator can press Enter or click the

-
After the operator has completed the Tag field, the next field will appear.
-
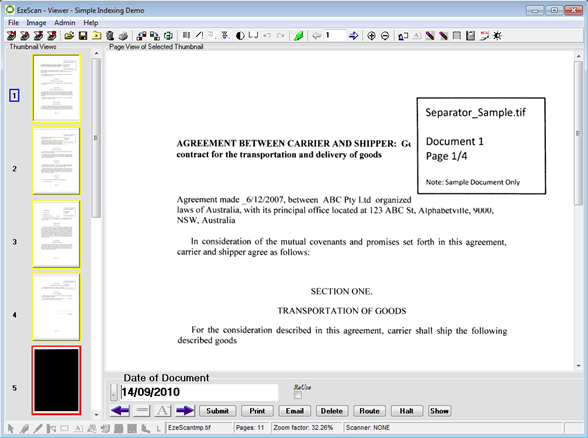
The operator will be prompted to enter a date.
-
When complete, press Enter and the submit button will highlight.
-
Press Enter or click

-
The document will be saved into the respective Content Suite folder and metadata applied.
There is sample Content Suite KFI / UPLOAD jobs on the EzeScan web site.
Appendix
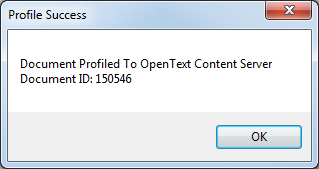
Display Content Suite node id after saving document
EzeScan can display a prompt to the operator after a document is saved into Content Suite. This prompt will display the node id of the saved document.
The image below is an example of this message.
To enable this setting:
-
Click the Admin menu and choose Jobs.
-
Select your Job from the dropdown list.
-
Click the Output
-
Click the Options
-
Click the Messages
-
Tick Display EDRMS Record Number Message.
-
Click OK.
-
Click
-
Click Close.
Configure web services for Content Suite in IIS
The following provides a brief guide on how to configure the Content Suites web services as required by the EzeScan UPLOAD module.
1. Install the Microsoft .NET Framework Version 3.0 Redistributable Package.
2. Enable IIS to handle WCF services by running the command -
"%SystemRoot%\Microsoft.NET\Framework\v3.0\Windows Communication Foundation\ServiceModelReg.exe" –i
3. Open IIS and create the below Applications using the specified Alias and Physical Path values. Only create applications 2 and 3 if you intend to utilise the Records Management and Security Clearance modules within EzeScan.
Please Note: If IIS has not been configured to allow ASP.NET v2.0 applications this must be done first. Please refer to section 9.4 How to configure IIS role services to support ASP.NET.
Content Suite 10.0
|
|
Alias |
Physical Path |
|
1 |
les-services |
OTHOME\webservices\dotnet\les-services |
|
2 |
les-services-recordsmanagement |
OTHOME\webservices\dotnet\les-services-recordsmanagement |
|
3 |
les-services-rmsecmanagement |
OTHOME\webservices\dotnet\les-services-rmsecmanagement |
Content Suite 10.5 or higher
|
|
Alias |
Physical Path |
|
1 |
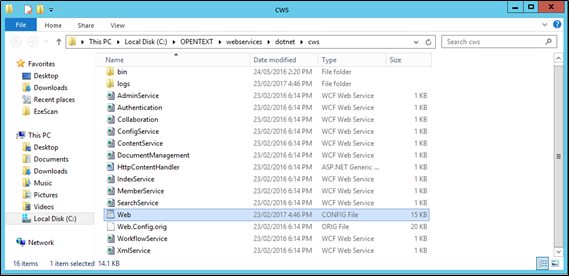
cws |
OTHOME\webservices\dotnet\cws |
|
2 |
cs-services-recordsmanagement |
OTHOME\webservices\dotnet\cs-services-recordsmanagement |
|
3 |
cs-services-recordsmanagement |
OTHOME\webservices\dotnet\cs-services-rmsecmanagement |
The IIS Web Server should look something like this: 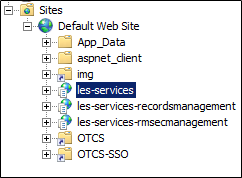
4. If configuring web applications for Records Management and Security Clearance copy the contents of “\les-services\bin” (“cws\bin” for Content Suite 10.5 or higher) to the “\bin” folder of each of the applicable web applications.
5. Configure the Application(s) to have Read and Script permissions. Traditional this will be the IIS DefaultAppPool account (e.g. Pass through authentication).
e.g. Permissions for the application(s) and logs folder. 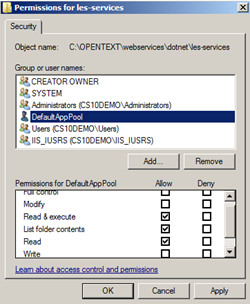
6. Open the Web.config file residing in each of the physical paths and ensure that the host, livelink.port, and livelink.encoding values have been populated correctly.
7. Open the Web.config file residing in each of the physical paths and ensure that the ContentServiceBinding MessageEncoding attribute is set to Mtom and TransferMode attribute is set to Streamed.
For example: 
Increase upload file size limit for web services hosted in IIS
The upload file size limited is defaulted to 4MB in IIS 6, and approximately 28.6MB in IIS 7, later versions of IIS may have different defaults. To increase this limit for any version of IIS apply the following changes to les-services\web.config for Content Suite 10.0 and cws\web.config for Content Suite 10.5 or higher:
Its strongly recommended that a text editor with colour coding (i.e. Notepad++) be used when making the below changes to help identify comments that may overlap the below settings.
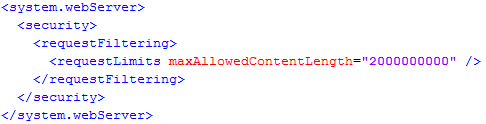
Set the httpRuntime element’s maxRequestLength attribute to the desired amount in kilobytes (2 Gigabytes = 2000000 Kilobytes):

For IIS 7 (and later) also set the requestLimits element’s maxAllowedContentLength attribute to the desired amount in bytes (2 Gigabytes = 2000000000 Bytes):
Configure IIS role services to support ASP.NET
-
Open the Server Manager
-
Select the Web Server (IIS)
-
Scroll down on the list on the right and click Add Role Services
-
Under Application Development, tick ASP.NET, click Next then Install
-
When complete click Close.
-
Confirm that the ASP.NET Role Service is installed.

Configure Windows Authentication on CS10 web services
The following provides a brief guide on how to enable Windows Authentication on Content Suites web services. Please refer to section 9.2 if you have not yet configured the web services in IIS.
-
Install and configure the Directory Services module on the Content Suite.
-
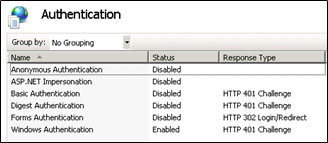
Enable Windows Authentication and disable Anonymous Authentication on each of the web service Applications.
-
Open the Web.config file residing in the physical path of each web service Application and change all occurrences of the “mode” and “clientCredentialType” values as follows –

The exact case of the domain and username passed through to the authentication service cannot be controlled, and therefore must be handled appropriately in the Directory Services module when usernames are stored in a case sensitive database such as Oracle.
Impersonate a user in OpenText Directory Services
The following assumes that OpenText Directory Services 10.5 or higher has been installed and configured in Content Server.
-
Enable impersonation in OpenText Directory Services (OTDS)
-
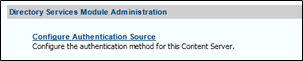
Login into the OpenText Directory Services administration console
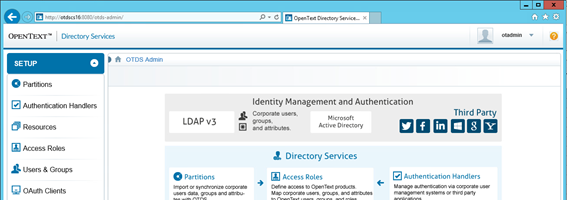
-
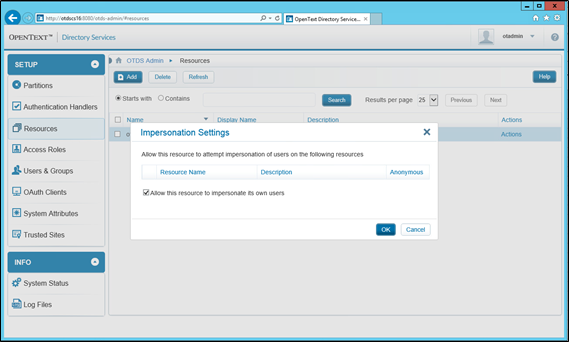
Navigate to Resources, open the Actions menu on the Content Server resource, and then click Impersonate Settings
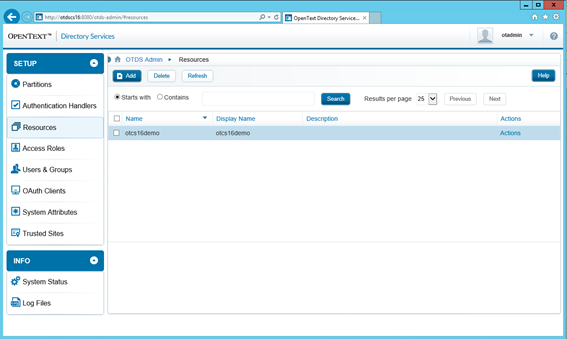
-
Tick “Allow this resource to impersonate its own users” and then click OK
-
-
Configure web services bindings for Content Web Services (CWS)
-
-
Open the Web.config for the .Net Content Web Services located in the Content Server installation directory
-
Change the clientCredentialType value to None on all bindings and then save the changes

-
Repeat the above steps for the Web.config in Classifications, Records Management, and Security Clearance web service folders (if applicable)
-
Restart Internet Information Services (IIS)
-
3. Configure connection settings in EzeScan
-
-
Open the connection settings (this is typically done in Workstation Options -> EDRMS Tab)

-
Set Host to the Content Server’s base address
-
Set User Name to the name of the OTDS user to authenticate as
-
Set Password of the OTDS user to authenticate as
-
Set Impersonate User to the login name of the user to impersonate. Use the system placeholder <<S2>> to insert the current Windows Login name at runtime
-
Set Authentication Mode to OpenText Directory Services
-
Set OTDS Service Url to base address of the OpenText Directory Services server
-
Save the changes
-
Enable SSL security on web services hosted in IIS
The endpoints required to add SSL connectivity to the Content Suite web services are disabled by default. Refer to the instructions below to enable these endpoints. Note these instructions assume that the web site has an Https binding and valid certificate allocated in IIS, if not please do this before proceeding.
-
Browse to the physical patch of the les-services web application. For example, "OTHOME\webservices\.net\les-services\"
-
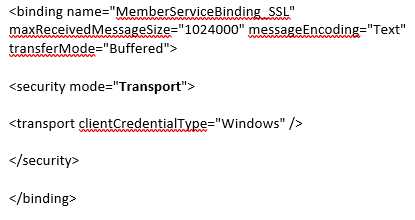
Open the file web.config file and remove all of the "<-- SSL Disabled" and “-->” commenting. For example, the text in red below should be removed.
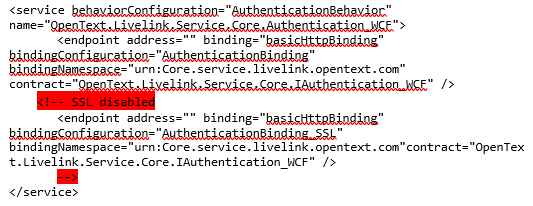
-
The SSL security bindings need to be changed to “Transport”
-
Save the changes to file and then repeat the above steps above for the Records Management and Security Clearance web applications if they exist.
To connect to Content Suite from EzeScan using the SSL endpoints do the following –
-
If using a self-signed certificate on the IIS server export it to this workstation and install it into the Trusted Root Certification Authorities store.
-
Upgrade EzeScan to version 4.3.60 or higher. To obtain the current version use the Help menu > About > More Details option.
-
In EzeScan modify the Server option in the appropriate connection settings to use a prefix of Https instead of Http.
Troubleshooting tips for web service connection errors
If experiencing sporadic connection errors such as “…contentservice.svc could not be activated” the server may be low on memory. In IIS 7 WCF services will fail to activate when the available memory falls below 5%. It is possible to lower this percentage by making the below change to les-services\web.config for Content Suite 10.0 or cws\web.config for Content Suite 10.5 or higher. However, the preferred option would be to increase the physical memory available to the server. 
Test the web service connection URL
If experiencing issues browsing options like classifications please test that you can connect to it via a browser. Change the YOURSERVER to the respective details in the environment.
http://YOURSERVER/cs-services-recordsmanagement/RecordsManagement.svc
A page like this should appear. 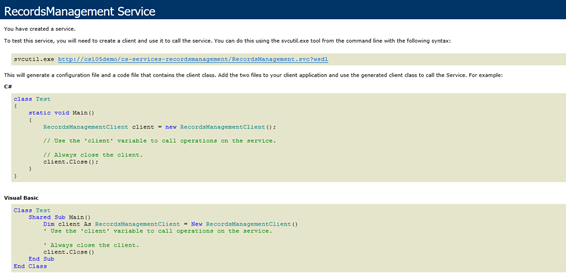
If it is giving an error about the log handler please refer back to section Configure web services for Content Suite in IIS and double check all steps have been completed.
Troubleshooting tips for “Unable to upload new document” error
If you cannot upload large files or are experiencing intermittent errors such as “Upload OpenText Content Server function failed: Upload Error: Unable to upload new document. ConnectionV105_Class: The server did not provide a meaningful reply; this might be caused by a contract mismatch, a premature session shutdown or an internal server error.” the Content Suite 10 will need to be configured per sections Configure web services for Content Suite 10 in IIS and Increase upload file size limit for web services hosted in IIS.
The seemingly intermittent nature of this error is related to the file size of the document, small files will upload correctly but large files will fail to upload and display an error. File size will vary based on number of pages, colour, and content. Check the actual output image size in the file system to confirm file size.