
The following information details the connectivity and functionality offered by the EzeScan integration with the Civica Authority Financials solution. It details the available options and how to configure an EzeScan job to browse and save into Civica Authority Financials.
For information on Civica Authority please refer to the Civica website - https://www.civica.com/en-au/
For information on EzeScan please refer to the EzeScan website - https://ezescan.com.au
System Requirements
For details on the minimum requirements for Civica Authority Financial solution integration with EzeScan, please see below:
EzeScan supports integration with Civica Authority Financials using the following components:
-
Civica API Server up to version 7.1.21.0
Version 7.1 patch 39 or higher is required to support invoices with line items that use Receive By Value calculations.
-
Civica Authority AP Workflow
NOTE
A connection login can be tested by using the http://<apiserver>/api/swagger/ui/index#!/Authority/Authority_IdentityLogin function. This link may vary and will require consult from Civica for the correct URL for your environment.
Developed for Ezescan Release: 5.0.21
NOTE
This information and EzeScan PRO manual excerpt assumes knowledge in both EzeScan and in typical I.T. practices and terminology. It is assumed that the operator has read about or is familiar with EzeScan Job, KFI and UPLOAD modules. If not please refer to the EzeScan PRO Old, KFI and UPLOAD guides. It is also assumed that the operator is experienced with the Civica Authority Financials product.
 Configuring Connection Settings
When configuring a Job, KFI or UPLOAD to use the Civica Authority Purchases connector the connection settings panel must be filled in. There are two ways this can be achieved:
-
If only using a single repository, it is recommended that the Civica Authority Purchases connector connection settings are configured at workstation level, in the Workstation Options -> EDRMS tab.
-
If not, the configuration can be set in the respective JOB, KFI and UPLOAD EDRMS options instead.
Configuring Workstation Options
If using a single repository it is recommended to configure the connection settings in the EzeScan Workstation Options. See below for instructions.
-
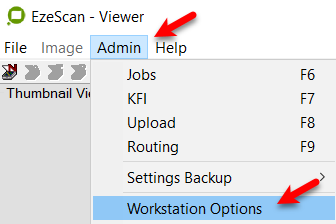
Click on Admin and choose Workstation Options
-
Click the EDRMS tab
-
Select the Civica Authority Purchases option from drop down list.
-
Enter the API Base URL Server Name…
-
e.g. http://Civica API Server:port/
-
-
Select Authentication Type from drop down list…
-
Choose Login for setting credentials OR
-
Choose OAuth for OAuth authentication
-
Enter the Authorisation URL (OAuth only) - e.g. http://Civica API Server:port/core/connect.authorize
-
Enter the Redirect URL (OAuth only) - e.g. http://Civica API Server:port/swagger/ui/o2c-html
-
-
Applying Global Settings to a Job, KFI or Upload
NOTE
These options are only available if the Global Settings have been set in the Workstation Options.
KFI
-
Click on the EDRMS tab of the KFI
-
Select Civica Authority Purchases from drop down list
-
Tick the Use Global Connection Settings box
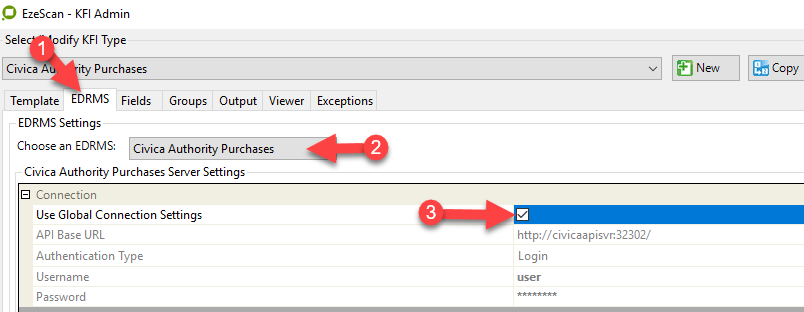
Figure 1 - setting Global Connection Settings on a KFI
UPLOADS
-
Select Civica Authority Purchases from the Upload to drop down list
-
Tick the Use Global Connection Settings box
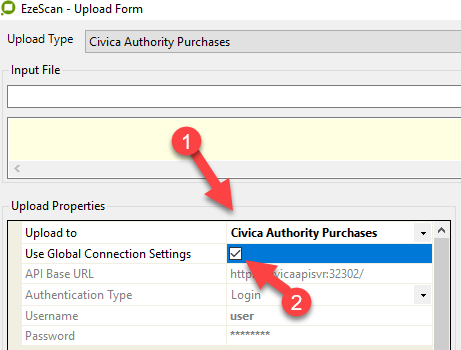
Figure 2 - setting Global Connection Settings on an Upload
KFI Field Settings
Enabling browse options
-
Press F7 to display the KFI form.
-
Select the EDRMS tab.
-
Select Civica Authority Purchases from drop down list
-
Tick the Use Global Connection Settings box or manually fill in the Connection settings

Figure 3 - selecting the Civica Authority Purchases “Use Global Settings” on the KFITIP: Refer to the Configuring the Connection Settings section for details on setting up the Global Connection Settings
-
Select the Fields tab.
-
Click the Edit link under Properties for the required field
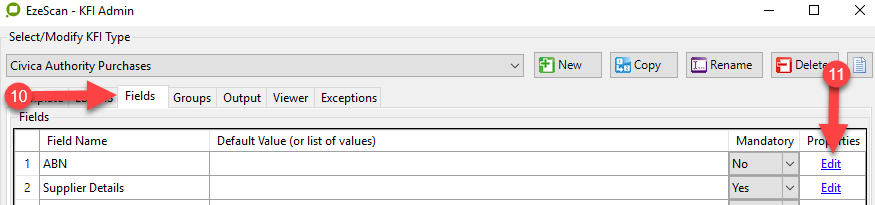
Figure 4 - Select the Fields tab and Edit the required field
-
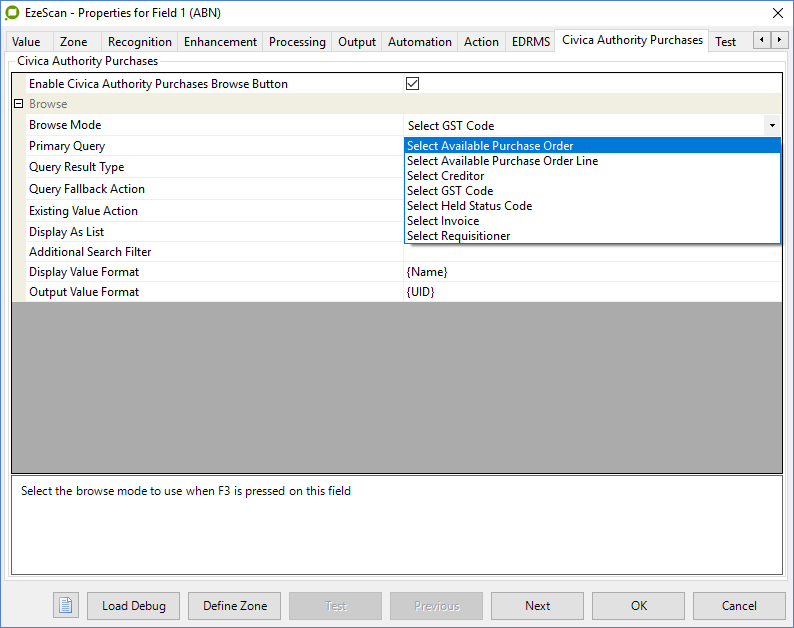
Select the Civica Authority Purchases tab
-
Tick “Enable Civica Authority Purchases Browse Button
-
Select the pull down list of the Browse Mode
The following browse options will appear:
|
Option |
Description |
|---|---|
|
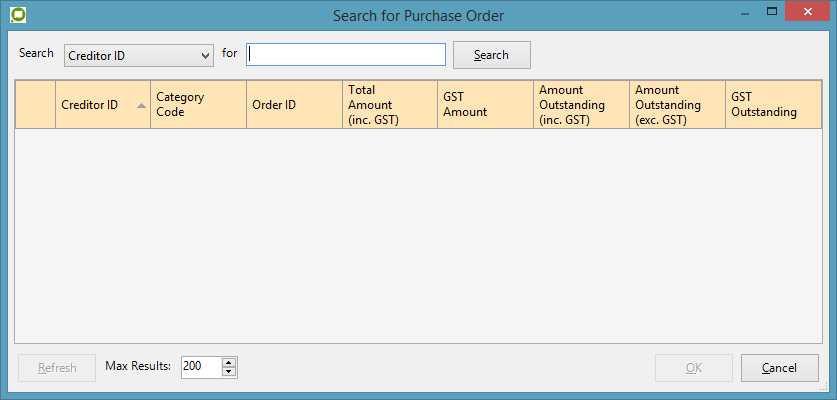
SELECT AVAILABLE PURCHASE ORDER |
This will allow EzeScan to select the Purchase order number by either a query or search form.
Primary Query: '<<F13>>' ne 'NOT FOUND' and CreditorId eq <<F5>> and OrderId eq <<F14>>
Display value format: {OrderId}|{OrderTotalGstInclusive}|{OrderGst}
This will return the Order Number, Order Total and Order GST from Authority.If the Order ID search fails then a search form can be used.
By using the “Additional Search Filter” the supplier code can be default to only show orders for the respective supplier ID.Additional Search Filter: CreditorId eq <<F5>>
The following screen will appear when selecting a search. |
|
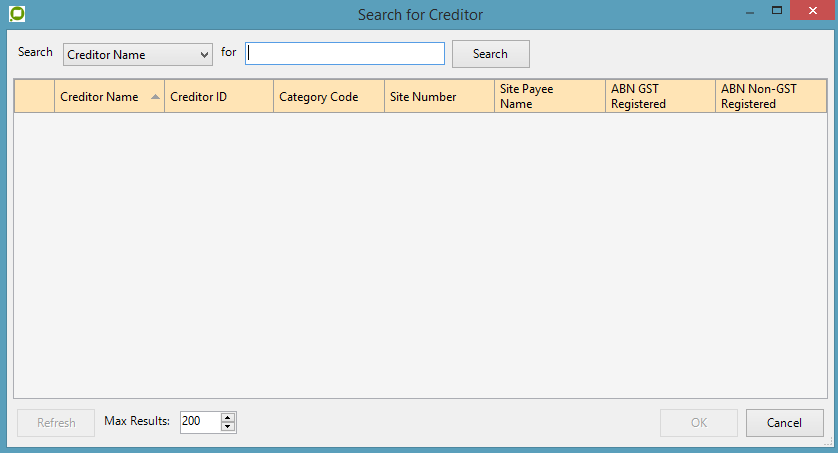
SELECT CREDITOR |
This will allow EzeScan to select the Creditor by either a query or search form. If using a query the below example could be used.
Primary Query: ('<<F1>>' ne 'NOT FOUND') and (AbnGstRegistered eq '<<F1>>' or AbnGstRegistered eq '<<F1>>')
Where <<F1>> = ABN
Display value format:
{CreditorId}|{CategoryCode}|{SiteNumber}|{CreditorName}|{BankBsbNumber}|{BankAccountNumber}
This will return the Creditor ID, Category Code, Site Number, Supplier Name, Bank BSB and Account details.If the ABN search fails then a search form can be used. The following screen will appear when selecting a search.
|
|
SELECT GST CODE |
|
|
SELECT HELD STATUS CODE |
This will return all available held status codes from the Authority server.
E.g. 0 – Not Held, 4 - Order Line Required, 5 - Raise Order Requisition, 6 - Exempt Order, 7 - Return to APThis will return all available held status codes from the Authority server. E.g. 0 – Not Held, 4 - Order Line Required, 5 - Raise Order Requisition, 6 - Exempt Order, 7 - Return to AP |
|
SELECT INVOICE |
This setting is to select an invoice in the Authority system.
This is used as a validation option to display a warning to the operator that an invoice number for the same supplier is already in the system. Please refer to the next section for validation options. |
|
SELECT REQUISITIONER |
This option will allow the user to select a requisitioner. This would be used if there is no purchase order number to select. In the Display value format setting the operator will need to return the {RequisitionerId} and {RequisitionerPosition} so it can be passed to the respective UPLOAD module. |
Enabling validation options
-
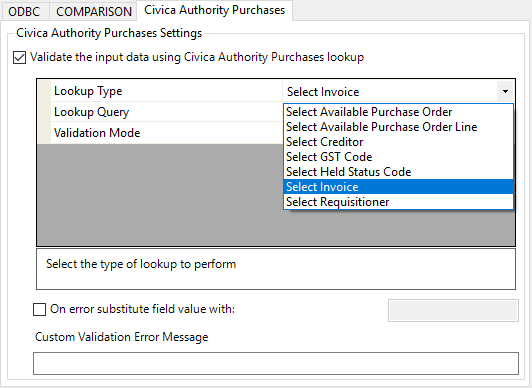
Select the Automation Tab and click on the Validation button
-
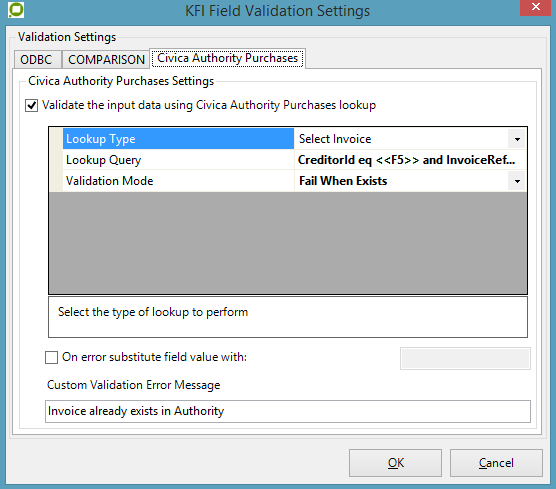
Select Civica Authority Purchases and tick “Validate the input data using Civica Authority Purchases lookup”. The following lookup Type options are shown:
-
The next steps are to choose the Lookup Type, Query and validation result.
For example to validate a duplicate invoice the following could be used:
-
Lookup Type “Select Invoice”
-
Lookup Query “CreditorId eq <<F5>> and InvoiceReference eq '<<F22>>'”
When <<F5>> = the supplier ID / Code
When <<F22>> = the invoice number -
Validation Mode = Fail When Exists
Configuring output settings
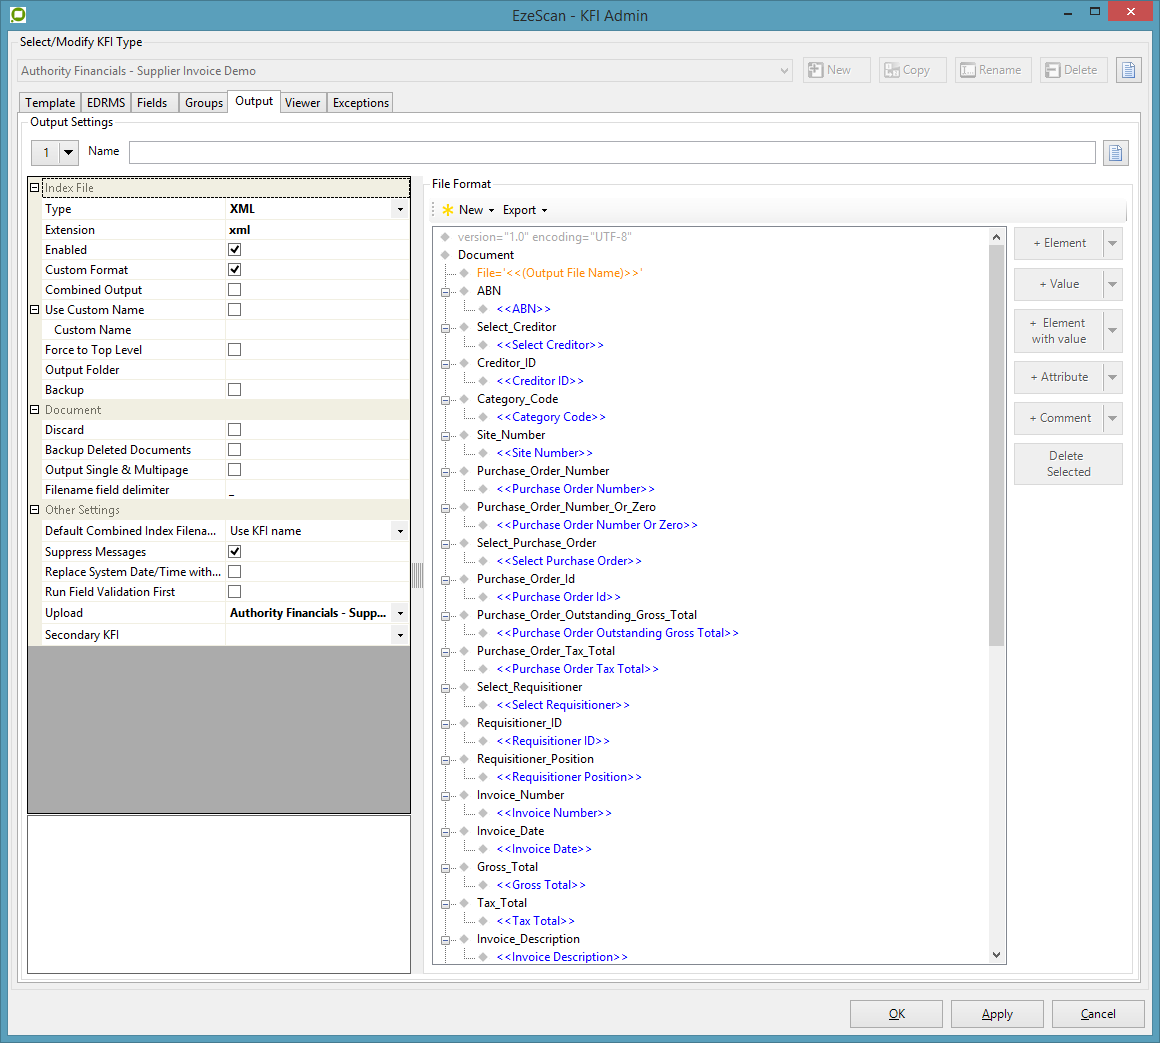
The KFI index file for the profile needs to be configured to output as XML. This is so the order line data can be passed through to the UPLOAD module through to Authority Financials.
-
Configure the output type to XML and set the extension to XML
-
Insert the XML Element tags and values. The KFI User Guide has more information on configuring these settings. Below is an example output
Upload Settings
The UPLOAD module will obtain the KFI output data to pass into Civica Authority Financials. It will create an invoice maintenance transaction (I_ap053).
Configuring connection and property parameters
-
Open the Upload Form (F8).
-
Choose the Upload Type you want to configure.
-
On the left hand side in the Upload Properties pane choose Civica Authority Purchases in the Upload To list.

-
Enter the connection settings
-
Index File settings. The KFI index file mappings need to output XML data. This is so order line data can be passed through the upload module.
-
Configure the Index File Type to XML
-
Council the XML Record Mapping to /Document
-
Configuring built-in upload fields
The common invoice header and invoice line fields will appear as per below:
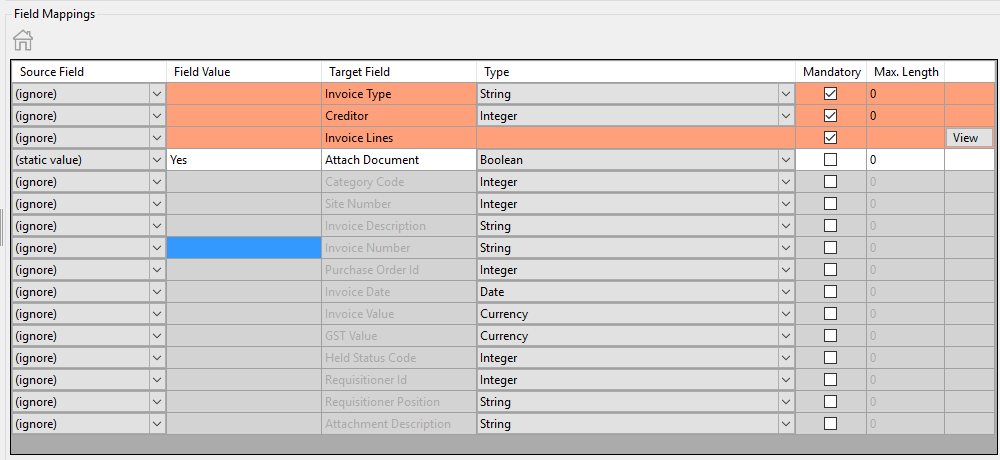
The invoice Lines fields are configured under the “View” button.
Each field can have its input set using the Source Field cell. The Source Field cells will be set to “Node Name” and then the respective XML node value will need to be applied.
Target Field
|
Description
|
||||||||||||||
|---|---|---|---|---|---|---|---|---|---|---|---|---|---|---|---|
|
Invoice Type |
This is the type of invoice being upload. The three available options are:
Held Invoice with PO Totals can only be used when invoice totals match the purchase order's totals and the purchase order is not partially receipted. If the purchase order is partially receipted Held Invoice with PO Lines must be used instead. |
||||||||||||||
|
Creditor |
This is the ID of the creditor field |
||||||||||||||
|
Invoice Lines |
|
||||||||||||||
|
Attach Document |
This is to attach the document. Can be set to Yes or No |
||||||||||||||
|
Category Code |
This is the Category Code of the creditor |
||||||||||||||
|
Site Number |
This is the Site Number of the creditor |
||||||||||||||
|
Invoice Description |
This is a description of the invoice/document |
||||||||||||||
|
Invoice Number |
This is the invoice number |
||||||||||||||
|
Purchase Order ID |
This is the purchase order number |
||||||||||||||
|
Invoice Date |
This is the invoice date |
||||||||||||||
|
Invoice Value |
This is the gross amount of the invoice |
||||||||||||||
|
GST Value |
This is the GST/Tax amount of the invoice |
||||||||||||||
|
Held Status Code |
This is the ID of the Status Code. Could be 0,4,5,6,7 |
||||||||||||||
|
Requisitioner Id |
This is the ID of the requisitioner |
||||||||||||||
|
Requisitioner Position |
This is the position of the requisitioner |
||||||||||||||
|
Attachment Description |
This is a description of the attachment |
Placeholder Values
KFI placeholder values
Placeholder
|
Comment
|
|---|---|
|
abnGstRegistered |
|
|
abnNonGstRegistered |
|
|
activeFlag |
|
|
bankAccountName |
|
|
bankAccountNumber |
|
|
bankBsbNumber |
|
|
categoryCode |
|
|
creditorId |
|
|
creditorName |
|
|
customerNumber |
|
|
defaultSiteFlag |
|
|
Description |
|
|
eftFlag |
|
|
GoodsReceiptId |
|
|
GstCode |
|
|
GstInclusive |
|
|
GstValue |
|
|
InvoiceReference |
|
|
modifiedDateTime |
|
|
narId |
|
|
OrderGst |
|
|
OrderID |
|
|
OrderLineID |
|
|
OrderTotalGstInclusive |
|
|
OutstandingValueGstExclusive |
|
|
OutstandingValueGstInclusive |
|
|
OutstandingGst |
|
|
postalAddressLine1 |
|
|
postalAddressLine2 |
|
|
postalAddressLine3 |
|
|
postalAddressLine4 |
|
|
postalAddressLine5 |
|
|
postalAddressLine6 |
|
|
QuantityOutstanding |
|
|
RequisitionerId |
|
|
RequisitionerPosition |
|
|
siteNumber |
|
|
sitePayeeName |
|
|
taxFileNumber |
|
|
UnitPrice |
|