Using the EzeScan configuration used in the basic/simple Line Items job covered in the previous section; we have taken additional steps to streamline the process.
-
Firstly we will use the EzeScan Discovery module to automate the capture of the fields on the invoice plus lookup the supplier name from a database using the ABN number.
-
Secondly we will create Line Items templates for the particular supplier so that the operator will not have to "drag lines" around the grid processing window as occurred in the previous example. New templates are added as invoices are processed from different suppliers and in time a "collection" of supplier templates will be available for quick processing of your invoices.
It is assumed that you have the skills to create the Job and KFI as well as an understanding how the Discovery module functions; along with ability to use regular expressions (Regex's).
About the job
This advanced job will process an invoice with Discovery recognition and lookup tables, creating 3 different types of output files. As fields are populated with no user input processing will flow quickly to the next field until the Line Items grid input is reached
-
PDF File for scanned/imported each invoice
-
Header File (CSV "combined" format) for all invoices captured
-
Line Items File (CSV format) for each invoice
Setting up the Job
The EzeScan Job imports 3 sample invoices
-
The job creates a PDF file for each invoice in the default output folder
-
Naming convention of files is Invoice # <<F6>> from <<F2>> dated <<F4>>
-
Setting up the KFI
The EzeScan KFI has 10 fields:
-
Tax Invoice <<F1>>
-
Uses Discovery to check that document is an invoice or not more details on page
-
-
ABN <<F2>>
-
Uses Discovery to locate and determine ABN more details on page
-
-
Supplier (Search or Lookup Using ABN) <<F3>>
-
Performs an SQL query from a "lookup set" called abnlookup to locate the supplier name using the ABN…
-
Select Supplier_Name from abnlookup where ABN='<<F2>>'
-
-
-
Order Number <<F4>>
-
Uses Discovery to locate the order number on the invoice
-
-
Invoice Date <<F5>>
-
Uses Discovery to locate the invoice date
-
-
Invoice Number <<F6>>
-
Uses Discovery to locate the invoice number
-
-
Gross Total <<F7>>
-
Uses Discovery to locate the invoice gross amount
-
-
Tax Total <<F8>>
-
Uses Discovery to locate the invoice tax amount
-
-
Sub (Net) Total <<F9>>
-
Uses Discovery to locate the invoice net amount
-
-
Line Items <<F10>>will create a new template based on the Supplier Name field <<F3>>
Set fields 1-9 to automatically process (1st check box on Automation tab)_
KFI Output tab -
-
Combined output file On
-
Custom Format On
-
Quote Values On
-
In the File Format pane click Data. In the fields to check select all except Line Items. (Line Items data will be output in a separate CSV file)
-
Click Add Columns (Data and Header rows are automatically populated)
-
-
Custom Name - Header file for invoices processed <<S3(DD-MM-YYYY)>>
-
Type CSV
-
Extension CSV
-
Click OK to Save
There is no Upload associated to this set-up.
-
Files are exported to the default output folder set in the Job: C:\ProgramData\Outback Imaging\EzeScan\Output\<<JOB>>
Field 9 Line Items set-up - in KFI
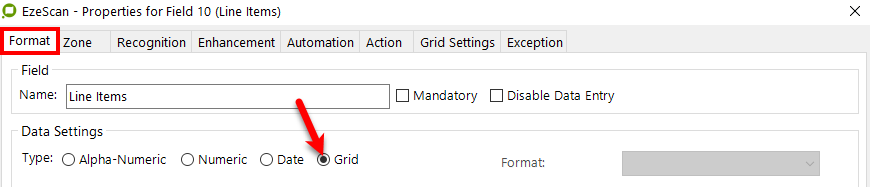
After creating all KFI fields (above) the Line Items field needs to be configured
To enable Grid processing set Format tab Data Settings to Grid

A Grid Settings tab appears after the Format tab. Click the tab then Grid Settings button
Output tab
-
Output Headers On
-
enable Grid to Separate Output File set format CSV
-
File Name set to Line Items Inv# <<F5>> from <<F2>> dated <<F4>>.CSV
-
Quote Output On
View tab
-
Untick all options
The EzeScan KFI output file creates 2 x CSV files in the default output folder
-
Output tab - Header file for invoices processed <<S3(DD-MM-YYYY)>>.csv
-
Combined output file
-
-
Line Items field - Grid Settings tab Line Items Inv# <<F4>> from <<F3>> dated <<F5>>.csv
-
Grid to separate output file
-
There is no Upload associated to this set-up.
-
Files are exported to the default output folder set in the Job: C:\ProgramData\Outback Imaging\EzeScan\Output\<<JOB>>
Line Items set-up - in KFI
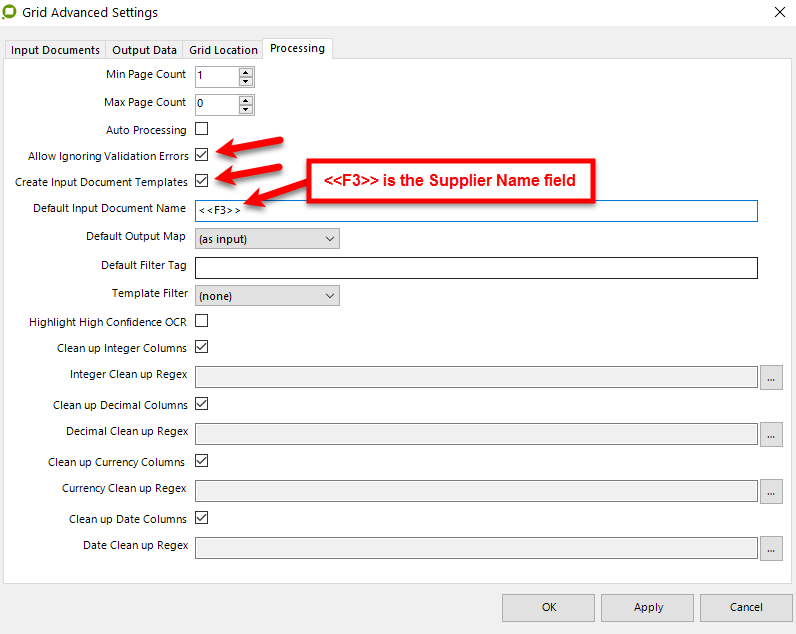
After creating the 9 (above) KFI fields the Line Items field <<F10>> needs to be configured
Advanced Setting button
Clicking the Advanced Settings button will present the screen below. Ticking the 2 boxes and adding the Supplier Name field number shown will allow you to create "Supplier based templates" so when a template is processed, EzeScan will use the supplier name to bring up a previously used supplier template. If there is no existing template then you will have the ability to create one.
Running the job
There are 3 sample invoices in the default job folder.
-
Click import
-
Select files & Open
-
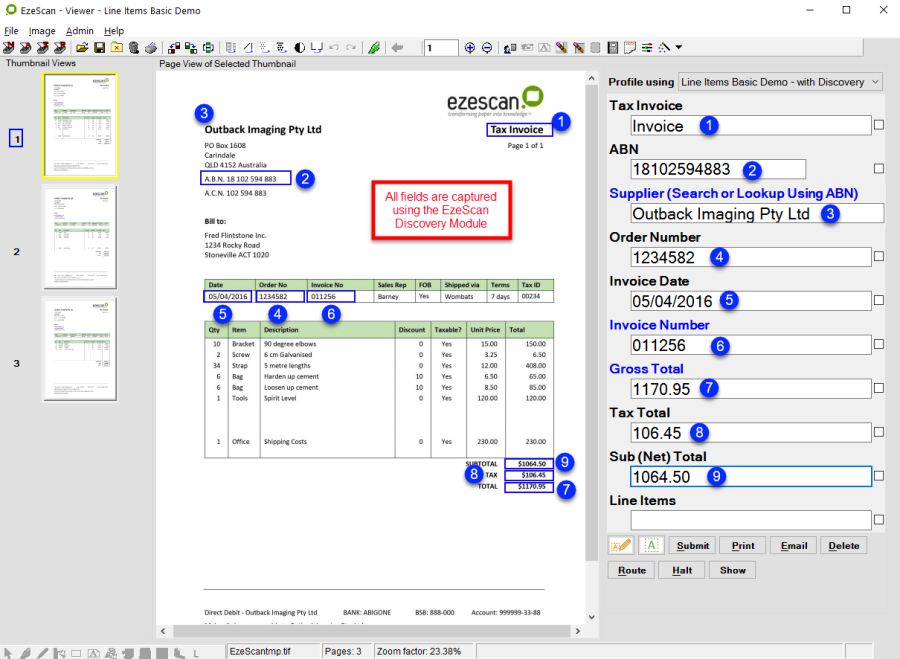
Press F4 to profile and the EzeScan Discovery module and pre-set SQL query (on field <<F3>>) will automatically process each of the fields
-
After the Sub (Net) Amount field is processed the Line Items function will automatically open the Grid processing for Line Items window
-
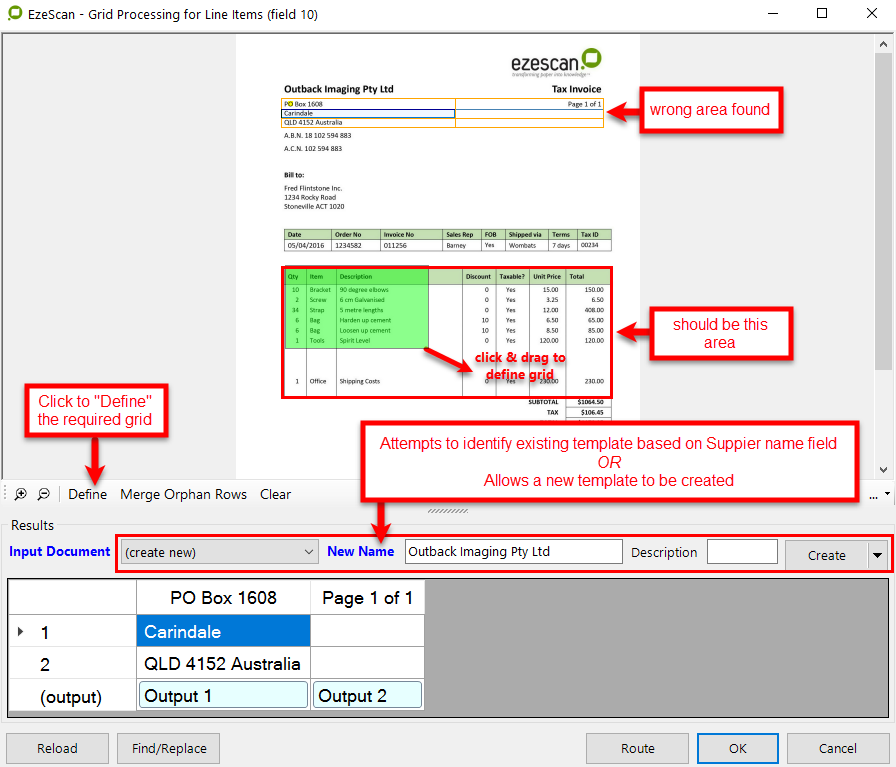
In this example the first attempt to locate the line items grid identified the incorrect area as shown above.
-
It is fairly easy to address; click on the Define option and drag your cursor over the required grid area
-
EzeScan will then re-calculate the grid and present the line items as shown in Figure 34
-
Additional work may be required as outlined below
-
EzeScan will attempt to identify the invoice grid but may need some manipulation
-
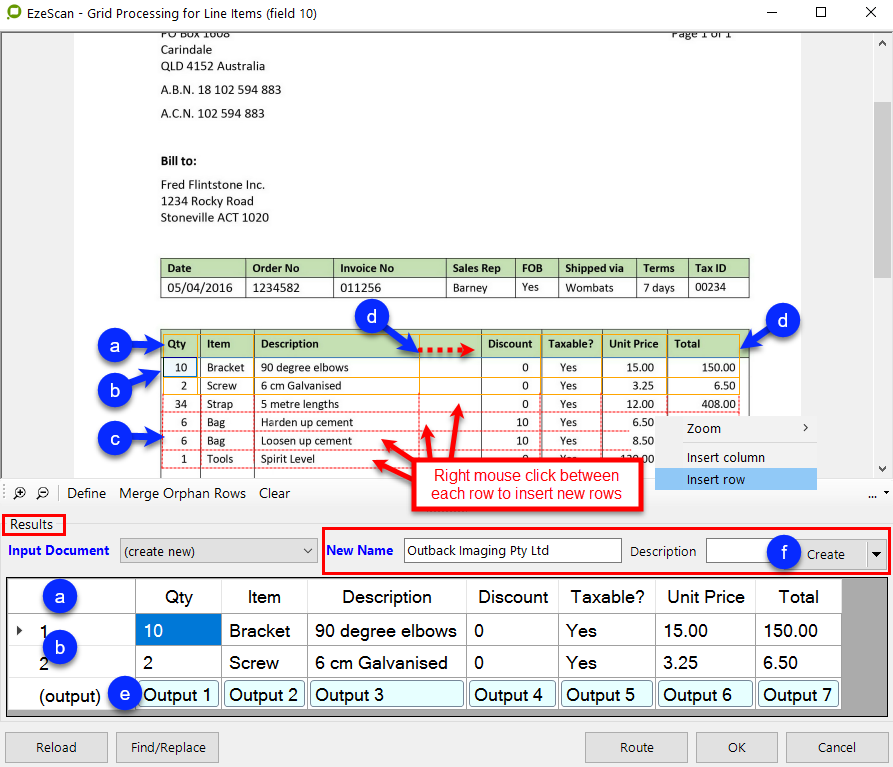
The header is identified which display in the Results section at bottom of window
-
The line items are identified which display in the Results section at bottom of window
-
Some lines may not be picked up. They are easily added by right mouse clicking between the lines and selecting Insert row. The new rows will appear in the Results section as they are added
-
Some columns may not be in the correct place. They are easily moved by clicking on the line and dragging it to the appropriate location. New column lines may also be added by right mouse clicking on the required location and selecting Insert Column.
-
The Output column names always default as shown. These may be edited in the advanced settings.
-
Click the Create button to create the new template
-
-
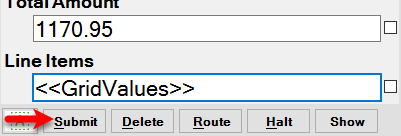
You may need to make slight adjustments to the details in the Results section, such as spelling etc. The fields are generally highlighted in yellow
-
Once all of the items are looking good click on the OK button and you will return to the Profiling window.
-
Click Submit to complete the process.
There are 3 output files created by the process:
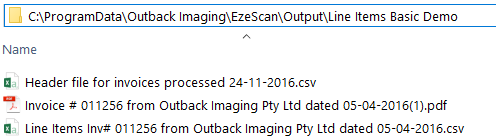
Header File (CSV) - viewed in Notepad

Header File (CSV) - viewed in MS Excel
-
Opening the CSV file using MS Excel may actually change the formatting of the values such as dates & currency. Take extreme care if doing this - do not make any changes and/or save the file when closing it.

Line Items File (CSV) - viewed in Notepad

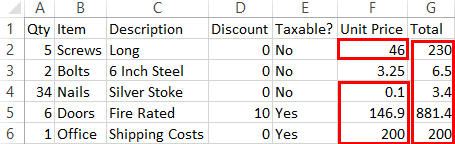
Line Items File (CSV) - viewed in MS Excel
-
Opening the CSV file using MS Excel may actually change the formatting of the values such as dates & currency. Take extreme care if doing this - do not make any changes and/or save the file when closing it.